Unusual drawing. Drawing basics: pencil drawing technique
Oksana Deneko
Probably all children really like paint... And they especially welcome non-traditional ways of drawing... But it plays into our hands, because any drawing contributes development creative thinking, imagination, creativity, expansion of ideas about the world around. It also develops fine motor skills of the hand, trains the muscles of the hand, prepares the hand for writing.
Shaving foam - very unusual surface for painting... The paint on it can be stretched and twisted with beautiful lines, curls and other patterns. Sometimes it looks like paper quilling. Each drawing is unique! At drawing the principle of monotype is used on the foam - Painting with unique prints. We use dried paper in the classroom, for gift wrapping, and even for further drawing!
Materials and tools:
a flat tray, lid or plate, or just an A-4 sheet.
shaving foam,
We take ANY paints!
a thin brush or toothpicks, combs, foam rubber tampons, brushes of different sizes.
Ruler (we took a plastic one) or strips of thick cardboard.
a pack of napkins, you can put a bowl of water to rinse the ruler.
And also ENTHUSIASM, GOOD MOOD, CREATIVITY!
First, let's prepare the work surface)
Apply some foam to a tray or sheet A-4.

Smooth with a ruler or a strip of cardboard, smooth the foam over the surface

Armed with ANY PAINTS, start paint…

We painted today only with tassels, it turned out like this….


When the image is ready, attach a sheet of paper to it and press down so that the image is printed on the sheet, but you should not press the sheet too hard.


Carefully so as not to smudge the drawing, remove the paper and place it with the foam up for a few minutes to absorb the paint.


Remove the remaining foam from the drawing by rubbing it with a ruler or cardboard.


Let's leave the drawing to dry.

And this is what we got in the end ...

And with the remaining foam, you can still think of a lot) For example, something to blind from it

Or you can invite the child to play with colorful foam - touch it with your palm and remove your hand, touch it again, collect foam in your palm and clench your hand into a fist, stretch it or pass it between your fingers.
Relaxation of fingers and palms, unusual pleasant sensory sensations useful for development, as well as positive emotions for the child are provided

Role drawing in the formation of speech in a child is great. As we know, adults - stimulation of fine motor skills, namely the movement of fingers hands: fast, slow, conscious, leads to an increase and intensification of speech activity. The more attention is paid to this during the period when the child begins to speak, the faster the process of staging speech goes.
Painting in turn performs two function: aesthetic perception of the world through drawing and increased speech activity.
In addition, it is very pleasant to see the joyful and desired fruits. enlightenment: skills drawing, joy in the eyes of a child, immeasurable happiness that he receives from his creativity.
Unusual ways of drawingYou can draw not only with ordinary paints and brushes. There are many unusual and fun ways to paint that your kids will love and instill in them a love of creativity.
Handprints and feet
You can draw not only with your fingers, but also with your palms and even legs. Like these ones interesting work can be made from the prints of handles and legs, with a little imagination.


Drawing with ice cubes
You will need:
- Thick paper
- Tempera (or watercolor)
- Form for ice
- Toothpicks
How to draw:
Pour water into a mold and place in the freezer. When the water is half-frozen, insert a toothpick into each cube and let the water freeze completely. Then remove the ice. You will use the cubes as brushes by holding toothpicks.
Apply a few spots of different colors on the paper (either dry tempera or crumble the watercolor) and paint over them with ice! For example, one and the same cube can cross all the spots of paint, allowing them to sparkle in a whimsical way.
Drawing with milk
You will need:
- A quarter glass of condensed milk
- Food paints
How to draw:
Mix condensed milk with paints, pour into separate containers (jars or molds) by color. The resulting paints must be applied in a thin layer, because they dry for a long time.
Shaving foam drawing
You will need:
- Shaving foam
- Food paints
- Aluminium foil
How to draw:
Tear off a long sheet of foil and apply a few piles of shaving foam to it. Let your child choose paint colors and mix them with the foam. The paints are ready, now you can paint with brushes or fingers. The main thing is to explain to the children that the foam should not be put in the mouth. After the drawing is dry, the foam will create an interesting texture. After painting, the foam is easily washed off the skin and any household surfaces.
Drawing with a toothbrush
You will need:
- Old toothbrush
- Dye
- Paper
How to draw:
It's very simple: a toothbrush serves as a brush. You can draw a face on gray paper with a pencil and brush his teeth with a toothbrush and white paint. And then paint the face.
Bead painting
Cut out a piece of heavy colored cardboard and place it on the bottom of a pie pan, tray, or similar. Put a few drops of paint on the cardboard, and then, while the paint is still dry, place a few glass beads on top and roll them - and see what happens!
Painting soap bubbles
Stir some watercolor into the bubble soap solution. Spread drawing paper on the floor and ask your child to blow bubbles - they will sit on the paper and create fancy patterns.

Blowing with a straw
Dilute some paint and pour a small amount of on paper, give the child a straw and let him blow any pattern (just make sure that the child blows on the paint, not sucks it in).
Another way of drawing with soap bubbles: in a glass with a colored soapy-foaming solution, add more foam and lean paper against it.

Frosty patterns on glass - we make and draw our own window, photo, description
If the frost has not reached your windows, then let's make our own window with a frosty pattern ourselves. It will turn out no worse than the present.
Required material: blue gouache and white flowers, wide brush, cocktail straw, glossy silver cardboard, plain pencil, glitter for decoration, masking tape 1.5 cm wide.
How we do:
1. Draw a window on the cardboard, stick masking tape along the contour.
2. Paint the surface of the cardboard with blue gouache. There is a point here: the gouache should not be diluted with water, otherwise the too liquid paint will flow under the tape and the contours of the window will become indistinct.

3.How to read blue paint dry, dilute the white gouache with water, take a straw and blow out frosty patterns.

4.After the frosty patterns dry well, carefully remove the tape. You should get a window with frosty patterns on the glass.

5. Let's decorate the picture with sparkles.
Mirror drawing
Fold a piece of paper in half, draw a simple shape on one half - or maybe just spray some paint. Then unfold the sheet and lay the other half over the painted one. Let the ink print and unfold again, then study the resulting mirror pattern together.
Cut out a large piece of cardboard and place it on a table or floor. Place a sheet of drawing paper on top. The cardboard will protect the surrounding surfaces from splashing. Then dilute the watercolors well, take a stiff paintbrush or toothbrush - and spray the paint on the paper. Show your child that you can make a nice splatter by brushing your bristles over a hard piece of paper or a wooden stick.

In the same way, you can make drawings using a stencil.
On colored paper overlay the stencil. It can be various flowers, silhouettes of houses, trees. In a jar of yogurt, thin the paint thinly. Dip a toothbrush into the paint and run the ruler across the bristles of the brush towards you, spraying paint around the silhouette. Try to keep the entire background covered with specks. Remove the stencil and paint the details on the “spotless” part of the drawing. You can also use tree leaves as stencils.
Take an unnecessary spray bottle and fill it with water and paint - and go paint. For this it will be more convenient to take big leaf paper or even a piece of old wallpaper. This is best done outdoors.
Blotography
It consists in teaching children how to make blots (black and multi-colored). Then a 3-year-old child can look at them and see images, objects or individual details.

You will need gouache, a thick brush, and paper (1/2 or 1/4 sheet is best).
Fold a piece of paper in half and unfold it again. On one half, ask your child to place a few greasy blots, smears, or curls. Now fold the sheet in half again and press firmly with your palm. Unfold the sheet carefully. You will see a fancy pattern "What does your blot or mine look like?", "Whom or what does it remind you of?" - these questions are very useful because develop thinking and imagination. After that, without forcing the child, but showing, we recommend moving on to the next stage - tracing or finishing the blots. The result can be a whole plot.
Bitmap
Children like everything unconventional. Drawing with dots refers to unusual, in this case, techniques. For implementation, you can take a felt-tip pen, a pencil or an ordinary stick for cleaning your ears. But here is the best way to get bitmaps with paints.

You will need a separate stick for each color. With this technique, lilac or mimosa flowers are beautifully produced. Draw the twig lines with a felt-tip pen. And already make bunches of flowers with chopsticks. But this is already aerobatics! Drawing simpler things - flowers and berries (the stems can be drawn with a felt-tip pen) will bring the child no less pleasure. Or you can cut a dress (scarf, tablecloth, mittens) out of paper and decorate with an ornament of dots.
For some reason, we are all inclined to think that if we paint with paints, then we must also use a brush. Not always. Foam rubber can come to the rescue. We advise you to make from it a wide variety of small geometric figures, and then attach them with a thin wire to a stick or pencil (not sharpened). The tool is already ready. It turns out a large brush without hairs. The stick is kept strictly perpendicular to the surface of the sheet, without tilting. Now you can dip it in paint and use the stamp method to draw red triangles, yellow circles, green squares (all foam rubber, unlike cotton wool, is well washed). At first, children will draw chaotically. geometric figures... And then offer to make the simplest ornaments out of them - first from one type of figure, then from two, three.
The trail left by such a "brush" can imitate animal hair, tree crowns, snow. A stick with foam rubber is dipped in paint (the main thing is not to a large number water), and the baby begins to cover the leaf with its traces. First, let him just understand that with the help of the "magic wand" you can quickly and easily draw footprints. Then draw a tree branch or a bush with a black felt-tip pen, let the child paint the foliage with green, yellow, red or orange paint. Draw a simple outline of a bunny or a fox with a pencil, let the baby "trample" it with his "magic tool" - the bunny and the fox will turn out fluffy, their fur will seem so disheveled that the baby will certainly want to touch it.

It is extremely interesting to work in this technique with a stencil.
Cut out an image in the middle of a thick piece of cardboard, such as the head of a tiger cub or a bear. Attach the cardboard with the cut-out stencil to the album sheet and invite the child to “trample" the part of the album sheet that is visible through the hole in the stencil. After the child does this, let the work dry, then draw with a brush for eyes, mouth, mustache, stripes.
Negative
Glue a sheet of white paper and a sheet of black paper together so that you end up with a large sheet, one half of which is black and the other half white. Give the child black and white gouache and offer to draw the same simple drawing, first with white paint on black, then with black paint on white.
Collect some leaves, spread them out on a piece of paper. Prepare a well-diluted watercolor and sponge. Dip a sponge in the paint and apply over the leaf, so that the area around it is stained. Then carefully remove the leaf.

Such an uncomplicated form of artistic creativity as non-traditional painting with leaf prints is great for small artists for whom a brush is still complex instrument... It turns out that a seemingly ordinary leaf (maple, poplar, oak or birch) can turn into a tool for artistic creation no worse than a paintbrush.
What do we need?
Paper
Leaves different trees(preferably fallen);
Gouache
Brushes.
Progress:
Child covers a leaf of wood with paints different colors, then lays it against the paper with the colored side to produce a print. Each time a new sheet is taken. The resulting drawing is finished with paints of your choice. This is how it turns out:


Passepartout painting
On the sheet, draw an apple, fish, or car in the center of the sheet. And now you need to cut out the object that you drew along the contour. It turned out to be a mat. Only part of the image can be cut out in pictures. A fish has a part of a body, a tail, and fins. Give your baby a piece of paper. Let the crumb smear the paint, slap on the sheet with his palms and leave traces. Paste the mat onto a piece of paper painted with crumbs. The kid will be very surprised and glad when he sees a colorful colorful fish (a car or a girl).

"Curly" figurine
A very interesting way of drawing with a pencil, felt-tip pen, ballpoint pen according to pre-made stencils. Stencils can be of two types - some are cut inside the sheet, others are made from the sheet and separated from it. It is easier for small children to trace the shapes embossed inside the sheet. Many squares and rulers have these patterns. Attaching them to the album sheet, you ask the kid to circle the figures. Then you remove the stencil and together with it you figure out how you can finish this or that shape. Children 4.5-5 years old will be able to circle single stencils cut from cardboard. This is more difficult, since the hand is poorly held on the outside of the pattern and the baby draws extra lines. But you can interest children in the content of stencils: for boys, these are silhouettes of cars and planes, for girls - animals, nesting dolls, bows and houses. By circling the patterns, children can paint over their images with felt-tip pens and paints, hatch with various lines: straight, wavy, zigzag, with loops, wavy with sharp tops. Stencils can help when creating your own drawings, they will complement what the baby himself created.
You can start a game: the child circles various objects, and you guess what it is. First, not all objects can be circled. Finding them, the baby will understand what is the difference between voluminous and flat objects or things that have at least one flat side, and those that do not. Secondly, it is not easy to circle one or another object yourself, without the help of an adult. And thirdly, in this game, the roles change: the baby confuses the parents, and the adults are trying to find the answer. All this pleases the child, providing him with a surge of creative strength.
Mysterious drawings-thread painting
Mysterious drawings can be obtained as follows. A cardboard of about 20x20 cm is taken and folded in half. Then a half-woolen or woolen thread about 30 cm long is selected, its end is dipped 8-10 cm in thick paint and clamped inside the cardboard. You should then pass this thread inside the cardboard, and then remove it and open the cardboard. You can dye several threads in different colors at the same time. It turns out a chaotic image, which is examined, outlined and completed by adults with children. It is extremely useful to name the resulting images. This complex mental and speech work in combination with visual will contribute to intellectual development preschool children.

You can draw with threads in another way. Cut a woolen thread about 20 cm long, dip it in the paint and give it to the baby. Let him run the thread over the sheet of paper as he pleases. Then do the same with the other thread and new paint... Multi-colored lines, zigzags, stains will remain on the sheet. In a word, a beautiful abstraction.
Drawing with crayons
Preschoolers love variety. These opportunities are provided to us by ordinary crayons, sanguine, coal. Smooth asphalt, porcelain, ceramic tiles, stones - this is the basis on which chalk and coal fit well. So, the asphalt is conducive to a capacious image of plots. They (if there is no rain) can be developed the next day. And then make up stories based on the plots. And on ceramic tiles (which are sometimes stored in the remains somewhere in the pantry), we recommend depicting patterns and small objects with crayons or charcoal. Large stones (such as boulders) are asked to decorate them under the image of an animal's head or under a tree stump. It depends on what or whom the stone resembles in shape.
Magic drawing method
This method is implemented as follows. With the corner of a wax candle, an image is drawn on white paper (a Christmas tree, a house, or maybe a whole plot). Then, with a brush, or better with cotton wool or foam rubber, paint is applied on top of the entire image. Due to the fact that the paint does not lie on the bold image with a candle, the drawing seems to appear suddenly before the eyes of the children, manifesting itself. You can get the same effect by painting first with office glue or a piece. laundry soap... In this case, the selection of the background to the subject plays an important role. For example, it is better to paint over a snowman drawn by a candle with blue paint, and a boat with green paint. Don't worry if candles or soap starts to crumble while drawing. It depends on their quality.

.
Photocopy
We draw a drawing with a candle on a white sheet. Paint over with black ink.
Painting small pebbles
Of course, most often the child depicts large stones on a plane, on paper, less often on asphalt. Plane depiction of a house, trees, cars, animals on paper is not as enticing as creating your own voluminous creations. In this regard, sea pebbles are ideally used. They are smooth, small and vary in shape. The very shape of the pebble will sometimes tell the child what image to create in this case (and sometimes adults will help the kids). It is better to paint one pebble under a frog, another - under a bug, and a wonderful fungus will come out of the third. A bright thick paint is applied to the pebble - and the image is ready. And it is better to finish it like this: after the pebble dries, cover it with colorless varnish. In this case, a voluminous beetle or frog made by children's hands glitters, brightly shimmers. This toy will take part in independent children's games more than once and bring considerable benefit to its owner.

Strange patterns
Take a Whatman paper and a small orange (tangerine) or ball, pour a little paint of different colors on a sheet and roll the ball over the sheet in different directions... Then "revive" the received.

Finger painting method
Here's another way to portray the world: fingers, palm, fist, feet, and maybe chin, nose. Not everyone will take this statement seriously. Where is the line between prank and drawing? Why should we only paint with a brush or felt-tip pen? After all, a hand or individual fingers are such a help. And the index finger right hand listens to the child better than a pencil. Well, if the pencil is broken, the brush is wiped off, the markers run out - but I want to draw. There is one more reason: sometimes the theme simply asks for a child's palm or finger. For example, a child is better at drawing a tree with his hands than with other tools. With his finger he will draw out the trunk and branches, then (if it is autumn) he will apply yellow, green, orange paints on the inside of the hand and draw a crimson-mahogany tree on top. It is also good to mix several colors and shades. For example, first you apply yellow paint, and then brown or orange, it turns out fluffy!
It is good if we teach children to use their fingers rationally: not one forefinger, but by all.

Monotopy method
Two words about this, unfortunately, rarely used method. And in vain. Because it is fraught with a lot of things that are tempting for preschoolers. In short, this is an image on cellophane, which is then transferred to paper. On smooth cellophane I paint with paint with a brush, or a match with a cotton ball, or with my finger (no uniformity is needed). The paint should be thick and vibrant. And immediately, until the paint has dried, turn the cellophane image down onto thick white paper and, as it were, blot the drawing, and then lift it up. It turns out two pictures. Sometimes the image remains on cellophane, sometimes on paper.
Drawing under the film
We squeeze out the paint on cardboard or paper, put the film on top and smooth it with cotton wool, then sharply pull the film back. Thus, the sunset, the sea, the fire are good ...

Drawing on wet paper
Until recently, it was believed that you can draw only on dry paper, because the paint is sufficiently diluted with water. But there is a number of objects, plots, images that are best drawn on wet paper. You need ambiguity, vagueness, for example, if a child wants to depict the following themes: "City in fog", "I had dreams", "It is raining", "Night city", "Flowers behind a curtain", etc. You need to teach the preschooler to make the paper a little wet. If the paper is too wet, the drawing may not work. Therefore, it is recommended to soak in clean water a lump of cotton wool, squeeze it out and hold it either over the entire sheet of paper, or (if so required) only on a separate part. And the paper is ready for the production of obscure images.
Draw with postcards
Almost every house has a lot of old postcards. Go through old postcards with the children, teach to cut the images you want and stick to the place in the plot. A bright factory image of objects and phenomena will give even the most simple unpretentious drawing a completely artistic design. It is sometimes difficult for a three-, four- and even five-year-old child to draw a dog and a beetle. You can take them ready-made, and let him paint the sun for the dog and the bug, rain and be very happy. Or if, together with the children, cut out of a postcard and paste fairytale house with the grandmother in the window, then the preschooler, focusing on his imagination, knowledge of fairy tales and visual skills, undoubtedly, will draw something to him.
Whose trace
Another way of drawing, or rather, printing, is based on the ability of many objects to leave colorful prints on paper. You take a potato, cut it in half and cut out a square, triangle, diamond, flower, or something interesting from one half. Moreover, one side of the print should be flat for applying to the paper, and you will hold on to the other with your hand. Then you or a child dip such a seal in paint (preferably gouache) and apply it to the paper. As you might guess, an imprint remains. With the help of these seals, you can make beads, ornaments, patterns, mosaics.
Not only potatoes, but also bottle caps, felt-tip pen caps, buttons, small boxes, etc. can serve as a stamp.
You can try to depict something on the principle of constructing from different parts. For example, a car (coil - wheels, cubes - body and window); castle of sorceress, animals, etc.

Can be painted with wheel paint toy car and carry her around on paper.
An interesting rose-shaped print is obtained from the remains of a head of Peking (Chinese) cabbage.


Salty drawings
But what if you paint with glue and sprinkle salt on top of these areas? Then you get amazing snow pictures. They will look more impressive if they are performed on cyan, blue, pink colored paper. Try it, it's very addicting!
Tooth paint
Or let's create winter landscapes in another way - painting with toothpaste. First, the baby needs to be explained what it is creative search, and such use of toothpaste does not give him the right to squeeze it on the floor, shelves and tables. Together with the baby, outline the light outlines of trees, houses, snowdrifts with a pencil. Slowly squeezing out the toothpaste, walk it along all the outlined contours. Such work must be dried and it is better not to put it in a folder with other drawings. For creativity, it is best to use a domestic product - it dries up faster.

Relief drawing
Flour is added to the paint and applied to the sheet. A cardboard strip is cut with teeth and we draw patterns along and across. Cut out a shape from a dried sheet, for example a vase. Let's draw flowers on a white sheet, and then glue them. You can draw with a stick, toothpick, fork, match.
Glue painting
We squeeze glue onto the image on paper, let it dry, and then paint over with paint, we get a relief.

As an artist to an artist
But absolutely unusual way! We need to get a large sheet of paper. You ask the baby to lie on such a sheet and circle it. Of course, it is better for it to fit all over (this can be achieved by gluing two or three sheets of Whatman paper) or, in extreme cases, to fit the body and head. You have circled the kid, and now his time has come - let him try to decorate the silhouette: draw eyes, mouth, hair, jewelry, clothes. If the child is small, then do this work together - the baby proposes, and you, admiring his imagination, draw with him.
Rainy fantasies
Another option unconventional drawing is as follows: during rain or snow, you boldly open a window and put out a sheet of paper for less than a minute, holding it horizontally. You probably guessed that drops of rain or snow will remain on the sheet. And this is what we wanted. Now traces of bad weather can be circled and turned into fabulous creatures... They can also be connected to each other, guessing what kind of image it turns out.
Drawing by points
An adult prepares a drawing scheme in advance, placing contour points. The child is told: “Do you want to be surprised? Then connect the dots to each other in order! " Offer the resulting contour to draw, paint, come up with a plot and a name.
Picture from both sides
You will need a piece of cardboard, a wide brush, paper clips, and colored pencils. First you need to paint over a sheet of cardboard with any paint (an old cardboard folder will do). Immediately, before the paint has dried, place a sheet of plain white paper (preferably writing paper) on top. Attach the paper with paper clips and have your child draw with a colored pencil on a white sheet of paper. If you want, you can use coloring, but the drawing should be simple - some object. When the drawing is finished, peel off and remove the paper. See what happened - on the side that was pressed against the folder, it turned out color picture with a convex, as if embossed pattern.
Take a thick paint that has not been diluted with water (it is better to use acrylic or gouache) and paint a colored spot. Scratch the lines with a piece of cardboard or crochet hook. Or you can cut the cardboard with teeth and scratch the combs in the paint. Crochet the different curls. With the edge of the cardboard, squeeze out the lines in a crisscross pattern. Make your prints with a felt-tip pen cap. After the child has mastered this technique, you can start creating a picture. To do this, apply paint of different colors on several sheets of paper and different ways scratch the surface. Now put together the composition. For example, cut a pond from a piece with scallops, a sky with clouds from curls, make a snake from a scaly surface, and so on. Stick the cut-out elements on clear sheet paper.

We draw with gouache using the poke method
You will need gouache, brush, album sheets. The child holds a brush in his hands and puts it on the paper perpendicularly. Show how your brush jumps! Using this method of poking, you can draw a fireworks, you can paint a fluffy cat (the cat should be drawn in advance with a felt-tip pen or pencil), you can also paint flowers.
The concept itself explains the meaning of this method: several of the above are collected in it. In general, ideally, the following seems important to us: it is good when a preschooler is not only familiar with various image techniques, but also does not forget about them, and uses it to the right place, fulfilling a given goal. For example, one of the children 5-6 years old decided to draw summer, and for this he uses a bitmap (flowers), and the child draws the sun with his finger, he will cut fruits and vegetables from postcards, he will depict the sky and clouds with fabrics, etc. The limit to improvement and creativity in visual activity no.
The English teacher-researcher Anna Rogovin recommends using everything that is at hand for drawing exercises: draw with a rag, paper napkin (folded many times); paint with dirty water, old tea leaves, coffee grounds, squeeze from berries. It is also useful to paint cans and bottles, spools and boxes, etc.
Children and creativity are inseparable concepts. Every child at heart is an artist and sculptor, singer and musician. Creative impulses in children are manifested in the most unimaginable form, but very often they are associated with artistic activity. Sooner or later, many mothers wonder why a child needs to learn to draw? Indeed, why, if you do not plan to raise another Surikov or Aivazovsky? If your goal is to see your child as a successful, confident person, then encourage creativity, because any visual work- an important condition for the normal development of the baby.
Unconventional drawing techniques in kindergarten and at home help to develop spatial thinking, eye, coordination. After all, the baby needs to tie the ratio of the sizes of the parts with a single composition and arrange them harmoniously on the sheet. When working on a complex decorative composition, the child learns to plan his actions, choose the right material. It is very important for him to understand that he can create something with his own hands.
Everyone knows that drawing is one of the favorite activities of our children. With great pleasure they draw with colored pencils, felt-tip pens, paints, dipping a brush into a bright substance. And why not get your finger wet there or smear paint all over your palm? It is impossible to set a framework for fine art, it is necessary to destroy all the boundaries of the familiar and the traditional!
Non-traditional drawing techniques attract our fidgets much more, because they do not require perseverance, they make it possible to more clearly reveal their potential during creativity, acquaint the child with the opportunity to use the things around us in an unusual way as materials for creativity. If the most unusual paints and bright pencils in the kid no longer cause the former interest, then you can dilute the creativity of your fidget with other drawing methods. Why is drawing in non-traditional ways useful in kindergarten and at home?

- The kid uses a variety of materials, recognizes the differences in textures, which allows him to improve fine motor skills.
- There is an acquaintance with volume, shape and space, which develops the imagination.
- The ability to combine and mix shades develops an aesthetic taste.
- The use of unusual materials develops thinking, teaches you to make non-standard decisions.
- Drawings using such techniques are obtained much faster, which pleases the crumbs who lack perseverance so much.
- It adds self-confidence and self-confidence, because even without outstanding skills, you can create a unique "masterpiece"!
All the most interesting techniques and techniques were collected and systematized by G.N. Davydov in the book "Non-traditional drawing techniques in kindergarten." This book is a great helper for both the teacher and the mother who wants to diversify the leisure time with the baby.

Getting started: fingers or palms
Non-traditional drawing techniques imply the image of images using various materials, including “non-artistic” ones: crumpled paper, foam rubber, threads, paraffin candle or wax crayons, dried leaves; drawing without using a tool - with palms or fingers and much more. Such methods are successfully used both in kindergarten and at home.
For of different ages you can offer your own technique, for example, it will be interesting for the smallest to draw with their fingers, because it is still difficult to hold a brush for a crumbs, but the baby already owns his own hands brilliantly. Dip the palm of the crumbs in the paint and offer to leave a mark on the paper, as the traces of cats and dogs leave. Consider the print with the baby, who does it look like? It looks like an elephant or a turtle, and if we draw an eye, there will be a fish! The whole action is guided only by the imagination of your baby, and if suddenly he is confused, then help him, conduct a master class - paint your palm and leave an imprint. “Look, the mother is an elephant, but where is the baby elephant?” - the child will be happy to join such a funny game.
You can not dip your entire palm in the paint, but only your fingers, and leave tiny prints. The more multi-colored prints, the more interesting drawing, - let the kid fantasize for his own pleasure. Adults should be prepared for the fact that the paint will be not only on the leaf, but also on the baby, more precisely, the baby will be in it all and the surrounding objects too. Therefore, take care of cleanliness in advance: cover the table where you plan to set up a creative workshop with oilcloth, and put on an apron and oversleeves for the baby, otherwise what kind of flight of fancy can we talk about if you constantly jerk the baby: "Be careful, you get dirty!"

We continue to fantasize. Stamps, impressions
Children of all ages like to use stamps when drawing. This unique technique unconventional method drawing in kindergarten is so easy to perform and diverse in manifestation that it is perfect for work both in the kindergarten and at home. Ready-made stamps can be purchased at an art supply store. But it is much more interesting to make a stamp yourself, or even better with a baby.
Almost anything that can be dipped in paint and then left on a piece of paper will work as a stamp. You can cut an apple or a potato - this is the simplest stamp. On a half of a potato, you can cut out some kind of figure: a heart or a flower. Another stamp is made from ordinary threads by winding them on any base. You don't need to wind the threads, but simply immerse them in the paint. After thorough impregnation, they are laid out on one sheet, covered with another, lightly pressed, and admire the intricate pattern.
It is not difficult to make a stamp from ordinary plasticine. Come up with an interesting shape and design a small piece of plasticine. It is better to choose thick paint for classic stamps. An unusual texture to the background can be given by using a crumpled napkin or paper, and then according to the worked out scheme: we dip in paint and stamp. Very beautiful stamps are obtained from dried leaves: paint a leaf with paint on one side, put it on paper and press down. After removing the painted leaf, we got the picture “ Golden autumn"- the kid is delighted.
There is another unconventional drawing technique, similar to a stamp, but with interesting feature, - drawing with foam rubber. Cut a small piece from an ordinary sponge, dip it in the paint and cover the sheet with light pressure. It's so easy and simple to get a wonderful background for further drawing, and if you use stencils or templates for children's drawing, you get an amazing floral, or geometric pattern.

Drawing with dots
Drawing with dots can be distinguished as a method of fine art for kids. This simple technique is understandable even to the smallest. You will need paints and cotton swabs or regular markers. We dip the stick in the paint, and with a slight pressure draw a point on a sheet of paper, then another one - until the invented image appears on the album sheet. You can help the kid by drawing the outline of the future drawing, and he will fill it in big amount bright prints. The topic of the bitmap can be any - both a winter fairy tale and a bright sun. Education at such a tender age should be carried out unobtrusively, in the form of a game.
Technique "monotype"
For older children, you can offer more interesting types of artistic creativity. For example, interesting technique, which is also based on impressions - "Monotype". Its purpose is to create symmetrical pattern, such as a mushroom, insect (butterfly or ladybug), for a senior preschool group, you can depict a landscape reflected in a lake.
We take a landscape sheet of paper, fold it in half, then unfold it and draw on one half relative to the fold line. Since we agreed to depict a butterfly, then we draw one wing, then we iron the folded sheet with our hand. We open - the butterfly already has two wings and they are exactly the same! The missing elements can be painted with a brush.

The feeling of delight is ensured, while the child understands that his "hooligan" actions, when blots and splashes are flying on the sheet of the album, is also an art form. "Blotography" also has the name "Splash". Unusual artistic effects can be achieved with these techniques.
Spray paint, aka "Spray". A toothbrush will come to our aid. Gently dip it into the paint and lightly tap with a pen or pencil towards you. Remains on the sheet great amount small droplets. With this unconventional painting technique, a very realistic winter landscape or distant space with many stars is obtained. "Blotography" will help the young artist populate uninhabited planets of space with funny aliens. One has only to pick up more paint on the brush and let it drain onto a sheet of paper, - it turns out a blot. And now we blow on it, dispersing the rays in different directions. Let's draw a couple of eyes for a dried blot, or two pairs, it's an unknown animal, and we'll send it to populate its distant worlds!

An interesting texture can be achieved by using a dry brush. Lightly immerse a dry wide brush in gouache, wipe off excess paint on a jar. We draw with vertical poke movements. The image turns out to be "shaggy" and "prickly", in this way Christmas trees and hedgehogs, a field with green grass are very realistic. In such an unconventional way in kindergarten, you can draw flowers, for example, asters.
Incredible possibilities of familiar things.
- Bubble.
It turns out that soap bubbles can not only be inflated and burst, but you can also draw with them. In a glass of soapy water, dilute a little paint, take a tube and let bubbles into the glass. Your kids will do this trick with pleasure. Well, there is a lot of bright multi-colored foam, apply a sheet of paper to it, and as soon as the bubbles begin to appear, the paper needs to be removed - the colorful pattern is ready!
- Salt.
Don't be surprised, but salt can be used for more than just cooking. An interesting texture will turn out if the wet drawing is sprinkled with salt, and when the paint dries, just chicken out.

- Sand, beads and various grains are also used to create creative textures. There are several options for using such materials.
- Sprinkle the sheet pre-coated with glue with cereals, sand or beads, and then draw on the textured surface.
- We cover with glue the areas in those places where the drawing will be depicted.
- Paint and dry the necessary materials in advance, and then decorate the drawing with them.
Classics in an unconventional reading
Let's put the stamps and salt aside, wipe the paint-stained pens, get out watercolors and brushes. Boring? It's not boring at all, but very interesting, because with the help of classic watercolors we will work wonders!
You need to take thick paper ( the best way- special watercolor), wet so that it gets wet enough. Take some paint on the brush and lightly touch the brush to wet paper... The movements should be light and smooth, the beauty of the result depends on this. Before your eyes, a drop of paint is spreading in different directions, turning into something amazing! The right time tell the kid about the rules for obtaining new colors and shades. This practice is most evident now. The resulting unthinkable divorces will serve interesting background for future creative work.
The next unconventional drawing technique, which we will consider, also from the category of "miracles nearby", is called "Aquatipia".
This is a painting technique with paints and water, also known as water printing. Just as in the previous method, thick paper will come in handy, we will choose no less traditional paints - gouache, we also need black or any dark ink. Think with the baby what he would like to portray? This method produces flowers unusually beautifully. After the paints dry, paint over the entire sheet with ink, then immerse your work in a bowl of water, and enjoy the wonderful transformations! All the gouache will dissolve, leaving only your drawing on a dark background. What is not magic?

The series of incredible transformations is not over yet! Let's take all the same thick paper, and with wax crayons (if they are not at hand, you can use an ordinary candle) we will apply a drawing or pattern. Next, we apply watercolor paint on the entire sheet (places treated with wax will not stain). On a colored watercolor background, a drawing will appear, which will be a surprise for the kid, because when you draw with colorless chalk on a white sheet, it is rather difficult to imagine the final result. In the end, the magic process can also bring quite practical results.
Making "marble paper" is an extremely exciting activity that little ones really like: it's funny to play with things that are not allowed to take at all. For example, Daddy's shaving foam. For work you will need:
- shaving foam;
- watercolor paints;
- flat plate;
- sheet of thick paper.

First you need to get a saturated solution: mix the paint with water. Then apply a thick layer of shaving foam to a plate, and drip a few bright drops of paint in a random pattern. Using a brush, paint with drops of paint on the foam, creating intricate zigzags and patterns. Here it is - a magical sacrament that will completely absorb a keen baby. And here is the promised practical effect. We apply the sheet to the rainbow foam, and then turn it over so that the foam is on top of the sheet. Remove the foam remaining on the paper with a scraper. And - lo and behold! Unimaginable stains appear from under the foam, similar to a marble pattern. The paper has absorbed the ink. Once dry, marbled paper can be used in craftwork or as an addition to decor.
There is no limit to creative manifestations
For the guys who have already met many interesting techniques and have shown their outstanding Creative skills, you can offer a rather difficult drawing technique - "scratching".

You need thick paper, you need to paint it with wax crayons, preferably bright colors, then, with a wide brush, cover it with black gouache or ink. If you intend to use gouache, add a little PVA glue so that the dried paint does not crumble. When the ink (or gouache) is dry, the workpiece is ready for further work. Now we take a thin stack (any sharp, non-writing instrument) and start drawing. But drawing this process can only be called conditionally, since the top layer of paint is scraped off. So, stroke by stroke, a bright wax layer appears and is projected into the artist's idea.
For young artists there will be a fascinating drawing technique with the help of plasticine on glass.
Choose the drawing you like, cover with glass, draw the outline of the drawing on the glass with a black felt-tip pen. Then we proceed to filling the contours with soft plasticine, trying not to protrude over the edge. The seamy side does not look so neat, but a bright and clear picture is visible from the front side. Frame your artwork and use colored cardboard as a background.

There are a number of other unconventional techniques drawing in kindergarten, which are easy for children of the middle and senior preschool group. For everyday activities, a combination of an applique with a classic pattern may be suitable. The pre-cut elements are glued onto a landscape sheet, after which, using pencils or paints, they give the image a finished look.
One of the available and entertaining techniques is "Front".
We are familiar with this type of fine art since childhood, remember, they hid a coin under a sheet of paper and shaded simple pencil? In the same way, instead of a coin, you can use dry leaves, and shade not with a pencil, but with colored pastels. The drawing will turn out to be bright and saturated.
We got acquainted with a lot of drawing techniques and already learned a lot, so why not put our knowledge into practice? With the help of both traditional and non-traditional drawing techniques, they decorate any interior items. Decorative painting in kindergarten it also has an applied character, the child can already decorate, for example, a pencil holder or a clay vase, or he can please his mother and create a unique pattern on a cutting board. It should only be remembered that paints for such works must be chosen waterproof: acrylic or oil. To make the result last longer, cover the finished craft with varnish.
The stained-glass technique is used for interior decoration.
The essence of the technique is to apply an adhesive contour and fill it with paint. There are many options for the execution of this technique, but one of the most interesting is drawing a pattern on the oilcloth, and after drying, the drawing can be removed from the oilcloth and glued to any surface, for example, on glass, - there will be a translucent bright picture.
Let us dwell in more detail on the execution technique itself.
The ideal option would be to use specialized stained glass paints, but if there are none, you can be smart and make them yourself. Take ordinary gouache and add PVA glue, after drying, the paints have an elastic structure, which will allow you to remove the picture from the film without difficulty. Select the drawing you like and draw its outline on a transparent oilcloth (you can take a regular file or a transparent plastic folder). It is better to make the contour first with a pencil or felt-tip pen, and then circle either with a ready-made stained-glass contour, or with ordinary PVA glue from a tube with a dispenser. Wait for the outline to dry, then fill with bright colors. After complete drying, you can peel off the drawing from the film, and decorate the intended surface.

You can decorate not only interior items, but also wardrobe items with special fabric paints. This technique is called Cold Batik. Invite your child to make a designer painting of an ordinary white T-shirt, this will only be your baby's, the one and only!
- Beforehand, the T-shirt must be fixed in a hoop for embroidery or in a stretcher for drawing on canvas.
- Use a pencil and tracing paper to translate the image of your beloved cartoon hero on the fabric.
One of the most important steps in this method is the application of a reserving compound, in other words, a protective contour, which will prevent paint from spreading over the fabric. The contour must be closed to prevent spreading.
- After drying, according to the scheme known to us, we fill the contours with paint.
- Then the drawing must be fixed. Place one sheet of paper under the drawing and the other over the drawing and iron with an iron.
You can wash such a product, but it is better to manually wash it in cool water. The unique product is ready.

Conclusion
All the considered non-traditional drawing techniques are applicable only to indoor conditions. But what about walks in the summer on fresh air? Are outdoor games only suitable for outdoor use? No, you can do fine art. Drawing in summer in kindergarten can also be done outdoors using classic chalk. Drawing on the asphalt in kindergarten is a wonderful entertaining and educational activity. Children draw with crayons wherever there is a more or less hard surface: asphalt, tiles, fence, walls of the house. It is wonderful to see a bright embodiment of fantasy instead of gray asphalt.
What to do at home with your baby when it's cold outside? Of course, creativity! And we made it easy for you huge selection, in which they talked about all sorts of unusual ways of drawing. Let's get started soon!
Top 40: unusual ways to draw!
If you have a pencil at home with an eraser on the other end, then this idea is for you! A little time to prepare, and you can create vivid pictures. You will appreciate the simplicity and accessibility of this type of creativity, and the little one will have fun and usefully.
Draw with an eraser!
We have an entertaining idea for you and your little ones, which combines creativity and the study of the laws of physics! This activity will captivate the whole family!
Thanks to this idea, crumbs will be able to better study colors and their combinations. And the method will definitely surprise them!
Making magical colored milk!
We have for you great idea how to entertain your baby while developing his creativity. It will not take much of your time and money, but the idea will definitely amuse the baby!
We paint with a spray!
If it suddenly rains outside, this is not a reason to be sad! We offer you and your little ones entertainment in inclement weather. Just don't forget to put on your raincoats)
What are cars for? Of course, arrange races, roll your favorite toys and give your parents a back massage in the morning) Have you tried using them as a drawing tool? We would like to offer you and your fidgets a simple but very unusual idea.
All kids love to do something unusual and interesting, discovering a lot of new fun. Therefore, we try to find for you and your little ones only the most curious and informative ideas! And this time we offer you to make bright ice paints! In the process of drawing, the baby will easily learn colors and their combinations.
Have you ever painted in 3D? We have found for you and your little ones an extraordinary idea for creativity, which combines painting, paper sculpture and the study of nature! It is very simple to implement it, but how much joy and new discoveries this activity will bring you!
After drawing with crayons, small "stubs" remain, which are no longer so convenient to use. We want to give you an idea of how you can use them. Continue to paint with them, just a little differently! Make paint out of them!
We will need: crayons, thick food bags, a hammer.
Put crayons of the same shades in a bag, close tightly. Tap the bag with a hammer to turn the crayons into powder. Be careful not to hit too hard or the bag may break. Pour the resulting powder into a bowl and add water. The paint is ready! It's that simple! This paint will adhere gently to paper or any other surface. Draw with pleasure!
This time we again want to invite your kids to draw, only now with ice crayons on butter! It turns out very nice and cool, besides, in the process, the kid observes that the oil does not mix with water, and this can be used as an artistic technique.
In the summer, nature appears before us in all its glory! Berries, fruits and vegetables ripen, on the street there is a riot of greenery, flowers bloom and give us their aroma. We invite you and your children to try one interesting summer fun - to make a natural water color! And if it's cold outside, you can buy flowers in the store. This paint will be completely natural and safe, and it's so much fun to make! Try it yourself!
We would like to tell you about an artist named Jackson Pollock and his painting technique that your children will certainly love. The most remarkable thing about this technique is that you need to "splash" with paint for your own pleasure! Jason Pollock's technique is to place the canvas on the floor and spray paint from brushes without touching the canvas with the brush. In 2006, a painting titled "Number 5, 1948" was sold at Sotheby's for $ 140 million!
We are sure that you have never painted with frozen paint! Today is the very day to discover new horizons and try this fun kind of drawing.
Is it still raining or is it over, and you didn't get to see the rainbow ?! No problem! Today we will make our rainbow out of colored rice (we will also tell you how to paint it), and at the same time we will repeat all the colors and learn a funny rhyme about the rainbow. We can admire our rainbow at any time, regardless of the weather and season!
Have you ever thought about becoming an artist? That's right, through practice and training. In general, drawing teachers have a lot of interesting and entertaining exercises, performing which you cannot say that you are undergoing training. This is how we treat them - as creative entertainment! Today we will share with you one of them - drawing circles.
Usually, on every holiday, the obligatory guests are air balloons... But then time passes, and the balls begin to deflate. You think they can no longer bring joy, but you are mistaken! Today we will show you how to create a wonderful portrait using a balloon. We guarantee fun! :)
We want to tell you about another funny kind of art - drawing with film with pimples. So it's time to get the still not thrown out box from under the TV, mixer or juicer, the film from there will be very useful for us today in the creative process;)
Today we invite you to bring our hooligan idea to life. Let's combine water balloon throwing and art! What will we get? Of course, great entertainment for the warm summer day! Intrigued? ;)
Let's paint with watercolor pencils!
We decided to invite you and your children to master an unusual type of drawing, which will surely amuse the whole family with its slightly hooligan mood! Today we invite you to draw using old pieces of yarn or thick threads, which are sure to be found in every home!
We decided to show you a recipe on how to make body paints at home. The best part about this recipe is that the paint is absolutely safe for your baby's skin! If your children have grown up, then be sure to let them make paint themselves, imagine their pleasure when from different materials they will get a real body paint!
Everyone knows about drawing on asphalt with crayons! Today we will tell you about another curious idea of asphalt art - painting with paints, and we will also give you a recipe for how to make these paints from scrap materials! With this idea, you will always have an answer to your child's question "What are we going to do today ?!"
Everyone knows about drawing with fingers, palms or a brush. Have you tried to paint with a living flower?
Do you want to know another unusual type of drawing? Then this idea is for you, because today we will draw on stones. The idea is very simple, but, nevertheless, it can successfully keep your child occupied for a very long time. Such unusual drawing develops imagination and contributes to the formation of a creative Self in your fidget.
Coloring is always a fun pastime for children. After reading this article, you will learn how easy and simple it is to make your own unique drawing templates and color them! Abstract coloring encourages children to use their imaginations and can keep them busy all day. Also, drawing actively develops fine motor skills, which favorably affects the development of speech and mental abilities.
Let's become artists for today? But we will create our own creative masterpieces in a very unusual way - we will put multi-colored stamps made from ordinary pepper. This simple way will allow even the smallest creators to create their first artwork, and more adult artists - to show their imagination and understand that there are practically no boundaries for creativity.
We invite you to show your child what miracles are in the world of science. Has your child ever seen paint grow before their eyes? If not, try this unusual experiment. The child will be delighted when he sees that the picture has become three-dimensional!
For sure, every child loves to embody his flight of fantasy in drawings. But have you already got tired of ordinary paints and pencils? Try to suggest to the little artist new way drawing with salt and glue. You will be surprised how much delight and emotion this unusual way of drawing will cause. After all, it is so interesting to observe how the colors themselves "diverge" according to the drawing, and the picture turns out to be bright and voluminous.
For many, autumn is a time of inspiration, someone begins to write poems or whole poems, someone conveys what they see in stories, and someone creative process pours into autumn paintings... It is on drawing that we want to stop and tell you about another unusual view - drawing on autumn leaves.
How wonderful it is when you can take a walk in the autumn park and enjoy the rustle autumn leaves... But the weather is not always conducive to such a walk. Today we offer you, together with your fidgets, to create a unique autumn mood in your home - we will make leaves with unusual, creative colors.
To make your walks brighter and more colorful, we suggest you pour paint into spray guns and paint a molded snowman or paint a whole picture in the snow.
Drawing, as you know, develops the creativity and imagination of a child, so we decided to offer you another unusual way of drawing, namely drawing with soap bubbles. You will get an unusual picture in which you can search and represent animals, plants or even various cartoon characters.
The experiment is very interesting and magical. You will see the white flowers turn into color. In addition, a wonderful holiday on March 8 is on the nose and such a spring bouquet will become great gift for mothers and grandmothers!
We recently covered seven simple watercolor painting techniques, and if you have mastered them, then it's time to move on to something more complex and interesting. Today we will analyze six more interesting techniques that will help you create your own masterpiece.
Spray
We wet the bottom of the paper to see what happens.
This technique is pretty simple. Just put some paint on the brush and start tapping the bristles of the brush on your finger so that the spray scatters randomly.
If your brush is too wet, it will be difficult to control the spray. Therefore, shake off a few drops from it, and only then get to work.
If you don't like hitting your fingers with a brush, then you can use any handy tool, a pen, for example.

Before we start sprinkling our paint, place the pieces of paper in the upper corner of our canvas.
We also wet the bottom edge of the leaf with clean water and tint it with a light purple color.
Search for an old toothbrush, rinse it out, and remove any remaining toothpaste. And get ready for a mess.

There are several ways to apply paint to your toothbrush. You can dip it in paint, which makes it very difficult to fill the bristles with paint. You can try filling your toothbrush with a brush. This way you can control the amount of paint.

Take your toothbrush and run your thumb over the bristles. You can also use the tools at hand. Choose a tool that is comfortable for you to spray paint from your bristles. Notice how the speed and distance of the brush from the paper affect the paint spray.

When you want to spray paint of a different color, rinse your toothbrush well and dry it with a towel.
Don't worry if you don't get this technique as well as you would like. Practice and you will succeed.

As you can see, the effect is quite interesting. Use whatever tools you have at your disposal, use your imagination and get creative with your drawing.

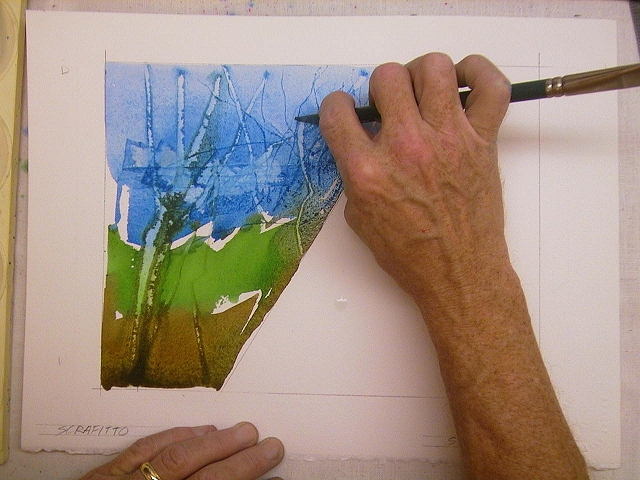
Sgraffito and stamps
Sgraffito is an Italian term for a scraping technique associated with rubbing off the top of a ceramic to expose the layers below it.
In the example, we scraped off paint with a penknife. If you scrape off the still wet paint that has soaked deep into the paper, you get dark lines.
Used wisely, this technique can create interesting landscapes by scraping out the shapes of trees and other flora.

You can use old credit cards to scrape off paint. A smooth side card can sweep away the remaining paint.

Many brushes have a pointed edge. You can use these brushes to create fine lines.
It is very important to understand at what interval you need to start scraping. Practice on a separate sheet of the same paper and with the same colors.
A stamp is the application of paint by pressing other objects onto the paper. You can choose any material in order to create stamps. Try everything that comes to hand.
In this example, we are using facial wipes. Let's fill them with paint and put stamps on the top of the paper.

You can also use a sponge. With its help, we will depict the grass.
You can play with textures using different materials. Experiment!

Don't be afraid to use body parts for stamps. Everything can be used!

Washout
A relatively simple technique will help you create unusual and interesting textures.
First, paint over the top of the paper with blue paint.

Then quickly paint over the rest of the canvas in red. This is how our drawing will look at this stage.

Now rinse the brush well and refill it with clean water. Light movements Spray the brushes with water droplets onto the paint that is still wet.

Continue splashing water until you are satisfied with the result.
How much the paint has dried can be understood by the strength of the effect of water on it. Notice that the more water gets on the same area, the lighter the shade of the paint becomes.

Don't be discouraged if you can't control the blur. You, most likely, will not succeed, since it is quite difficult to influence this process.

Experiment with the amount of water, colors and dryness of the paint. This technique can help you create an interesting and textured background.

We use alcohol
You will need cotton swabs and rubbing alcohol.

Lightly paint your sheet with paint.

Create the background shade you want and get ready for the fun.

Dip cotton swab in alcohol and start dripping it onto the paint.
Alcohol, getting on the paint, repels it, as it were, creating a light spot.

Try dripping rubbing alcohol onto the paint as it dries to see the effect.
It's pretty pretty, isn't it?

This interesting technique allows you to create unusual textures.

We use salt
Obviously we will need salt for this technique.

Let's draw the sky and the hill.

The second hill will be crimson in color, we will mix it a little with the first hill to get an interesting transition.

Now let's take salt and sprinkle it on our drawing. After a few minutes, add some more salt. She pushes the paint away from herself, creating an unusual texture.

Let's wait until all this is dry and see what happens next.

After the drawing has dried, the effect of the salt becomes more visible.
Shake the salt off the drawing and enjoy the result.

Better to use a sponge to brush off the salt. This way you will not damage the paint. Clean the drawing with light movements, try not to rub it.

The salt absorbed the paint, creating a huge number of star-like specks.
It is worth noting that coarse salt will leave larger specks, and fine, respectively, smaller ones.
