How to draw balls and flowers. Ottisk by balloon
Subject: "Drawing in the printing technique with balloons" Christmas toys ".
Purpose: Formation of parental interaction skills with children through creative activities.
Tasks:
- Developing:
Development of shallow motility, color perception, tactile perception, imagination.
Development of children's creative abilities, to interest children with unconventional drawing methods.
Develop interest in non-traditional image on paper.
- Training:
Improve the skills of the unconventional image of the subject (air balloon print on paper).
- Educational:
Education of aesthetic taste and labor culture
Relieve accuracy when working with paints.
Educate attention and abatinity in children;
Methods used:
Valid: guessing mysteries, teacher's story.
Practical: Fingering gymnastics "" We went to the courtyard to walk ".",
Equipment: landscape sheets of paper for each child, gouache red, yellow, blue, green, slightly inflated balloons, napkins for hands, tape recorder, audio record: "Christmas tree, tree - Forest fragrance" Words I.Shucher, music O.Feltsman
Integration of educational areas: "Artistic and aesthetic development."
Preliminary work: Consider illustrations about New Year's holiday, conversations, reading poems about the new year.
Travel course.
1. Surprise moment.Aerial balloons appear, for the threads of which are attached envelopes with riddles to children.
- Look at what a miracle! Bright balloons flew to us in the group. And what is tied to threads? Let's read! This is riddles.
We bought a hanger
With a star on the painter.
Hang on the hanger
Not hats, but toys!
(Christmas tree.)
In winter, in the watches of fun,
Vice on a bright ate
The Christmas tree will rise in the corner
At the window on the floor.
And on the Christmas tree to the top
Multicolored ...
(Toys.)
Round like a ball
Light as a flashlight
Only he does not jump -
Very fragile ... (Ball)
- What do you think, what is our today's event dedicated? (New year, Christmas tree, Christmas toys ...)
- Do you know what Christmas toys are made from? (From plastic, glass, paper, fabric)
- First, the Christmas decorations were only edible: eggs and waffles swung on branches next to fruits, sweets and nuts. It is believed that it was the crumbs of apples that made Christians show fantasy and find them a replacement in the form of other Christmas tree toys. The first decorations changed crafts from paper and wool, from foil and tin wires.
Also, the toys are mastered from cardboard, there were toys and from cotton boiled on a wire frame: so made the figures of children, angels, clowns, sailors.
However, it is impossible to present a New Year tree without glass toys and in particular without balls.
- Listen to the poem:
Lush tree decorated with himself
Blue big painted ball.
Near the branch brightened by beauty
Also painted ball gold.
Both shined the drawings important:
Christmas trees sparkled on the ball each.
(Tatyana Lilo)
2. Show
- Today we will draw Christmas balls with you. Only what we will draw, because we have no brushes and pencils?
- Now we will turn into wizards ... We will draw in an unusual way - balloons. We will not just draw, we will apply on a sheet of paperprint with a balloon.
-Ber the ball for the tip, and dipped it half into a plate with paint. We put a ball on a sheet of paper perpendicularly, holding it for the tip. Tilt the ball up and slightly pressing to the paper, then remove. In the future, apply it in any direction, painted side, rotating around its axis.
In the process of drawing, you can change or add color, parts (fir branches, threads to balls, background, etc.) Dorisy the brush.
- Now, dismiss your fingers.
3. Fallen gymnastics
"We went to the courtyard to walk."
Once, two, three, four, five, (thumb trim).
My snow blindly blind. (Children "pose").
Round, strong, very smooth (shown the circle, squeeze palms, stroke one palm to another).
And it is not very sweet. (Fresh finger).
Once - throw, ("throw up").
Two - catch, ("catch").
Three - drops ("drop").
And ... Break.
(Joint activity of children and parents. Children draw music ("New Year! Christmas tree, balls, clappers", performer Lera)).
The educator conducts individual work, helps as needed
4. Analysis of work.
- Admire what beautiful and unusual balls from us turned out!
- How did we paint them?
- What do you think that we got Christmas toys?
- What did you like to draw most?
- Guys, what are you all well done! What are your wonderful christmas toys!
5. Outcome classes.
- That ended our occupation. Have you been interested?
- What do you remember?
- Thank you guys that you were faithful to me and smart assistants!


Draw ball balls
(non-traditional drawing techniques)
Balloons,
Obedient breeze!
The wind is renewed.
Let them fly away and want!
The acquisition of children to artistic work can be made fascinating if it is used to use non-simple brushes or pencils, but any material suitable for paint . Unusual materials and original techniques attract children by the fact that the word "impossible" is not present here, you can draw than you want and how you want and even you can come up with your unusual technique.
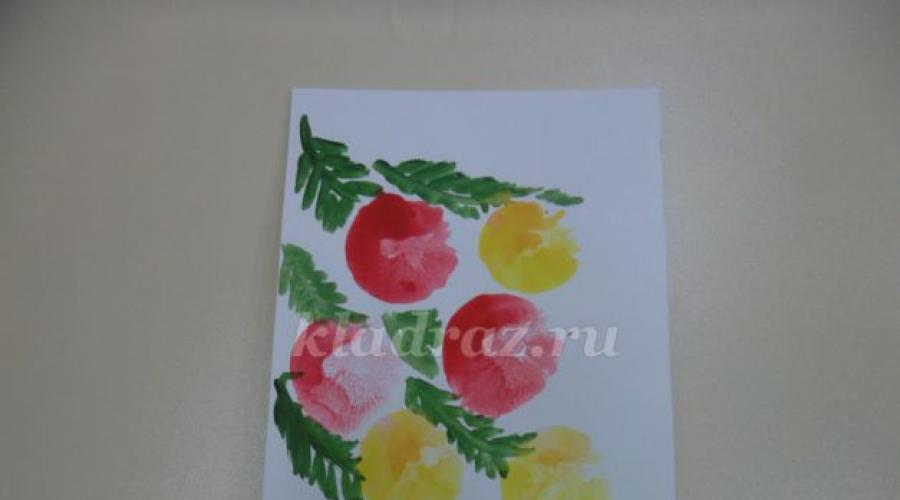
On the eve of the feast of the mother's day, we decided to draw flowers with balloons. Everything is very simple and, at the same time, very curious and interesting for children.
Inflation the usual air ball before the size of the desired print. For each color you can use different balls. Pre-prepare paint, it can be either gouache or finger paints. It is more convenient to pour out paint on a disposable plate. Then we put the ball on paper perpendicularly and with a different force pressed on it from above - it turns out the fold of the round shape.
Then Makazy the ball in the paint and make a print on a sheet of paper, then one more, we do as much prints as much as we want a bouquet of flowers. In the process of drawing, you can change or add colors of paint. To complete the composition, we draw the stems, leaf with cotton wand, using the reception of the pointelism.
Download:
Preview:
To use the preview, create a Google account and log in to it: https://accounts.google.com
On the topic: Methodical development, presentations and abstracts
"Unusual air balloon journey" Musculital activities in 2 youngest group together with parents.
Most parents are ready to actively participate in the physical development of their children. Equally organized joint engines of parents and children, contributes to the most ef ...
Node "ball balls for clown"
Abstract of the inactive area "Artistic creativity" "Balls for clown" using ICT 1 - younger group ...
Instruction
First of all, try to portray a flat circle - the basis of the ball. In the piece of the sheet you need, spend a straight line and tick the point in its center. After this point, spend the same line perpendicular to the first line. Let the lines be barely noticeable. You can use a ruler to define the center, but better learn to enjoy the eye meter - if you intend to practice painting, it will be useful for you more than once.
Draw a circle by connecting 4 extreme points of intersecting lines. Do not be discouraged if there is no smooth circle from the first time - just try to draw it until it turns out. If necessary, erase the extra lines when the circle is ready.

The next stage is the creation of volume. This is achieved by apparing the shadows. For example, light falls on the left and above. Denote the most illuminated part of the ball. And tickly mark the shadow width.

Now spend the diameter of the ball through its center, perpendicular to the direction of the incident light. On the database of the segment of diameter, draw an ellipse. Its purpose is to designate the boundaries of light and shadow.

Conditionally, the ball is divided into several parts depending on the degree of illumination. One part is highlighted, the other is weak, the third is darker, the fourth is in the shade. Mark these areas of different illumination, first mentally. For clarity, you can put any physical item in the shape of a ball before our eyes. The most illuminated place reflecting the light is called a glare. You can just remember him or designate on paper.

Around the glare will be a light spot, around it - a half (gradual transition from light to the shadow), as well as the most shadow area. Draw a shadow with arcuate strokes.
Now go to the hatching. If you draw a pencil, just leave the flare area untouched. Make a light area with light gray, the hatching should become darker in the shade direction. Use arcuate strokes parallel to the ball contour, and then diverged radially from the glare to the shade. Mark the reflex lighter compared to the incident shadow (reflex is a reflection from the surface on which the ball is located).

Draw a housing shadow (discarded ball on the surface). The farther from the ball, the shadow is lighter. In daytime lighting, it is less clear, with artificial - clearer.

If necessary, pictures the subject plane and background.

note
Do not use the eraser too often, so as not to damage the paper. Choose a high-quality soft eraser.
Helpful advice
If you have not painted before, first practice in hatching and learn how to keep the pencil correctly.
Training drawing begins with basic geometric shapes. To sort out the principles of building any subject, you will need to mentally decompose it on already familiar forms - a cone, cube, cylinder, ball. We will figure it out how to draw the latter.

You will need
- Paper, pencils 2T, T, TM, 2M, 4M
Instruction
Determine the position of the figure on. Do not stand the object right in the center, leaving a lot of space around. After all, it is necessary to reserve the place also for the falling shade from the ball, the front and rear plane boundaries. At the same time, do not let the ball "stick" to the edge of the sheet.
To build, use the 2T hardness (do not overdo it with pressure - the auxiliary lines will have to wash). Watch the horizontal and vertical axis, at equal distances from the center, mark the edges of the circle. With the help of a pencil (using it as a ruler, the Eyemer trains) measure this distance on the axes and set aside the same between the axes. Connect the outlined points into the circle.
Take any object of a spherical shape - orange, tangle of threads, ball tennis ball (better not very dark color and matte surface). Use it to understand how the light falls on the ball and is distributed over its surface.
Video on the topic
Helpful advice
The contours of the object and the falling shadow should not be brighter than hatching.
Sources:
- Learning to draw vegetables as a phased pencil to draw
The ball is one of the main geometric shapes, which the artist should own. Without a bowl, you do not draw an apple or a flower, no sun. To learn to reproduce the beauty of the visible world on paper, patience is required and the work that the skill is mined. Drawing and painting is one of the few arts where you can start with Azov at any age. Who knows, perhaps you own a uncooked gift.

You will need
- - Pencil,
- - Paper.
Instruction
Squeeze equal distances from the center to the right, left, up and down, and mark them on the cross lines. Connecting the obtained points, draw a circle. You can add a couple more auxiliary lines intersecting in the center to make marking more often.
Draw an ellipse: draw two direct corner-intersecting for marking. Put the two points on the right and left from the center, at an equal distance from it. On the vertical direct, put two points at the top and below at a distance of twice as much as horizontally.
Draw a bowl: first draw markings for the circle and circle, then divide the vertical line from the center up three points to four equal segments, just divide the vertical line from the center down. Through the third point from the center up, spend a straight, parallel central horizontal, spend the same line through the third point from the center down.
Draw an ellipse based on the central horizontal, while the upper and lower boundaries of the ellipse pass through the first points from the center of the vertical direct. Then draw ellipses based on the upper and lower verticals, while the lower borders of the ellipses pass in the middle between points 2 and 3 by vertical, the upper bounds are in the middle between points 3 and the upper points of the circle.
Watch how the ball reflects the light where the most illuminated place is located, and where is the most dark. We put the light falls on the ball on top, then the most illuminated place will be in the upper third of the ball, the dark is exactly in the middle, in the lower third - less dark place, weakly lit by reflected light. Mark the area of \u200b\u200bdifferent lighting on the resulting circle, using applied ellipses as marking. Strike circle on the markup.
Video on the topic
Sources:
- Draw a ball
The principle of creating a volume on a ball image differs from the methods that are suitable for drawing other geometric shapes. In this case, there is only one tool to create an illusion of volume - this is a color. By changing its shades and saturation, you can make a flat circle almost tangible item.

Instruction
As a sample, take any round item with a smooth surface. It is desirable that it be one-color - so it will be easier for you to figure out the distribution of light on the surface. Put it on the table and install the light source to the left above.
Take a sheet of paper A3. Place it horizontally. Easy pencil contour. Note the outline of the ball to determine the most successful location on the sheet. When searching for the best composition, take into account that in addition to the object itself, its shadow should fit on the sheet. Between the contours of the pattern and paper borders, reserve 2-3 centimeters of unfilled space.
To draw a circle without using a circulation, first draw the square. Enter the circle into it. Through the center, spend several rays and check with a pencil if their length is the same. To make sure that the circle turned out to be smooth, turn the sheet on the side and upside down, move away from the picture a few steps back - so errors will be more noticeable.
Erase all auxiliary lines. Lasting-klyachka Loosen the saturation of the pencil line. Color the ball with watercolor. To do this, you will need only one color - you can take black or sepia.
Determine the brightest area on the surface of the ball. It is located closest to the light source, that is, on the left upper part. Remember the location of the round flare and do not paint it.
Mentally divide
Let's find out how to draw balls with a pencil stepmate. This lesson is very light, and you will definitely work out, even if before that you never painted with pencils or paints. Prepare drawing materials and can be processed.
Before drawing any item, still life or portrait, it is recommended to place a sheet. You must imagine the size of the subject, its proportion and fit all this on the sheet. I place the sheet in this way before drawing the balls.
I start drawing balls from the bottom of the ligament. Draw three - one in the middle and two on the sides.

Take five more balls in the upper part of the figure so that they are all inscribed in it. The main lines first can be drawn very light strokes, and then bother already with confident lines, so your drawing will look neat and beautiful.

Now you need to draw strips from the balls, we painted eight balls, so there will be eight threads too.

Add a beautiful bow down at the bottom to our drawn balls looked at all festive.

Let's describe the balls that we painted. Choose the brightest colors, then it all looks very cool.

Here is a drawing in the end we succeeded. If you liked to draw balls in a phased pencil with me, I recommend trying other lessons.