Methodical development of a plan-outline of a lesson iso. Homework
Artists always try to convey the character and mood of animals.
This is an elk. What is he like?
Huge, majestic.
How did the artist show this?
- He has a proud posture, and he holds his head straight, despite the fact that it has huge heavy horns.
But the same artist depicted an elephant. And what is his character?
- restless, awkward, hasty
How did the artist show this?
-The elephant quickly rearranges its thick legs and stretched out its neck, and rolled its trunk into a ring so that it did not interfere with running.
Look at how Walter Foster portrayed the monkeys - some monkeys are gloomy, or sad. others are cheerful and cheerful, some are openly fooling around and "making fun" of people. Never look directly at monkeys, otherwise they may regard this as aggression.
How did the artist show this? How can you understand from the artist's image that the monkey is sad?
- sad look, arms folded, stoop
So how do artists show the character of the animal in their work?
- characteristic movements, habits
The character of the beast is expressed through the movement and shape of the body - impetuous and flexible or bulky and awkward, graceful or powerful; through the size of body parts - a large head, long legs or short legs, arched back, large or small eyes; through expressive details - shaggy or smooth wool, through the shape of ears, claws, mustache, glitter of eyes. The artist does not just copy, but emotionally enhances what expresses the character, makes visible what he understood and felt. That is why the artist is attentive to his feelings.
Mystery:
This beast lives only at home.
Everyone is familiar with these beasts.
He has a mustache like knitting needles.
He, purring, sings a song.
Only the mouse is afraid of him ...
Have you guessed? This is a cat)
Let's see postcards with images of cats. Let's admire these cute creatures!
Determine what exactly we will draw (theme and goals).
Today the topic of our lesson is "The depiction of the character of a cat in a portrait."
We have now seen a wide variety of cats. How do they differ from each other? (Children answer)
That's right, they are all different in color and character. One is playful, the other is calm. Cats, like humans, can be funny or sad, cunning or very kind and caring.
All artists paint cats differently. But you can see with what love, tenderness they portray these fluffy pets.
You will also have them all different. But before we get down to doing the work, let's get acquainted with the basics of building the correct drawing. Please tell me, what is the shape of the head? That's right, round. To draw the face correctly, you need to draw a circle in half horizontally and vertically. Place the image in the center of the sheet. The image shouldn't be small, but it shouldn't be huge, we should have the cat's ears. We draw on paper barely noticeable contours with a pencil, the lines should be thin enough so that you can easily erase the failed places in the drawing with an eraser. Do not forget that an indent from the edge of the sheet is required from the bottom, and from the top, to the left, and to the right.
Draw the eyes on the middle line. The cat's eyes are large and beautiful. We divide the eyes in half with a barely noticeable line and raise these straight lines to the top of the head. Ears begin to grow from these points. The ears are not too sharp, but not too round either. From the top of the ears, we lower the rounded line almost to the horizontal line that divides the round head in half. Place the nose on a vertical line. Don't make it too short, Pay attention to where the muzzle ends, where the chin begins. The cat also has lips. Do not forget that without cilia, eyebrows and antennae, a cat's face does not look expressive. Do not paint the antennae with a bush that grows from one point. Pay attention to how the antennae grow and in what place. Well done, everyone did a great job with the proportions.
Then you can start shading using both pencils and crayons. Apply shading free movements and always make sure that the lines follow the direction of the fur growth. Do not forget that cats also have black pupils, but they are more elongated, and the color of the eyes is also different for all cats.
Bibliographic description:
I.A. Nesterova Outline of a lesson in fine arts [Electronic resource] // Educational encyclopedia site
The Fine Art Lesson Outline is a plan for the teaching process, broken down by structural elements. The outline plan involves setting tasks based on the curriculum and taking into account the complexity of the lesson, and also contains the lesson program, the approximate composition of the students, necessary equipment and the terms of the lesson.
Since the outline of the lesson is drawn up by each teacher of fine arts, taking into account their own experience, it is a reflection of the teacher's creative approach. Fine art lesson outline is a structural model created to help students develop creative mastery of fine arts techniques. School course Fine art contains a fairly large amount of drawing techniques and methods, so the teacher needs to structure it in the form of separate lessons.
The outline of the art lesson consists of the main sections that are typical for all outline plans. As usual, the lesson plan contains lesson objectives, equipment, detailed lesson flow, etc. An extended outline plan may also include detailed description what students should do during the lesson. Often, the visual arts lesson plan does not include homework, as this is usually the task of completing the drawing started in the lesson.
Fine arts lesson outline it is characterized by a strict structure in relation to the main elements. Otherwise, it all depends on the teaching methods of a particular teacher and his approach to students. However, a thesis model of construction is not allowed, since it is absent in fine arts lessons.
The general form of the abstract on fine arts should be convenient for the teacher, but it must contain all the main elements. At the same time, it is recommended to add general recommendations regarding the methods of teaching fine arts. From can be taken out of bounds traditional elements outline plan, which, however, should have a well-thought-out structure for presenting the material.
An example of an outline of an art lesson
The topic of the art lesson: "I love Russia, for the golden autumn. Drawing on a given theme."
Lesson objectives:
To draw the attention of children to the features of the signs of autumn in nature, to the beauty of the forms and colors of plants;
To develop in children the ability to write with a brush, using different techniques: wide and smooth strokes and lines, the end of the brush, wetting the brush to paper and small strokes;
To instill the skills of the spatial arrangement of the drawing in place;
Learn to fill the entire drawing with color.
Equipment for the art lesson:
For the teacher:
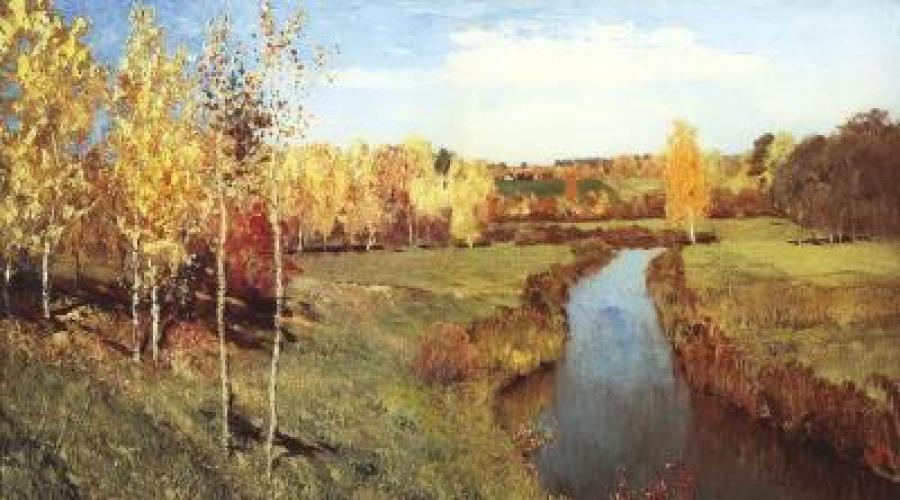
Reproduction of I. Levitan's painting "Golden Autumn":

Illustrations by the artist A. Belyukin on the verses of A. Pushkin in the book "Already the sky was breathing in autumn":

Record "October" from P. Tchaikovsky's children's album "The Four Seasons"
A large sheet of paper and everything you need to demonstrate the sequence of work with paints.
For students:
White and colored paper (blue, light gray, yellowish or pale green);
Brushes and everything you need to get the job done with paints.
The lesson is preceded by the students' observation of the trees in the school garden.
The course of the art lesson.
1. Organizational moment
2. Communication of the topic of the lesson.
After checking the readiness of the class for the lesson, the students
The teacher says that in the lesson they will draw autumn trees... But first, they need to remember their observations of nature, trees in the school garden while walking.
3. Conversation.
4. Questions from the teacher:
a) What time of the year?
b) What changes have occurred in the life of plants in the fall?
c) How do trees differ from each other?
Students' responses are summarized:
Autumn has come and the nature around us has changed. Trees, bushes and grasses are in autumn dress.
The foliage on the trees in autumn is very varied in color. It has greens, reds, yellows and other shades. The leaves on the trees are getting smaller. They fall, whirl in the wind, fall like a carpet on the ground.
We observe trees of various species. They differ from each other in shape, color of trunks and leaves. Their branches are also not located the same. But all trees have thicker trunks at the bottom and thinner towards the top, branches are located around the trunk, leaves are located on large branches and small branches. We see the base of the front trees lower than the bases of the distant ones, the bases of the trees are located on the ground, and the sky is visible behind the trees.
Working with illustrative material.
Then the attention of children is drawn to the reproduction of the painting by I. Levitan "Golden Autumn".
Do you like this picture?
Explain why?
Why do you think the artist named his painting that way?
Examining the picture, students pay attention to the beauty of nature depicted by the artist, to the brightness and variety of autumn colors, with which this beauty is reflected.
What are the trees that you see in the picture?
Indicate which trees are on foreground and explain how they are depicted in the picture.
Why do we immediately see which trees are closer to us, which ones are farther away?
The attention of children is drawn to the same features when viewing the illustrations by the artist A. Belyukin to the poems of A. Pushkin:
It's a sad time! Charm of the eyes!
Your farewell beauty is pleasant to me;
I love the lush wilting of nature
In crimson and gold, dressed fields ...
And also on how the poet and artist convey their feelings and attitudes towards nature in the fall.
Then the students recall their observations in school garden again and try to convey them in drawing with a brush and paints.
Students complete a drawing in the entire sheet, laying it horizontally.
5. Showing and explaining the teacher.
The teacher proposes to designate the earth twice as narrow as the sky. Then he shows how to choose the color of the sky on the palette and from top to bottom (from left to right) to a horizontal line apply this paint on paper, how to draw clouds. For those children who work on colored paper, the color of the sky will replace its color.
The teacher then shows you how to use color to represent the earth. To do this, take brown, yellow or green paint.
After the background dries up, the children paint the trees (immediately with a brush, without first drawing with a pencil.)
The teacher explains how to write with a brush so that it is clear which trees they are and that some of them are closer, others are farther away.
First, we outline the tree trunks with light lines. We do this in quick movements from the bottom up, not forgetting that the trunks are wider at the bottom, and narrower at the top.
Then we draw the branches. We arrange them not symmetrically, as small children usually draw, around the trunks, so that some branches obstruct others, as is observed in nature.
We paint the color of the trunks with wide brush strokes.
Then, with light smooth lines, outline the branches, twigs and foliage on the trees. In this case, we use one more work - the method of attaching a brush to paper.
Finally, we clarify the details. We paint the detail with the tip of the brush. For work we use different paints, both in pure form and mixed with each other.
After the explanation, all illustrative material is removed so that it does not interfere with the use of their personal impressions by children.
6. Physical education
The wind blows in our face
The little tree swayed
The breeze is quieter, quieter,
The tree is getting higher, higher.
7. Independent work of students.
Students begin independent work
During the work, the recording of the play "October" from P. Tchaikovsky's album "The Four Seasons" is switched on. Children perform their drawings to the sounds of quiet music.
8. Exhibition of drawings.
An exhibition of works and their analysis is held.
9. Lesson summary. What did you learn in the lesson?
What did you like the most in the art lesson?
What will you tell us about at home?
Lesson plans for fine arts
|
Lesson topic |
||
|
Secrets of paints. |
to acquaint with the types of activities in the lessons of fine arts |
|
|
Draw vegetables and fruits |
teach to draw vegetables and fruits from nature |
|
|
How to draw the leaves of vegetables and fruits |
teach to draw leaves |
|
|
Types and genres of fine art |
to acquaint with the types and genres of fine art |
|
|
Making an ornament from plant leaves |
familiarize with types of ornaments |
|
|
We get acquainted with the paintings of artists depicting autumn fruits. |
to acquaint with the paintings of artists depicting autumn fruits. |
|
|
We paint the dishes with a floral pattern |
to acquaint with one of the artistic crafts - "Zhostovsky" |
|
|
Design. Patchwork rug |
to expand the understanding of artistic folk crafts |
|
|
Generalization. Bouquet of flowers |
to acquaint with the art of drawing up bouquets and to acquaint with illustrations with the image of flowers |
|
|
We draw a still life. Paths of the image of a jug and an apple |
teach to depict the simplest still life |
|
|
Acquaintance with folk art |
to acquaint with the types of painting on wood (Gorodets, Palekhov, Khokhloma) |
|
|
Image of a person |
to acquaint with the genre of the portrait, its varieties, with the work of individual portrait painters |
|
|
Let's depict winter sport games |
to acquaint children with methods of mixing paints to obtain a variety of shades |
|
|
Let's depict winter trees |
familiarize with wax technique |
|
|
Sculptures of animals. Leopard. |
to acquaint with sculpture, expand ideas about the work of a sculptor, methods of fastening parts, develop the ability to catch and transfer proportions |
|
|
Making a pattern on the surface of dishes |
determine the dependence of the shape and decor on the purpose of the dishes |
|
|
Drawing up samples of blankets from colorful paper |
broaden the horizons of artistic folk crafts |
|
|
Let's depict sports equipment |
broaden your horizons about a variety of sports |
|
|
Draw fairytale heroes |
to acquaint with the work of animal artists |
|
|
Still life |
to acquaint with the design, through drawing, linear construction, chiaroscuro, perspective elements, |
|
|
We draw signs, symbols of the national calendar |
to acquaint with the methods of drawing from general to details and combining details |
|
|
Sunny spring |
to acquaint with the genre of painting - landscape, its varieties, the laws of composition, tell about the work of Repin |
|
|
Draw a tree branch with blossoming buds and leaves |
familiarize with the design, through drawing, linear construction |
|
|
Draw sketches of costumes for astronauts |
||
|
I am the defender of the Fatherland |
||
|
Let's compose and depict a Baskur ornament |
||
Plan - outline of the art lesson
Date _______________ Topic: Secrets of paints.
Objectives :: 1. Educational: to acquaint with the types of activities in the lessons of fine arts, the formation of moral
military-aesthetic responsiveness to the beautiful in life and art, hu-
artistic and creative activity, artistic knowledge, skills and
skills, to familiarize children with the methods of mixing paints to obtain
various shades.
2. Developing: develop observation, attention, outlook, creative activity.
3. Upbringing: upbringing. aesthetic taste.
Lesson equipment: for the teacher - tables, children's drawings from the methodological fund, for students - albums, pencils, brushes, watercolors, an eraser, a palette, a cloth for wiping brushes.
During the classes
1. Organization of the lesson.
To start the lesson faster,
Everyone needs to stand more evenly.
B) Safety rules at art lessons.
2. Introductory conversation.
Guys, let's take a closer look at the secrets of paints in more depth. Pay attention to the world around you. How wonderful everything around! Delicate flowers, green trees, blue sky, snow-white clouds. Even the colors of the cars on the streets are different. The basis of all this wealth of colors is united by three primary colors: red, blue and yellow. By combining these three colors, we get the rest of the colors. For example, if you mix red and yellow, you get a dark red color, if you combine blue and red - purple, the combination of yellow and blue gives us green.
Various stripes of colors can be seen near the rainbow. Three of them are the primary colors, and the other four colors came from the combination of these paints.
What tools are needed for drawing. What is the purpose of the palette?
How do you understand the phrase "cold" colors?
How do you understand the phrase "warm" colors?
3. Goals and objectives of the lesson.
In fact, there are many shades of the same color. In today's lesson, we will learn how to mix paints to get a varied palette.
3. Work on the assignment.
Look, look - threads stretched from the sky!
What thin thread wants to sew the earth with the sky? (Rain.)
Autumn has come. The wind drove the clouds, it started to rain. But a gloomy autumn day is brightened up with multi-colored umbrellas - red, yellow, blue. Let's draw the umbrellas using 3 basic colors.
4. Didactic game "Exam from the artist Tube".
5. Lesson summary.
6. Homework.
Learn to mix colors.
Plan - outline of the art lesson
Date _______________ Topic: We draw vegetables and fruits (2 hours).
Objectives: 1. Educational: to acquaint with the types of activities in the lessons of fine arts, to teach to draw
vegetables and fruits, the formation of moral and aesthetic responsiveness
to the beautiful in life and art, artistic and creative active
sti, artistic knowledge, skills and abilities, to acquaint with the concept
chiaroscuro.
During the classes
1. Organization of the lesson.
To start the lesson faster,
Everyone needs to stand more evenly.
A) Checking the readiness for the lesson.
B) Safety rules at art lessons.
2. Introductory conversation. Riddles.
Golden head
Great, heavy.
Golden head
I lay down to rest.
The head is great
Only the neck is thin. (Pumpkin.)
It goes off the cam,
Red barrel,
You touch it - smoothly
And take a bite - it's sweet! (Apple.)
In the summer in the garden, fresh, green,
And in winter, in a barrel, they are yellow, salty.
Guess, well done,
What are our names? (Cucumbers.)
Many robes are worn
On a yellow doll
The sultan is black on his head,
The whole body is made of grains. (Corn.)
The lady sat down in the garden,
Dressed in the finest silks.
We prepare tubs for her
And half a bag of coarse salt. (Cabbage.)
Balls hang on the knots
Turned blue from the heat. (Plum.)
Small stove
With red coals. (Garnet.)
3. Goals and objectives of the lesson.
Vegetables of various shapes and colors convey to us the bright, rich colors of this season. Let's, looking at these vegetables, draw them.
4. Work on the assignment.
B) Students' independent work.
1 lesson
- 2nd lesson.
4. Didactic game "Guess vegetables or fruits by description".
5. Lesson summary.
Cleaning of workplaces.
6. Homework.
Plan - outline of the art lesson
Date _______________ Topic: Draw the leaves of vegetables and fruits.
skills, to familiarize children with the ways of depicting leaves.
2. Developing: develop observation, attention, outlook, creative activity.
3. Upbringing: upbringing. aesthetic taste.
Lesson equipment: for the teacher - tables, children's drawings from the methodological fund, for students - albums, pencils, brushes, watercolors, an eraser, a palette, a cloth for wiping brushes.
During the classes
1. Organization of the lesson.
To start the lesson faster,
Everyone needs to stand more evenly.
A) Checking the readiness for the lesson.
B) Safety rules at art lessons.
2. Introductory conversation. Riddles.
Autumn pleases us with a rich harvest of vegetables.
Grass above the ground
And under the ground is a scarlet head. (Beet.)
In the summer I'm glad I'm fresh
Bear berry,
And dried in stock
Heals us for colds. (Raspberries.)
Under every bush
Sits in a ball
And will come out into the light
It is not tastier. (Potato.)
Yellow chicken
Under the tynom sulking. Pumpkin.)
Our pigs
Grew up in the garden
Sideways to the sun
Crochet ponytails. (Cucumbers.)
Has dried up in the hot sun
And breaks out of the pods. (Peas.)
Green, striped,
And in the heart is smooth. (Watermelon.)
If you carefully examine the leaves of garden plants, you can see that they differ from each other in structure, shape and color. So, for example, pumpkin leaves are large, dark Green colour... The leaves of the cucumbers are smaller, green. The leaves of the grapes are complex in structure, mostly green, in some places alternating between yellow and burgundy colors. Grapes belong to fruit and berry crops. Different in taste and color, it has equally curly stems and carved leaves. The grape leaf pattern is often used as an ornament.
3. Goals and objectives of the lesson.
Now, looking at the vine, make up different patterns.
4. Work on the assignment.
A) Detailed analysis of the work to be done (shape, color, characteristics).
Sequence of work: 1) think over the plot;
2) define a bounding box;
3) make a sketch in pencil;
4) make a sketch in color (in the second lesson after the conversation on mixing colors for display colors).
4. Didactic game "Guess the plant".
The teacher offers the class a herbarium. Children guess the plant.
5. Lesson summary.
6. Homework.
Plan - outline of the art lesson
Date _______________ Topic: Types and genres of fine art.
Objectives :: 1. Educational: to acquaint with the types and genres of fine art, the formation of moral
military-aesthetic responsiveness to the beautiful in life and art, hu-
artistic and creative activity, artistic knowledge, skills and
2. Developing: develop observation, attention, outlook, creative activity.
3. Upbringing: upbringing. aesthetic taste.
Lesson equipment: for the teacher - tables, children's drawings from the methodological fund, for students - albums, pencils, brushes, watercolors, an eraser, a palette, a cloth for wiping brushes.
During the classes
1. Organization of the lesson.
To start the lesson faster,
Everyone needs to stand more evenly.
A) Checking the readiness for the lesson.
B) Safety rules at art lessons.
2. Introductory conversation.
You received information about the types of IZI in grades 1-2. What types of fine art do you know?
Types of fine art: painting, graphics, sculpture, etc.
What is a genre? The word "genre" exists in all types of art, but is especially common in types of fine art. For example, there are several genres in only one art form - painting. Among them: portrait, landscape, still life, household and military genres. Therefore, the paintings of artists differ from each other in genres.
Portrait Is a genre that includes images of a person or a group of people in painting, sculpture, graphics or photography. Through a portrait, the artist tries to show the character, the inner world of a person.
Landscape Is a genre that includes images of a location. Through landscapes painted by artists, we can admire the wonderful moments and features of nature.
Still life Is a genre that includes images of objects around us, vegetables, fruits, flowers, etc. Through the still lifes of artists, we can see the beauty, colors, features and compatibility of various objects.
Household genre Is a genre that includes images of a person's daily life. Through works everyday genre you can get acquainted with the daily life of different peoples.
3. Goals and objectives of the lesson.
Today we have to understand the existing genres of fine art and learn how to determine which genre this or that reproduction belongs to.
4. Work on the assignment.
View slides. Definition of genres of fine art.
5. Didactic game "Guess the picture".
The teacher offers a classroom presentation. Children name the painting and the author.
6. Lesson summary.
Explain how you understand the word "genre" of fine art.
What genres of painting art do you now know?
7. Homework.
Compose a story based on a picture.
Plan - outline of the art lesson
Date _______________ Topic: We compose an ornament from plant leaves.
Objectives :: 1. Educational: to acquaint with the types of ornaments, the formation of moral
military-aesthetic responsiveness to the beautiful in life and art, hu-
artistic and creative activity, artistic knowledge, skills and
skills, teach to depict an ornament in a strip.
2. Developing: develop observation, attention, outlook, creative activity.
3. Upbringing: upbringing. aesthetic taste.
Lesson equipment: for the teacher - tables, children's drawings from the methodological fund, for students - albums, pencils, brushes, watercolors, an eraser, a palette, a cloth for wiping brushes.
During the classes
1. Organization of the lesson.
To start the lesson faster,
Everyone needs to stand more evenly.
A) Checking the readiness for the lesson.
B) Safety rules at art lessons.
2. Introductory conversation.
Various types of ornaments are used to decorate objects, clothing, and household dishes. An ornament is a pattern based on the repetition and alternation of its constituent elements. Ornaments are geometric, plant, animal (zoomorphic), anthropomorphic (with the processing of the human figure), symbolic, combined. By the nature of the composition, the following types of ornament can be distinguished: ribbon, ornament in a circle, in a square or rectangular shape, mesh (common for fabric). All ornaments can be classified into three main groups: closed, ribbon or mesh.
Subject, symbolic images and ornaments with their rhythms, symmetry, contrasts increase the emotional expressiveness of things, the beauty of their forms, the unity of their appearance and content, the aesthetic and artistic value of the object.
So, the ornament can make up patterns, geometric figures(triangle, quadrilateral, circle), as well as figures based on plants and animals. Among them, the most common is the floral ornament. You can draw floral patterns within a strip, square, rectangle, or circle. With the right arrangement of their elements, beautiful ornaments can be obtained. (Demonstration of ornaments inside a circle, strip, square.)
3. Goals and objectives of the lesson.
In the previous lessons, you learned how to draw plant leaves. Along with this, we got acquainted with the structure, type and color of leaves of various plants. Various patterns can be made from them. Now let's try to draw a pattern by combining grapes and its leaves. Draw the patterns inside the strip.
4. Work on the assignment.
A) Detailed analysis of the work to be done (shape, color, characteristic features).
B) Students' independent work.
Sequence of work: 1) think over the plot;
2) define a bounding box;
3) make a sketch in pencil;
4) make a sketch in color (in the second lesson after the conversation on mixing colors to display colors).
5. Didactic game "Guess vegetables or fruits by description".
The teacher offers the class an illustration. Children describe characteristic signs, and one student (who has not seen the picture) guesses.
6. Lesson summary.
What kinds of patterns do you know? How is the floral ornament made?
Review and analysis of completed work.
7. Homework.
Plan - outline of the art lesson
Date _______________ Topic: Getting to know the paintings of artists depicting
autumn fruits.
Objectives :: 1. Educational: to acquaint with the creativity of artists, the formation of moral
military-aesthetic responsiveness to the beautiful in life and art, hu-
artistic and creative activity, artistic knowledge, skills and
2. Developing: develop observation, attention, outlook, creative activity.
3. Upbringing: upbringing. aesthetic taste.
Lesson equipment: for the teacher - tables, children's drawings from the methodological fund, for students - albums, pencils, brushes, watercolors, an eraser, a palette, a cloth for wiping brushes.
During the classes
1. Organization of the lesson.
To start the lesson faster,
Everyone needs to stand more evenly.
A) Checking the readiness for the lesson.
B) Safety rules at art lessons.
2. Introductory conversation.
The image of the beauty of the nature around us, the seasons is one of the eternal themes for artists. Some artists devote all their paintings only to the depiction of nature. You know they are called landscape painters. At the same time, in the paintings of many artists you can see the gifts of nature, especially autumn fruits and vegetables.
3. Goals and objectives of the lesson.
Let's get acquainted with the works of artists depicting autumn fruits.
Slide show.
4. Didactic game "Guess".
B) Guess the name of the fruit from the description.
C) Riddles.
5. Lesson summary.
What is the name of the artists depicting nature?
6. Homework.
Plan - outline of the art lesson
Date _______________ Topic: We paint the dishes with a floral pattern.
Objectives :: 1. Educational: to acquaint with one of the artistic crafts - "Zhostovo",
form the concept of an ornament and its elements, develop figurative
representations, skills of dividing into parts, to form artistic
creative activity, artistic knowledge, abilities and skills.
2. Developing: develop observation, attention, outlook, creative activity.
3. Upbringing: upbringing. aesthetic taste.
Lesson equipment: for the teacher - tables, children's drawings from the methodological fund, for students - albums, pencils, brushes, watercolors, an eraser, a palette, a cloth for wiping brushes.
During the classes
1. Organization of the lesson.
To start the lesson faster,
Everyone needs to stand more evenly.
A) Checking the readiness for the lesson.
B) Safety rules at art lessons.
2. Introductory conversation.
The artist plays a huge role in the creation of dishes: he designs and decorates the dishes, makes a prototype, and then at the factory they make a repetition of it - mass production. But there are dishes in one copy - the author's work.
The dependence of the shape and decor of the dishes is due to the purpose of the dishes: everyday, festive, children's or adult. Tableware decor can be hand-painted or decals. Dishes by their nature, according to their purpose, can be slender, powerful, airy, squat, etc. In addition to these types of dishes, folk arts and crafts still live, producing it for a long time from materials used by the people in the past - Khokhloma (wood), Zhostovo (iron), Skopin, Gzhel (clay).
Consider these trays. (Slides.) On them, flowers are sometimes collected in elastic bouquets, sometimes woven into an elegant wreath, or are scattered with branches on a black-lacquered surface.
Do you recognize the flowers on the Zhostovo trays? (lush roses, tulips, asters, dahlias. Peonies, poppies, bells, cornflowers, forget-me-nots, chamomile)
What is the color palette on the trays?
Consider which of them use a similar color scheme, and which differ in harmonious contrasting shades. What flowers are most often found in the background and colors? How does color help to see the beauty of large and small flowers and blades of grass?
3. Goals and objectives of the lesson.
Today we will also paint the tray with a floral pattern, like the masters of Zhostov.
4. Work on the assignment.
The master begins work in stages: 1) smears- application of silhouettes of flowers and leaves with bleached paint. They are already arranged in a compositional way, collected in bouquets; 2) shadow- the master puts shadows on the dried out inlay; 3) pad- dense corpus letter. The master specifies the shape and color of the leaves. The petals gain strength, become thin, graceful; 4) glare- completion of the pictorial form; 5) drawing and cleaning- the final stages of finishing.
A) Detailed analysis of the work to be done (shape, color, characteristic features).
B) Students' independent work.
5. Lesson summary.
Review and analysis of completed work. (The teacher notes the beautifully found color combinations.)
Analysis of common mistakes. Cleaning of workplaces.
6. Homework.
Learn to mix colors.
Plan - outline of the art lesson
Date _______________ Topic: Design. Patchwork rug.
Objectives :: 1. Educational: to expand the understanding of artistic folk crafts, for-
mating moral and aesthetic responsiveness to the beautiful in life
nor in art, artistic and creative activity, artistic
knowledge, abilities and skills.
3. Upbringing: upbringing. aesthetic taste.
Lesson equipment: for the teacher - tables, children's drawings from the methodological fund, for students - albums, pencils, brushes, watercolors, an eraser, a palette, a cloth for wiping brushes.
During the classes
1. Organization of the lesson.
To start the lesson faster,
Everyone needs to stand more evenly.
A) Checking the readiness for the lesson.
B) Safety rules at art lessons.
2. Introductory conversation.
For a long time, peasant labor on the land was replaced by holidays, then fun, then engaging in various crafts. The way of life of the farmer is closely related to the change of seasons. October is the wedding month. And it is also the beginning of girls' gatherings, the beginning of a craft.
Consider the works of craftswomen-needlewomen: blankets, panels, rugs made of variegated threads, scraps of fabric. And how skillfully these products are made! Patch to patch are so cleverly fitted, the threads are so skillfully selected in color that you will admire. Like paintings, these products convey the colors of the sky, sun, meadows, fields, flowers. Take a closer look at the patchwork colors.
Have you noticed that in some cases the center is light and in others it is dark?
Can these pieces of fabric be called picturesque? Why?
How can you get stepwise color stretching with watercolor, gouache?
3. Goals and objectives of the lesson.
Today we will also try to create our own patchwork rug.
4. Work on the assignment.
A) Performing training exercises (on paper in a cage).
A) Detailed analysis of the work to be done (shape, color, characteristic features). Elements of ornaments on rugs.
B) Students' independent work.
4. Didactic game "Vietnamese game".
Tangram.
5. Lesson summary.
Review and analysis of completed work. (The teacher notes the beautifully found color combinations.)
Analysis of common mistakes. Cleaning of workplaces.
6. Homework.
Plan - outline of the art lesson
Date _______________ Topic: Summary. Bouquet of flowers.
Objectives :: 1. Educational: to acquaint with the art of making bouquets and to acquaint with illustrations
tions with the image of flowers, to do joint work on the topic,
the formation of artistic and creative activity.
2. Developing: develop observation, attention, outlook, creative activity.
3. Upbringing: upbringing. Feelings of beauty and the ability to admire him.
Lesson equipment: for the teacher - tables, children's drawings from the methodological fund, for students - albums, pencils, brushes, watercolors, an eraser, a palette, a cloth for wiping brushes.
During the classes
1. Organization of the lesson.
To start the lesson faster,
Everyone needs to stand more evenly.
A) Checking the readiness for the lesson.
B) Safety rules at art lessons.
2. Introductory conversation.
Slideshow "Flowers".
There is a beautiful legend about lily of the valley. They tell about his appearance as follows: the burning tears of the Mother of God over the crucified Son fell to the ground, and white lilies of the valley grew in their place, on which then fruits, red like drops of Christ's blood, appeared. The French celebrate the holiday of lilies of the valley on the eve of the first Sunday in May. Lily of the valley has long been revered as a healing plant. Lily of the valley drops help with heart disease.
Bouquet arrangement - special art, which is taught specifically. But each person should be able to collect flowers in a bouquet so that the beauty of the flowers does not fade in him, but on the contrary - manifests itself.
Flowers for a bouquet are usually selected in such a way that they make up the harmony of color spots and the rhythm of forms. From this, the bouquet can be joyful, restrained solemn, tender lyrical.
3. Goals and objectives of the lesson.
Today our work will be collective. By depicting a flower, cutting it out along the contour. Each row will decorate its own vase.
4. Work on the assignment.
A) Detailed analysis of the work to be done (shape, color, characteristic features). What kind of flowers are there in shape and color? Each student draws his own flower.
B) Students' independent work. Color resolution.
Each student should think about matching his color to a given vase.
4. Didactic game "Flower connoisseur".
Name the flowers.
5. Lesson summary.
Review and analysis of completed work. (The teacher notes the beautifully found color combinations.)
Analysis of common mistakes. Cleaning of workplaces.
6. Homework.
Plan - outline of the art lesson
Date _______________ Topic: Drawing a still life. Paths of the image of a jug and an apple
Objectives :: 1. Educational: teach to depict the simplest still life, the formation of moral
military-aesthetic responsiveness to the beautiful in life and art, hu-
artistic and creative activity, artistic knowledge, skills and
various shades.
2. Developing: develop observation, attention, outlook, creative activity.
3. Upbringing: upbringing. aesthetic taste.
Lesson equipment: for the teacher - tables, children's drawings from the methodological fund, for students - albums, pencils, brushes, watercolors, an eraser, a palette, a cloth for wiping brushes.
During the classes
1. Organization of the lesson.
To start the lesson faster,
Everyone needs to stand more evenly.
A) Checking the readiness for the lesson.
B) Safety rules at art lessons.
2. Introductory conversation.
The ability to draw a still life in fine art is the initial stage of a competent drawing. Still life Are paintings depicting inanimate objects. Still life is a separate genre art of painting. What can you make up a still life? What unites objects in a still life?
The art of still life has a beautiful and long history. Throughout its centuries-old history, still life has been forming as an independent genre. Considering the works of masters of still lifes, an important pattern can be determined. All attributes that make up the production are united by content, theme.
3. Goals and objectives of the lesson.
Today we are going to draw a still life.
What subjects are included in a still life? Which object is closer to you, and which one is farther away? What is the tallest item? From which side is the still life illuminated? What is the lightest item? Is there a highlight on a light object?
3. Work on the assignment.
A) Showing the sequence of linear construction of a still life.
B) Students' independent work.
In the 1st lesson students should make a preparatory line drawing of a still life under watercolors. The drawing sequence is from general to detail. When constructing a symmetrical figure, the presence of a vertical centerline is required.
In the 2nd lesson pupils once again check their drawings, comparing them with nature and correcting the noticed mistakes. When re-viewing the slides, attention is drawn to how the artists managed by means of painting to convey in their works the distribution of light-tonal gradations on objects. -Determine the general (local) color of the jug, apple, drapery. Which object is darker in nature? ... lighter? From which side is the nature illuminated and from which side does the shadow fall from it?
4. Didactic game "Find a shard of a jug".
5. Lesson summary.
Review and analysis of completed work. (The teacher notes the beautifully found color combinations.)
Analysis of common mistakes. Cleaning of workplaces.
6. Homework.
Learn to mix colors.
Plan - outline of the art lesson
Date _______________ Topic: Acquaintance with folk applied art.
Objectives :: 1. Educational: to acquaint with the types of painting on wood (Gorodets, Palekhov, Khokhloma),
the formation of moral and aesthetic responsiveness to the beautiful in
life and art, artistic and creative activity, artistic
knowledge, abilities and skills.
2. Developing: develop observation, attention, outlook, creative activity.
3. Upbringing: upbringing. aesthetic taste.
Lesson equipment: for the teacher - tables, children's drawings from the methodological fund, for students - albums, pencils, brushes, watercolors, an eraser, a palette, a cloth for wiping brushes.
During the classes
1. Organization of the lesson.
To start the lesson faster,
Everyone needs to stand more evenly.
A) Checking the readiness for the lesson.
B) Safety rules at art lessons.
2. Introductory conversation.
The most common type in folk art is the art of working with wood. Since ancient times, craftsmen have carved the necessary utensils for home and everyday life using various types of wood: maple, birch, oak, walnut, cedar. Craftsmanship and art were demonstrated by craftsmen working with wood. When making wood products, craftsmen paid great attention to their painting.
Painting and decorating wooden utensils is one of the types of applied arts. At the same time, much attention is paid to the methods of making and decorating wooden dishes. On the dishes made of birch, the pattern was applied by burning, and the dishes made of maple and mahogany were decorated with carvings. Painting with a plant pattern has its own characteristics, depending on where it was produced: Khokhloma, Palekhov, Gorodets). The unique look of Gorodets painting is given by elastic branches and bouquets formed by decorative flowers. Bright, large flowers surrounded by luscious green leaves give a joyful, life-affirming sound to the Russian color ornament. Special expressiveness color shades of Gorodets painting is created due to the fact that it uses special welcome applying white strokes in the form of strokes, dots. White strokes are applied to the color image of bouquets, flowers, less often leaves. How flowers and leaves alternate in Gorodets painting. What color are the flowers?
3. Goals and objectives of the lesson.
To depict a fragment of the Gorodets painting.
3. Work on the assignment.
A) Detailed analysis of the work to be done (shape, color, characteristic features).
Elements present: big flower rose tree (in the middle), buds and leaves at the edges. The drawing method resembles the technique of Zhostovo trays. Initially, a spot is drawn, and then details are drawn. Leaves are drawn by applying (wetting) a brush. The leaves can be fanned out, 3 leaves each to the left and right of the bud. The buds and leaves are decorated with dots-beads. The painting ends with the application of white petal strokes. Work is carried out gradually, after the first layer has dried, the second is applied, etc.
B) Students' independent work.
4. Didactic game "Learn the picture".
5. Lesson summary.
Review and analysis of completed work. (The teacher notes the beautifully found color combinations.)
Analysis of common mistakes. Cleaning of workplaces.
6. Homework.
Learn to mix colors.
Plan - outline of the art lesson
Date _______________ Subject: Image of a person.
Objectives :: 1. Educational: to acquaint with the genre of the portrait, its varieties, with the work of
efficient portrait painters, show the reflection of proportions and
facial expressions in the portrait, Tell about the ceremonial portrait as a kind of
genre.
2. Developing: develop observation, attention, outlook, creative activity.
3. Upbringing: upbringing. aesthetic taste.
Lesson equipment: for the teacher - tables, children's drawings from the methodological fund, for students - albums, pencils, brushes, watercolors, an eraser, a palette, a cloth for wiping brushes.
During the classes
1. Organization of the lesson.
To start the lesson faster,
Everyone needs to stand more evenly.
A) Checking the readiness for the lesson.
B) Safety rules at art lessons.
2. Introductory conversation. Riddles
Guess the riddles, think about how they might be related to the topic of our today's lesson.
Two windows for the night
They close themselves
And with the sunrise
They open themselves. (Eyes.)
One says
Two are looking
Two are listening. (Tongue, eyes, ears.)
I have worn them for many years
I don’t know the account. (Hair.)
Between two luminaries
I'm alone in my heart. (Nose.)
3. Goals and objectives of the lesson.
Today we are going to paint a portrait. Portrait is a genre of fine art, dedicated to the image of one person or a group of people. The main thing in a portrait is the appearance of a person, his resemblance to the original. In addition to external individual similarities, artists strive to convey in the portrait the character of a person, his spiritual world. There are many varieties of the portrait genre: half-length, bust (in sculpture), full-length portrait, group portrait in the interior, portrait against the background of a landscape, architecture. By the nature of the image: ceremonial ( full height) and a chamber portrait (half-length, bust, generational image). By the number of images: individual, double, group, paired. Other types of portraits: costume, miniature, self-portrait, psychological, social.
4. Work on the assignment.
A) Detailed analysis of the work to be done (shape, color, characteristic features).
B) Students' independent work.
Stages of drawing:
We retreat from above 2-3 cm, divide the remaining distance into 3 parts. The face will be located at the top.
We draw a head - an oval shape, more extended at the top, more narrowed at the bottom. This shape resembles an egg. It is symmetrical.
Litsi (oval) is divided into 3 parts by lines.
Image of parts of the face. Eyebrows, eyes are formed by arched lines. Draw the iris and pupil in the middle of the eye.
We draw a nose - in the middle. The beginning of the nose - the bridge of the nose comes from the eyebrows. The middle of the nose is near the eyes.
Drawing the mouth below the nose, below the second horizontal line.
Drawing details of the face (ears, hair, neck).
5. Lesson summary.
Review and analysis of completed work. (The teacher notes the beautifully found color combinations.)
Analysis of common mistakes. Cleaning of workplaces.
6. Homework.
Plan - outline of the art lesson
Date _______________ Topic: Let's depict winter sports games.
military-aesthetic responsiveness to the beautiful in life and art, hu-
artistic and creative activity, artistic knowledge, skills and
skills, to familiarize children with the methods of mixing paints to obtain
various shades.
2. Developing: develop observation, attention, outlook, creative activity.
3. Upbringing: upbringing. aesthetic taste.
Lesson equipment: for the teacher - tables, children's drawings from the methodological fund, for students - albums, pencils, brushes, watercolors, an eraser, a palette, a cloth for wiping brushes.
During the classes
1. Organization of the lesson.
To start the lesson faster,
Everyone needs to stand more evenly.
A) Checking the readiness for the lesson.
B) Safety rules at art lessons.
2. Introductory conversation.
I'm like a grain of sand
And I cover the ground
I'm out of the water, and I'm flying in the air
I lie like fluff in the fields,
I shine like a diamond
In the sun. (Snow.)
Old man at the gate
The heat is dragged away.
He does not run himself,
Doesn't order to stand. (Freezing.)
Walks free
In the forest, in an open field
Twists, howls, mutters,
The whole world grumbles
Flies through the villages, cities,
Doesn't want to know anyone. (Blizzard.)
What is the theme united all the answers?
Snow and snow patterns.
There is a blizzard in the field, conversations.
It's already dark at five o'clock.
Day - skates, snowballs, sleds.
Evening - grandmother's tales.
Here it is winter.
3. Goals and objectives of the lesson.
Winter fun is interesting. Draw winter games.
4. Work on the assignment.
A) Detailed analysis of the work to be done (shape, color, characteristic features).
B) Students' independent work.
5. Didactic game "Exam from the artist Tube".
6. Lesson summary.
Review and analysis of completed work. (The teacher notes the beautifully found color combinations.)
Analysis of common mistakes. Cleaning of workplaces.
7. Homework.
Learn to mix colors.
Plan - outline of the art lesson
Date _______________ Subject: We will depict winter trees.
Objectives :: 1. Educational: to teach how to depict winter trees, to familiarize with the drawing technique
on wax, the formation of moral and aesthetic responsiveness to the beautiful in life and art, hu-
artistic and creative activity, artistic knowledge, skills and
skills, to familiarize children with the methods of mixing paints to obtain
various shades.
2. Developing: develop observation, attention, outlook, creative activity.
3. Upbringing: upbringing. aesthetic taste.
Lesson equipment: for the teacher - tables, children's drawings from the methodological fund, for students - albums, pencils, brushes, watercolors, an eraser, a palette, a cloth for wiping brushes.
During the classes
1. Organization of the lesson.
To start the lesson faster,
Everyone needs to stand more evenly.
A) Checking the readiness for the lesson.
B) Safety rules at art lessons.
2. Introductory conversation.
At night in the fields, to the tunes of a blizzard,
Doze, swaying, birches and ate ...
The month between the clouds over the field shines, -
A pale shadow comes and melts ...
I think at night: between white birches
Frost wanders in the misty radiance.
What folk winter signs you know? (If the smoke comes out of the chimney, frost will stand. A titmouse begins to squeak in the morning - wait for frost. Sparrows swim in the snow - to rain. January, frequent snowfalls, blizzards - frequent rains in July. If crows and jackdaws hover in the air, there will be snow. Hoarfrost on the trees - to frost, fog - to a thaw.
Slide show "Winter beauties".
3. Goals and objectives of the lesson.
Pay attention to lonely trees with fallen leaves in winter. They are very different and interesting in shape. If the branches of some are curved and thin, in others they are straight and thickened. In winter, snow and frost on the branches give a fabulous beautiful view trees. It is very interesting to draw trees covered with snow and frost in winter. Therefore, today we will learn how to depict winter trees more accurately and correctly.
4. Slide show "Winter on famous canvases".
What works are the most memorable? Name the authors.
5. Work on the assignment.
A) Detailed analysis of the work to be done (shape, color, characteristic features).
B) Students' independent work.
6. Didactic game "Exam from the artist Tube".
7. Lesson summary.
Review and analysis of completed work. (The teacher notes the beautifully found color combinations.)
Analysis of common mistakes. Cleaning of workplaces.
8. Homework.
Learn to mix colors.
Plan - outline of the art lesson
Date _______________ Topic: Animal sculptures. Leopard.
Objectives :: 1. Educational: to familiarize with sculpture, expand the understanding of the work of sculpture-
torus, methods of fastening parts, develop the ability to catch and re-
give proportions, the formation of artistic and creative active
sti, artistic knowledge, skills and abilities.
2. Developing: develop observation, attention, horizons, creative activity.
3. Upbringing: upbringing. aesthetic taste.
Lesson equipment: for the teacher - tables, children's drawings from the methodological fund, for students - albums, pencils, brushes, watercolors, an eraser, a palette, a cloth for wiping brushes.
During the classes
1. Organization of the lesson.
To start the lesson faster,
Everyone needs to stand more evenly.
A) Checking the readiness for the lesson.
B) Safety rules at art lessons.
2. Introductory conversation.
Stone processing on the ground has been practiced since antiquity. The first tools of human labor were made of stone. (Digging stick, bow tip, sword.) Currently, monuments and sculptures are sculpted from stone. Stone sculptures made by ancient stone-cutters have survived to this day. Our ancestors were good sculptors. They paid much attention to sculptural images of animals: buffalo, horses. Artists of all times have painted, sculpted, painted with paints animals, which, just like we live on planet Earth. So was born animalistic genre in fine art. Silhouettes of mighty lions adorned the entrances to buildings. When fountains were built, the central place was usually given to the sculpture of an animal. There are a lot of animal sculptures in the city of St. Petersburg.
Slide show.
Sculpture is a type of fine art in which the artist creates three-dimensional images. The methods of performing sculpture are different from modeling, ebb to carving, carving. The materials used for the manufacture of sculpture are different: marble, wood, metal, sandstone, polystyrene, glass, rubber, wax. According to its intended purpose, sculpture is: monumental (monuments in city parks), decorative (decorates architectural structures), easel (small forms).
To receive you need to desired result the sculptor has been working on its creation for a long time. First, an idea appears - a sketch in plasticine, clay - a plaster model - work in the material: stone, metal, cement, wood. If the sculpture is great, the artist uses a frame that acts as a skeleton.
What sculptural monuments of our city do you know?
3. Goals and objectives of the lesson.
Today we will act as sculptors and sculpt the figure of a leopard.
4. Work on the assignment.
A) Detailed analysis of the work to be done (shape, color, characteristic features).
B) Students' independent work.
5. Lesson summary.
Review and analysis of completed work. (The teacher marks the beautifully found color combinations.) Requirements for the work: performed anatomically correctly, proportions are observed, movements are transferred, small details are worked out, neatly executed.
Analysis of common mistakes. Cleaning of workplaces.
6. Homework.
Learn to sculpt pet silhouettes.
Plan - outline of the art lesson
Date _____________ Topic: Making a pattern on the surface of the dishes (2 hours).
Objectives :: 1. Educational: to acquaint with the types of activities in the lessons of fine arts, the formation of moral
military-aesthetic responsiveness to the beautiful in life and art, hu-
artistic and creative activity, artistic knowledge, skills and
skills, to familiarize children with the methods of making utensils, defining
pour the dependence of the form and decor on the purpose of the dishes.
2. Developing: develop observation, attention, outlook, creative activity.
3. Upbringing: upbringing. aesthetic taste.
Lesson equipment
Lesson type: combined.
Teaching methods: verbal, visual, practical, explanatory-illustrative
During the classes
1. Organization of the lesson.
To start the lesson faster,
Everyone needs to stand more evenly.
A) Checking the readiness for the lesson.
B) Safety rules at art lessons.
2. Introductory conversation.
What tools are needed for drawing. What is the purpose of the palette?
Do you know how cookware is made?
The artist plays a huge role in the creation of dishes: he designs and decorates the dishes, makes a prototype, and then at the factory they make a repetition of it - mass production. But there are dishes and in one copy - the author's exhibition work. The dependence of the form and decor is due to the purpose of the dishes: everyday, festive, children's or adult.
The material from which the dishes are made is of great importance. The festive tableware is thin and elegant, made of fine porcelain, its details are more complex, the decorations are rich and varied. Everyday dishes are simpler in shape and less decorated, but more durable. Dishes can be cheerful, solemn or indifferent, boring. Children's utensils should be attractive by painting, be stable and comfortable.
Tableware can be decorated with painting or decals. The image is applied to the dishes by conveyor or manually. Russian majolica - Gzhel also belongs to handicrafts. They are recognizable by their blue painting on a snow-white background. For painting majolica, the basis of flowers, trees, birds, landscapes is characteristic. But a common feature is color stretching, painting techniques, patterns, processing of real forms, outlining contours, silhouettes.
3. Goals and objectives of the lesson.
4. Work on the assignment.
B) Students' independent work.
Sequence of work: 1) think over the plot;
2) define a bounding box;
3) make a sketch in pencil;
4) make a sketch in color (in the second lesson after the conversation on mixing colors to display colors).
6. Lesson summary.
Review and analysis of completed work. (The teacher marks the beautifully found color combinations.) Analysis of common mistakes.
Cleaning of workplaces.
7. Homework.
Plan - outline of the art lesson
Date _____________ Topic: Drawing up samples of blankets from multi-colored paper (2 hours).
Objectives :: 1. Educational: to acquaint with the types of activities in the lessons of fine arts, the formation of moral
military-aesthetic responsiveness to the beautiful in life and art, hu-
artistic and creative activity, artistic knowledge, skills and
skills, broaden the horizons of artistic folk crafts.
3. Upbringing: upbringing. aesthetic taste.
Lesson equipment: for the teacher - tables, reproductions, children's drawings from the methodological fund, for students - albums, pencils, brushes, watercolors, an eraser, a palette, a cloth for wiping brushes.
Lesson type: combined.
Teaching methods
During the classes
1. Organization of the lesson.
To start the lesson faster,
Everyone needs to stand more evenly.
A) Checking the readiness for the lesson.
B) Safety rules at art lessons.
2. Introductory conversation.
For a long time, peasant labor on the land was replaced by holidays, then fun, then engaging in various crafts. The way of life of the farmer is closely related to the change of seasons. October is the wedding month. And it is also the beginning of girls' gatherings, the beginning of a craft.
Consider the works of craftswomen-needlewomen: blankets, panels, rugs made of variegated threads, scraps of fabric. And how skillfully these products are made! Patch to patch are so cleverly fitted, the threads are so skillfully selected in color that you will admire. Like paintings, these products convey the colors of the sky, sun, meadows, fields, flowers. Take a closer look at the patchwork colors.
In their works, the craftswomen use different methods of tone stretching of color: the color from dark to light gradually passes, as if by steps. There are many ways to achieve these transitions. Pay attention to the selection of patches for the center in different squares-pictures. You have noticed that in some cases the center is light and in others it is dark.
Whose grandmothers and mothers make such rugs, blankets? They consist of simple geometric frames: square, triangle, rectangle. The square - the symbol of the house - is always the basis of the composition.
3. Goals and objectives of the lesson.
4. Reading compositional patterns of patterns.
4. Work on the assignment.
A) Detailed analysis of the work to be done (shape, color, characteristic features).
B) Students' independent work.
Sequence of work: 1) think over the plot;
2) define a bounding box;
3) make a sketch in pencil;
4) make a sketch in color (in the second lesson after the conversation on mixing colors to display colors).
5. Didactic game "Find the shard". (Help Tube to find the missing piece of the rug)
6. Lesson summary.
Plan - outline of the art lesson
Date _____________ Subject: Let's represent sports equipment.
Objectives :: 1. Educational: to acquaint with the types of activities in the lessons of fine arts, the formation of moral
military-aesthetic responsiveness to the beautiful in life and art, hu-
artistic and creative activity, artistic knowledge, skills and
skills, broaden your horizons about a variety of sports
2. Developing: develop observation, attention, horizons, fine motor skills, eye-
measures, creativity, analytical thinking, overview imagination
3. Upbringing: upbringing. aesthetic taste.
Lesson equipment: for the teacher - tables, reproductions, children's drawings from the methodological fund, for students - albums, pencils, brushes, watercolors, an eraser, a palette, a cloth for wiping brushes.
Lesson type: combined.
Teaching methods: verbal, visual, practical, explanatory and illustrative.
During the classes
1. Organization of the lesson.
To start the lesson faster,
Everyone needs to stand more evenly.
A) Checking the readiness for the lesson.
B) Safety rules at art lessons.
2. Introductory conversation.
There is a proverb - "Movement is life." The human body is designed in such a way that constant movement is necessary for its normal operation. Only through sports can you keep your body in shape. - How many of you go in for sports? - What kinds of sports do you know? (Athletics, weightlifting, gymnastics, swimming, fencing, slalom, cross-country skiing, boxing, all kinds of games: volleyball, basketball, tennis, football, badminton, hockey, etc.) The main achievement of any athlete is victory at the Olympic Games. These games bring athletes together in fair and equitable competition. The Olympic emblem consists of 5 intertwined rings: blue, black, red, yellow and green flowers... The national flag of any country has at least one of these colors. And the interlacing of 5 rings symbolizes 5 continents. At the Olympic Games, Olympic records are broken - the highest achievement of an athlete. But to break the record requires daily exhausting workouts, you need to exercise regularly.
What are sports accessories? (Ball, chess, boxing gloves, gymnastic benches, etc.)
3. Goals and objectives of the lesson.
4. Work on the assignment.
A) Detailed analysis of the work to be done (shape, color, characteristic features).
B) Students' independent work.
Sequence of work: 1) think over the plot;
2) define a bounding box;
3) make a sketch in pencil;
4) make a sketch in color (in the second lesson after the conversation on mixing colors to display colors).
5. Didactic game "Assemble the drawing". (Collect jigsaw puzzles with images of sports equipment)
6. Lesson summary.
Review and analysis of completed work. (The teacher marks the beautifully found color combinations.) Analysis of common mistakes.
Cleaning of workplaces.
7. Homework.
Plan - outline of the art lesson
Date _____________ Topic: We draw fairy-tale characters (2 hours)
Objectives :: 1. Educational: to acquaint with the types of activities in the lessons of fine arts, the formation of moral
military-aesthetic responsiveness to the beautiful in life and art, hu-
artistic and creative activity, artistic knowledge, skills and
2. Developing: develop observation, attention, horizons, fine motor skills, eye-
3. Upbringing: upbringing. aesthetic taste.
Lesson equipment: for the teacher - tables, reproductions, children's drawings from the methodological fund, for students - albums, pencils, brushes, watercolors, an eraser, a palette, a cloth for wiping brushes.
Lesson type: combined.
Teaching methods: verbal, visual, practical, explanatory and illustrative, research.
During the classes
1. Organization of the lesson.
To start the lesson faster,
Everyone needs to stand more evenly.
A) Checking the readiness for the lesson.
B) Safety rules at art lessons.
2. Introductory conversation.
What is the name of a work with an unprecedented plot, magical transformations, unusual heroes? (Fairy tale) Think about the name. How did the word "fairy tale" appear? (From the word say, tell.)
All generations of people are brought up on fairy tales. Fairy tales are melodic and instructive. Thanks to the colorfulness of the language, their content is accessible even to young listeners.
Didactic game"Guess." (Teacher demonstrates illustrations famous artists... Children must guess the name of the tale.)
3 Goals and objectives of the lesson.
On what basis did you quickly identify a fairy tale? (Based on the images of the main characters.)
Think about what kind of fairy tale you will portray. Try to compose a verbal plot for the fairy tale that you will draw.
4. Work on the assignment.
Independent work of students.
Sequence of work: 1) think over the plot;
2) define a bounding box;
3) make a sketch in pencil;
4) make a sketch in color (in the second lesson after the conversation on mixing colors to display colors). How to convey the state of the hero using color? Can the heroes be highlighted in color?
The main colors are always bright, contrasting, beautifully combined with each other: red and yellow, yellow and blue, blue and red, as well as their shades. The color of the illustration has essential: color can express the mood of the characters, convey the beauty of natural phenomena, highlight the main thing in the composition, emphasize the fabulousness, the unusualness of what is happening. Remember the technique of drawing: large brushes are used to paint the background, details are drawn with thin brushes on the dried layer of paint only after the main layer of paint is applied.
5. Didactic game "Find the shard". (Game "Puzzles" - drawing up plot pictures for famous fairy tales.)
6. Lesson summary.
Review and analysis of completed work. (The teacher marks the beautifully found color combinations.) Analysis of common mistakes. Cleaning of workplaces.
7. Homework.
Plan - outline of the art lesson
Date _____________ Topic: Still life.
Objectives :: 1. Educational: to acquaint with the types of activities in the lessons of fine arts, to systematize
knowledge about the types and genres of fine art, familiarize with the design, through the
drawing, linear construction, chiaroscuro, perspective elements,
drawing methods from general to details and combining details.
2. Developing: develop observation, attention, horizons, fine motor skills, eye-
measures, creativity, analytical thinking, overview imagination
tion, a sense of proportion, proportionality, the ability to draw from life.
3. Upbringing: upbringing. aesthetic taste.
Lesson equipment: for the teacher - tables, reproductions, children's drawings from the methodological fund, for students - albums, pencils, brushes, watercolors, an eraser, a palette, a cloth for wiping brushes.
Lesson type: combined.
Teaching methods: verbal, visual, practical, explanatory and illustrative.
During the classes
1. Organization of the lesson.
To start the lesson faster,
Everyone needs to stand more evenly.
A) Checking the readiness for the lesson.
B) Safety rules at art lessons.
2. Introductory conversation.
If you see in the picture
A miracle vase on the table
It contains a bouquet of beautiful
Snow-white chrysanthemums;
There are a lot of dishes
Both glassy and simple
Maybe a cup or saucer
With a gilded border.
And in the picture can
Drawn to be a cake.
And so the picture
The still life is called.
Still life is an image of inanimate objects. Still life can perform various functions: decorative still life - captures the colorfulness, grace and splendor of natural forms, decorates the interior, symbolic still life- candles, hourglasses and other objects - symbols are depicted, it reminds of the transience of human life.
3. Goals and objectives of the lesson.
4. Viewing reproductions.
What is still life? What are your favorite still lifes on reproductions? What colors prevail in them? What unites all objects in a still life? (Theme, affiliation) How do artists convey the volume of objects? Why are lighter strokes on one side and dark ones on the other?
5. Didactic game " Living picture". Groups of children depict a joyful - solemn, gentle - melodious, gloomy - sad still life.
6. Work on the assignment.
A) Detailed analysis of the work to be done (shape, color, characteristic features).
B) Students' independent work.
Sequence of work: 1) think over the plot;
2) define a bounding box;
3) make a sketch in pencil;
4) make a sketch in color (in the second lesson after the conversation on mixing colors to display colors).
5. Didactic game "Find the shard". (Help Tube to find the plate shard)
6. Lesson summary.
Review and analysis of completed work. (The teacher marks the beautifully found color combinations.) Analysis of common mistakes.
Cleaning of workplaces.
7. Homework. Compose a composition for a still life. View still lifes of different authors in museums.
Plan - outline of the art lesson
Date _____________ Subject: We draw signs, symbols of the national calendar.
Objectives :: 1. Educational: to acquaint with the types of activities in the lessons of fine arts, the formation of moral
military-aesthetic responsiveness to the beautiful in life and art, hu-
artistic and creative activity, artistic knowledge, skills and
2. Developing: develop observation, attention, horizons, fine motor skills, eye-
measures, creativity, analytical thinking, overview imagination
3. Upbringing: upbringing. aesthetic taste.
Lesson equipment: for the teacher - tables, reproductions, children's drawings from the methodological fund, for students - albums, pencils, brushes, watercolors, an eraser, a palette, a cloth for wiping brushes.
Lesson type: combined.
Teaching methods: verbal, visual, practical, explanatory and illustrative.
During the classes
1. Organization of the lesson.
To start the lesson faster,
Everyone needs to stand more evenly.
A) Checking the readiness for the lesson.
B) Safety rules at art lessons.
2. Introductory conversation.
3. Goals and objectives of the lesson.
Each nation has its own folk calendar. According to the eastern folk calendar, each year is called the name of an animal. Time reckoning was renewed every 12 years. In accordance with the popular calendar, each of the 12 months also has its own distinctive images.
What are the popular names for the months of the year?
Draw the sign of the folk calendar you like.
4. Work on the assignment.
A) Detailed analysis of the work to be done (shape, color, characteristic features).
B) Students' independent work.
Sequence of work: 1) think over the plot;
2) define a bounding box;
3) make a sketch in pencil;
4) make a sketch in color.
5. Didactic game "Find a corresponding number for each sign of the national calendar."
6. Lesson summary.
Review and analysis of completed work. (The teacher marks the beautifully found color combinations.) Analysis of common mistakes.
Cleaning of workplaces.
7. Homework.
Plan - outline of the art lesson
Date _____________ Topic: Summary.
Objectives :: 1. Educational: to acquaint with some art museums, their architecture, interior
rum halls, with views of museums, arrangement of exhibits, the formation of moral
military-aesthetic responsiveness to the beautiful in life and art, hu-
artistic and creative activity, artistic knowledge, skills and
skills, to acquaint with the work of animal artists.
2. Developing: develop observation, attention, horizons, fine motor skills, eye-
measures, creativity, analytical thinking, overview imagination
3. Upbringing: upbringing. aesthetic taste.
Lesson equipment: for the teacher - tables, reproductions, children's drawings from the methodological fund, for students - albums, pencils, brushes, watercolors, an eraser, a palette, a cloth for wiping brushes.
Lesson type: combined.
Teaching methods: verbal, visual, practical, explanatory and illustrative.
During the classes
1. Organization of the lesson.
To start the lesson faster,
Everyone needs to stand more evenly.
A) Checking the readiness for the lesson.
B) Safety rules at art lessons.
2. Goals and objectives of the lesson. Introductory conversation.
Each city can be proud of its museums. Museum- repository of historical monuments, material and spiritual culture. Museums of Moscow, St. Petersburg - custodians of the most important works of the world and Russian art... These are museums such as the Tretyakov Gallery, the Hermitage, the Russian Museum, many small museums and exhibition halls.
Each of you should touch these masterpieces and learn to be proud that your city, country keeps such great works.
For museums, special premises are often built or old palaces are used, which themselves are cultural heritage. But cultural protected areas - open-air museums can also be preserved. The old city cannot be hidden under a hood, but it can be protected from destruction, restored and not cluttered with modern high-rise buildings. In Moscow, these are the Kremlin, Ostankino, Kolomenskoye.
In every city you can find corners reminiscent of the past. The museums of folk arts and crafts store folk costumes, jewelry, toys, household items.
Museums are very different, but only those in which are stored and exhibited mainly works of fine art are called art.
Exhibit- an item exhibited for viewing in a museum, at an exhibition, etc.
Exposition- systematic placement of exhibits in museums and exhibitions.
Collection - picking up items.
By the way, the works have their own destiny, often very difficult, especially for the famous masterpieces. They are bought, sold for a lot of money, they are kidnapped, and the work becomes a real hero of detective stories in which people are divided into 2 camps: some see beauty and wisdom in the work, while others calculate the profitability. But a reasonable society always strives to replenish collections, and not only in order to increase wealth. Society "accumulates" in art museums the wisdom and beauty of all mankind.
3. Slideshow of famous museums. Acquaintance with their masterpieces.
5. Didactic game "Puzzle". (Help Tube to jigsaw a famous painting)
6. Lesson summary.
7. Homework.
Plan - outline of the art lesson
Date _____________ Topic: Sunny Spring.
Objectives :: 1. Educational: to acquaint with the genre of painting - landscape, its varieties, laws
us compositions, tell about the work of Repin, the formation of moral
military-aesthetic responsiveness to the beautiful in life and art, hu-
artistic and creative activity, artistic knowledge, skills and
skills, to acquaint with the work of animal artists.
2. Developing: develop observation, attention, horizons, fine motor skills, eye-
measures, creativity, analytical thinking, overview imagination
3. Upbringing: upbringing. aesthetic taste.
Lesson equipment: for the teacher - tables, reproductions of Levitan, Shishkin, Yuon, Surikov, Levitan, Kuindzhi, children's drawings from the methodological fund, for students - albums, pencils, brushes, watercolors, an eraser, a palette, a cloth for wiping brushes.
Lesson type: combined.
Teaching methods: verbal, visual, practical, explanatory and illustrative.
During the classes
1. Organization of the lesson.
To start the lesson faster,
Everyone needs to stand more evenly.
A) Checking the readiness for the lesson.
B) Safety rules at art lessons.
2. Introductory conversation.
The snow is melting.
The meadow came to life.
The day is coming.
Consider the works of artists. They managed to capture the beauty of their native nature in their works. You can admire it at different times of the year, as the artists were able to “stop the moment” in their paintings. (Viewing works, analyzing color combinations: an abundance of blue-blue, pale green, light brown, red, crimson, yellow-green.)
3. Goals and objectives of the lesson.
4. Generalization.
What pieces did you particularly like and why?
Name pictures with calm and soft colors and pictures with "sonorous" colors of blossoming nature.
How varied are the colors of the water spaces?
The presence of a person in a landscape helps to feel the connection with nature and to feel the mood that the artist wanted to convey by painting nature in its various states. Types of landscape genre: rural, urban, park, marine, architectural, industrial, heroic, decorative, historical, romantic, space, etc.
5. Work on the assignment.
A) Detailed analysis of the work to be done. The laws of perspective: 1) all near objects are perceived in detail, and distant ones - in detail; 2)) all nearby objects are perceived clearly; 3) at a great distance, light objects appear darker; 4)) all nearby objects have contrasting light and shade; 5) the color of objects in space is influenced by the air environment.
B) Students' independent work.
Sequence of work: 1) think over the plot;
2) define a bounding box;
3) make a sketch in pencil;
4) make a sketch in color (in the second lesson after the conversation on mixing colors to display colors).
6. Lesson summary.
Cleaning of workplaces.
7. Homework.
Plan - outline of the art lesson
Date _____________ Topic: We draw a tree branch with blossoming buds and leaves-
Objectives :: 1. Educational: to acquaint with the types of activities in the lessons of fine arts, the formation of moral
military-aesthetic responsiveness to the beautiful in life and art, hu-
artistic and creative activity, artistic knowledge, skills and
skills, to acquaint with the work of animal artists.
2. Developing: develop observation, attention, horizons, fine motor skills, eye-
measures, creativity, analytical thinking, overview imagination
3. Upbringing: upbringing. aesthetic taste.
Lesson equipment: for the teacher - tables, reproductions, children's drawings from the methodological fund, for students - albums, pencils, brushes, watercolors, an eraser, a palette, a cloth for wiping brushes.
Lesson type: combined.
Teaching methods: verbal, visual, practical, explanatory and illustrative.
During the classes
1. Organization of the lesson.
To start the lesson faster,
Everyone needs to stand more evenly.
A) Checking the readiness for the lesson.
B) Safety rules at art lessons.
2. Introductory conversation.
Shines the sun is brighter,
The sun is warming up hotter
Nature awakens
Gradually from sleep.
The morning of the year comes
Spring begins.
Spring comes with drops
The streams murmur.
Meet, we arrived, -
The starlings are screaming.
3. Goals and objectives of the lesson.
The days get warmer in the spring. Buds open on trees, everything around comes to life and blooms. Draw a branch with open buds.
4. Work on the assignment.
A) Detailed analysis of the work to be done (shape, color, characteristic features).
B) Students' independent work.
Sequence of work: 1) think over the plot;
2) define a bounding box;
3) make a sketch in pencil;
4) make a sketch in color (in the second lesson after the conversation on mixing colors to display colors).
5. Didactic game "Find the shard". (Help Tube to find the plate shard)
6. Lesson summary.
Review and analysis of completed work. (The teacher marks the beautifully found color combinations.) Analysis of common mistakes.
Cleaning of workplaces.
7. Homework.
Plan - outline of the art lesson
Date _____________ Subject: We draw a still life from dishes.
Objectives :: 1. Educational: to acquaint with the design, through drawing, linear construction
ny, elements of perspective, drawing methods from general to detail-
lam and combination of details, the formation of moral and aesthetic
responsiveness to the beautiful in life and art, artistic creativity
iic activity, artistic knowledge, skills skills.
2. Developing: develop observation, attention, horizons, fine motor skills, eye-
measures, creativity, analytical thinking, overview imagination
3. Upbringing: upbringing. aesthetic taste.
Lesson equipment: for the teacher - tables, reproductions, children's drawings from the methodological fund, for students - albums, pencils, brushes, watercolors, an eraser, a palette, a cloth for wiping brushes.
Lesson type: combined.
Teaching methods: verbal, visual, practical, explanatory and illustrative.
During the classes
1. Organization of the lesson.
To start the lesson faster,
Everyone needs to stand more evenly.
A) Checking the readiness for the lesson.
B) Safety rules at art lessons.
2. Introductory conversation.
What is still life? (image of inanimate objects) Still life is a very comfortable nature in all respects: it is motionless, retains its appearance for a long time, objects can be given any position and an interesting combination of forms can be obtained. Still lifes tell about the life of people of different times.
3. Viewing reproductions.
What still lifes did you like the most and why? How do artists convey volume on a flat surface of paintings? (Lighter strokes are on one side, and darker strokes are on the other.)
4. Goals and objectives of the lesson.
Today we are going to draw a still life from dishes.
5. Didactic game "Living Picture". (Image of a joyful, gentle and gloomy still life.)
6. Work on the assignment.
A) Detailed analysis of the work to be done (shape, color, characteristic features).
B) Students' independent work.
Sequence of work: 1) Marking the contours of objects with light lines.
2) Working with paint - general light characteristic.
3) Volume - we increase the saturation with separate strokes.
4) Generalization of all colors - we highlight the parts with saturation,
vay - by extinguishing.
7. Didactic mosaic game "Still Life".
Assemble a still life from cut parts. (You can take reproductions of famous paintings as a basis.)
8. Lesson summary.
Review and analysis of completed work. (The teacher marks the beautifully found color combinations.) Analysis of common mistakes.
Cleaning of workplaces.
9. Homework.
Plan - outline of the art lesson
Date _____________ Subject: We draw sketches of costumes for astronauts.
Objectives :: 1. Educational: to acquaint with the types of activities in the lessons of fine arts, the formation of moral
military-aesthetic responsiveness to the beautiful in life and art, hu-
artistic and creative activity, artistic knowledge, skills and
skills, to acquaint with the work of animal artists.
2. Developing: develop observation, attention, horizons, fine motor skills, eye-
measures, creativity, analytical thinking, overview imagination
3. Upbringing: upbringing. aesthetic taste.
Lesson equipment: for the teacher - tables, reproductions, children's drawings from the methodological fund, for students - albums, pencils, brushes, watercolors, an eraser, a palette, a cloth for wiping brushes.
Lesson type: combined.
Teaching methods: verbal, visual, practical, explanatory and illustrative.
During the classes
1. Organization of the lesson.
To start the lesson faster,
Everyone needs to stand more evenly.
A) Checking the readiness for the lesson.
B) Safety rules at art lessons.
2. Introductory conversation.
Tempting, interesting, cool and alluring the world of space. Man is trying to get to know this world, full of secrets and mysteries. (Slide show - photos in space.)
April 12 - Cosmonautics Day. Who was the first astronaut on Earth? What are the names of famous cosmonauts of our time?
For the first time in the history of mankind, the cosmonaut Yu.A. Gagarin made a flight into space. It was April 12, 1961. His flight lasted 108 minutes. Gagarin made one orbit around the Earth on the Vostok-1 spacecraft. Gagarin's flight proved the possibility of man's stay and work in space. 47 years have passed since then. During this time, the latest space discoveries have been made. The design of the ships and the clothing of the astronauts have changed significantly.
3. Goals and objectives of the lesson.
Our clothes are sewn according to special designs. And these sketches are created by fashion designers. Everyone knows the costumes of cosmonauts. They are light-colored, comfortable, and reliably protect from cold and heat. To provide air and comfort when working in space, a spacesuit is required. What will be the costumes of astronauts in the future may be up to you. Suits should be comfortable, fit, and pleasing to the eye. Let's try and come up with costumes for astronauts.
4. Work on the assignment.
A) Detailed analysis of the work to be done (shape, color, characteristic features).
B) Students' independent work.
Sequence of work: 1) think over the plot;
2) define a bounding box;
3) make a sketch in pencil;
4) make a sketch in color (in the second lesson after the conversation on mixing colors to display colors).
5. Didactic game Collect the names of famous astronauts.
6. Lesson summary.
Review and analysis of completed work. (The teacher marks the beautifully found color combinations.) Analysis of common mistakes.
Cleaning of workplaces.
7. Homework.
Plan - outline of the art lesson
Date _____________ Topic: I am the defender of the Fatherland.
Objectives :: 1. Educational: to acquaint with the types of activities in the lessons of fine arts, the formation of moral
military-aesthetic responsiveness to the beautiful in life and art, hu-
artistic and creative activity, artistic knowledge, skills and
skills, to acquaint with the work of battle painters.
2. Developing: develop observation, attention, horizons, fine motor skills, eye-
measures, creativity, analytical thinking, overview imagination
3. Upbringing: upbringing. aesthetic taste.
Lesson equipment: for the teacher - tables, reproductions, children's drawings from the methodological fund, for students - albums, pencils, brushes, watercolors, an eraser, a palette, a cloth for wiping brushes.
Lesson type: combined.
Teaching methods: verbal, visual, practical, explanatory and illustrative.
During the classes
1. Organization of the lesson.
To start the lesson faster,
Everyone needs to stand more evenly.
A) Checking the readiness for the lesson.
B) Safety rules at art lessons.
2. Introductory conversation.
It is the duty of every citizen to be the defender of the Fatherland. Motherland - there is no more meaningful word, therefore the defense of the Motherland is our sacred duty. After all, the Motherland is your family, your city, the land on which you were born, and our whole country.
Quiz.
In ancient times, when people acquired surnames, they received them by character, by appearance, by occupation. What are the names associated with military affairs. (Cossacks, Voinov, Streltsov, Druzhinin, Pushkin, Pushkarev, Soldatov, Gusarov, Fighters.)
What are the types of tanks? (Heavy, light, floating.)
In which country did the first tank appear? (In Russia in 1915.)
What are the types of troops in the modern army? (Artillery, motorized rifle troops, armored, infantry, marines, armored, airborne, engineering, aviation.)
Who built the world's first airplane? (Engineer Mozhaisky 1882)
Continue the row: battle, battle, battle, ... (battle).
What is the name of the artist who depicts the paintings of the battle? (Batalist)
Name the warships. (Boat, cruiser, battleship, destroyer, destroyer, minesweeper, battleship.)
What does the sea word mean half-tundra? (This Dutch word literally means: be afraid of an object falling from above, this is a signal of danger.)
3. Goals and objectives of the lesson.
The defense of the Motherland has always been a sacred duty and obligation for our ancestors. Thanks to their tireless struggle against foreign enemies, we today live in a huge, independent, free country. At present, upon reaching the age of 18, every healthy young man is called up to the ranks. The armed forces to fulfill their military duty to defend the Motherland. Many of them serve in the aviation, some in the tank forces, and some serve as border guards. Today you must complete a drawing on the theme of "Defense of the Motherland".
4. Work on the assignment.
A) Detailed analysis of the work to be done. Verbal sketches.
B) Students' independent work.
Sequence of work: 1) think over the plot;
2) define a bounding box;
3) make a sketch in pencil;
4) make a sketch in color (in the second lesson after the conversation on mixing colors to display colors).
5. Lesson summary.
6. Homework.
Plan - outline of the art lesson
Date _____________ Subject: Let's compose and depict a Baskur ornament.
Objectives :: 1. Educational: to acquaint with the types of activities in the lessons of fine arts, the formation of moral
military-aesthetic responsiveness to the beautiful in life and art, hu-
artistic and creative activity, artistic knowledge, skills and
2. Developing: develop observation, attention, horizons, fine motor skills, eye-
measures, creativity, analytical thinking, overview imagination
3. Upbringing: upbringing. aesthetic taste.
Lesson equipment: for the teacher - tables, reproductions, children's drawings from the methodological fund, for students - albums, pencils, brushes, watercolors, an eraser, a palette, a cloth for wiping brushes.
Lesson type: combined.
Teaching methods: verbal, visual, practical, explanatory and illustrative.
During the classes
1. Organization of the lesson.
To start the lesson faster,
Everyone needs to stand more evenly.
A) Checking the readiness for the lesson.
B) Safety rules at art lessons.
2. Introductory conversation.
Since ancient times, people have sought to decorate their homes.
In the yurt, besides the wall carpet embroidered with multicolored silk threads hanging in a conspicuous place - tuskiiz, patterned syrmak, tekemet, carpets laid on the floor, there are other things. These are woven products or baskur. Baskour- this is a hand-woven woolen strip, to which the skeleton (kerege) of the yurt is attached (from above in the girth). According to the manufacturing methods, Baskur is divided into white and variegated, striped. The main element of the Baskur decoration is a woven ornament. Baskur patterns in a canopy are made by repeating or alternating the same images. The Baskur ornament is one of the oldest types of weaving art, which is also often used to decorate clothes and household items.
3. Goals and objectives of the lesson.
Make sketches of the Baskur ornament.
4. Work on the assignment.
A) Detailed analysis of the work to be done (shape, color, characteristic features).
B) Students' independent work.
Sequence of work: 1) think over the plot;
2) define a bounding box;
3) make a sketch in pencil;
4) make a sketch in color (in the second lesson after the conversation on mixing colors to display colors).
5. Didactic game "Find the shard". (Help Tube to find the plate shard)
6. Lesson summary.
Review and analysis of completed work. (The teacher marks the beautifully found color combinations.) Analysis of common mistakes.
Cleaning of workplaces.
7. Homework.
Plan - outline of the art lesson
Date _____________ Topic: Drawing on the fabric. Batik.
Objectives :: 1. Educational: to acquaint with the technique of drawing on fabric (batik), with the work of the artist
on fabrics - the artist's decor., types of ornaments, the formation of moral
military-aesthetic responsiveness to the beautiful in life and art, hu-
artistic and creative activity, artistic knowledge, skills and
skills, to acquaint with the work of animal artists.
2. Developing: develop observation, attention, horizons, fine motor skills, eye-
measures, creative activity, analytical thinking, overview imagination
3. Upbringing: upbringing. aesthetic taste.
Lesson equipment: for the teacher - tables, reproductions, children's drawings from the methodological fund, for students - albums, pencils, brushes, watercolors, an eraser, a palette, a cloth for wiping brushes.
Lesson type: combined.
Teaching methods: verbal, visual, practical, explanatory and illustrative.
During the classes
1. Organization of the lesson.
To start the lesson faster,
Everyone needs to stand more evenly.
A) Checking the readiness for the lesson.
B) Safety rules at art lessons.
2. Introductory conversation.
The pattern on the fabric is often used in the textile industry. Cotton mills employ specialist artists who paint on fabric, come up with designs and colors for fabrics.
Clothes are the adornment of a person. All drawings, colors on it are made by the artist. To perform batik, first make a sketch on paper. These can be simple ornamental elements. Then the samples you like are launched into production.
In their works, artists use different methods of tone stretching of color: the color from dark to light passes gradually, as if by steps.
3. Goals and objectives of the lesson.
Today we are going to act as fabric artists and draw a drawing on a white fabric, placed in a frame.
4. Work on the assignment.
A) Detailed analysis of the work to be done (shape, color, characteristic features).
B) Students' independent work.
Sequence of work: 1) think over the plot;
2) define a bounding box;
3) make a sketch in pencil;
4) make a sketch in color (in the second lesson after the conversation on mixing colors to display colors).
5. Didactic game "Find the shard". (Help Tube to find the plate shard)
6. Lesson summary.
Review and analysis of completed work. (The teacher marks the beautifully found color combinations.) Analysis of common mistakes.
Cleaning of workplaces.
7. Homework.
Plan - outline of the art lesson
Date _____________ Topic: Drawing in nature. Plein air.
Objectives :: 1. Educational: to acquaint with the types of activities in the lessons of fine arts, the formation of moral
military-aesthetic responsiveness to the beautiful in life and art, hu-
artistic and creative activity, artistic knowledge, skills and
skills, to acquaint with the work of animal artists.
2. Developing: develop observation, attention, horizons, fine motor skills, eye-
measures, creativity, analytical thinking, overview imagination
3. Upbringing: upbringing. aesthetic taste.
Lesson equipment: for the teacher - tables, reproductions, children's drawings from the methodological fund, for students - albums, pencils, brushes, watercolors, an eraser, a palette, a cloth for wiping brushes.
Lesson type: combined.
Teaching methods: verbal, visual, practical, explanatory and illustrative.
During the classes
1. Organization of the lesson.
To start the lesson faster,
Everyone needs to stand more evenly.
A) Checking the readiness for the lesson.
B) Safety rules at art lessons.
2. Introductory conversation.
Wherever the artist is - in nature, in a city, in a village - he tries to depict everything beautiful on canvas. Artists often travel to nature to paint. This is necessary in order to learn to convey the richness of natural colors in your paintings.
To display the beauty of nature in the paintings, it is necessary to go to the open air as often as possible - painting in the open air, in the middle of nature. This will help to correctly reproduce in the paintings the real shades of color that are directly observed in nature.
At the same time, it is necessary to distinguish the ratio between large and small, near and far, high and low. You also need to be able to distinguish colors. And only after defining the space, it is necessary to depict nature on paper.
What are the names of the artists depicting nature? What landscape painters do you know?
3. Goals and objectives of the lesson.
4. Work on the assignment.
A) Detailed analysis of the work to be done (shape, color, characteristic features).
B) Students' independent work.
Sequence of work: 1) analyze the plot;
2) define a bounding box;
3) make a sketch in pencil;
4) make a sketch in color (in the second lesson after the conversation on mixing colors to display colors).
5. Didactic game "Learn the picture". (Use reproductions.)
6. Lesson summary.
Review and analysis of completed work. (The teacher marks the beautifully found color combinations.) Analysis of common mistakes.
Cleaning of workplaces.
7. Homework.
Plan - outline of the art lesson
Date _____________ Topic: We organize an exhibition.
Objectives :: 1. Educational: to acquaint with the types of activities in the lessons of fine arts, the formation of moral
military-aesthetic responsiveness to the beautiful in life and art, hu-
artistic and creative activity, artistic knowledge, skills and
skills, to acquaint with the work of animal artists.
2. Developing: develop observation, attention, horizons, fine motor skills, eye-
measures, creativity, analytical thinking, overview imagination
3. Upbringing: upbringing. aesthetic taste.
Lesson equipment: for the teacher - tables, reproductions, children's drawings from the methodological fund, for students - albums, pencils, brushes, watercolors, an eraser, a palette, a cloth for wiping brushes.
Lesson type: combined.
Teaching methods: verbal, visual, practical, explanatory and illustrative.
During the classes
1. Organization of the lesson.
To start the lesson faster,
Everyone needs to stand more evenly.
A) Checking the readiness for the lesson.
B) Safety rules at art lessons.
2. Introductory conversation.
Guys, which of you has a drawing lesson - one of your favorite lessons? And some of you go to the art studio or to the nursery art school? Why do you think everyone is taught drawing, although not all of you will become artists?
Drawing is taught to everyone in order to develop visual memory, attention, imagination, creativity, the ability to reason and analyze, acquire skills in using tools and materials, broaden horizons, etc. For this, a fine arts lesson has been introduced in schools.
Are there any artists among your friends or relatives? Where are the art museums in our city? How many of you were there?
3. Goals and objectives of the lesson.
We will organize an exhibition. Choose the best drawing. Frame it. Sign up.
4. Didactic games.
Find the flaw in the portrait.
"Get to know the picture"
"Collect the landscape"
"The game of attentiveness" (Reproduction of a battle painter is used).
"Draw an object."
5. Lesson summary.
And at 10, and at 7. and at 5 -
All people love to paint.
And everyone will boldly draw
Everything that interests him.
Everything is of interest:
Far space, near forest,
Flowers, cars, fairy tales, dances,
Let's draw everything! There would be paints
Yes a sheet of paper on the table
Yes, peace in the family and on Earth!
6. Homework.
Go with your parents to a museum, remember your favorite works of art.
Art
Topic Types of still life. How to compose a still life.
Tasks: educational: to master the concept of still life, to introduce the big world still life, instilling interest in the subject, to create conditions for observation and penetration of students into the essence of the objective world, to understand its significance in human life, its symbolism, spirituality and beauty, to consolidate the skills of drawing up and performing a still life composition with graphic means and in color with the transmission of constructive the structure of objects, their proportions; educational: to bring up aesthetic taste, attentiveness, observation; developing: to develop creativity, an aesthetic concept, broaden the horizons of students, activate the observation of children, develop their eyes, imaginative thinking.
During the classes
1. Org moment.
2. Introductory conversation.
All fine art is divided into different genres on the themes that the artist depicts,
this is a thematic painting (depicting scenes from people's lives)
portrait (image of a person)
landscape (depiction of nature views)
interior (image of the interior decoration of the premises)
still life
Today in the lesson we will get acquainted with one of the genres of fine art.
Still life is a literal translation from French "dead nature" ie. the image of inanimate objects (household utensils, dishes, weapons, fruits, fruits, flowers, etc.) A still life appeared a very long time ago, back in Ancient China... Pay attention to this work, it is called "Peonies and Butterflies". This is an example of the classic watercolor painting China. Wonderful lush peonies seem to smell and attract butterflies that hover over fragrant flowers.
Tell me guys, why do we classify the genre "Flowers and Birds" as a still life?
Because the Chinese paintings depict separate parts of the natural world (flowers, butterflies, birds) in various combinations.
Teacher. Let's move on to the next slide and take a look at a still life from the heyday of this genre. This is the work of Peter Claes "Still Life", a Dutch painter who lived in the 16th century, it was at this time that still life as a genre flourished. The fact is that people began to be interested in the ordinary world, and not the sublime, and therefore the artists paint a lot of still lifes that tell us not only about the life of people of that time, but also about
how the artist himself sees and feels life.
What kind of person do you think Peter Claes was?
Looking at his picture, try to describe his inner world?
He was kind, generous, cheerful, generous, etc.
Let's look at other still lifes and you will see how diverse the world of the image is.
inanimate nature, the world of still life. And what different ideas the authors tried to convey to us.
3. Comparison of two still lifes.
Still life can tell us about the artist's attitude to the things depicted. To get a better feel for this, let us compare two works by Mikhail Vrubel and “Roses and Thistles” by Ilya Mashkov.
Vrubel's "Rose" seems to be made of a fragile, thinnest material - with such tenderness the artist depicts her pale, porcelain-brittle petals. It seems almost weightless: the brush barely outlined its whimsical forms with transparent watercolor. Standing in a simple glass, the rose is modest and beautiful. The artist depicted her alone, as the precious chosen one of his soul. The surrounding objects are not at all important for him. We do not see the furnishings of the room, not even the outline of the table on which there is a glass with a rose. And this allows you to feel even more the quivering beauty of a lonely beautiful flower.
Vrubel's rose is almost a dream, Mashkov's roses are also a symbol of the soul, the soul over which the material world (the world of weeds) has won.
Tell me guys, what work did you like more and why?
4. Independent work of students.
Teacher. You will be doing practical work today from nature using the technique of watercolor filling.
Look guys in front of you various still lifes (2-3). We will draw them today.
Still lifes consist of two objects according to the principle of contrast.
5. Sequence of work
Fill immediately with "a la prima" color
6. Lesson summary
a) an exhibition of students' works
b) generalization of the material.
Sources of
Art. Lesson plans for the textbook Kuzin, Kubyshkina
1. Alekseeva V.V. What is art. Issue 1.M., 1973.
2. Alekseeva V.V. What is art. Issue 2.M., 1979.
3. Alpatov M.V. An Undying Heritage: A Teacher's Book. M., 1991.
4. Arbat Yu. Russian folk painting on wood. M., 1970.
5. Beletsky P. Obsessed with drawing. The Story of the Japanese Artist Ho $
bite. M., 1970.
6. Belov V. Lad. Essays on folk aesthetics. M., 1983.
7. Birich I.A., Lomonosova M.T. Fundamentals of Artistic Culture. Isob $
Striking Art and Architecture: Evaluating Creative and Artistic $
natural abilities. Book. 1 and 2.M., 2000.
8. Vatagin V.A. Memories. Animalist notes. M., 1980.
9. Goryaev V.G. Using Music in Fine Arts Lessons $
state in elementary school: A book for the teacher. M., 1991.
10. Goryaeva N.A. First steps in the art world. M., 1991.
11. Goryaeva N.A., Ostrovskaya O.V. Arts and crafts in
human life. Textbook for grade 5. M., 2000.
12. Dmitrieva N.A. A Brief History of Art. M., 1969.
Working curriculumKurevina O.A. Balass 2011 22 1 ISO ISO Kurevina O.A. Balassa 2011 22 .... "Title" 2006 11 Biboletova 2 ISO ISO"Balass" 2012 25 Kurevina O.A. ... early XXI century. 9 cl. Lessons plans 2007 Lessons plans on the course "History of the Fatherland of the XX century." (...
Detailed lesson plans contain all required material for full-fledged lessons on stories... . The tribunes of the people were elected: a) from plebeians; b) from plebs; v) from patricians; G) from nobles. Application. TESTS Keys ...
Calendar thematic plan for computer science and ict class 8
Thematic plan2009 Electronic manuals: Informatics. Lessons plans on the textbook of N.D. Ugrinovich. Fun program ... work 3.6 Upload files from Internet Be aware of the possibilities ... text area, sending data from forms. Practical work...
Organizing time.
Hello guys! Sit down.
Let's check if everyone is ready for the lesson today?
You should have on your desks: paints, a palette, brushes, a pencil, an eraser, an album, a glass for water.
Explanation of the topic and purpose of the lesson.
Today in the lesson we will talk about one genre of painting - the urban landscape. Let's get acquainted with reproductions of artists.
Introductory conversation.
Let's first remember what a landscape is? (A landscape is paintings depicting nature or some area (forest, field, mountains, grove, village, city)). What types of landscape do you know? (urban, maritime and rural). Now look at the screen and try to determine the type of landscape (children watch reproductions and name the type of landscape).
Guys, on what grounds are landscapes divided? How do they differ from each other? (In the city, houses, roads, people, cars, etc. are depicted in the sea - the sea, the coast, boats, etc. In the rural area, wooden houses, meadows, country paths, etc. are depicted).
You and I often admire the beauty of nature. We can easily depict the splendor of the expanses of fields, meadows, lakes and rivers, we can show the beauty in the drawing blooming garden or the majesty of a mighty oak .... Much can be depicted in a drawing. Our task today is to show the beauty of the cityscape. Cities…. Big and small, with modern skyscrapers and narrow streets…. They are so different…. Let's take a look at pictures of different cities. What do you see in the photos? What is in the foreground and what is in the background? (children's answers).
A city landscape is a painting in which the artist
depicted streets and lanes, squares and small courtyards. See the reproduction of Konstantin Yuon "View of the Lavra from Vokzalnaya Street". What is shown on the reproduction? What colors prevail here? (children's answers). Well done boys.
In nature, we always feel a single connection between objects. This is expressed in the arrangement of objects, and in their combination, and in their general color coloring, and in their ideological, semantic content. Solving the idea of a drawing depicting an urban landscape, we must note the most characteristic, the most important and significant. Should express their attitude to what they saw. Look at the reproduction of Vasily Ivanovich Bazhenov "Italian Landscape".
Aesthetically complete, emotional and expressive landscape design will be one that vividly conveys impressions, thoughts and feelings.
Before we start, let's watch a movie about a cityscape with you. And then you will answer my question, what do you remember the most from the film?
Step-by-step explanation of the work to children.
We will also be artists today. And our task is to draw a street of a modern city in a frontal perspective.
In order to correctly build the composition of the drawing, that is, so that everything is successfully and correctly located on the sheet, we recall some rules for drawing a landscape, including an urban one. First, we place the sheet in accordance with what we will depict on it, namely, a section of the street (children place a sheet of paper). Let's imagine that we are standing in the middle and looking along the street. What do we see? What building rules do we need? Let's remember.
We must remember what the horizon line is.
Skyline formed from the intersection with the object of an imaginary horizontal plane passing at eye level.
If we go up or go down, then the position of the horizon line changes in accordance with this. Depending on where the object is: above eye level or below, its visible shape changes significantly.
Skyline divides the visible view of nature into two parts: what is above the horizon line looks different than what is below the horizon line.
Objects that are located above the horizon line have their bases visible, and those below them have their upper sides.
The horizontal line at eye level coincides with the horizon line and is depicted horizontally in the figure (that is, without tilt).
Now let's get down to drawing. In order to convey the depth (space) in the drawing more convincingly and expressively, we will try to correctly establish the horizon (display on the board), vanishing point on the horizon and try to convey the scale of objects - buildings, trees along the street.
Then, lightly touching a sheet of paper with a pencil, we outline a perspective view of each object, taking into account the nature of the form, as well as the boundaries of the falling shadows. When the construction is completed, then we move on to working with paints.
Independent work of students.
Getting started ...
Summing up the lesson.Exhibition of students' works, their analysis and assessment.
Now, guys, let's hold an exhibition of your work and see with you.
What works did you like the most?
Who do you think has the best job?
Developed by:
primary school teacher
Gorgun Tatiana Ernestovna
Topic: Expressive possibilities of color.
Program section:“Aesthetic perception of reality”, “Perception of works of art”, “Image on a plane. Colour."
Practical work topic: « Festive city»
Art materials and tools for work: gouache; watercolor; templates of houses, flags, flowers, lanterns; brushes; jars for water.
TSO: multimedia presentation.
Chalkboard decoration: at the top in the middle is the date and topic of the lesson, the motto of the lesson (Notice everything beautiful!); on the left side there are photos of architectural objects of Minsk, photo collage; on the right, pictures of children from past lessons; in the middle is a line drawing on the topic of the lesson, elements of the future composition.
Target: the formation of the ability to use the expressive possibilities of color when creating artistic images.
Tasks:
Updating knowledge about expressive means painting;
Formation of skills to determine the mood of a work by its color scheme;
Expansion of ideas about expressive possibilities colors;
Formation of skills to convey the joyful emotional state of the image with color;
Improving skills to compose on a palette and use when creating a composition different shades colors;
Development of color perception and imaginative thinking.
During the classes
Organizing time.
Checking the readiness of the class for the lesson.
Smile at each other, Wish each other and yourself success in your work.
Reading the motto "Notice everything beautiful!"
Link to past topics.
Pay attention to the work of the previous lessons.
How was the work done? Paints and pencils.
What types and genres of art are drawings? Painting, graphics. Landscape, still life.
What kind of mood does one get when stroking to work? Cheerful, kind, sad.
What helps the artist to convey the mood in the painting? Colour.
Explanation of the new teaching material.
Do you like holidays? Why do you like them? Mine hometown Do you love Minsk?
Look at the pictures. Let's try to find out the places of our city.
Children tell from pictures about the architectural objects of Minsk.
Where have you been? Where else would you like to visit?
The beautiful city of Minsk. Does the city change during the holidays? What's changing? Can you find out what holiday is going on by decorating the city?
Artists love to depict Minsk in their works.
Today we will get acquainted with one such picture. Consider the paintings Rimashevsky Igor Vileorovich. This is a modern Belarusian artist.
What mood arises when looking at a picture? What colors does the artist use to convey a joyful mood in a painting?
Now let's look at another painting of the artist Dovbush
Leonty Andreevich 1935-2005
Let's compare the first picture with another one.
How are they similar and how are they different?
What conclusion can be drawn?
Color helps to convey the mood in the picture. Light, warm colors create good mood... Dark, cold - sad, sad, alarming.
In the picture, the color conveys the mood, but in life, what makes the city festive? nice and cozy?
People of what professions create, maintain and control the beauty of the city.
Designers, janitors, painters, policemen, drivers, etc.
Will the fine arts come in handy for these people in work and in life?
Primary fixing of the material.
Development training exercises fine motor skills and color culture. Students in A5 format make up a palette of colors for performing the composition "Festive City". (Cotton swabs, poke with a brush)
Physical education
Independent practical work of students.
Group work.
Remember the fairy tale that we listened to in the last lesson. What happened in the fairy tale with magic city? Who put the spell on the city? Today we will also try to disenchant the city. Linear drawing of the city on the chalkboard. It is necessary to color it in such a way that the composition could be called “Festive City”. Can we handle it?
We will work in groups. Each group is people of a certain profession.
Group. Painters. Coloring ready-made templates in different colors to make the city colorful, festive mood... (Jab, dab)
Group. Electricians. Coloring lanterns for garlands. (Any technique)
Group. Pyrotechnics. Paint fireworks on ready-made templates using cotton swabs.
Teamwork design.
Children use double-sided tape and magnets to glue the elements of the composition onto a line drawing.
Analysis of the work performed.
We filled all the free space on the format?
What colors did we use?
What is the mood when looking at work?
Have we chosen the right colors?
Did you complete the task? Disenchanted the city?
Self-esteem.
According to the table.
Summing up the lesson.
What professions did we remember today? Do people in this profession need visual arts? Will it be beautiful around us or not?
Reflection. Continue the phrase.
I learned in class today ...
I found out …
It was interesting to me…
It was not easy for me ...
My work in the lesson ...
ELECTRICIANS
PYROTECHNIC


