Step-by-step drawing landscape. Drawing stamps with preschool children
Draw nature, such different and volatile, not easy. The article will help to portray a simple winter pencil, summer, seascapes.
Many love to be in nature, admire it, charge its energy. In order for positive emotions from communicating with nature longer, you can try to learn to draw landscapes - images of nature. To do this, we need to master the original skills, and then you can diversify your drawings, because nature itself is so diverse!
How to draw a beautiful landscape with a pencil phased for beginners?
First you need to decide what will be depicted on the landscape. You can draw:
- coast of the Sea, River or Ocean
- ravine
- lonely standing tree
- road leaving in the distance
- exotic island with palm trees
- nature at different times of the year
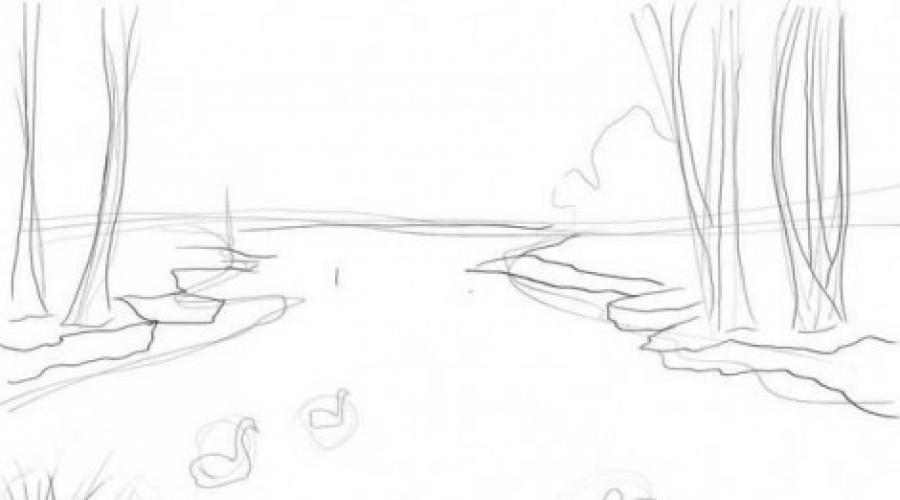
This is how you can draw pond, surrounded by trees:
- It is best to start with the branch of the horizon line, so then it will be easier to distribute objects in the picture.
- Uneven winding lines are delineated by a pond.
- Around the pond marks the lines of place where several trees will be. In the pond itself, you can mark with circles that it will later turn into floating clarops.
- "Strengthen" the banks of the pond, drawing parallel lines initial.
- In the foreground, the grass type is drawn, and trees are detailed. Let them have trunks of different widths and heights, in some places, the trunks will be broken or uneven.
- The stage of detailing came: Ducks are drawn, light sink is painted on the water, the grass should be thick, like branches on the trees.
- In the background, let the clouds be visible.
- The last step will be sharpened and shading.
 Pond pencil: Stage 2.
 Pond pencil: Stage 3.
 Pond pencil: Stage 4.
 Landscape with pencil: pond.
 River crossing forest.
- As always, the drawing begins with the definition of the horizon line. Vertically in the drawing, respectively, you need to draw winding lines of the banks of the river.
- As ideally, the river will surround the forest, that is, the trunks of different volumes and height are drawn. And, before drawing the trunks, it should be noted that they are standing on the elevation in relation to the river.
- Add crowns to trees so that they do the thick cover of the forest; Strengthen the banks of the river, shadow the trunks.
- River is more interesting to draw with the thresholds. With hatching on the river there is a flow.

 Landscape with the River Pencil: Stage 1.
 Landscape with a river Penndasha: Stage 2.
 Landscape with the River Pencil: Stage 3.
  Landscape with a river Pencil.
 Mountain Lake
- The sketch of the lake and the surrounding mountains and hills are made.
- Between the lines of the lake and lines of the mountains, the band is left on which the vegetation or a couple of small houses can be placed.
- Fuzzy contours of vegetation and houses reflected in the water are made.
- With the help of a more dense hatching, mountains and hills are highlighted, while the hatching on the surface of the lake, let it be barely noticeable.
 Landscape with mountain lake: Stage 1.
  Landscape with mountain lake: Stage 2.
 Landscape with mountain lake: Stage 3.
 Landscape with mountain lake.
 Island in the ocean.
Many dreams to visit such an island in the ocean, which they saw in the pictures - immense blue water around, yellow sand on land in the middle of her, palm trees, creating a shadow. While trying to draw such a landscape with a pencil.
- The horizon line cross the sheet almost in half. In the middle, we note the place of the island, it will still look like pancakes or cake.
- Above the island designated clouds. You can draw wavy clouds.
- The island will be trunks palm. Palms can be drawn thick, but you can only three or five, if desired.
- Under the palm trees need to draw grass.
- Now you can go to the water surface. It is better to draw alone lines of different lengths.

 Island in the ocean: Stage 1.
 Island in the ocean: Stage 2.
 Island in the ocean: Stage 3.
 Island in the ocean.
 Lone sailboat at sunset
The smooth of the sea and the setting sun is not difficult to draw, and the sailboat, too, and the landscape will turn out beautiful.
- The line of the horizon is drawn primarily, the contours of the sailboat are indicated, because it floats somewhere in the distance.
- The sailboat looks like a triangle, but the sail is better to shake.
- The range of the Sun, close to the horizon line, will mean that the sun is about to sit down.
- Last bar - we make water alive by drawing small waves.
Important: The sailboat should be reflected in the water!

 Sunset: Stage 1.
 Sunset: Stage 2.
 Sunset: Stage 3.
 Landscape with sunset.
 VIDEO: How to draw a landscape with a pencil trees?
How to draw a summer landscape of nature with a pencil phased?
If you want to draw a summer landscape, then they may well approach those described above. And, as an option, you can offer to draw a landscape with a summer house and a garden where many are sent to relax or tinker in the garden.
- The horizon line is indicated, over her sun and clouds.
- In the foreground, on the one hand, the sheet will place the trunks of future trees, and on the other - the house.
- The house is drawn from two rectangles, and the roof is located on top.
- From schematic designated elements of the figure can now go to detail. The crowns of trees need to make lush, because this is summer. On the house you can draw a pipe on the roof, door, windows, including the attic window. At the same time, all the extra lines slowly erase so that they do not distract from the main picture.
- The fence is drawn from the house, and the grass is done under it with strokes. You can also draw uncomplicated flower flowers.
- Finally, you can draw a path to the house and some other details that will be pleased to portray.

 Summer landscape: Stage 1.
 Summer landscape: Stage 2.
  Summer landscape: Stage 3.
 Summer landscape: Stage 4.
  Summer landscape: Stage 5.
 Summer landscape: Stage 6.
  Summer landscape: Stage 7.
  Summer landscape: Stage 8.
 Summer landscape: Stage 9.
  Summer landscape.
 How to draw a winter landscape of nature with a pencil in stages?
The easiest most beginning to draw winter and snow on the hills. This can be made with smooth uncomplicated lines.
- Since winter is often associated with the New Year, and the new year with the Christmas trees, even if the hills covered with snow covered with snow. Moreover, they are not difficult to draw them.
- Above the hills you can draw a few tuckers.
- The detail stage includes drawing the trees and strokes on the snow, meaning its fragility and surface irregularities.
 Winter landscape: Stage 1.
 Winter landscape: Stage 2.
 Winter landscape: Stage 3.
 Winter landscape: Stage 4.
 Winter landscape.
 VIDEO: Draw a winter landscape with a pencil
How to draw nature landscape with paints in paints?
Paint is more complicated than a pencil, but there is nothing impossible.
- With the help of blue watercolor paint, draw the sky. From the sky, the same blue paint will draw the line down, it will be the river.
- We have a purple or raspberry clouds, and the hills are yellow. Yellow is worth drawing and foreground pattern.
- An interesting combination of paints has already appears, which can often be observed in nature. A variety of it, adding orange on the banks of the river and slightly stenling the sky.
- On the river you can draw several laps, the effect will be created, as if the water plays. Also, with the help of additional layers, the paint can also be isolated and the surface of yellow in the foreground.
- At will, you can add trees to the landscape with the help of green areas and brown trunks. In addition, trees can be done right with fruit.
 Landscape with paints: Stage 1. Picture for handling: Park.
 Video: Sea P ezazh. Figure by a simple pencil
This lesson shows the work with the color and technique of working with a brush, as well as phased work on the rear, middle and foreground.
Newbies are best used inexpensive acrylic or oil paints. For example acrylic paints of the company "Sonnet"
For the lesson, this picture is selected. Simple night landscape with a small workshop over a thistle in the foreground.

This is a sketch. The horizon is located below the middle, two mountains, a plot with waves and a sand dune in the foreground. Make the sketch carelessly, as you see in the photo.

Mix a little yellow light cadmium with white and start writing the sky.

Add the cadmium yellow dark and more yellow light cadmium to get such a color.

Apply paint where I am in the photo, and, appropriate, make a color stretch.

Add a red light and black cadmium to the last color resulting to get such a color as in this photo.

Fill in the color of the mountain, which is behind.

Add the cadmium red light and blue to get the next color.

Write another mountain as you see in this photo.

Add the same colors for the horizon.

Fill the back of the paint, as you see in this photo.

Add black, cadmium red light and blue to get this color.

Make a mixture for the mountains or use a bit of the one that remains and continue to write.

Mix blue and red until you get such a color and fill in the paint where you see on the photographer.

It is mixed here more black, red and naologo to get darker. Mix up to mix the paint on the canvas to get fluffy outlines of soft grass.

Here I used a fan brush to add fluffiness. A fan brush is very good for such a process. Now you need to wait everything to dry before continue.

Make sure the surface dried before making the next step. For the main color of the foam mix blue, some black and white.

After the main wave is written and somewhat rear, I add a foam pattern in the foreground.

So your submarine should look. Leave dry before proceeding.

Flat brush Mix black, phthalocian green and cadmium red to get dark green color. Red shuffling brightness, but leaves green tone.

Draw the lines as you can see in this photo. The trick is that they look more likely to be located at different levels. Try to avoid very curved and highly straight lines. Practice on a separate canvas if you are not confident.

We start writing the basis of the thistle, moving the brush from the bottom from the middle to the side.

Now Mix Neopaitan Yellow with Fine Light, to brighten the dark green mixture. The resulting color we will use to highlight the brightest sections in the foreground.

Add stem thistle as you see in this photo. Let them overlap each other in different angles to maximize the natural effect.

The same color, flexing and turning the brush, strokes writing the leaves. It is necessary for this practice, so practice on another canvas to get the right effect in both directions: right and left.

Here I used Alizarine Crimson to change the color of the leaves. This gives interest and games foreground.

Stay light blue color for thistle colors. Use blue or phthalocian blue.

We write with sharp movements from below, so that the flower is as if dissolved in the dark. Wrap your brush and repeat, so you do not get dark color from above. Use white and yellow to highlight bright places.

The lesson is over.
You may need to need several times to put correctly strokes. Do not retreat, continue. Do not be afraid of mistakes because you will still do them. Write this picture 3 times and for the fourth time you will succeed correctly. Use art panels, they are inexpensive and good for practice.
Elena Dyachenko
Comprehensive creative development is useful and necessary for all children. But not all the children love paint, but technique drawing stamps, I like everyone without exception to children and even adults.
Drawing in this way, children are not afraid to be mistaken, since everything can be fixed easily, but it is easy to come up with something new, and the child finds self-confidence, overcomes "Fear of pure sheet of paper" And begins to feel like a small artist. He appears interest, and at the same time and desire paint.
After all, you can print anything. That is what will be real creativity.
Teach the baby to make prints. To do this, heal a piece of foam rubbed with a diluted gouache, so that the stamped pad is like. Now dip our mold in the paint, add to the paper and carefully remove. Color imprint ready. You can apply paint on stamp with brushesOr to dip it into thick paint.
It does not matter that neat prints from the baby will not get immediately. Here, as in any case, we need a certain dexterity and skill.
In order for the printing of figures to acquire some meaning, offer the kid to decorate the ornament paper plate, carved from cardboard vase, dress drawn doll. Can draw Rowan berry foam rubber and alway strawberries, beads on the neck of the girl and a bright tail of the rooster. The main thing that the process of creativity liked, caused an emotional response in a young artist.
Materials for homemade stamps They surround us at every step, and the number of execution options is almost infinite, but to begin with, it is worth trying to implement several common and well-proven ideas.
In the process drawing You can use the following types with kids stamps:
1. The very first printing tool - your own fingers and palm baby.
Child draws on paper palm, or edge ladoshki, cam. Packs in paint and imprinted on paper as it is necessary for the drawing, which it depicts. Do not hurry draw it with hands, You can just show him an example - on your sheet, principle drawing The child quickly grabs himself. Then the paint with the palms wipes the rag.
Making fingerprints - no less fun than hands, such an occupation will require greater concentration, even better breaks a small motorcy.
2. Stamps from vegetables.
Morkovi stamps
Make two or three stamp: Circle, oval, and for the petals - a circular sector (for this you need to cut only two sides of the triangle, and one left rounded).
Potato stamps
Cut the potato in half, apply the drawing to the side of the cut and carefully remove the excess.
You can cut anything, or rather what allows you to your skill - from a house to a beautiful flower
Cabbage stamps
You can twist the cabbage sheet, make a smooth slice - the print will be an unusual rose. An interesting imprint is obtained from a cutting cabbage.
Halves of onions, apples, pears and other vegetables and fruits serve excellent stamps.
3. Patrolone drawing
The child lowers a piece of foam rubber (or tampon from foam rubber) In thick paint and puts off the paper. You can use stencil. Slices of foam rubber well tint paper, creating a background for the future drawing, draw animals, Birds, transmitting wool texture, plumage.
4. « Drawing with leaf»

Find on the street beautiful e in the form of the leaves of trees.
Dry one side of the leaflet in the diluted paint.
Gently apply it to the painted side to the landscape sheet, slightly pressing to the paper with a napkin, arrange hand.
Remove the leaves and consider prints together.
5. As a basis for sealing, good covers from plastic bottles, corks, erase, small planks, matchboxes, cubes and parts of type constructors "Lego" (however, the latter themselves are already quite good stamps).


6. Stamps From plasticine from manufactured by extruding the pattern in it using any acute item like a rod ballpoint handle. It is very convenient to urge the drawings on pieces of plastic trays, which sell vegetables, fruits.

7. Excellent seats are obtained from ordinary gum for money, if you stick them to the base, bent in the form of a square, triangle, mug, stars, snakes, etc.
8. Jars and bottles with different configurations and neck diameters and bottom - this is ready stamps. For example, donyshki plastic bottles give a wonderful peeling of a flower or a sun.

9. Improve the same images a little in another form will help the cocktail straw cleaned at the end - the deeper the cuts, the longer the prints of petals.


10. For drawing Background Create Stamps From wound to the base of thick threads, as well as rope girls, slices of an old sweater of embossed mating and rope.
11. To make a drawing repeating, you can make the switch-rollers, taking the coil from the tape or the rolling pin for the base.
12. Very convenient to do stamps from foam and food tray. 13. You can twist the paper of the candy or box - it will turn out stamps for flowers.

14. Ward sticks - Ready stamp. You can also use cotton wool and purulent paper.
For each color you will need a separate wand. With the help of this technique, lilac or mimosa flowers are perfect. Spend lines flomaster. And the bunches of colors already make chopsticks. But this is the highest pilot! No less pleasure will bring the child and painting More simple things - Flowers and berries (Stems can be draw feltster) . And you can cut out a dress (scarf, tablecloth, mittens) And decorate the ornament from the points.

Drawing stamps contributes to the development of the child nKA:
Shallow motors of hands and tactile perception;
Spatial orientation on a sheet of paper, eyelasor and visual perception;
Attention and enhancement;
Visual skills and skills, observation, aesthetic perception, emotional responsiveness;
In addition, in the process of this activity preschooler The skills of control and self-monitoring are formed.
Painting For a child, joyful, inspired work, to which it does not have to be forced, but it is very important to stimulate and maintain a baby, gradually opening new features of the visual activities.
Drawing stamps Attracts with its simplicity and accessibility, reveals the possibility of using well-known objects as artistic materials. This is especially clear when working with babies to the fine period, when they have not yet formed technical skills to work with paints, brush ...
And the main thing is that drawing stamps Plays an important role in the general mental development of the child. After all, self-concrete is not the final product - drawing, and the development personality: Forming confidence in yourself, in your abilities, self-identification in creative work, focusing activities.
Though the Lord and made a lot of problems (not counting the disease, crime, hunger, poverty, war, corruption and Russian pop) He still managed to create a good atmosphere of life on our planet. Earth with water is often capricious, having massive sacrifices. But in some places it turned out very not bad, you can even make a bunch of nyashny photos. But we can save even deeper. In this lesson you will learn how to draw nature with a simple pencil. After that, you can take your drawing tools and safely go to a cozy place in order to create an indescribable masterpiece. Nature is a symbolic name for everything that eyes see. An exception can be considered to be plastic or reality shows, the rest refers to one formal body that manages life and has a strange plan for the production and provision of its livelihoods. As an ordinary harsh boss, nature easily removes any office plankton, sometimes whole types, and, like any girl, loves whims and antics. The last critical days of this lady ended with the birth of Hitler, Hussein and Justin Bieber, which grand influenced the state of the planet as a whole. It may seem that the nature of evil and impeccurnin, in fact she didn't care exactly just like a dog on the ethnic origin of fleas in her wool. Suddenly it turns out that nature needs help, and some people are sacred in this, while they can not even protect themselves from local splines. If suddenly it turned out that you are - nature itself, then what are your privileges:
- You are beautiful, for you are the concept of being.
- You exist, although I will never really understand this.
- You own all valuable metals on the planet, and therefore the shortage of money does not suffer.
- Portraits are hanging in almost every house on each wall.
- No need to worry about what you made a mistake, your mistake will fall either in a circus for freaks or in the Red Book.
- You can always arrange fireworks from volcanoes.
- You put a bolt on the theory of relativity, as you can be in all places at the same time.
- You can cure cancer, but no one will believe you.
But now take a pencil in your hands and try to draw a mother-nature.
How to draw the nature of the pencil phased
Step one. Immediately select the lines with a small pond with the shores, on the shores the same lines draw several trees. Several circles in the water will serve to turn into ducks.  Step second. Below we draw high grass, the circles slowly turn into birds. The thick line will neatly circle the edge of the shores.
  Step Three. In this step, all the attention of switching to the back background behind the horizon line. Draw clouds there.
  Step fourth. Now draw small waves and shadows on the water, make the grass thicker, and the rear fountain hatch.
  Pitch fifth. Residually sketch and missed places on trees and earth, and then accurately finish the drawing, putting the ducks.
  See also similar lessons for drawing landscapes.
How to draw a landscape, where to start his drawing to children, let's draw a landscape yourself. Let's see examples how to draw landscapes, pencil and paints. You have a phased drawing of summer, autumn and winter landscapes.
1. The horizon line is indicated.
2. Above it draw the sun and clouds.
3. In the foreground on one side of the sheet, you will place curved lines it will be the trunks of future trees.
4. Now give branches to the trunks.
5. The trunks are ready, now draw crowns by trees, they draw almost as well as tuch. The crowns of trees need to make lush, because this is summer.
Do not forget to raise extra lines.
6. Now draw on the other hand the house. The house is drawn from two rectangles, and the roof is located on top.
7. On the house you can draw a pipe on the roof, as well as draw the roof of the corridor.
8. We continue to make a house draw: door, windows, including an attic window. At the same time, all the extra lines are slowly erased so that they do not distract from the main picture.

9. The fence is drawn from the house, and the grass is done under it strokes. You can also draw uncomplicated flower flowers. Finally, you can draw a path to the house and some other details that will be pleased to portray.

10 Here is also ready for our summer landscape, drawn by a pencil, now the wish can paint it.

To fulfill the autumn landscape we will need: gouache, watercolor paper, brushes, simple pencil, pieces of newsprint, plastic butterfly or flat palette.
1. We plan a pencil line of the horizon and coast.
2. Tinging the sky from the dark to the light to the horizon line, by adding in the blue color of white guashi.

3. Light uroat with dark yellow, paint the far bank.
4. Light okra, with the addition of dark brown, we sworify the near shore.

5. White, with the addition of blue, green and brown, cover water. Closer to the shores make darling.
6. Using a piece of crumpled newspapers typing clouds.

7. It should work out as in the picture.
8. In the distant plan, we draw a semi-dry brush with strokes, different shades of green, tree.

9. A piece of newspaper Print bushes on the far plan dark yellow with the ocher and the crown of the tree on the right (large shrub) okra, with the addition of red and yellow. Here colors can be used as desired. To match the colors of autumn foliage.
10. Thin brush draw a tree twigs (large shrubs) and bustle on the bottom of the foreground. On the bush with small strokes we plan to foliage.

11. Light gray drawing trunks of birch and dark gray branches with a thin brush and spots on the trunks. We add, if desired, small Christmas trees on one of the shores.
12. Again a piece of newspaper with yellow paint, with the addition of white, printing carefully crown birch and yellow, with the addition of ocher, grass in the first and distant plans.

13. Add color darling (dark brown) and print grass under trees and shrubs
14. Thin brush Draw twigs of bushes, blasting in the foreground

1. At first, the pencil in the middle of the sheet will make out the outlines of one Christmas tree and one house. The Christmas tree will be wide, racking.
2. And now we will add two more houses on the sides and another Christmas tree. The houses will have triangular roofs characteristic of many villages.

3. Add more Christmas trees and a little fence.
4. Now the outline will be drawing with paints. The Christmas trees will be a juicy green shade, the houses will give a warm shade of the unpreded tree, and the snow will be a little pouring blue. In order for the picture to looked alive, we assign on the fence of three birds.

Read 4223 time