We draw e. How to draw a Christmas tree with toys and New Year's garlands in stages is easy and beautiful: master classes for children
You can draw a Christmas tree the most different ways... Although it is "arranged" in the same way as the rest of the trees (trunk, branches extending from it), but this "skeleton" is disguised by fluffy spruce paws. Therefore, when drawing a Christmas tree with children in general, it is convenient to take a triangle as a basis. By the way, such a triangular (or rather, cone-shaped) shape of fir trees has a deep ecological meaning. Spruce grows in places with harsh climates, with snowy winters. This shape of the crown does not give snow in a large number accumulate on tree branches. He just rolls off the tree, like from a mountain. And this helps the branches to withstand, not to break from excessive snow weight. People have spied on this "trick" from nature and are building houses with a gable roof so that the snow does not accumulate there either.
Paint christmas tree it is very convenient with children with gouache paints. First, paint over the needles with green paint, and when the gouache dries a little, draw balls and beads. These round decorations are very easy to draw with small children not with a brush, but with cotton swabs. Dip cotton swab into the paint and press it against the paper. You will have a print that is fairly regular and round. Then, on the dried balls with white paint, you can make glare-revives.
We offer seven options for drawing a Christmas tree with children of different ages... They are located as the work gets more complicated.
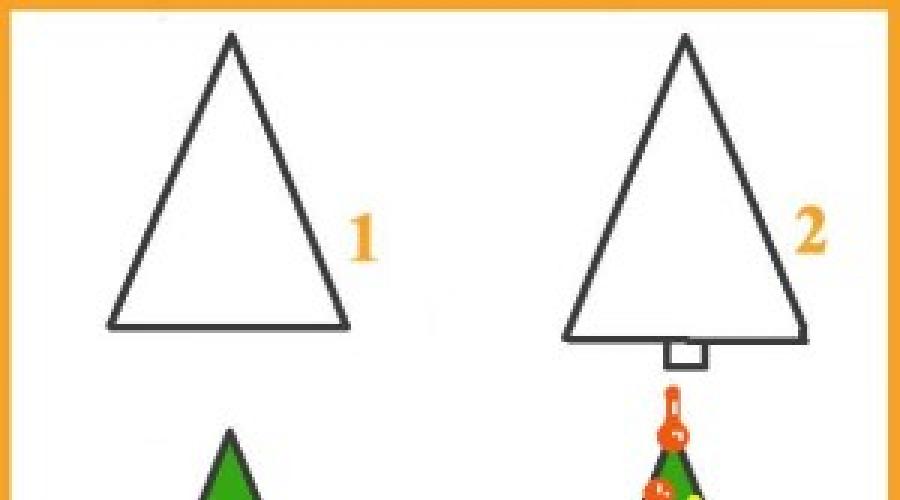
Christmas tree triangle - step-by-step drawing with children from 4 years old.
This is the simplest Christmas tree. It's not even based on a triangle - it's just a triangle. Add balloon decorations - and you have a wonderful New Year picture!

Christmas tree-triangle - a step-by-step drawing scheme with children from 4 years old.
Simple with children from 5 years old.
This tree is a little more complicated. She already has characteristic prong branches. Such a Christmas tree can be decorated with balls or, simply painted with green paint, "plant" in the forest.
 A scheme for the phased drawing of a Christmas tree with children from 5 years old.
Christmas tree based on a triangle - step by step drawing
with children from 6 years old.
This tree has more branches-legs. Draw them like a fence, right away by hand. The bottom of the tree is also openwork. It already looks more like a real tree. Drawing decorations in advance only makes sense if you are going to paint the tree with felt-tip pens or colored pencils. If you work with paints, then you can write balls and garlands later, without a preliminary drawing.

A scheme for the phased drawing of a Christmas tree with children from 6 years old.
Christmas tree based on a triangle - step by step drawing
with children from 7 years old.
In this version, the Christmas tree is replaced simple lines come broken, wavy. And the herringbone looks less schematic, even acquires some volume. Although its base is still the same flat triangle. The sense of volume is achieved by the fact that we outline not only the side branches, but also the branches in the middle of the tree. And also not straightforward, but capricious and whimsical line of the garland.

A scheme for the phased drawing of a Christmas tree with children from 7 years old.
Volumetric tree - step-by-step drawing with children from 8 years old.
When drawing this tree, we use a conditional skeleton - the trunk. Its main feature is that here we draw branches that are facing us. They should be short, distorted in perspective. After the drawing is done in pencil, you can offer different variants registration and decoration of the Christmas tree. Figure 4A is a summer tree in the forest. Figure 4B - winter tree swept up by the snow. Very suitable for such work gouache paints... After finishing the work with green paint, take white and apply snow waves on the branches. Another idea - try to make the Christmas tree not green, but blue. Figure 4B - christmas tree dressed up in beads and balls.

A scheme for the phased drawing of a Christmas tree with children from 8 years old.
Realistic Christmas tree - step-by-step drawing with children from 9 years old.
This, of course, is a very young Christmas tree. This work is best done with paints. The Christmas tree will look like a real living tree. Dressing her in a New Year's outfit is unlikely to work.

Realistic Christmas tree - a step-by-step drawing scheme with children from 9 years old.
Christmas tree based on a pyramid - step-by-step drawing with children from 12 years old.
This work is interesting to do with pastels, charcoal or sanguine. In two recent cases the picture will turn out to be monochrome. The work is quite difficult and even for children of 12 years old without artistic training, it is better to choose another option for drawing a Christmas tree.

Christmas tree on the basis of a pyramid - a step-by-step drawing scheme with children from 9 years old.
In addition to the Christmas tree, there are many other trees that are interesting to draw with children. Check out the article about step by step drawing trees with children. You will surely find interesting options for children of all ages.
Master - class for children 5-8 years old "Christmas tree-beauty"
Ostanina Viktoria Aleksandrovna, educator, MDOU DS KV "Raduga" JV "Silver Hoof"
Target: Performing New Year's crafts.
Tasks:- learn how to draw a Christmas tree;
- learn to use materials at hand in your work;
- develop Creative skills children;
- learn to be careful when working with gouache and glue.
Purpose: Drawing is an interesting process. This master class will allow creative people it is easy to draw a winter beauty, and for educators and teachers working with children of preschool and junior school age, will serve as a guide to teaching their wards a simple and understandable way of drawing and decorating crafts for the new year.
Description: The master class will open to everyone a simple option for drawing a Christmas tree with its subsequent decoration. We will use materials at hand in our work, which will make our craft accessible to everyone: white napkins - for making snow on the paws of a Christmas tree, and tinsel - bright sparkles to complement the image. The craft process is accompanied by detailed photo.
Materials: white sheet of paper, colored cardboard, gouache, brushes number 5 and a glue brush, scissors, a pencil, an eraser, glue stick, PVA glue, silver tinsel, white paper napkins.

Progress:
Soon, soon New Year
Will come to visit the children.
Soon, soon in every home
The tree will light up with lights!
The lights will sparkle
It's just a miracle - look !!!

In anticipation New Year's miracles so you want to make your home a little brighter a little more interesting. Every adult remembers his childhood, when he had the opportunity to take paints and brushes and draw a wonderful Christmas tree with toys and a bunch of gifts under it, hang on the wall and delight everyone with his creativity. As adults, we lose this opportunity due to lack of free time or indecision, because not all of us know how to draw beautifully and sometimes feel embarrassed about it. But we have a unique opportunity - to give the children around us the opportunity to believe in our strength and draw a wonderful Christmas tree and decorate it with improvised materials, and in the end we will get a wonderful christmas craft, able to decorate our home and give it a festive atmosphere. Feel free to take a gouache brush and start painting !!!

And in parting words to us, a wonderful poem by Tatyana Volgina, after all, it is such a beautiful Christmas tree that we will now do:
“Before the holiday, winter ...
Before the holiday winter
For a green tree
The dress is white itself
Sewed without a needle.
Shook off the white snow
Christmas tree with a bow
And is more beautiful than everyone
In a green dress.
Her color is green
The tree knows this.
How is she on New Year's Eve
Well dressed! "
1. Let's start by making the background. For this we need a white sheet of paper and a bright background, such as red. We want the white sheet to be smaller than the red sheet of cardboard. To do this, cut off with scissors 2 centimeters from both sides of the white sheet.

2. Now attach it to a red piece of cardboard.

We will not glue it yet, we just checked how it looks.
3. Now let's start drawing. We need to draw the base. To do this, using a pencil and a ruler, draw a large triangle with a convex base, stepping back about 2 centimeters from the top of the sheet and from the bottom corners. It's just important not to draw lines clearly, try to choose soft pencil and do not press on it - the lines should be slightly noticeable, we will erase them later.

4. Now we divide the triangle with transverse lines into 4 equal parts in height.

5. Now let's draw arcs instead of straight lines, our Christmas tree should turn out to be beautiful! On the outer sides of the Christmas tree, the lines are concave, and on the transverse lines, the arcs are curved downward.

6. Now erase the extra lines.

7. To paint we need a green gouache, a glass of water and a brush.

8. Type in gouache on the brush and apply long strokes, as shown in the photo.

9. We try to apply strokes evenly, overlaying them at the beginning a little on top of each other, and to the bottom of the tree exactly next to each other, trying not to leave gaps so that the tree is fluffy.

10. Now draw the second tier of branches similar to the first.

11. Now the third tier. Make sure that the strokes overlap the transverse arcs and maintain the same length of strokes.

12. Now draw the top of the head. We start the strokes from one point, trying to make the top of the head sharp. The Christmas tree is ready.

13. Now, with the very tip of the brush, make the Christmas tree fluffier. With small strokes, we apply short needles to the crown of the Christmas tree.

14. We continue to draw the needles at the Christmas tree. You can use a darker shade of gouache. With short vertical strokes, apply needles along the bottom of each tier.

15. The Christmas tree is ready.

16. With the help of a pencil glue, we glue our drawing onto a colored cardboard base.

“Here it is, our Christmas tree,
In the blaze of radiant lights!
It seems she is the most beautiful of all
All greener and more luxuriant.
A fairy tale hides in the green:
The white swan floats
The bunny slides on a sled
The squirrel gnaws nuts.
Here it is, our Christmas tree,
In the blaze of radiant lights!
We all dance for joy
On New Year's Day under it! "
Such wonderful words were written by Valentina Donnikova and they just perfectly describe our beauty.
But to complete the look, let's bring in some sparks and white fluffs!
17. For making snow we need white paper napkins. We tear them into small pieces.

18. Roll into small lumps.

19. Now, using a brush, apply PVA glue in the form of droplets on the Christmas tree.

20. Now put the resulting lumps on the glue droplets and press lightly. We let it dry and a snowball fell on our Christmas tree.

21. Now a little magic and sparks will appear on our Christmas tree!
We take silver tinsel and scissors. Carefully cut off the tips of the tinsel.

We try not to scatter them, but put them in one pile.

22. Now, with the help of a brush, apply PVA glue, but not in droplets pointwise, as in the previous time, with small horizontal strokes.

23. Now add some silvery sparkles to the glue. After the sparks have been poured, you can turn over the sheet with the Christmas tree and shake off the excess sparks, and then sprinkle them again on the visible glue.

The Christmas tree is ready!


Such a wonderful Christmas tree will become a worthy exhibit at the children's art exhibition.
Less than a week is left until the most important holiday of the year, so more and more often people are engaged in creativity and create for themselves good New Year spirit... And it is for such people that several master classes are presented below, how to draw a Christmas tree step by step for novice artists with a pencil.
Before starting work, you should get the following things in advance:
- A4 white sheet or even more;
- simple soft pencil;
- eraser;
- sharpener (just in case);
- colored pencils or paints as desired.
And so, the main stages of work:
A large triangle is drawn on the sheet - it depends on its size what the future Christmas tree will be at the very end. If necessary, you can use a ruler to keep the lines as straight as possible.

After that, the top of the future tree is drawn in the form of wavy lines, as shown in the figure below.

Now it's worth drawing the branches below in exactly the same way. They do not have to be a single whole, but as if they go scattered.

At the next stage, the most lush part of the tree is drawn and the auxiliary triangle is erased. This should be done as carefully as possible so as not to erase too many necessary details. Of course, after they will need to be finished again.

Straight lines draw a short but reliable tree trunk. Since the Christmas tree is New Year's, it is not on the street, but transplanted into a pot, which appears on paper at the same stage.

Now comes the fun part. The tree needs to be decorated with garlands, as shown in the example below. But you can also turn on your imagination and decorate the Christmas tree at your discretion.

On the last stage are completed Christmas toys, snowflakes and any other New Year's attributes at the discretion of the artist.

It remains only to decorate the resulting drawing so that it becomes "alive" and looks more interesting in a frame on the wall.
Now you know how you can draw a Christmas tree with a pencil in stages, but this is not the only lesson for beginners in our article today.
Little herringbone
The next option is a little lighter than the previous one, and the holiday tree looks very cute and attractive. Even children can cope with such a pattern.
So, in order to show all your possibilities in drawing, it is enough to go through the following steps:
A4 sheet is placed vertically and a straight vertical line is drawn in the middle of it. Its size will correspond to the height of the future Christmas tree, so this moment should be thought out in advance. In the same way, you can draw several small Christmas trees on one sheet.

At the very top, just where the depicted line ends, a Christmas star is drawn. It will become the main decoration and should be quite large. You can also draw eyes or a funny face on it for fun.
If I may say so, the tree will have three tiers that complement each other. At this stage, he begins to draw the top level on paper in the form of a mountain with jagged ends.

After that, the next part of the Christmas tree is drawn. Everything is done in exactly the same way as in the previous step, only this time the "mountain" should be slightly larger.

The penultimate stage is a detailed drawing of the lower part of the tree. Of course, it will be bigger and more magnificent than all the previous ones. Now we need to finish drawing the visible trunk and the horizon line at the bottom so that the tree does not “hang in the air”.

At the very end, all kinds of new Year decoration and garlands that will sparkle with colorful lights.
Most often, for novice artists, it is important not only how to draw a Christmas tree step by step with a pencil, but also what colors it will be presented in. So it's time to pick up pencils and trust your inner voice.
Christmas tree from the cartoon
V Soviet time many holiday cartoons dedicated to the New Year were released. And we all probably liked the festive spruce, whose branches were crushed by snow and decorated to such an extent that at times dazzled in our eyes.
It is very easy to draw a similar Christmas tree yourself. And this can be done in just 4 steps:
In a familiar pattern, a triangle is drawn on a piece of paper. An auxiliary horizontal line is neatly drawn from its very top. With its help, it will be possible to harmoniously finish the tree trunk, stars and a stand for the spruce.

It's time to start drawing the left side. To do this, smooth lines with pointed tips are drawn on paper. Sometimes they bifurcate, sometimes they remain fused. This will make the branches look more harmonious. At the same stage, a pointed star is drawn on the top of the tree and its lower branches.

In the same way, the right side of the Christmas tree appears on paper and both sides are connected with wavy lines. It remains only to finish drawing the trunk and stand, as well as New Year's toys or a small amount of snow.

After the step-by-step principle of drawing a Christmas tree with a pencil for beginners has become clear, all that remains is to erase additional lines and paint the resulting masterpiece with paints or pencils.

Such a drawing can be a good basis for a homemade new year card or for a gift to parents. You can also hang it in a frame on the wall or send it to creative competition young talents.
The last holiday version of the picture
So that it does not seem there at the very beginning, but there is nothing difficult in drawing a Christmas tree on your own with a pencil. How to do this in stages will be shown below for novice artists.
To do this, you only need a pencil, paper, an eraser, a little time and self-confidence. And even if it does not work out the first time, this is not a reason to quit creative pursuits.

So, let's start with the simplest:
- A flat horizontal line is drawn in the middle of A4 or A1 sheet. To do this, you can use the ruler.
- Based on the example below, an asterisk is neatly drawn, which will become the main decoration on the festive Christmas tree. It can be supplemented with interesting elements.
- Now two arc-shaped lines are drawn from the star - they should smoothly diverge to the sides and connect with each other in a zigzag strip. You shouldn't rush at this stage.
- A similar element is drawn below, which should start from the second zigzag on the right, and then on the left.
- The third part of the tree is drawn according to the same principle, but different. large size... After that, a trunk visible from under the branches is drawn.
- It remains only to decorate the New Year's beauty with green paint and the drawing will be complete. For harmony and " interesting image»It is recommended to paint the upper part of the tree with light shades, and everything else in dark shades.
- As soon as the paint dries, you can paint festive toys on the branches of a tree with multi-colored paint, as well as depict a beautiful background with snow.
Now everyone can draw a Christmas tree and even use different variations for this. But don't stop there - use your imagination and don't be afraid to be original.
For him, a canvas is created on paper in the form of a triangle, the shape of which will result in a Christmas tree with symmetrical sides and the desired size. To do this, you can use a ruler or a regular triangle, with which it is even easier to draw neat lines.
The top of the triangle will become the crown of the Christmas tree, the branches of which can have both clear lines and imitate needles, if the lines of the drawing are not created straight, but in the form of jagged cutouts. As the sides of the triangle expand, the branches of the Christmas tree also become more massive. Bottom part the picture may end with the image of a tree trunk or just snow, in which the sprawling branches of the New Year's beauty are buried.
If there are doubts that it will be possible to make the branches the same size, then inside the triangle itself you can draw thin horizontal lines, which will serve as the border between the branches of the tree, allowing you to get them symmetrical. According to this scheme, difficulties with how to draw a Christmas tree in stages with a pencil, easily and beautifully and in a matter of minutes, will not arise at any level of professionalism and artistic skills.
Interesting! In this technique, the pencil may not be the only possible tool. With the same success, the base part of the tree can be outlined with felt-tip pens, and painted over with paints. A Christmas tree and volumetric applications will help to make an original one, when toys and garlands are not drawn over the already finished drawing, but are glued from other materials. You already know, ?
The second way to draw a Christmas tree is easy and beautiful
In order to use it and figure out how to draw a Christmas tree in stages with a pencil, easily and beautifully, a slightly different template is used than the one described above. The triangle is replaced with a vertical line indicating the height of the future tree. It is very easy to adjust the size with this method: the higher the line, the larger the spruce itself.
The drawing will begin with an image of a star crowning the crown of the head and at the same time serving as the top of a tree. In total, the tree will have three levels, the upper one in the shape of a triangle is drawn directly under the star. The jagged ends of the bottom line of the triangle mimic branches. It is advisable to make them not quite straight, but with a slight bend in the shape of a crescent, the protruding part of which will be directed downward.

The second triangle is drawn larger and wider than the first, as the tree expands from the top of the head down to the bottom of the trunk. The largest triangle is the last one. The teeth on it must be present in the same way as on everyone else, otherwise the drawing will be more schematic and not reminiscent of a real fluffy beauty. We also tell Dogs by zodiac signs.


The last step is to draw a tree trunk, the same vertical line helps to make it even and not to be mistaken with the center. You can decorate the spruce according to your taste and imagination.
Good afternoon, we continue the series of articles on the topic "How to draw New Year- 48 ideas and 10 lessons "... And today I add the FIR-TREE to the common piggy bank of New Year's drawings. We will draw Christmas trees in DIFFERENT TECHNIQUES. I will show you how to create simple drawings trees, and how to create with your own hands a real tree with a drawing of coniferous needles and shine reflected in glass Christmas balls.
So, let's see what ways to draw Christmas trees I have collected for you in this article.
METHOD # 1 - ZIGZAG
The easiest way to draw a Christmas tree is with a zigzag that expands downward. It can be painted with a soft brush (left photo) or with a thin brush (right photo below).

How to draw a Christmas tree
METHOD # 2 - DUSTER.
This method is also quite simple for drawing with children's hands. You just need to draw on a piece of paper straight line(or slightly tilted if the tree tilts).
This line will serve the central axis of the tree- its backbone. And then, with paints - to the left and to the right of this axis - we will draw our bunches... You need to draw from the bottom rows of the tree to the top. This is important so that our upper tiers lay on top of the lower legs of the tree.

That is first we draw the lower tier of the tree(a row of sweeping brush strokes-branches from below), then the second tier above the bottom (we put the strokes overlap to the edge of the lower row), and then one by one tier by tier we go to the top.
Then on this tree you can draw snow.

Here in these pictures below also a tree drawn using the DUSTER technique. Note that, after we draw Christmas balls on the Christmas tree, we need to take green paint on the brush again and apply a few coniferous strokes ON TOP OF THE BALLS so that the balls seem to look out from under the paws.

In the same technique, you can draw trees on winter landscapes. The background for such a New Year's landscape can be circular blizzard from shades of blue gouache. And the spruce branches themselves are also painted with SEVERAL shades of blue, turquoise and white.

It also looks beautiful when this technique is used in painting. WET PAPER WATER COLOR... We get fuzzy blurry fir tree silhouettes... And already Christmas balls on such a tree can be drawn with emphasis clearly with perfectly straight edges.

Such a Christmas tree-broom can be decorated with dots of beads, bows, New Year's candies, round spots of balls.

To make the ball perfectly round (as in picture above), it is better to draw it not just with a brush, but with a stencil. You just need to cut a round hole stencil out of cardboard - preferably several holes for different sizes of balls.
To do this, circle several glasses of different diameters on a sheet of cardboard, pierce each circle with scissors and cut out the inside along the line of the circle - and we will get round holes patterns. We put them on the Christmas tree - the desired hole-circle in Right place Christmas trees. And carefully paint over the hole with a thick and rich color. You can do it not with a brush, and sponge- that is, a piece of foam rubber sponge for washing dishes. With the help of a sponge, the paint will lay down evenly - since the fibers of the brush can crawl under the stencil and spoil the ideality of the circle.
Now, look at the pictures below. Here we see that our MAZKOV equipment is being performed in the other direction... Here the strokes are placed not downward from the axis-trunk of the tree, but on the contrary, the lines of the needles are laid semicircular vector up... And we get already new silhouette New Year tree. That is, a different kind of Christmas tree.

CONCLUSION: The main thing in this technique AXLE-BARREL(we draw our brush strokes from it). And more importantly SEVERAL PAINT COLORS- strokes should be made from paints of different shades of green (or different shades of blue). Then our tree will look volumetric, textured and close to its real natural beauty.
How to draw a Christmas tree
METHOD # 3
silhouette bicolor
This method is also very simple. Little children adore him. First, draw the usual christmas tree silhouette- Shaggy (left picture below) or geometric with sharp triangular corners (right picture below), as you please.
Paint over silhouette in green color... Dry. And on top of the dried background we draw Christmas tree decorations. Or we immediately place the Christmas tree decorations, and then separately paint over the gaps between them in green.

The silhouette of a Christmas tree can be the SIMPEST one - an ordinary rectangle. The stars, balls, and stem of the trunk make any triangle look like a Christmas tree.

And here in the photo below are more examples of SILHOUETTE trees, but already with DOUBLE PAINTING. Here the silhouette is divided into ZONES - each zone is painted in its own shade of green.
The zones are drawn with a pencil on a dry green background - and then painted over with a new shade of green. Dry. We draw decorations, a star ribbon beads - and the Christmas tree is ready.

How to draw a Christmas tree
METHOD # 4 - LONGER.
Tiered trees we all knew how to draw back in kindergarten... When the tiers were erected from triangles different sizes... Here in the pictures below I present to your attention variations of this technique images of a Christmas tree.
Tiers can have rounded corners and smooth lines floors (as in the left image below). Or tiers can have sharp corners and broken lines floors (as in the right image below).

The tiers can have CLEAR SYMMETRY (as in the left image below).
Or each tier can be NON-SYMMETRICAL - not the same on the left and right (as in the right picture below).

Each tier can be painted over in your shade of green... From dark to light, or alternating between dark and light in turn (as in the picture of Christmas trees below).

Along the edges of the tiers of the Christmas tree, you can expand the lines of SNOW, or the lines of the HIRLAND GIRLAND.

A tiered tree can have an interesting stylization - for example, these trees in the pictures below are the edges of their legs twisted in curls of varying degrees of coolness.


How to draw a Christmas tree
METHOD # 5
drawing of shadow zones.
And here are the Christmas trees, which no clear tiers- but hints of tiering are given drawing a shadow under the spruce legs. That is, due to the fact that on the silhouette of the Christmas tree we select BROKEN UNEQUAL LINES and paint over them with a darker shade of green - due to this we get silhouettes of shadow zones on the tree - and the tree becomes textured, with clearly outlined coniferous legs (as is done on (see pictures of Christmas trees below).

Above the shadow zones, you can whiten snow in some places (as in the New Year's picture below).

And here is a drawing of a Christmas tree below, where shadow zones presented as ROUND LINES.
That is, with a pencil on the green silhouette of the Christmas tree, we draw rounded lines and loops... That is, coniferous legs are depicted in the form of a kind of cakes-ears.
And then along these lines we draw dark green tassel... Dry. And here and there on the green paws we put light spots of light green - this gives the paws-cakes of the Christmas tree a visual bulge.

How to draw a Christmas tree
METHOD # 6 MOSAIC.
This method is well portrayed on gift wrapping, on postcards and as interesting work to the competition new year drawing at school.
We start with the fact that on a sheet of paper with a pencil draw a triangle. And then with paints fill in this triangle with a variety of shapes (Christmas tree decorations, flowers, birds, snowflakes and other patterns, etc.).


We draw a stylized Christmas tree.
METHOD # 6
Horizontal lines.
But the way to draw a Christmas tree is perhaps the simplest - we draw the outline of a triangle on a sheet of paper with a pencil. And then we put horizontal lines inside this drawn triangle. different color... According to your taste, the lines can be - straight, wavy or broken lines as in the picture below. They can be positioned horizontally, vertically or diagonally.


A simple way to draw a Christmas tree.
METHOD NO. 7 WINDS.
Here we draw a triangle on a piece of paper. And then in any place of the triangle we put a large drop of light green paint - next to it is a drop of dark green paint. And just use your finger to mix these two drops into a round rose curl. As a result, the paint of two shades is mixed and we get a two-color roll. We repeat the same procedure in a different place on the tree. And over and over again until we fill in the entire field of the outlined triangle.

How to draw a Christmas tree.
METHOD # 8
CONIFEROUS PAWS.
And here is a way to draw a Christmas tree using the drawing of coniferous legs.


Let's take a look at the example below how exactly such an image of a Christmas tree is created on a piece of paper.
To get such a tree, we first have to draw a triangle with a pencil. Then paint it with a dark green background color. And then on top of the background draw bone lines of future coniferous legs. And then grow green needles on these bone-branches.


We draw Christmas trees shining with lights.
METHOD No. 9
A RAY OF LIGHT.
But now I want to show how extraordinarily beautiful the Christmas tree drawn by us looks, if you think over the BACKGROUND in advance. The background on which you started drawing the tree can make your drawing shine.
That is, if you make the background not a solid one color, but make a wide background strip in the center of the sheet one tone lighter than the rest of the background area of the sheet. Thus, we get, as it were, a pillar of light, inside which our tree will shine.

And in this luminous flux-ray (when the paint dries) we will draw our tree in any way we choose. And in the end we will get a Christmas tree shining with unearthly beauties. Here in the picture above you can see how such a background looks spectacular. The tree is as if illuminated by heavenly light.
And the drawing of the tree itself is a heap of spots of different colors (in fact, stuck with a finger). But the illusion of unearthly radiance of the picture is created - due to the fact that 1.) the background of the leaf in the center has a whitish light shade 2.) except for color spots are scattered throughout the tree White spots.
Let's now consider detailed master class according to the drawing of a coniferous New Year tree, for which we will just apply SUCH BACKGROUND RECEPTION - as a "pillar of light".
How to draw a bright Christmas tree
METHOD # 10
Dense needles.
And in this picture below we also see the same technique of background preparation of the sheet. The sheet was painted over in a bluish tint in the center and yellowish at the edges (it is better to paint the background not with a brush, but with a sponge, a sponge for washing dishes).
In the same example, we learn to draw light glossy glare on Christmas balls.

Please note that this Christmas tree (pictured above) is drawn in a technique similar to the DUSTER. Only here not alone the central axis, from which our brush strokes dance (as in method number 2), is not present - here they serve as the axes for the broom-needles multiple axis lines chaotically scattered in different directions.
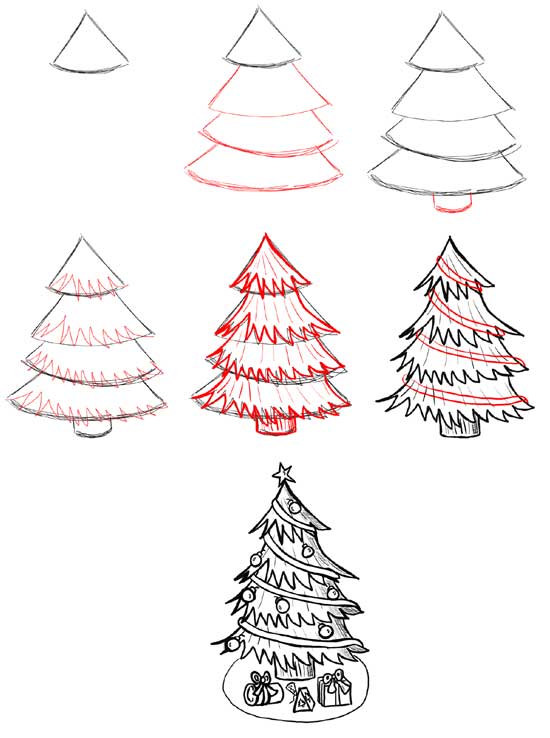
Let me draw you step by step MASTER CLASS , with a detailed diagram of the stages of drawing such a Christmas tree.
(I'm too lazy to get paints and a brush, so I will paint computer mouse... This will slightly distort the similarity with the original, but still convey the essence of the technique itself. So…
STEP 1- we make the general background, glowing in the center with a bluish spot.
STEP 2- in the luminous background, set a dark background for the future Christmas tree.

STEP 3- Draw on top of our base and around it line-axis of future spruce legs. We draw randomly and, most importantly, not very densely (so that there is more air between them). And the main thing is that they look down and a little bit out of the way.
STEP 4- We take light green paint on the brush. And we begin to cover the BOTTOM TIER of the FIR-tree with long needles. It is important to start drawing the legs of the tree from the bottom up - mentally divide the tree into 4 tiers-floors and start from the bottom, gradually moving up. Then the tree will look natural (where the upper legs cover the lower ones, as in nature). In this master class, in order to save my time, I will show only one lower tier.

STEP 5- We take just green on the brush - and we also make rich green needles between the light needles. Also chaotic - here and there we make brush strokes.
STEP 6- we take light brown gouache on the brushes. And also with this color we make needles of brown coniferous color here and there. We finished with the BOTTOM LINE.

STEP 7- We pass to the second tier - and do the same - draw needles alternating brushes with light gouache, rich gouache and brown gouache.
STEP 8- take on a brush dark green(the darkest shade) and here and there we add dark strokes with a brush - drawing the needles that are in the shadow under the paws. Draw anywhere. Without hesitation.

AND FURTHER we continue with the third tier and with the fourth tier at the top of the tree. Until the whole tree is covered with coniferous branches. I will no longer draw here to the very top - a computer mouse is not the most convenient drawing tool.
Now let's figure out how we will draw decorations for this tree.
STEP 9- under a round stencil (a hole in the cardboard), draw circles of ONE COLOR anywhere on the tree - but preferably under the legs - that is, we place each ball between the branches. It is important - to make the balls look natural(we then in the last step will slightly cover them with needles from the legs hanging from above the ball).

STEP 10- on the brush we take the color of the same shade as the ball itself - only a few shades darker. And draw curls of this dark color on the ball.
STEP 11- on the brush we take another ADJACENT WITH DARK shade of color. And next to the first dark curl on the ball we put another one, also dark but of a different shade.

STEP 12- we take a light (but not white) shade of color on the brush. And put a spot in the center of the ball light color- a spot of a round shape, or in the form of a thick curl.
STEP 13- take on a brush White color... And in the center of the ball we put a plump white dot. And in the lower side of the ball we make a white semicircular stroke. Thus, our balls sparkled like real glass balls.

STEP 14- Now we take a stick with a round tip, with which we will draw BEAD DOTS. A simple pencil with a round wash at the end will do. Pour thick white gouache into the saucer - poke the end of the pencil into the saucer and draw a chain of beads between the balls. White beads and red.
STEP 15- And now we need to slightly push the needles of the Christmas tree on the balls. To do this, we again take the green color on the brush - and put a few sharp needles-strokes on the tops of the balls... We alternate shades of green - a couple of light strokes, a couple of dark ones. So our balls will be slightly covered with needles and will look naturally hanging under the paws of the Christmas tree.

By the same principle you can draw any of the Christmas trees below.
This tree, for example, is drawn entirely and completely first with a DARK GREEN BRUSH, and then after drying on the brush we take a LIGHT Tint of GREEN and over the dark needles we draw light paws.
But notice: we draw light branches without repeating the contours; dark - that is, dark branches stick out not the same sides as light.

But here (the picture of the Christmas tree below) is just different. Here, the light branches of the needles are drawn OVER the same dark branches. Only lines of light needles are applied slightly out of sync with the dark.

Very few toys can be placed on such a thick tree. The main thing is to make sure that after drawing the balls you did not forget again take a green brush on the brush - and again draw the needles of coniferous legs, which with their edges RIDING over Christmas tree decorations ... To Christmas balls as if partially drowned in dense needles and peeked out of it with their glossy smooth sides.

And it also looks good on such a Christmas tree a garland of bright multi-beam stars.
To make the asterisks burn WITH A LIGHT FROM INSIDE (picture below), we use tricky way. We use flat brush(where the bristles are arranged in a row, and not in a round bunch), and on the palette we drop a light yellow drop of paint and next to it a dark yellow one. We apply a brush to this paint so that one edge of the bristle row of the brush takes a light paint, and the other dark one.
And now such two-color brush draw rays of stars. The rays are just brush prints - we print the brush in a circle, placing its light-colored edge in the center of the circle, and the dark-colorful edge of the brush on the outside of the asterisk circle. (Look at the stars in the picture of the Christmas tree below - they have yellow rays towards the center, and darker at the edges). After the rays have dried, put a round spot of white paint in the middle of such an asterisk.

And a white artificial Christmas tree you can use the same technique to draw thick spruce branches. To do this, on a bluish background with a gray brush, draw the same legs of the Christmas tree (shaggy twigs). And then on top of their gray outlines we draw already white shaggy twigs. And we get a drawing where the white needles stand out against the background of a gray coniferous shadow (as is done in the picture of the Christmas tree below).

How to draw a winter tree
METHOD 11
snow-covered Christmas trees.
And here is another pretty snow-covered evening tree, hallowed by the lantern... Using a computer mouse, I tried to draw this tree in stages. Of course, this is not as convenient and indicative as brush strokes, but still this master class transfers general principle creating a drawing in this style. Here it is shown how the mosaic alignment of the tiers of the paws of the Christmas tree is transmitted with simple bold strokes.


In a similar technique, many snowy images of painted Christmas trees.

Let's take a closer look at how at home an ordinary unprepared person (without arts education and the everyday experience of waving a brush on paper) to create a masterpiece himself in one evening with the help of a brush and a jar of paint in his unfamiliar hand.
Here is one of the clever ways to draw a Christmas tree with your own hands in a short time. First, draw the outlines of a triangle on paper.
Be sure to draw on the triangle center line axes (this is necessary in order to know in which direction - to the left or to the right - to unfold the tip of the brush).
We take black paint on the brush. An important condition is that the shape of the brush should be flat (not a round tuft) and the bristles should be preferably rigid. The second important condition is that the paint should not be too wet. That is, we breed a thick, dryish black mixture - we dip the same dry brush into it. And we print to the drawing - so we get the prints of the villi of the natural contour, which is not washed out by excess dampness (similar to the contour of a real needle-like needles).

And then you can take and apply on the tip of the same black brush dry white gouache(also smear thick gouache on a saucer, dip the edge of the bristles of a flat brush and lay its prints along the tiers of the tree in even rows.

And here's another quick way to draw a Christmas tree. Everything is even simpler here. This method is similar to the very first zigzag method in our article. Only with the addition of white snow.

And here is the way where the tree is drawn with a wet brush, she was dipped in dark green paint, and then the tip of the same brush dunked in white gouache. And immediately this white tip was printed to the bottom of the drawn oval foot of the Christmas tree. Thus, we get a foot, where the bottom edge has a pure white outline, and further from it, white-green stains go up.

And here is a real jewelry way of drawing needles snow-covered tree... Here it is drawn subtly and gracefully each large needle on the needles... Here we just personally see the method where the brush is dipped in paint from both sides.

And with such a brush we apply the needles along the drawn branch. First, the left row (like on a comb), then the right row (like on a comb), and then (!!!) be sure as many as three central rows of needles(so that the coniferous twig gets volume).

You can draw such experimental Christmas trees in gouache at once in one drawing, fitting them into a single winter landscape.

These are the ideas of Christmas tree drawings for you today I have collected in one Family Pile on our website. Now you can choose any way to draw a Christmas tree, based on the materials available and faith in your abilities.
Go for it. Swing at artistic masterpieces... And may you succeed.
Olga Klishevskaya, specially for the site ""
If you like our site, you can support the enthusiasm of those who work for you.
Happy New Year to Olga Klishevskaya, the author of this article.