Tracing Illustrator CC. Adobe Illustrator lesson: hand trace
Read also
# 1 do not smack
If you are used to drawing on a piece conditionally three three centimeters, and you have drawings are quite detailed, or get used to draw on a larger scale, or choose very thin tools. Based on your experience, I can say that lettering, drawn on the A5 Liner Pigma Micron 03 rubs up normally, but if you draw the same picture to Tolstoy Sharpie - nothing can be released. For me, the size A5 is the minimum
As you already understood, this item is closely related to the previous one. If you draw in a small scale - use thin tools if on conditional A3 can (and you need) choose something thoroughly (the trace can work on Ice, if you draw on a3 thin-sleeve handle, lines are confused).
# 3 Use good tools
Good - does not mean top and super-expensive, then comfortable and professional. For the trace it is very important that the picture is as contrast as possible, so it is best to draw a black tool that well covers the surface of the sheet and is not interrupted where it is not necessary. My Pets - Pigma Micron, Sharpie, Pentel Brush, writing tools .
# 4 Scan in TIFF, with a resolution of 300-600 dpi
In general, even the most simple scanner will give ten times the best result than a photo from the phone. But even better - if there are additional settings in the scanner. Try to make a scan by selecting TIFF (instead of standard JPG instead of a standard JPG) and setting the resolution of 300-600 (any of the values, the more - the better the scan and in the end the trace, but the harder it will be with a lot of points it will be). Already said that I scan on the simplest MFP CANON MG2900 (begging, do not google a specific model and do not attempt to buy it, I have it exactly for one reason - there was no choice :)).
# 5 process scan in photoshop
I repeat once again: contrast pictures will brag better and get more alive and cheerful than faded. But even if you draw a black handle or a liner, after the scan of the line will not be perfectly black, they will be gray - somewhere lighter, somewhere - darker.Therefore, if you want to improve the quality of the trace, before tracking the trace, shove the scan into photoshop and make minimal processing, making black for black, and white - whiter. I do it through the "Levels" panel.The detailed process and settings of the trace are in my paid (Let the name do not confuse you - it is possible to apply information not only for letters, but also for any other directions).
# 6 Set the parameters individually under the picture
Using standard illustrator settings for the trace is only at the very beginning to understand how it works at all. As soon as they understood - learn to customize the panel under your tasks. It will need to do for each picture (but it is not difficult;)). The main thing that needs to be monitored and what affects the result is a slider with a strange name "Isaohellius". The smaller the number - the smaller the black color remains in the picture, the more, respectively, more. If you fall out some pieces and lines - you need to increase, if, on the contrary, everything merges - reduce. The exact value that would come to all cases, no - each time you need to adjust a little bit. In this, in fact, the secret lies - no need to wait that the same parameters are ideal for all pictures;)
Vector Magic really justifies its name. In my opinion, neither the tracing Corel Draw nor Adobe Illustrator and in the notes do not suit him. (Many thanks to the user of our resource Mechanik for this useful link).
So, more. This is a free online image tracing, i.e. At the entrance we have a raster, and we get the vector at the output. This is the brainchild James Diebel and Jacob Norda from the research laboratory of the artificial intelligence of Standford University. They tried to create a resource so simple as possible with a clear and understandable interface that requires minimum costs. How much they did it, judge you.
To work with the service you will need Adobe Flash Player 9 - alas, nothing will come out without it. The second problem with which I encountered is the unwillingness of the Opera browser to work with this site. Probably, if desired, it could be customized, but there was no desire. Internet Explorer (as well as Firefox) worked as it should.
The first page of the resource gives us much information about the project, vector, tracing, and the worse all the previously used tracers. But the main one is the window where we select the desired trace image (from your computer). The boot process takes some time. You can download JPG, GIF, PNG, BMP and TIFF formats.
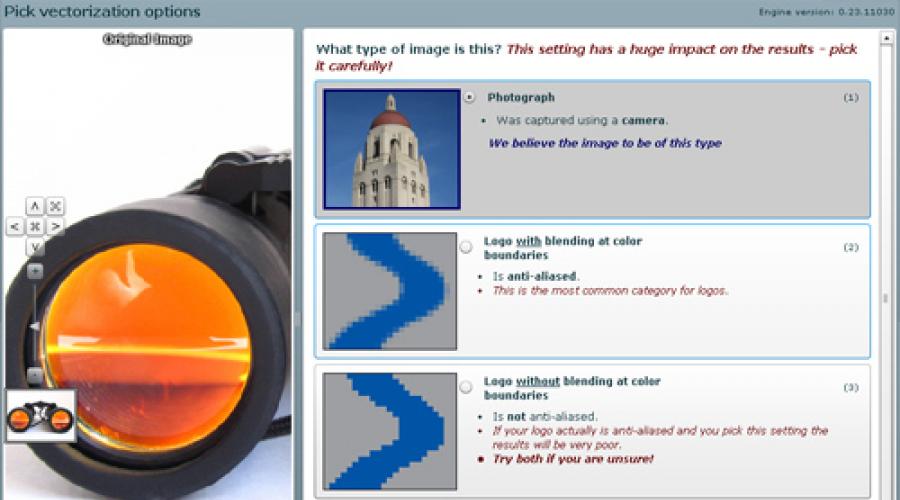
After downloading, the sign pops up: "Most likely, in your image there will be mixing colors at the boundaries of the elements. This is important because the result will depend on the correctness of the selection of the settings. Confirm the selection of settings by pressing the Next button, and if necessary, try multiple other settings. " This service tries to automatically determine the type of your image (to improve the quality of trace). Just below, you will learn how to control the correctness of the selected type.
Another nuance: It is desirable that the resolution of your image does not exceed 1 megapixel. On this occasion, the window will again pop up with the following content: "The loadable image will be quite large to be reduced to 1 megapixel. This precaution is needed not to overload the server. Unfortunately, this can lead to the loss of small elements of the image and to the appearance of mixing colors at the boundaries of objects. You can either continue to work, or download another file. "
Despite the warnings, I still continued.
Next you will be offered to choose the type of your image.

- The photo (Complex graphic image created using the camera).
- Image with blunders of colors at the boundaries of objects (This is an image with smoothed color transitions (Anti-Aliased) - the most suitable category for logos and other simple graphics).
- Image without mixing colors at objects boundaries (Not Anti-Aliased).
At the bottom (in the fourth square) - you will see an enlarged portion of your image. Use it to visually compare it with all three options and choose the most suitable. To go on, click Next.
The choice of quality of your image

- High
does not have compression artifacts or other noise;
the color of objects is homogeneous;
no Blur;
If this item is selected, the trace occurs more thoroughly, along the contours of objects, noise can spoil the result. - Average
there are artifacts and noise;
the color is almost homogeneous with minor changes;
places of blur;
(Offered by default) - Low
many artifacts and noise;
color is non-uniform with significant changes;
strong Bluch;
Noise and billions are not included in the trace process because of which the loss of some details is possible. - Detail of your image for comparison.
Select the most suitable option and click Next.
How many colors in your image?
(this point will not be if you chose a photo in the first paragraph)
- Yes, little, about 12 colors
The selection of this item may reduce the error from noise or disbet. - No, in my image a lot of colors
This option can leave errors from noise and disgust.
We make a choice and click Next.
Color analysis
In the right half of the screen, trace palettes based on the color scheme of your image are offered. The default is the most successful (according to the service) of the palette. Below are other, from black and white to the maximum possible for your image. It is possible to replenish the chosen palette for set of others, take a pipette color from the original, create your own colors, but still within the existing color row. A few tips:
- In the left side - your picture. It can be "zaming" and "scrub".
- To choose a pipette color, you need to click, holding Ctrl.
- Try not to do a double click on the palette, tracing automatically starts automatically.
Tracing
Tracing takes some time - the progress of this process is displayed on the strip and in percent. After the process is completed, you can check and download the trace result.

Formats offered for download: EPS, SVG, PNG. Result again can "scoff" and "zoom". The result view mode can be changed by using the:
- Split - helps to see both images (raster original and tracing) next to each other;
- Single - view the result of trace;
- Bitmap - holding this button, we see a raster original, releasing - vector result;
If the result did not impress you, and you want to change something in the settings, please. The right is offered such an opportunity. Possible shortcomings and recommendations for their elimination are indicated. Below each instruction has a button starting a trace with changed conditions. Each time the trace begins again.
Color borders are not enough smooth?
Select a lower image quality in the settings to achieve smoother boundaries.
Noise spoil the result on the set of small sites?
Select a palette with fewer colors or lower image quality in the settings.
Lost colors?
Choose a palette with lots of colors.
Where are the minor details?
Select a higher image quality in the settings.
Small errors and errors, points and cropped lines?
You can fix it now, instead of editing already downloaded file.
Editing an image online

This feature exists in order to allow you to edit errors in separate sites of traced images. This allows you to achieve the most perfect result for almost every image. Segmentation is the view? In which the image is fragmented to parts, which are then smoothed in the process of creating a total trace result. That is, in the window we see as if pixels, of which the image consists and edit this species.
On the image field there are buttons, and on the right - their small description.
UNDO and REDO: respectively cancels and returns the actions and manipulation. I could not find restrictions on return actions.
RESET: Apparently cancels all changes.
Bitmap and Vector: When holding the first we see a raster original, when held the second - vector result.
Finder: Sometimes small parts are not detected automatically. Finder helps to find them. Each such a plot must be edited so that it is completely separated from the rest of the mass of the gap.
PAN: Scrurt image.
Zap: Sometimes, still traces from filters and mixing the colors are processed by the tracer and they look like, as parts of details different from the general color. Zap breaks the item to segments, and then connects, painting in that color to which you click.
Fill: Pouring, just click on the selected item.
Pixel: A pencil painting that is indicated in the color window.
Color: Pipette for color selection. The selected color is reflected in the window below.
All modified changes are saved on the server, subject to the NEXT and FINISH buttons. Changes are not saved if you overload the page during the edit process.
Here, it seems like all instructions on the use. I can add only what I traced not a complex picture with minimal colors and with quite good quality. The downloaded file (I downloaded the EPS) looks exactly the way on the preview. All traced correctly without unnecessary points and angular angles, and all the details of the illustration are grouped and located on one layer.

PS: It is worth noting that, unfortunately, now the use of Vector Magic has become paid.
14.06.2012
Today we will look at a new trace mechanism in Adobe Illustrator CS6 and talk about its new features. To begin with, we distinguish the photo, sketch and texture, and then compare the results obtained in Adobe Illustrator CS5 and Adobe Illustrator CS6. So, let's begin!
Step 1
In Adobe Illustrator CS6, trace options are now in the new palette - tracing images (window\u003e Tracing).
The appearance of this palette will allow us to use other palettes and tools during trace. In Adobe Illustrator CS5, as well as earlier versions of the program, there were no such features. Tracing parameters were set in the trace settings dialog box. And it was impossible to work with other objects and interfaces.

Step 2.
There are also changes in presets.

The Adobe Illustrator CS6 appeared a new preset "Silhouettes", which allows you to quickly create a vector silhouette.

After applying the team to disassemble (Expand), we get a vector object with the optimal number of reference points.

Step 3.
Let's compare the quality of tracing in Adobe Illustrator CS5 and Adobe Illustrator CS6 after applying the presets of high quality photography (High Fidelity Photo).


Note that in Adobe Illustrator CS6 there are several options to choose from the palette. This parameter is set if the image is selected - a color or gray scale. As you can see, the new trace mechanism in Adobe Illustrator CS6 gives the best results.

A new feature has appeared in Adobe Illustrator that allows you to instantly see the original image. Press and hold the "Glazik" near the View option.

Step 4.
There are some changes in the tincture of the maximum number of colors. This parameter sets the number of colors from which the final image will be. In Adobe Illustrator CS5, the maximum number of colors can be set by the number, and in Adobe Illustrator CS6 - as a percentage of high accuracy.


Step 5.
Opening in the palette Tracing tab additionally you can set additional settings. In Adobe Illustrator CS6, it has the opportunity to select the trace method. Distribution method (abutting) creates cut out circuits. The contours of objects are joined.

The control method (overlapping) creates outlines one over the other, the contours of objects are superimposed.

Step 6.
The contour fit option determines the accuracy of the trace of the original raster image. In Adobe Illustrator CS5, the smaller the value, the more preciserate the contour, the greater the value, the rougher contour. In Adobe Illustrator CS6, the other way around: the greater the number, the more accurate the contour we get.
The option is Minimal Square in Adobe Illustrator CS5 corresponds to the noise option in Adobe Illustrator CS6. This option determines the size of the smallest details of the source image that will be taken into account during tracing.
Option The minimum angle in Abode Illustrator CS5 corresponds to the angles option in Adobe Illustrator CS6 and is set as a percentage. The greater the number we install, the more the corners will be in the final image.

The Adobe Illustrator CS6 does not have such trace settings as blur and resolution change. In Adobe Illustrator CS5, the blur setting is used to reduce the number of small parts and mitigate the boundaries of the result. Setting Resolution Changing Allows you to speed up the process of tracing large images and reduce the quality loss of the final image.
Step 7.
Let's see how a new trace mechanism works with sketches. Apply the preset black and white picture. Tracing an outline in Adobe Illustrator CS5 gives good results.

If we apply the same preset in Adobe Illustrator CS6, most small details will disappear.

Unfortunately, to achieve the same results in Adobe Illustrator CS6 as in Adobe Illustrator CS5, you need to change the trace parameters manually.
Step 8.
Let's try to complete the texture tracing. Apply the same back black and white picture. As you can see, the trace result in Adobe Illustrator CS5 looks better than in Adobe Illustrator CS6.


In today's article, I will talk about my trace method (translating a raster image into a vector format), and also explain why I prefer not to apply a vectorization to my work.
Modern versions of vector graphics programs, such as Adobe Illustrator, have become so smart that sometimes traced vector image is difficult to distinguish from the base raster. Thus, the paper drawing acquires one of the most profitable properties of vector graphics - scalability without loss of quality. However, when it comes to detailed drawings of a large format, software tracing capabilities can show a very mediocre result. Periodically, I get queries for creating prints in the vector format, but in 100% of cases I reject similar suggestions. The only exception I do is trace the sharp sketches for Creative Market. Recently, I episodically replenish your collection with new sets.
Thus, today's post will be half the opportunity to highlight my trace process, half-visual TVet to the question why I avoid this procedure for complex works.
How to turn a raster image in vector form?
Here is a drawing, on the example of which I will demonstrate my process. These sketches "live" on a sheet of paper A4 format, which was scanned in the 600 DPI resolution, and then slightly rejuvenated in Adobe Photoshop (contrast brightness and removal of visual garbage using an opaque white brush). I will make a reservation that it is not a strict need - scan all drawings in a resolution of 600 dpi. 300 DPI will be enough. Moreover, with a resolution of 300 DPI, the likelihood is reduced that your computer will think and flatly refuses to work further.

I put this image in Adobe Illustrator (I use this program, because it is a kind of standard in your industry, and in terms of trace part very good).
This is a panel Image Trace. (It can be found in the menu Window.). In my screenshot, this panel is in the deployed form, with open advanced settings. I specifically marked red dots the most important settings for us, because if you are not familiar with this program, it will be easier and easier to navigate what I am writing about.

To strictly speaking, we need to know for anything in the details, for which each settings is responsible, since only a few of them are important. I will tell you about them, and then you can take it to work if you plan to try to raise some kind of my own image with me.
First option is PRESET.There are many options, from High Fidelity photo. before Black and White Logo,depending on what needs to be turned into a vector. Since our example is a sharp sketch, the best option will choose Sketched Art..
Next important setup - Threshold.. Speaking simply, the closer slider to the right edge (more), the darker there will be a vector result, the more intense will be all the shadows in your work. Conversely, if we are talking about the proximity of the slider to the left edge (less).
Paths., Corners.and Noise..
Paths. - The higher this percentage, the greater the points in the vector image. Corners. - The lower this value, the more smoothed the result will be. Noise. - The higher the value, the more items will disappear, because They will be perceived by the program as harmful garbage. These three functions require a permanent experiment, because it is impossible for any work, even made in the same technique, to find an absolutely suitable, ideal combination. Only an individual approach.
And finally, I highly recommend to include checkbox Ignore White. When tracing black and white sharp illustrations. Thus, the illustrator understands that it is not necessary to spend resources on white space, and only a black mascara is obtained in a vector format.
As soon as I choose Sketched Art.pRESET, the program begins to conjure the mio-image. At this stage, I have not yet configured anything, only PRESET and IGNORE WHITE.

I am not delighted with the resulting result, a lot of details have lost. Therefore, I begin to twist the options about which I told a couple of paragraphs back:
- Threshold. It was decided to leave the default, by 128, because the shift in one direction or another broke the black and white balance of my image,
- Value Paths. increased already up to 90%
- Corners. - a slight increase, only 6%
- Noise.- The slider left almost until the left.

Finally, the last step to be done to make the image has become really vector, it is pressing the button. Expand On the top of the toolbar.
Is it better?
Just we looked at the fast image trace path with a relatively large number of items (after all, we have three outline on one sheet of paper). If you have a similar situation with the number of objects, you can use a similar algorithm of actions, or, if time allows and want to achieve a better result, apply another strategy, and tracing each drawing separately. In my case, it means that I highlight each sketch, and I repeat the steps already familiar to you.
Let's compare two results. On the left, the one that turned out as a result of the trace of three sketches at once, and on the left - the one that I was separately allocated in Photoshop and then quoted on the principle proposed by previously configuring all the options for this image of ice cream.
It seems to me that the option of the right retained much more details and looks more similar to the original stagnation. As you can see, the illustrator shows the best results when not overloaded with a large number of objects that need to be processed.

Thus, the main advantage of tracing each small drawing separately is the ability to get higher quality of the image and prohibit this process, which gives confidence that everything is done on itself aweight for an excellent result.
Pros and disadvantages of tracing of carcasses, or can it always rely on the capabilities of the program
And now I would like to return to the question, why I do not tracing large-scale detailed work. Here is my print (the readers will certainly remember him), which I will now try to turn into a sample vector graphics. This is a big drawing, the format of paper A3, with a plurality of tiny parts made by liners 0.03 and 0.05 mm. I put this picture in an illustrator.

I choose Sketched Art.
PRESET ...

And it turns out something completely disappointing, deprived of details and any indity. Bad news is that as if I tried to fix this image, it will not be like the original. It is possible to achieve only small, practically inconspicuous, changes for the better.
That's why I do not translate my prints and complex illustrations in the vector. I also do not draw in vector programs from scratch, I do not find sketches. Thus, I think it becomes clear why I say "no" to everyone who is interested in "print like this, only vector" :)
As a rule, in your sets of graphics on Creative Market I put raster options made from the original drawings, and not raster versions of vector image. The whole thing is how the digitized version keeps the connection with its source, it is important that it was "alive." I want, even from small preview of my drawings, a feeling was created, as if these works would remember my touch.
Sometimes raster formats cause concern, they say, the files will not be scalable. But after all, the raster image can also be increased, the main thing is that it is initially painted on a sufficient paper size and scanned in high resolution.
Here, in fact, all I wanted to tell today. Thanks for attention!
Vectorization (tracing) is a manual or automatic conversion of a bitmap image into its vector representation. Thanks to this conversion, the source image gets all the advantages of vector graphics - small file sizes, the ability to scale and edit without loss of quality.
Today I will tell you who does not know, and I am sure that such is about how a raster image is translated into vector. This function is not new and the name of her tracing. She translates your raster in the vector. But, I immediately want to note that today I have not yet met the programs of tracers that can be translated by any image automatically without subsequent manual correction. Tracing components are present in the Corel Draw and Adobe Illustrator known to us.
In Corel, this is done like this: Create a document → We put into it (in any way) your raster image → Press on it to PCM → and in the submenu that opens, choose any of the trace options.
In Illustrator: Open an image → Menu → Object → Image tracing → Create Create and disassemble → On the top panel of the auxiliary menu, select the desired option.
If we talk about the quality of the trace of images, then from these two options is defeated uniquely Corel. But, as always, there are nuances. Those, if we talk about tracing in general:
1) Do not hope that the trassser will execute a photo on vectors so that there will be no difference.2) The tracer does not know how to trace the gradients correctly3) After tracing, you still need to correct your image.4) For the most acceptable trace, the image quality should be 300dpi
Well, for example, here is the result of the work of the tracer with a photo (click to enlarge and everything will become clear):
I think now it is clear what result should be expected from the tracers when working with such images.
Where is the traceser use good?
He save you a bunch of time and strength in such situations as, for example, the customer has a logo, but it is, as often happens, only V.jpg and a small size, but it is necessary to stretch it, for example, on the billboard. There is a traceser and will be indispensable for you. It will best work with images without gradients and blur. To improve the quality of the result, I recommend first in Photoshop to erase everything unnecessary before transparency, then save V.PNG, and only then trace.
How to use the traceser?
I specifically did not sharpen attention not to Corel, not on Illustrator because I want to tell you about Vector Magic. When I first discovered tracing for myself, I decided to lock it a little and brave this topic. To my surprise, I found several programs of the tracers, but in all reviews stumbled on the mention of Vector Magic as the best of the tracers.

From the Internet:" The company of Magic, founded in 2007, is a leading provider of services and software to identify images. The flagship product of the company - Vector Magic - allows you to easily and quickly convert raster images into vector using a simple web interface. Another popular Solution of Vector Magic - Vector Magic Desktop - is an application that extends the functionality of Vector Magic to the means of professional image conversion. "
There are several program options: online, installation and portable. I use portable because it does not require activation, and always a friend even where there is no Ineta. The program has a lot from the program:
1) Works on the Drug & Drop principle (i.e., you can simply drag a picture into a program, for example, from the desktop) 2) Saves the image in many vector formats3) Simple navigation and intuitive interface.4) There is a filter in colors5) little weighs6 ) It works relatively quickly.
In general, a lot of advantages. It can be easily downloaded on the Internet. Add only that it is a pleasure to work with her.