How to spend a flat line in the Word. How to make a line in the Word? How to make a horizontal line using a figure

When you work with Microsoft Word, you may very often need different dividers in the form of lines. In this article, we tell you how to make a line in the Word in various ways.
1. The easiest way is to underscore. To do this, go to the "Home" tab and click on the icon with the letter C. Thus, you activate the text underscore. After that, the entire selected text will be emphasized from below.

You can also "emphasize" an empty area. To do this, activate the text underscore icon (the letter "h") and press the Tab key several times on the keyboard.
You can set the view of the underscore line and choose its color.

2. Also a very simple way and efficient. To do this, simply clamp the SHIFT key and click on the space.

3. To make a line across the entire width of the sheet over a string or under a string, you can use the block installation tool that are more often used to adjust the boundaries of the page. The line can be horizontal, and vertical.

4. If you need to do an underscore in various blanks or complex texts, you should use tables. You can configure them such a way that one part will be invisible, and the other will be installed as an underscore.

Click on the table and choose the "borders and fill". Configure the table so that some lines are visible, and other invisible
5. Line in Word can simply draw. To do this, go to the "Insert" tab and in the "Figures" column, select the "line" item. In order for the line horizontal, hold the SHIFT key.

In the usual text in the Word, the lines are used quite rare, but without them can not do when drawing up various blanks or forms. To emphasize the finished text is quite simple, but when drawing up forms, it is necessary to emphasize empty space, and if we consider that this form will be filled in electronic form, the usual underscore can not do here. Next, we will look at how to make a line in the Word in various ways, of which everyone can choose the appropriate option.
The easiest way to make a line under the text in the Word is to use the text underscore. To emphasize this way, you can text and tab. But use such an underscore to place the line on an empty place, i.e. Create such field lines for further text entry, it is extremely inconvenient. When the text will be written on such a line, an underlining will be applied to it, but the entire further text will move, which can immediately disrupt the document structure.
To make such a simple text underscore. "The main" In chapter "Font" Find icon "Text underscore", and click on it. The text highlighted in advance will become underlined, and the entire instructed text will also be emphasized.
If you click on the down arrow, you can choose different styles of underscore and even color line.

The following way to make a line in Word is to use the underscore symbol that is available on the keyboard. To do this, clamp the key SHIFT and pushing the lower underscore icon «_» Draw the line of the required length. But such a line is also far from perfect. Write on such a line in the Word will not work, and it does not coincide in terms of the usual underscore.
A more appropriate way to make a line in a word to sign, it is to use a table of a table, in which you need to leave only the lower boundary. In this case, some problems may arise with the positioning of a separate cell, but for the sake of the ability to fill the underlined area of \u200b\u200bthe document in electronic form and can be tried. You just need to insert a table from one cell and adjust its placement, size, as well as borders.

Well, the last way to draw a line in the Word, where you can write, it's just to draw a line like a separate object. To do this, go to the tab "Insert" and find item "Figures" In chapter "Illustrations". In the figures we find the usual line, click on it and draw in need place on the sheet. If you hold the key when drawing a line SHIFTThe line will turn out horizontal. If necessary, the line can be additionally configured in the corresponding menu.

A rather common question regarding the work in Word program is the creation of a line. What line are we talking about? Fat, solid, dotted, horizontal, vertical? What function should such a line perform? All these questions are quite difficult to give one answer. Therefore, we consider ways to create different lines in Word.
How to make a drawing line in the text?
If you wrote text and you need to spend a straight line under it or emphasize some word, offer, in the Word program there is a special adhesion tool. To apply it to perform the following actions:
- We highlight the lower offer, the word to emphasize.
- In this case, we emphasized the last line. The line appeared under it.
How to make a fat, dotted or dual line in Word?
In order to create a bold line, double or dotted, you should use the following ways:
- If a fat or dual line should emphasize the text, choose an underscore tool. If you press next to it, the variants of various lines will appear. We choose a fat, dotted, double or other format.

- If the bold line should be beyond the text, select the "border" tool. Select the location of the line.

- Pressing the right mouse button on it, specify the color, thickness and size of the line.

How to make a solid line or line under the text?
The toolbar has another button that can be used to create a solid line to the entire width of the sheet or line under the text.
- We put the cursor after the stitch, under which you need to carry out a solid line.

- In the Home tab, select the "Borders" button.

- In this case, we need to put a line between the text. Choose the "inner" border. If the line needs to be put at the end of the text - "Lower line".


How to make a horizontal and vertical line?
Smooth horizontal and vertical line can be created by the previous way using the "border" tool. It has options for horizontal and vertical line. If the line needs to be carried out in random order, we use the following method.
- Go to the "Insert" tab and choose "Figures".

- In the pop-up menu, select "Lines".

- Select the line type and carry it in the right direction.

How to make a flat line?
On a digital keyboard there is a button that denotes a dash. If you hold down the "Ctrl + dash" key, a smooth line will appear.

However, this method is not suitable for text.
How to make a line for signature?
In order to make a line for signature in the Word, you should perform the following actions:
- Click "Insert" and choose the "Signature Row" icon.

- A new window will open. We introduce data on the face and click "OK".

- If the position of the signature does not suit you, we allocate the registry area and change the position in the text.

How to make a table line?
In order to make the table line in Word or draw a table using lines, we carry out the following:
- Click "Insert", "Table", "Draw a table".

- A pencil appears on the sheet, and the table boundaries will be displayed on the line.

- Place the table and lines in it.

If you need to add a line to the finished table, you can use the insert function.

Or select the table, press "Designer", select "Draw a table" and add the desired line with a pencil.

How to make a line invisible?
To the line in Word is invisible, it must be part of the table.
- We draw a table and fill it with text or numbers.

- Choose the "constructor", "borders" and exhibit "no border".

- Table lines will become invisible.

If you at least sometimes use the MS Word text editor, you probably know that in this program you can not only recruit text, but also perform a number of other tasks. We have already written about many possibilities of this office product, if necessary, you can familiarize yourself with this material. In the same article, we will tell about how to draw a line or strip in the Word.
1. Open the document in which you want to draw a line, or create a new file and open it.

2. Go to the tab "Insert"where in the group "Illustrations" Press the button "Figures" And select the appropriate line from the list.

Note: Our example uses WORD 2016, in previous versions of the program in the tab "Insert" There is a separate group "Figures".
3. Draw a line by pressing the left mouse button at its start and released at the end.
4. The line you asked the length and direction will be drawn. After that, the MS WORD document will appear the mode of operation with the figures, which read the capabilities below.

After you draw a line, the Tab will appear in the Word "Format"in which you can change and edit the added figure.

To change the appearance of the line, expand the item menu "Styles of Figures" And select the one you like.

To make a dotted line in Word, expand the button menu "Styles of Figures"After clicking on the figure, and select the desired line type ( "Hatch") In chapter "Billets".
To draw not a straight, but curve line, select the appropriate line type in the section "Figures". Click on the left mouse button and pull it to set one bend, click the second time for the next, repeat this action for each of the bends, and then click on the left mouse button twice to exit the line drawing mode.

To draw a free form line in the section "Figures" Choose "Polyline: hand drawn curve".

To change the size of the drawn line field, highlight it and click on the button. "The size". Set the necessary parameters of the width and height of the field.

- Tip: Amend the size of the area that the line occupies can be used and use the mouse. Click one of the circles framing it, and pull it into the desired stron. If necessary, repeat the action and on the other side of the figure.
For shapes with nodes (for example, a curve line), the tool is available.

To change the color of the shape, click on the button. "Contour of Figures"located in the group "Styles"And choose the appropriate color.

To move the line, just click on it, to display the form of the figure, and move it to the desired place of the document.

On this, everything, from this article you learned how to draw (spend) in the Word. Now you know a little more about the possibilities of this program. We wish you success in its further development.
Not rarely when designing text documents, it is necessary to draw a line, for example, in order to separate one part of the text from another. In the Microsoft Word text editor, there are several possibilities for solving such a task.
In this article, we will consider the three most simple ways to draw a line in Word. The material will be relevant for all modern versions of Word. Including Word 2007, 2010, 2013 and 2016.
Method number 1. Insertion of the sign of the dash or underscore.
Perhaps the easiest way to draw a line in Word to take advantage of a sign of a dash or an emphasis sign. In a row inserting a large number of such signs, you will get a horizontal line. For example, in order to draw a line using the dash sign, just clamp the Ctrl key and not releasing it press the "minus" key on the optional keyboard unit. Further hold this key combination until you get the line you need.
In the same way, you can draw a line using an underscore. To do this, clamp the SHIFT key and the key of the underscore. Next, you need to hold these keys until the length of the length you need is drawn.

This method of creating lines is convenient because such a line is easy to draw and easily remove. If the line is not needed, it can be deleted exactly as any other text.
Method No. 2. Inserting the finished line.
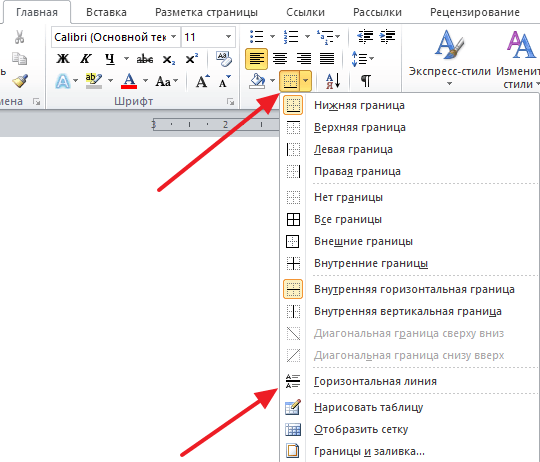
Another way to draw a line in the Word is to use the button to create boundaries. This button is located on the Home tab and it allows you to quickly draw the line anywhere in the text. All you need to do is install the cursor in the place where the line should be, click on the button and select the "horizontal line". As a result, a horizontal line will be drawn in the selected page.
The advantage of this method is that the line drawn in this way can be changed. The line can be made thicker, thin, long or short. To do this, the line must be highlighted with a mouse, after which its size can be adjusted by moving its corners. In order to delete such a line, you just need to highlight and press the Delete key.
Method # 3. Inserting shapes.
On the Insert tab, there is a "Figures" button, with which you can insert various figures to the document. Among other things there is a figure in the form of a line. In order to insert it into the document, click on the "Figures" button, select the line and draw a length in the document you need.

The plus of this method is that such a line can be placed at any angle. To remove such a line, you just need to highlight it with the mouse and press the Delete key.