Light drawings with a simple pencil. Pictures for drawing a pencil: Beautiful and light images
Learn to depict animals - useful knowledge for children and adults. First it will come in handy in children's garden, School, and the second - to create knitted patterns, appliques from the fabric, decorating cakes.
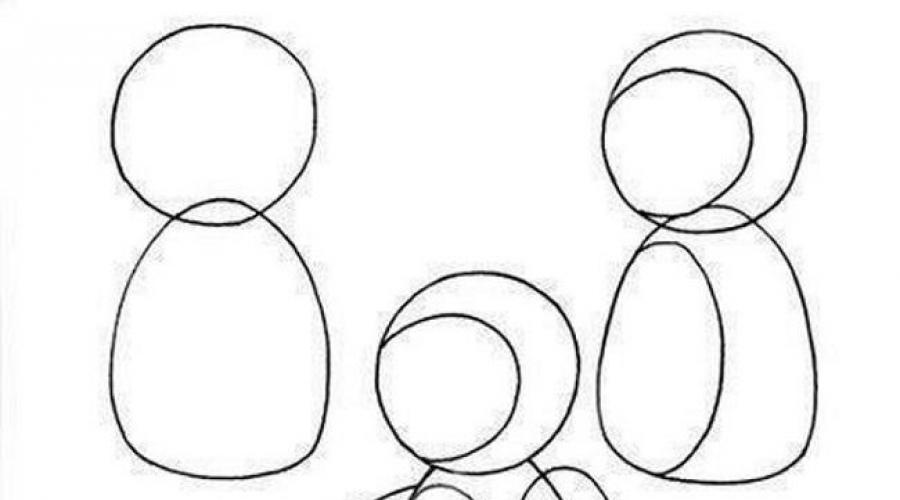
How to draw penguin?
See how to create this unauthorizing bird.
This will require:
- simple pencil;
- eraser;
- paper.
Such beautiful drawings simple pencil Create. Since then you can erase unsuccessful and auxiliary features and draw new ones. Therefore, do not press a pencil.
- Draw a small circle - this is a penguin head. It crosses the oval body of this animal, but at the bottom of this figure, do straight.
- At the next stage, you will depict 2 rounded features - the first is almost parallel to the back, and the second one is the left side of the body. If you then want to make a drawing in color, these features will help to leave the face and tummy white, and separate items - black.
- Next - we draw underdeveloped Penguin bird wings, two small oval at the bottom of the body, which will soon turn into paws of this animal.
- You will make them more realistic at the next stage. To do this, draw 3 fingers on each paw. A small circle on the face will be the eyes of this bird, she will also get a beak.
- It remains to show that its wool is quite fluffy. To do this, make some small lines on the tummy, back, head. Draw a horser. Add an eyelid eye and pupil.

That's how to draw a penguin simple and easy. Other animals along the same technology you will also create without problems.
How to draw a pig?

- Draw the figure of oval shape. In its lower part, draw a circle that will become a piglet. His patch is depicted on the right side of this circle.
- Picture 2 of his front legs, one rear, lop ears.
- Indicate the hooves, the cheeks of the animal, make the outlines of his eyes. At the next stage, depic pupils, as well as eyebrows, mouth, nostrils.
- Completes the image of a naughty pig. His twisted tail.
How to draw donkey?

Having learned this, you and children will be able to take a picture of the cartoon about Winnie the Pooh.
- First, draw a figure similar to the figure on the figure 8 is a head. Circle will soon become his body. Connects these details elongated neck.
- Ears similar to small wings, draw the following. Two oval eyes will acquire pupils and centuries in the next step. Then draw your nose and nostrils.
- It remains to portray bangs, a hooker, the legs of the donkey and his tail.
How to draw a lamb?
The image of this animal can also be used for appliqué. But make a fur coat from fur or glue the curls of threads from segments, twisting them.

How gradually similar simple photo drawings are shown.
- First draw a small figure of the ovoid shape, which will be the head of the lamb. And the body is a slightly larger size.
- To make it easier to draw a horn, first draw a small circle on the side of the head. And then draw a spiral horn in it. The second is located in the background and is not completely visible.
- Four rectangular legs end with hooves. Curly bangs will add an animal charm.
- Draw his dreamy eyes, curly wool, nostrils, tail.
Fish

If you think how to teach to draw little child, then show him how this maritime resident is created.
- Draw a semicircular line on top and bottom by connecting them to the right and left. On the one hand, draw lips, on the other - the tail. Separate a semicircular line of a face connecting place with a body, depicting a round eye on the muzzle.
- At the next step of phased drawing, add the eyelid eye, depict two fins.
- It will remain to draw pupil, scaly with the help of wavy lines. Using small dashes, make fins and tail more realistic.
How to draw a cat?
You will learn this in 5 minutes.

Draw a circle - this is a head blank. It crosses the egg-shaped body. Will erase the place of intersection of these two parts.
Draw the front and rear paws. Also, with the help of the lasty, remove the intersection points with the body. Picture tail.
At the third stage, add a cat's ears, make a face more repeated, drawing an oval in the bottom.
You already have practically know how to draw a cat. It remains to erase the auxiliary dashes, draw a small triangle inside the right ear, depict eyes, nose, mustache, fingers on the paws and tip of the tail.
Winnie the Pooh
The hero of the cartoon of the same name and books draw quite simple.

- First, draw 2 the same figures - they are among the average between the square and the circle.
- At the next stage, we will erase the place of their intersection and add the hero front and rear paws.
- It's time to draw Winnie Puhu Morch and ears. Picture eyes, nose, claws. Mouth, like the hero of the cartoon, slightly on the side. What adds to him charm and identity.
How to decorate a fondant cake in the form of a picture?
To do this, you can use the image of any hero that has just learned to draw or portray another character, for example, owl.

To collect such a cake, take:
- biscuit cakes;
- oil, custard or whipped cream;
- white mastic for cake;
- food dyes of three colors;
- black currant or raisins;
- water;
- silicone roller;
You can make food dyes yourself using black currant juice, spinach and beets.

The same dyes will be needed to give the desired shade mastic. But first you need to collect a cake. Given the cakes with cream, put one on another. Place the cake for an hour in the refrigerator, then roll the white mastic, cover the sheet of this sweet flexible cake material.
The mastic is better attached to it if you preload the cake with oil cream.
Cut extra mastic, add more. It should be divided into 3 parts, in each interoperade a little food dye. Roll the mastic into the layer. Attach a template of owls or any other character to it, cut out this sample.
Pulse the culinary brushes into the water, moisten a piece of mastic on the cake, attach a blank of owls here. In the same way, glue them all.

From the remnants of white mastic roll round eyes. Insert the black currant or one Izu to the center of each beser to make pupils. But pre-soam the raisins for 20 minutes in warm water so that it becomes soft.

It is not necessary to make eyes on all billets, perhaps, some owls are turned to the viewer back.

Typically, a cake with mastic must be left in a cool place for a day so that it dries, after which you can serve.
So simple drawings will help to decorate the cake. If you want to become a designer of your home, do not forget about accessories. And not necessarily buy dear paintings. You can make them yourself, the master class will help. Such canvas are created very simply, but look spectacular.
Pictures of stones for beginners with their own hands

To create such a man-made masterpiece, use:
- smooth pebbles type pebbles;
- king's shell;
- artificial moss;
- transparent titanium glue;
- thin branches of the tree;
- phaneur;
- colored paper;
- paints.
If you do this for the first time, then it is better to first chateen the location of the elements by a simple pencil.
Mandater where the lovers will be located. Stick 3 almost identical flat pebbles to create a guy, and his head - with the help of light pebbles.
For the body, the heads and feet of the girl, use one pebble, make a skirt from the Korolen seashell, pre-climbing the "mustache" pliers.
Such a picture is perfect for those who rest on the sea or brought from there from holidays a little seashells and smooth pebbles. Such a panel will become an excellent reminder of the rest on the sea coast.
And you can take twigs from a tree growing in the yard, but it is better to use dry. Treat them with pliers, removing unnecessary.
A relatively smooth trunk attach to the painting of the "Titan" glue. In the same way, glue small twigs that will become tree branches. Leafs for it cut out of green paper, and birds are from the other color.
Dorisinate wood elements, plants with paints. Stick Moss as grass, after which you can drive work and start up.

This simple picture Created also quickly. For it, you will need:
- plywood or tight cardboard;
- frame;
- threads;
- flat stones;
- glue.
Girl holds balloons For the rope, and they themselves are made of round pebbles.
If you relax on the sea, walking around the beach, look for a heart shape stone, it will be needed for the next romantic picture.

The oblong pebbles will become hands and legs of the characters, round - their heads, and an oval - torso. Stick down the panels are a bizarre dry branch - it will become a walkway on which the lovers cost.
Insert a guy with a branch of dry flowers or make them out of colored paper. Such a picture of stones will be another pleasant reminder of the wonderful summer holiday on the southern coast, like the other.

For each cat, you will need a couple of the same pebbles, but different in size to make a torso and tail. If you fail to choose identical color gamutjust paint stones in needed color. When the coating gets dry, glue the blanks on the dense base, pre-paint it or gluing a leaf of light cardboard.
Dorisinate your ears, grass. Get branches that will become a tree and a couple of small pebbles that have turned into birds.

By the way, on their creation you can stop more. After all, creating simple drawings in gradually, you will show both feathers.
How to draw watercolor birds?
In just a few minutes you can draw a junction. To do this, take:
- tight paper sheet;
- simple pencil;
- watercolor;
- tassel.

This phased watercolor drawing suggests using blue and black shades in the second step. The paint of such colors will highlight the eye, breast, the outlines of the back, tail, the head of the joke.

Prior to that, you need to barely designate these fragments, at the next stage, to allocate them more confidently. Light gray draw the plumage of the joke.

In the next step, act more confidently, because you all turn out! Create a background, let it be green bushes in the background, yellow flowers, heaven and twig on which a bird sits.

The last stage is the final. Make a bird more realistic by performing several strokes of black and gray paint on her breast, side, head. Highlight the background by adding green, yellow watercolor. Also you can portray the bottom of the Blue Sky.

That's how to draw watercolor in stages. Now you can create simple canvas with a simple pencil, paint and even using stones. Create, dare, and you will certainly work out!
How to draw novice simple drawings, see here:
To date, 3D drawings on paper are becoming more popular, you can peer and admire it for a long time. Create such masterpieces can not only talented artistsbut also those who are just getting acquainted with fine art. It will be learned to draw it never too late, to make a spectacular 3D drawings can each.
Tools that will be required for 3D, the simplest: handle, pencils, marker and sheet of paper. By the way, draw newcomers best in the cells in the notebook, so depict the shapes are much easier.
It is worth noting that the image is created on paper in stages, in this matter the main thing is the sequence, even if simple and uncomplicated pictures are reproduced.
Many are interested in how to draw 3D drawing on paper with pencil bright and realistic. To do this, it is worth using photo instructions or videos that will clearly show all the recreation technique of a 3D picture.
Let's analyze the pencil drawings in stages for beginners. For clarity, print drawn images to facilitate the task. Note that the first acquaintance with the 3D technique can cause ambiguous impressions, here you do not need to rush, smooth movements and exposure - the main assistants of the novice artist.
So, let's go down, we will learn how to draw beautiful 3D drawings.
Butterfly
A simple scheme will allow you to understand how to draw a 3D handle amazing beautiful insect. Check out this technique and draw a miracle drawing yourself.
Step-by-step instruction:

Steps
If you do not know what you can draw a 3D handle or pencil, then start with the simplest. After all, it is not so difficult to give images to images at all, make sure the photo class suggested below.
Image creation steps:

Bananas
Symbol lying on the table Fruits is quite simple, there is no need to apply special technique images of objects. You can use to create a handle and markers.
Fractional technique:

More detailed instructions For the performance of work in such a technique, on the example of the hands of the aliens, you can see on the video (or you can use your hand, just circle your palm and fingers with a pencil, and then follow video instructions):
Funnel
If you want to know how to draw a simple 3D drawing on paper, use the printed sample. On the developed technique, you can teach both a child how to draw 3d.
Step-by-step performance:

Stairs
Before drawing a 3D handle, you need to try to make similar drawings with a pencil. Learning to create beautiful volumetric images together.
How to perform drawing:

A heart
Volumetric, as if the living heart becomes great gift For a loved one. Take a pencil and marker in the hands, clearly spend the lines, highlight them and grow. Believe me, the painted image will be able to fully pass your feelings.
How to draw:

Video 3D illusion of the heart:
Remember, the imagination does not borders, create your own unique drawings, hit all the ability to create volumetric images.
For example, you can draw on this instruction Carlson:
Simple option:
Complex option:
Video Bonuses: Figures 3D Handle
Draw a 3D handle Beautiful butterfly:Draw a 3D photo frame:
We draw a 3D pen bouquet of daisies:
3D Snowman:
3D Christmas tree handle:
Today we will talk to creative theme, Namely, drawing. But do not think that we will disassemble how to draw. This is available art schools. We will be interested in the usual redrawing. Will you say why it is necessary? Imagine that a person does not know how to draw how specialists do it, but I want to draw something. Even just for the radio good time Transactions. Here it is for the aid and draw pictures that you can draw and paint as it should.
You can draw both a simple pencil and color. The picture will be a good help for you. For example, you imagine a cat, but you can't draw it from memory. Then you take the finished picture and starting to sink slowly. This is also painstaking and creative work.
Drawings for drawing light and beautiful gradually for beginners
Let's start with the fact that if you only try your hand in sriska, it stands with a phased drawing. There are schemes where step by step is shown, as you need to draw a particular object. Take for an example of a minion from a cartoon. It can be drawn in this way:

Or take a very simple drawing, say fish.

And here you can draw with different angles hare.

A good option is a cow.

If you have already mastered the sketch. You can go to objects more complicated, for example, a horse.

You can draw it not entirely, but to make a portrait.

You can draw not only animals, but also flowers.

Returning to the portraits of animals, such a wonderful tiger. Try.

And finally, in the subject of the coming year of the pig, the corresponding drawing.

If you have children who love to draw, try it together with them.
Pictures for drawing stages for girls 12 years
What can be interested in girls. Of course, various princesses, dolls, fabulous heroes.

For lovers of phones:

And here is a whole selection of beautiful drawings.

Enough easy picture "The best girlfriends."

And that's good picture Girl with a dog. The idea of \u200b\u200bthe picture itself is interesting.

This image in the style of anime.

Another one in the same style.

Simple cat drawing.

Portrait pattern.

And the drawing is quite simple technically. It can be trained in the drawing of the autoportist.

Sketches of drawings for drawing for boys
For girls found that you can draw, now we will find the drawings for boys. What could be better machines? Only a lot of machines.

Military equipment is suitable, such as tanks.

For lovers of martial arts, such a drawing with a ninja is suitable.

Another car jeep. Maybe the dreams will then come true.

Besides military equipment You can draw the military themselves.

So the choice is also large enough.
Light I. beautiful pictures For Skotchbuk
Skotbuk is an album for sketches and sketches. Each self-respecting artist must have such an album. But even if you just fond of drawing, then such an album is also just necessary.
In this album, you can not only draw something like that, but also make your sketches under the influence of emotions.

Popular portraits are popular in albums.

Simple drawing, for example, dandelions.

You can practice, drawing different talismans.

In addition to drawings, you can make pictures logos or sketches with text.

Skotbuk, therefore, is a peculiar portfolio of the artist.
How to draw beautifully on cells
If you find it difficult to draw any pictures on pure sheet Paper, you can use the method. However, even experienced artists sometimes use this method. It is that you draw cells or take a ready-made sheet into a cell and draw your picture picture on these cells.

These may be simple drawings, such as dolphin.

Or such a bear.

And can be more comprehensive.

These drawings are more like pixels, but for training, they will fit well.

Drawings for sketch in the form of a unicorn
For fantasy lovers, you can advise to draw the most traditional creature of this genre - unicorn.

You can draw a unicorn in classic style.

And you can make a drawing and in the "cartoon" style.

Portrait of a unicorn.

And another fairly artistic picture.

Make beautiful drawings about autumn
Fall. It's time rather romantic. Here you can draw a lot of wonderful compositions.

Leaf fall.

Set of leaves and acorns for autumn design.

And this is a phased drawing of the autumn landscape

And one more beautiful portrait In the leaves.

We draw a phased owl with patterns
If you like to draw owls, then here are some options for drawing.

Owl with patterns of flowers.

Portrait of owls.

Owl in flight.

But the owl can be drawn somewhat easier. For this look phased drawings And try to do the same.

Or, for example, such a drawing.

Or another such very simple way of drawing. We make oval, in which you draw eyes and ears.


How to statenly draw heroes from cartoons
And last. Figures from cartoons. For children, they will be particularly interesting. You can start with Luntka.

Portrait of a hare from "Well, wait."

Famous Winnie Pooh. 
Wolf from Mowgli.

Cartoon smuffy pictures.


Loves kids - pony. 
Most likely, everyone has a periodically desire to draw something, but not just a kalyak-blossom, and so that everyone liked. In particular, often such desire appears when looking at a beautiful and talented picture. It would seem that difficult? I want to learn how to paint the pencil cool, take the paper and draw the masterpiece. But if it comes to incarnation, difficulties appear: the center is shifted, the scale and the ratio of the parties are incorrect, then the details did not work. How to quickly learn to draw a simple pencilIf immediately, because of your own inefficiency, the desire to create masterpieces disappears?
Remember that even the most talented masters learned not immediately: everyone went through a long way, in order to improve the skills and delight other beauty. This is preceded by more than one year and not one month of hard work - it will take quite a bit of time, and here we already draw well simple pictures and people.
Pencil is considered the most simple tool For drawing, because it is worth starting to study from it.
You need to get used to wearing a pencil and notepadin order to make sketches. Only work and perseverance will help achieve the goal. But what to do if in addition to the desire and some abilities, there is nothing?
Drawing: As for beginners, draw something beautiful and easy
So, for drawing pictures, you need to know where to start. remember, that for beginners, the pencil acts as the most convenient means. This is due to the fact that it is easy to erase, but with the wrong line, it can be changed. Especially what is different types Pencils, with them, you can easily create a beautiful picture.

Chief Council for future artists - never do not start drawing from complex and large paintings until you study the details. You hardly do something, and the desire to draw again will simply disappear.
First learn to portray separate subjects. To do this, highlight one element from others. Then visually appreciate the form and magnitude. Next, select where it is better to place it, given the amount and shape. Do not forget that high elements are located along the length of paper, and wide - width.
Also, keep in mind that real subject, usually more than a piece of leaf, because it is required to draw it, considering aspect ratio and scale. This is a difficult task for a beginner. Because to generate skills, below will be offers simple exercisesthat will help to highlight the place for the drawing.
Exercises for drawing
In these drawing exercises, we draw objects as schemes without creating small details - This is what the newcomer can be drawn simply and beautiful. It is important to see here how the use of unpaired figures are created objects, their dimensions are taken into account. Getting similar skills, in the future you can find the location and size of the drawing on the machine.
Exercise number 1: So, the first task is that it is required to draw the subject not from the natural value, but from the picture. It greatly simplifies the task, because the element is not selected and the search for its placement is not required - everything has already been done. You need to reproduce the same thing, but in another size, in order not to copy it.
Repeat similar exercises with other images, developing an understanding of proportions and space.
Draw a mountain. First, look closely at the picture. Visualize it on your sheet. Now spend a straight line. It will be the foundation. Examine the shape of a hill, its slopes. If the mountain has the same sides, depict it as the correct cone, whose height in size is less than the base width. To understand how many times the part differ in size, you can take a ruler, but the main thing is to be able to do it on the eye. In this situation, the proportions of height and width are 1: 3.

For proper definition Aspect ratios, create a top first. Find a place on the horizontal where you place it. Create on line 3 equal segments. Next, find the middle and draw a perpendicular. Then mark the top of the mountain at a distance of 1 division from the base. If the image matches - everything is done correctly. Now try to create the same mountain, but in another size.
Do not forget that for the correct definition of the ratios of the subject parties, it is necessary to start from separation to the same parts of the base, and already go further. Such a task will teach you to accurately determine the ratio of various elements of objects. And this is the basis of drawing.
Exercise number 2.: Another task is that it is required to portray the mountain with other proportions of width and height. Here they will be 1: 4, and the peak is rejected on the right side. The task is more complicated, but not impossible.
First, repeat the actions of the first exercise: Draw a straight, sharing it on the same parts (here 4). Then there is a feature - the peak will not be in the center of the segment. She seemed to be over the third segment because they spend perpendicular line. Then the top is postponed. Usually, when creating a pattern, the base is divided by 2 or 3, by 5 rare.
Exercise number 3.: This exercise will need to portray on one sheet. profiles of different mountainswhich possess different vertices by location and altitude. Do not be afraid, the task is not too complicated. Represent each hill separately, spend a mentally dotted line to the grounds. And then you will realize that the first exercise is simply repeated several times.
Other skill - skills draw straight lines without fixtures. It's not too simple, workouts will be required. First draw a vertical line using the ruler. Now exercise, trying to create a maximum parallel by hand. A similar exercise is repeated with a horizon.
Mastering hatching
When creating masterpieces, a pencil will need to master hatching skills for the volume of the subject. She will show where the shadow falls, and where is the light. Start with simple figures: cube, ball, cone, etc. In addition, if you look carefully, then it is noticeable that there are fevering on these figures.

In order to get the smoothness of the transition from light to the dark, you will need pencils with different density. After mastering this skill, you will easily learn to draw volumetric parts. For classes, you can choose interesting and stylish drawings for beginners - not very complicated, but beautiful they will delight the result and support confidence in their abilities.
How to draw a person correctly
If you have achieved success in previous tasks, we'll figure it out now, how to draw a man. This is not the easiest task. Consider phased drawing. First try creating people on paper that cost is important to distinguish between the ratios of the parties.
Spend a vertical direct, repel from it to create a grid, i.e. Main lines waist, shoulders, heads, hands and feet. But how to understand the size of these lines? When drawing from nature it is important to use a pencil as a measuring instrument. For example, you want to determine the gap from the belt to the head. Take a pencil, viewing its tip with a top of the crown, then check on it where the waist is located. Transfer the size of paper. So it turns out to measure all items.
Drawing people - a challenge complex. Start by creating the basis, then draw the items.
To check yourself remember that the body is visually divided into 8 parts. One piece is equal to the size of the head. At representatives of the strong floor, the length of the body is 3 heads, and the border is located on chest, chin, crotch and belt. Feet - 4 heads, and the center near the knees. Shoulder width reaches 2 1/3 head size. Hands in length reach 3.5 sizes of the head. Women's proportions are different - the body is more elongated, and the hips are considered the most wide part.

If you have determined the proportions of a person, draws marks, then add the body shape. For this, all elements in the form of cylinders and ovals are drawn. If you all like, then draw contour. Now it will only remain creating details - fingers, hair, face, clothes.
How to draw a portrait
The greatest difficulty creates the creation of portraits. The difficulty is that to obtain similarities, it will be necessary to correctly draw all the details and features. So, we'll figure it out how to draw a portrait of beginners.
First Council: Think that you can easily draw or draw with a photo with a pencil? Separate facial zones: nose, eyes, lips in various angles, even ears. Then go to the creation of a full image. For beginners will be easier work According to the photo, it is gradually possible to move to personal observations, sketches and sketches from nature.
Tip Second: Start with creating oval head. Then spend the vertical centered. She will divide the face to the same parts. Then divide it into 2 parts horizontal - this is the line of eye location. Eyebrows are located on the line of the upper edges of the ears.
Third Council: The length of the nose can be determined as follows: divide the gap between the eyes and the chin on 2 is the place of the tip. Its width corresponds to the gap between the edges of the eyes. These ratios are not an axiom, but most often the face is exactly what they draw.
There is a certain concept of a person proportions that can be taken as the basis.
When there are parts of the person, it is required to create the contour of the lips, the nose, ears, hair. If the details were arranged, then start drawing. Now it remains only to add concluding strokes.
Graffiti style
If you like the inscription, then you should think about. there is different areas and stylistic exercises for drawing the word, letters, phrases. And in order to understand what specifically the direction you will create, you will need to study them all.

Train first on paper. Create a word. Letters are required to be located at a distance corresponding to the ½ height of the letter, because they will need to circulate along the contour. Now give each letter to the volume and bulkness of the hatching.
Selection of tools
A considerable role in drawing plays the choice of tools and sheets. So, what to choose fixtures:
there are different types of pencils. Simple pencil happens with different levels of softness. Often they are marked with Latin letters: B - the most soft, n is the most hard, and NV - firm-soft pencils. In addition, there are still numbers from 2 to 9. They show the tone;
beginning will need different pencils S. different hardness
. In addition, when drawing will need soft erase;
paper Plays not the last role. Better use white dense sheets - they are able to withstand corrections. The pencil is suitable grainy leaf, because shades are noticeable on it.
We considered in detail how to learn to work with a pencil and how to draw something beautiful at home, but now we will bring a kind of outcome. Consider short tips How to fill hand for drawing - the list, of course, is not full, but summarizes the experience:
Create outline.
This is the main point. Per day you need to create not less than 5 sketches. It is worth working at the maximum. Use each chance of creating drawings: on the road, in the office, at home. It snaps down his hand, develops fantasy, the ability to understand the size ratios. It is useful to draw ruskends, comics.

Copy the work of the masters.
Imitate masters, it develops taste. Do 1 copies every 3 months. These include originals good artists. Try to get closer to the source to the maximum, study not only the technique of masters, but also the features of the culture of that era.
Experiment, do not be afraid of errors and do not postpone the creativity for later. So you will rather learn the creation of masterpieces.
Draw a memory.
Even when drawing from nature, you have to create an image from memory. Moreover, it is important to draw small elements - It will improve the visual memory and fantasy.
Repeat errors.
Often, people at the first problems throw labor: they are afraid to repeat the error. But you should not do this. Does not go out - Start again. Do not avoid mistakes, you should look close to them - it is possible that it is your personality that is.
Do not draw in the photo.
Yes, at first, this is the only way to stretch, but then it is not worth doing this. The lens is not capable of transferring the depth of the forms.
Take a break.
Do not concentrate on one, it is important to be able to switch. Does not come out something - do breaks. Start other drawings, change the point of view, equipment.
Conclusion
Even if for you draw with pencil or paints (pastel, watercolor, butter, etc.) - a completely new direction of vital activity, do not be afraid to put goalslike modest and global. It is important to remember, for what you have decided to learn drawing: will it be future profession Or Hobbies, do you want to please friends or relatives presented as a gift by a scenery or portrait, did you just master the new creative niche?
The fears of their own ineulsion do not give rest, constantly buzzing in the ear "Don't get anything anyway"? You should not postpone the ideas and plans for later, gradually buying boxes of pencils and paints or spending the weekend in search of the stores of the best paper. Imagine your desires today - Just take a notebook and pencil and start doing let it still be very skillful, but then your own sketches.
January 23, 2014.