Draw face lungs. How to learn how to draw portraits of people with pencil novice artists? Draw a portrait of a man with a pencil phased in different angles: Afas, profile and head turn
This lesson is devoted to how to draw a face girl Without pronounced emotions with soft features.
In this lesson we will need:
- album for drawing;
- pencil HV;
- eraser-Klyachka;
- line.
I know that in this lesson a lot of time is given to the measurement. In my opinion, at the initial stage it is necessary, especially if you are new. When you master the proportions and leave a hand on drawing female people, you can repeat this lesson without spending time on the metrics. Ready to practice? Then let's start!
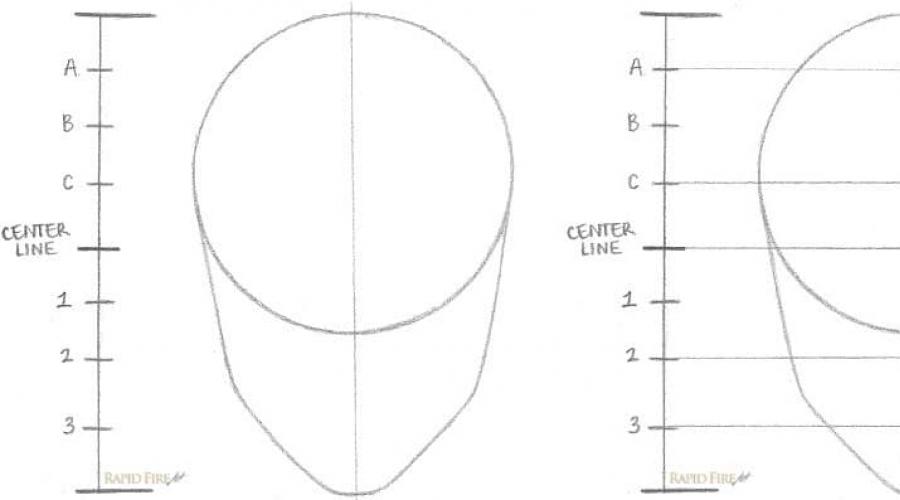
How to draw a girl's face. Step 1: Face form.
Draw a circle and draw a small horizontal line at the bottom, half the diameter of the circle. It is important to comply with this rule, since the circle was drawn by hand.
In women, chin is less than men. An increase in the chin will give the masculine to a female person.
After that, draw the cheekbones by connecting the chin with the circle. Forms of female faces are extremely diverse. As an example, I will use the image of soft cheekbones.
Then swipe the vertical line exactly in the middle of the future face.
How to draw a girl's face.Step 2: Wealthing proportions.
Measure the length of the face and divide into eight equal parts. Indicate each part by a sequence number or letter, as shown in the figure. Then, with the help of the ruler, spend direct horizontal lines through points marked as Sentter Line, 2.3, A and C.

If you have completed this lesson several times and want to try to draw a face without the help of the line, draw the lines in this order: Sentter Line, 2, 3, B, A, C, breaking the lines each time in the middle again and again.
How to draw a girl's face. Step 3: Eyes.
Divide the central line inside the face into five equal parts. Remember that women's eyes are wider and more open than men.

How to draw a girl's face.Step 4: Nose.
To draw a nose, spend two vertical lines down from the inner edge of the eye to line 3. These lines will limit the nose in width. Then draw a small circle just above the line 2. My nose will be short and narrow, with a narrow bridge.

How to draw a girl's face.Step 5: Eyebrows.
In the picture on the left, I inscribed a surprise arc to show the organic position of the brow itself towards the arc. In the figure on the right we see that the eyebrow is located under the line C. To portray the surprised facial expression, the eyebrow will need to be further closer to the line C.

How to draw a girl's face.Step 6: Lips.
To refer to the boundaries of the lips from the middle of each pupil, it will be necessary to carry out a perpendicular line down to the line 3. Then draw a triangle whose start will go from the tip of the nose. The base of the triangle must be inside the square. The top of the triangle should be located strictly at the tip of the nose. As mentioned earlier, this example is characteristic of a person who does not express bright emotions. If you want to portray the smirk on the face, as if the girl bluffs in the process of the classic version of the well-known card game, position the bottom of the lip just below. Mark teeth by spending several perpendicular lines.

After you drew lips, you may want to lengthen the chin. Or, on the contrary, make it shorter that the proportions look natural. It's quite normal. I constantly correct these proportions.
How to draw a girl's face.Step 7: Ears.
The borderline lines for the ears are the central line and line 2. To practice in the image of realistic ears, we recommend contacting this lesson (not yet translated).

The central line and line 2 limit ears from above and below.
How to draw a girl's face.Step 8: Hair.
When you draw women's hair, remember that the female forehead is usually smaller than the male. On my example, the hair line begins below the line A. Also, I draw my hair on both sides of the temples, but I follow that the hair is not too close in the eyebrows. Do not forget to give hair volume, leaving a small space between hair and head. For more detailed instructions for the image of realistic hair, I recommend contacting one of.

Before you erase all auxiliary lines, check again how harmonious facial proportions. If after checking you have been satisfied with the result - you can safely wash them.

Well, after you have mastered the lesson on the image of a female face, it is time to experiment and perform several exercises without a ruler.

The article is translated from the site.rapidfireart. com.
Each novice artist sooner or later wants to learn how to draw portraits. Of course, to create a full-fledged portrait, you will need limitless patience and long workouts. For beginners, it is important to master the technique of drawing the main components, to work out the correct proportions. A human face can be depicted in arbitrary form, and then work on the details and components.
For such a difficult work, like drawing a human face, stock quality materials. You will need a sheet of paper, eraser and several pencils. Pencils should choose different hardness that can be distinguished by labeling. The solid pencil is marked with a label "H" or "T", soft - "in" or "m". Using a solid pencil, you get a thin light line. When drawing a soft pencil line will be darker and thicker. Let's start drawing. Carefully look at yourself in the mirror or consider any images of a human face. Look at the proportions. The narrowest part of the face - chin, wider - cheekbones and temporal zone. Any human person can be depicted using the following three figures: two trapezoids and a triangle. The line of contact of the trapezoids indicates the eye line and the top point of the ears. The line of contact of the triangle and trapezium is the line of the lower lip.


Drawing a person is a difficult task that, by the forces, those who are not afraid of hard work. Before starting the process, carefully examine the methods of applying shadows, drawing eyes, lips and other elements of the face. Observe the proportions, but do not be afraid to experiment and do not cease to improve your skills.
To correctly draw a man's head, you need to know its proportions.
The head has an oval shape, which is divided by the eye line into two approximately the same parts, that is, the eye line is approximately in the middle of the face.
The face draw quite difficult. Conditionally, it can be divided into three parts: from the beginning of the hair to the line of eyebrows, from the line of eyebrows to the end of the nose and from the end of the nose to the chin.
The top edge of the ear is located at the level of eyebrows, the lower - at the level of the nose. An eye line can be divided into five identical parts, of which the second and fourth occupy eyes.
The width of the nose is equal to the length of the eyes, and the mouth is a little wider than the nose.
The distance between the eyes is equal to the width of the eye or the width of the nose base. The ears are located from the eyebrow line to the base line of the nose, the incision of the mouth is one third of the distance from the base of the nose to the end of the chin.
The head is symmetrical, and it is possible to draw it on the basis of the conditional line, which begins on the back of the head, passes in the middle of the forehead between the eyes, along the nose, in the middle of the mouth and chin. This line is called middleand serves to build paired symmetric forms.
Knowing these proportions will help the novice artist in working on a portrait.

The shape of the head can be different types.

Now see how to draw a different expression of a person's face.

The drawing of the head starts with the construction of its egg-shaped shape, while it must be remembered that the shape of the head should be outlined so that its mid-horizontal takes place slightly above the middle of the sheet and that the head is not very shifted to the right or left. Only after that we are planned part of the person. They need to be learned very carefully: the similarity of the portrait with nature depends on this.
The main parts of the person belong to eyes, nose, lips and ears. Of course, each person has their own, unique eyes, nose and lips. But it only seems to be in fact they can be generalized and simplify their shape.
Human head paints in full face(when he looks straight)

in profile (when the head is turned sideway),

and in the half turn.

Draw your eyes
Eyes play a very important role in portrait similarity with kind. You can start painting the eye from its generalized shape - a ball inserted into the horizontally located oval (eye depression). Therefore, starting to draw an eye, you need to outline the eyelabies, while remembering that they are not very close to the nose. The distance between the eyes is equal to the length of the very eye.Next, by chateating the pupil, we begin to draw eyelids.


R  isuu profile, you need to remember that the upper eyelid is advanced a little more forward than the lower one. And the pupil from the round turns into a flattened oval.

Drawing face in half turn, pay attention to the upper eyelid eyes raised.
The reliability of the portrait depends on the greater or smaller strengthening of the shadows, and not from the direction of the strokes, so first of all you need to try to put the shadows and do the hatching only when it is already purchased.

Conduct a line passing through the eye, watching its direction carefully. Find the length of the eye, which is indicated by two vertical lines. Draw contours of the eye, remembering that the front convexity or roundness of the eye is visible in the eyes drawn in profile or half turn.

Draw lips
Before starting to draw lips, you need to outline the middle line of the mouth (this is a line where the upper lip is connected to the bottom), then to determine the length and thickness of the lips on this line (usually the lower lip is thicker than the top, but it happens that they are equal in thickness ). It should also be remembered that the mouth is below the nose base line. Next, you need to begin to outlines the outlines of the lips, trying to convey their characteristic shape (thin, thick, medium, smooth along the contour or with a bend on the upper lip).

When drawing lips to the profile or in the half-turn, you need to mark the amount of the rotation of the mouth, its tilt, as well as the degree of thickness (that is, the extension of one of the lips).

The incision of the mouth is located on one third of the distance from the base of the nose until the end of the chin.

Draw your mouths in Afas and profile. First, you will schedule a line intersecting your mouth, then we define the length of this line with two screws,

Then we will find the middle of the mouth and denote its line parallel to the lines denoting the length of the mouth.

Then we denote the thickness of the lips and denote the teeth if the mouth is discontinued.

Draw nose
Drawing a nose, you must first carefully examine its characteristic features: the noses are straight (1), drinks (2) and with a hubber (3).

Also noses are long, short, narrow and wide. The base of the nose is equal to the width of the eye. Outdoor nose, you need to remember that the middle of the front line of the nose passes through the middle of its base and tip.

Drawing a profile or half turn, you must not forget that the stronger the turn of the head, the further the tip of the nose is from the median line.

Now let's try to draw your mouth and nose together.

Now draw nose and eyes.

Draw your ears
Ears are usually located at the level of eyebrows to the base of the nose. In order to properly outline ears, you need to draw an imaginary ear axis that passes parallel to the nose line. Then outlines the general shape of the ear and draw the details.

Draw a continued quadrolon and divide it across two equal parts. Cut out the outer circumference of the ear, then outline it with a thickness and draw the middle (ear cavity).

Place your hair
Hair is beautifully framed and start in the middle of the distance from the eye line to the pattern (the top point of the head). All hairstyles can be reduced to the most typical.


Draw a neck.
The neck is a support for the head and firmly strengthened on the shoulders. Before starting drawing, you need to determine the height of the neck and its attitude to the height and width of the head. First, the middle line of the neck, passing from the bottom of the jaw to the cervical depression, is scheduled. The neck itself consists of some of the three conditional figures: a rectangle and two triangles.


We can now carefully look at the details. And let's start with the face. The person's face is the first thing that we pay attention to in any situation, and this is also definitely applicable to art: the observer will first of all consider a person with your characteristic features. The transfer of the face on paper, especially the drawing of living expressive expressions, undoubtedly worth the effort.
In this lesson we will get acquainted with the main components face drawing - proportions, features and angleAnd in the following lessons already we will analyze a variety of expressions of individuals.
1. Proportions of the face
Full face:
In this position, the skull will be a flat circle to which the outlines of the jaw are added, which in general forms the shape of the egg, pointed below. Two perpendicular in the center of the line divide the "Egg" into four parts. To distribute face features:
- Mix the middle of the left and right half of the horizontal line. At these points will be eyes.
- divide the vertical lower line into five equal parts. The tip of the nose will be at the second point from the center. Write fold will be at the third point from the center, for one current below from the tip of the nose.
- divide the upper half of the head into four equal parts: the growth line of hair (if a person has no bald) will be located between the second and third point from the center. The ear will be located between the upper century and the tip of the nose (in the event that the face is on the same level). When a man looks up or down, the position of the ears is changing.
It is useful to know that the width of the face is the width of five eyes or a little less. The distance between the eyes is equal to the width of one eye. For people, it is uncharacteristic to have widespread or too closely related eyes, but it is always noticeable (widespread eyes give a person an innocent children's expression, and narrowly delivered for some reason excite suspicion in us). The distance between the bottom lip and chin also equals the width of one eye.
Another criterion measures is the length of the index finger over the thumb. In the diagram below, all lengths are marked according to this criterion: the height of the ear, the distance between the level of hair growth and level of eyebrows, the distance from the eyebrows to the nose, the distance from the nose to the chin, the distance between the pupils.

Profile:
From the side, the shape of the head also resembles an egg, but pointed to the side. The central lines now share their heads on the front (face) and rear (skull) parts.
From the skull:
- Ear is located right behind the central line. According to its size and location, it is also located between the upper century and the tip of the nose.
- the depth of the skull varies between two separated dots lines (as shown in step 4).
From the face:
- The features of the face are located in the same way as in Afas.
- The deepening of the nose or coincides with the central line, or is located just above.
- The most outstanding point will be the level of eyebrows (1 point from the center).

2. Facial features
Eyes and eyebrows
The eye is built from two simple arcs, in shape resembling almonds. There are no strict rules here, since the shape of the eyes can be completely different, but there is general recommendations:
- an outer corner of the eye above internal, and not vice versa.
- If you compare the eyes with the almond, the rounded part of the pupil will be on the side of the inner corner, decreases towards an external corner.

Details of the eye
- Rainbing eyes partially hidden behind the upper age. It crosses the lower eyelid only if the person looks down or pushed (the lower eyelid rises).
- The eyelashes bend outward, and they are shorter in the lower eyelid (in fact, it is not necessary to draw them every time).
- If you want to portray the oval of the tears in the inner corner of the eye, as well as to show the thickness of the lower eyelid, it completely depends on your preferences; Excess details does not always look appropriate. Adding such details in proportion to the complexity of drawing.
- The same can be applicable to drawing the folds of the century - it adds expressiveness and looks less alarmed. I think it is better not to add a fold if you perform stylized pattern or your drawing is too small.
The eye into the profile reminds on the form of the tip of the boom (the parties can be concave and convex), with a slight designation of the upper eyelid and, selectively, lower. In life, we do not see the iris in the profile, but we see the eye protein. When I worked on the lesson, many said that "it looks strange," so the iris must still be designated.
As for the eyebrows, the easiest way to draw them after the eye to repeat the bending of the upper eyelid. Most of the eyebrows length looks inside, and her tip is always a bit shorter.
In the profile, the form of eyebrows changes - it becomes like a comma. This "comma" continues the level of eyelashes (where they bend). Sometimes an eyebrow seems one whole with eyelashes, so you can also draw one curve for the top of the eye and the eyebrows.
The nose is usually a wedge-shaped form - it is easier to visualize and give three dimensions before complementing the details.
The partition and the sides of the nose are flat, which will noticeably on the finished figure, but already at the stage of the outline it is necessary to designate them to subsequently distribute the parts. In our wedge, the lower flat part is a truncated triangle, connecting the wings and the tip of the nose. Wings are bent towards the partition, forming nostrils - note that if you look at the bottom, the lines forming the side partitions are in the foreground, in parallel to the face. The partition protrudes below than the wings (if you look straight), which means that during anonymous ¾ the far nostril will not be visible, respectively.

The most difficult moment during the drawing of the nose can be the decision-making, which parts of the nose are better not to depict for a natural look. You will not always have to fully draw the wings of the nose (where they are connected to the face), and in most cases the picture looks better if you simply draw the bottom of the nose. The same applies to the four lines of the nose partition, in the place where they are connected to the face - in most cases it will be better if you draw only the bottom of the nose (wings, nostrils, partition) - you can alternately cover the line to make sure . If the head is turned to ¾, it becomes necessary to draw the bridge lines. You will need to observe a lot, by the method of trial and error to recognize the unique features of the nose. Caricaturists have this feature - it is necessary to carefully consider the outlines of noses to understand why they are depicted. We will return to this issue in the following lessons.

Lubs
Tips on the image of the mouth and lips:
- First you need to draw a lip fold, as it is the most stripped and dark of the three almost parallel lines that form the mouth. In fact, it is not a solid straight line - it consists of several implicit curves. In the figure below, you can see hyperbulous examples of the movement of the mouth line - note that they repeat the top lip line. This line can be "mitigated" in several ways: the hollow over the lip can already be (to distinguish between the corners) or so wide that it becomes invisible. It may be the opposite - the lower lip is so complete that he creates a feeling of inflated lips. If you find it difficult to stick with symmetry at this stage, try starting from the center and draw one line on each side.
- The upper corners of the lips are more noticeable, but you can soften them by portraying two wide curves, or soften so that they will stop being noticeable.
- The bottom lip is definitely reminds the usual curve, but it can be almost flat or rather rounded. My advice is to designate the lower lip of at least a conventional dash under the bottom boundary.
- The upper lip is almost always lower, and it is less represented forward. If its outline is encountered, it should be brighter expressed, as the lower lip and so stands out with his shadow (in size should not exceed the size of the lip).
- The lip profile resembles the arrow tip form, and the protrusion of the upper lip becomes obvious. The shape of the lip is also different - the top is flat and is located diagonally, and the lower more rounded.
- Looping in the profile is deflected down, starting with the crossing of the lips. Even if the person smiles, the line goes down below and rises again in the area of \u200b\u200bthe corners. Never lift the line level if you draw a profile.

Ears
The main part of the ear (if it is drawn correctly) has the form of the letter FROM From the outside and the form of an inverted letter U. On the inside (the border of the top cartilage of the ear). Frequently paint smaller U. above the ear of the ear (you can make your finger to your ear), which goes on to a smaller letter FROM. Ear details are depicted around the ear hole (but not always), and their forms can be completely diverse from different people. The drawing can be stylized - for example, in the figure below the ear in its general form resembles the elongated "@" characters.

When the face is turned into an Afas, the ears are depicted in profile, respectively:
- The glass, before the designated letter U is now visible separately - the same when you watch the side of the plate and then see her bottom, as if it was closer to you.
- on the shape of an ear hole resembles a drop and stands out on a general ear background.
- the ear thickness from this angle depends on the proximity to the head, this is another individual factor. Nevertheless, the ear is always issued forward - it happened during the evolution.
If you look at the back, the ear seems separate from the body, mostly this is a glass connected with his head with the help of the channel. Do not understand the size of the channel - its function is that the ears come forward. In this perspective canal weighing the lobe.
3. Rackers
Since the head is based on the circle, where the contours are indicated by the facial features, changing the head of the head is easier than it seems at first glance. Nevertheless, it is even more important to observe the position of people's heads in different angles in life to remember all the protrusions and depressions, superimposed on each other as an unexpected way. The nose, undoubtedly, significantly retreats from the head (also appear eyebrows, cheekbones, lip center and chin); At the same time, the sockets and the sides of the mouth form some of the depressions on our "circle".
When we painted my face in the Father and in the profile, we simplified the task to a two-dimensional image, where all lines were flat. For all other persons, we need to rebuild our thinking into a three-dimensional world and realize that the shape of the egg is actually an egg, and the lines we used before to arrange the features of the face, crossed this egg like the equator and meridians on the globe: at the slightest Changing the position of the head we will see that they are rounded. The location of the facial features is just the drawing of intersecting lines at a certain angle - now there are three of them. We can again share our heads on the upper and lower parts, "cut" our "egg", but now it is necessary to keep in mind: the most close to us components look thicker. The same applies to face drawing in a raised or lowered state.
Man looks down
- All the features bend towards upwards, and the ears are "rising".
- Since the nose is issued forward, his tip falls below the original mark, so it seems that he is now closer to her lips, and if a person drops his head even lower, then Mr. partially brings her lips. From this angle it is not necessary to draw additional details of the nose - there will be enough bridges and wings.
- Eyebrow arcs are fairly flat, but they can be curved again if too strongly tilt their heads.
- The upper eyelid eye becomes more expressive, and just a little change the position of the head, so that they completely hid the eyes orbits.
- The upper lip is almost invisible, and the bottom increases.

Man looks up
- all lines damn face seek down; Ears are also moving down.
- The upper lip is visible in full (which does not happen in the Afas). Now the lips seem to be inflated.
- eyebrows bend stronger, and the lower eyelid rises, because of what the eyes seem fair.
- The lower part of the nose is now completely visible, both nostrils are clearly displayed.

Man turns out
- When we see a person almost completely unscrewed, abrasive arcs and cheekbones remain from visible traits. The neck line is superimposed on the chin line and is located next to the ear. When a person turns, we also see eyelashes.
- Also when turning, we can see part of the eyebrow line and the protrusion of the lower eyelid; The tip of the nose also appears right due to cheeks.
- When a person turns almost into profile, eye apples and lips appear (although the fold between the lips is small), and the neckline is merged with the chin line. We are still visible part of the cheek covering the wing of the nose.

It's time to practice
Use the method of fast sketch, throwing the expression on the paper that you notice around yourself in a coffee shop or on the street.
Do not try to detail all the features and do not be afraid to make a mistake, the main thing is to transfer the traits from different angles.

If you are difficult to draw in the amount, take the present egg (you can cook it, just in case). Draw three lines in the center and add separating lines. Watch and drucribe an egg with contour lines from different sides - so you will feel how the lines and distances between them will behave in different angles. You can outline the features of the face on the surface of the eggs along the main lines and trace how they change in the amount when the egg is rotated.
In this lesson drawing, we will get acquainted how the female face is drawn, building a face, how to draw the face of a girl with a pencil phased.
Why we start, so it's from drawing a circle. Then we carry out a line where the middle of the head should be, then two vertical straight, the top is the line of eyebrows, the second is the line of the eyes. Memind and put a dash where the nose ends (it is done on the eye or measured). Now the distance 2 measure and deposit the same down and the top (3 and 1, respectively).

Eye line we divide on 5 equal parts. In humans, the distance between the eyes is equal to the earliest, but there are of course exceptions, H6e without it. Distance from the nose to the chin is divided into three equal parts. Making the sketch of the contour of the face. From the beginning of the eye, the dotted line is debugged to the nose. When drawing, the wings of the nose should not be over the boundaries.

Now draw eyes, nose, mouth, eyebrows, carry the contour of the face, draw the top, hair, ears. No need to draw each eyelashes, just draw a shared shape. Eyelashes go for the size of the eye, i.e. For our dashes. When drawing lips, the first dash is the bottom of the upper lip. On the site there are many lessons drawing eye and mouth, for example, lips - and, eyes - and.

Will erase all the auxiliary elements, draw the neck and shoulders from the girl, hair. Principle can be finished on this and you can add a little to the shadows for realism.
