Space drawing with a simple colored pencil. How to draw space: the simplest methods and tools
Summary: Children's drawings on the theme of space. How to draw a drawing for the day of cosmonautics.
On the eve of Cosmonautics Day, it will be relevant to talk about children's drawings on the topic of space. In this article, we want to tell you how to draw space using unconventional drawing techniques. Here we will consider drawings on the theme of space, made in the techniques of scratchboard, mat, "splash". Also you will learn how to draw unusual drawing for astronautics day with shaving foam or air bubble wrap. The techniques for drawing space described in the article are simple to perform and are available, among other things, to children of preschool and primary school age.
1. Drawings on the theme of space using scratchboard technique
The word "scratchboard" comes from the French gratter - to scratch, scratch, therefore another name for the technique is the scratching technique.
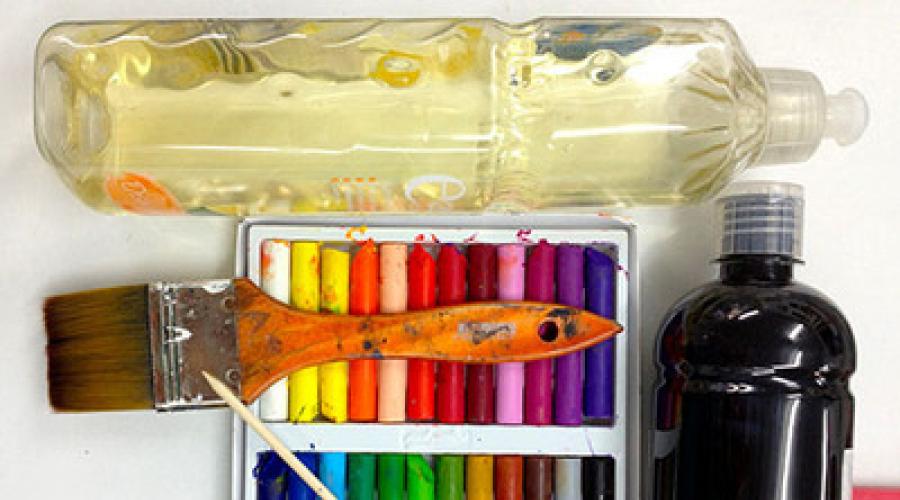
To draw a drawing on the theme of space using the scratchboard technique, you will need:
Heavyweight white paper (or cardboard)
- colored wax crayons
- black gouache paint or ink
- dishwashing liquid
- brush
- any sharp object (wooden skewer, toothpick, knitting needle, etc.)

Work plan:
1. Color the paper with wax crayons in a free style. Do not feel sorry for the crayons, they should cover the paper with a thick layer. Note: even a small child can handle this part of the job.

2. Mix 3 parts black gouache paint(mascara) and 1 part dishwashing liquid. Cover the paper with the resulting mixture evenly.

3. Let the paint dry completely. You can speed up this process with a hair dryer. Now comes the fun part! Take any sharp object and scribble your drawing on the theme of space with it. The result will be an original work for the Day of Cosmonautics, performed in an unconventional drawing technique, scratchboard

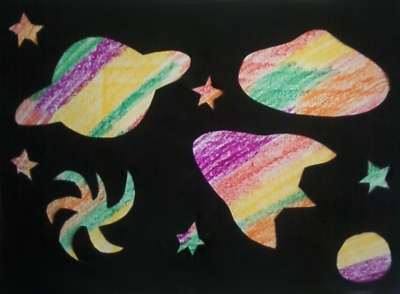
2. How to draw space. Drawing in the technique of "mat"
This is a very unusual and fun drawing technique. First, as in the previous technique, you need to paint a sheet of paper with colored wax crayons. The result is a bright, colorful rug. After that, draw on cardboard patterns of planets, flying saucers, space rockets, stars, etc. Cut out templates. Lay out the cut templates in the form of a composition on a thick sheet of black paper. Circle them with a pencil, then cut out the silhouettes with nail scissors. Note: This step must be done by an adult. Now place a black sheet of paper with cut out silhouettes on the "rug" painted with crayons. The drawing of space in the "passe-partout" technique is ready. Link to the original source.
3. Children's drawings on the theme of space. How to paint with shaving foam
For children in creativity, the process itself is more important than the result obtained. We, adults, are interested in the final product of our activity. Today we want to offer you a type of paint game that will satisfy the needs of both children and adults. The site games-for-kids.ru describes an interesting way to create a so-called. "marbled paper" with regular shaving foam and paint (or food coloring). Taking advantage of detailed instructions on the production of "marble paper" described on this site, you can make beautiful drawings on the theme of space for the day of astronautics.

4. Drawings for the Day of Cosmonautics. Drawing space to music
In 1914-1916, the English composer Gustav Holst composed symphonic suite"Planets". The suite consists of 7 parts - according to the number of planets in the solar system (excluding the Earth), known at the time of writing. We suggest you spend the following with your child interesting occupation, dedicated to the topic space, on the eve of the day of cosmonautics.
Give the child big leaf paper and paint. Ask him simple pencil divide the sheet into four equal parts. Now let him take turns listening to any 4 parts of the suite (for example, Mars, Venus, Jupiter, Uranus). Listening to every part piece of music, he must depict on canvas the emotions and feelings that this music evokes in him. Children, as a rule, enjoy such work very much. This is what one of our students drew.

Of the resulting abstract paintings then you can cut out the planets and glue them on a sheet of black paper. The drawing for the Day of Cosmonautics is ready!


5. Drawings on the theme of space. How to draw space with a toothbrush
We invite you to make a drawing on the theme of space in the so-called. technique "spraying". Using a toothbrush, spray on a piece of black paper white paint... You will have a starry sky. Planets can be drawn with a sponge by smearing paints on it. different colors... See what beautiful drawing on the topic of space turned out with us!


6. Children's drawings on the theme of space. Unconventional painting techniques
If suddenly a piece of air bubble film is lying around at your home, now is the time to use it for children's creativity... After all, with the help of this wonderful material, you can very easily paint the planet. You just need to put paint on the film and attach it to the picture in the right place.

The planet in the picture below is also made using this technique. unconventional drawing... Additional prints were made using a cardboard toilet roll and a plastic straw. Also, when drawing this drawing on the theme of space, the so-called. spray technique.


7. Drawings space. Drawings for the Day of Cosmonautics
An interesting project for children for Cosmonautics Day was prepared by the website MrBrintables.com. On this site you can download and print a drawing of the moon. The moon is presented in three sizes: large (22 sheets), medium (6 sheets) and small size(1 sheet). Print the drawing, glue the sheets on the wall in the correct sequence.
Now invite your child to dream up who lives on the moon. Let him draw its inhabitants, their houses, transport, etc.

8. Drawings on the theme of space. Children's drawings on the theme of space
These charming aliens are drawn with this unconventional technology drawing like blowing paint through a straw (plastic tube). What is this technique?

We apply paint diluted with water on a sheet of paper with a brush (or pipette), so that a stain of paint is obtained on the sheet. After that, we blow on the paint through a straw, it spreads in different directions and we get a bizarre spot. When the paint dries, we finish drawing all the necessary details for our alien.
So the month of April has come ... with the hope for warmth and a bright sun, with flowering and joy ... Very soon the world will celebrate the Day of Cosmonautics. This is a holiday that includes important events and greatest discoveries, the achievements of human civilization and the discovery of inaccessible secrets and worlds.
V different time the children and I conducted a variety of activities on the topic of Space, links to some of them will be at the end of the article and in. And today I invite you and your children to arm yourself with pencils and paints and go to draw space!
Hooray! I announce the opening new heading "Learning to draw" and I invite you to meet the artist Yulia, who shared her drawing skills with us.
How to draw space in stages
Drawings on the theme of space are a frequent April task in schools and kindergartens. Julia offers us two options space theme on different age: for preschoolers and elementary school students.
I know that many parents strongly oppose drawing templates and examples. But I am also convinced that in order to learn to draw, sometimes you need a push, an example, by embodying which, the child will believe in himself and begin to reveal his capabilities and talents. Let's try?
Drawing "Rocket in space" for children 4-5 years old.


The drawing is so simple and light that it seems to me that it does not need additional descriptions... However, if the video format of the lesson is more convenient for you, then watch this video:
Drawing on the theme "Space" for children 6-7 years old.

And here is the video MK of the rocket drawing, posted on our:
These are the simple and accessible drawings about space that the artist Julia suggested to us today. And I am grateful to her for her beautiful work.
How do you like these drawings about space? And what do you and your children like to draw on a given topic? By the way, you can send your drawings on this MK to me by mail, I will post them in this article.
What do we think about looking at the night sky? Many of us imagine space as infinity. Many stars, planets, orbits and others celestial bodies... Even the smallest fraction of space has not yet been explored. If you want to express your emotions on paper, depict the Universe. How to paint space with watercolors, we will discuss in today's article.
School of the beginning artist
From school lessons In astronomy, we remember that space is the space in which other planetary systems, stars, meteorites, comets, and satellites are concentrated. Man has already repeatedly visited space, but no one was able to convey his feelings and the bewitching beauty of emptiness and infinity in words.
With the help of drawing, you can express your emotions, unleash your imagination and creative potential... Drawing the cosmos is the perfect start. No need to draw strict lines and certain objects, mixing colors is your drawing.
Many novice creators are interested in how to draw space with gouache and a sponge. This is not difficult. A dark background is applied to the sheet and then mixed different colors colors to create the effect of the abyss, serenity, remoteness, mystery.
Small stars, planets and comets have the right to be in your drawing. The easiest way to draw space watercolors, because they are easy to mix and give the picture volume and unprecedented beauty. You can experiment and combine two opposite colors, the result will pleasantly surprise you.
Before we show you how to paint space in watercolor step by step for beginners, learn a few tips:
- for drawing space with watercolors, a sheet is suitable thick paper any format and size: the bigger the better;
- the image is drawn in several stages, at the first level we dilute the paints with water;
- first you need to completely paint over the sheet with a dark background, for example, black or dark blue;
- the first layer must dry well, otherwise mixing tones can bring an unexpected and not at all impressive result;
- then you can draw stains with any colors that smoothly connect to each other;
- at the very end, the figure depicts galaxies, stars, comets, nebulae or planets.
If you are drawing planets or comets, then their outlines can be drawn with a simple pencil. This will make it easier for you. The stars are far from us, and they need to be drawn with fuzzy and blurry lines. But if you are drawing space as seen through a telescope, then the features of the stars should be correct. Draw four to six edges. In order for the drawing to acquire a certain mystery, first rub a sheet of paper with wax. It will turn out to be a brilliant work of art.
Do not sit down to drawing when inspiration has left you. To paint space with watercolors, you need to think about something sublime and eternal.
Eternal and unattainable
People are trying to conquer space and are rapidly exploring the surface of the Moon and Mars. There are many other galaxies in this space. Ours is called The milky way, but to the nearest one, Please, the distance is as much as four light years. And this is neither more nor less - trillions of kilometers and hundreds of years.
We can only imagine this unexplored space and draw it in our imagination. Today we will learn how to paint space in watercolor. The master class will tell you how to portray infinity in stages, what techniques should be used.
For convenience, you can use an easel. We fix the canvas with masking tape. For mixing paints, you simply cannot do without a palette.

Required materials and tools:
- brushes;
- a set of watercolor paints;
- a sheet of thick paper;
- coarse salt.
Step-by-step description of drawing:

Tip: after each color, the brush must be thoroughly rinsed and blotted in water. This way you can avoid getting messy colors.
There is no doubt that any person, thinking, so to speak, about the eternal, imagines the depths of space with its unexplored expanses and tries to express his feelings in the form of a picture or drawing. Let's see how to draw space using different tools and techniques.
What do we associate outer space with?
Primarily, the association of outer space, even at a subconscious level, for any person is reduced to infinity, although not everyone can imagine what it is.
If you come to the question of how to draw space in stages, you should pay attention to some of the elements that are most often depicted in the paintings. The spatial structure is created first. These can be galaxies or nebulae with rarefied gas, then stars visible to the naked eye or through modern telescopes fit in here.
Only then can we assume the presence of a planetary system, although in most cases the question of how to draw space comes down to depicting objects known to us in solar system, because we do not know how the surfaces of planets of other star systems look like (the nearest distance is 4 light years - Proxima of the constellation Centaurus).
And, of course, to depict his view of what may be there, even a novice artist uses completely different tools that are most suitable for his imagination.
If you consider all the drawings and paintings, you will notice that most often they depict stars (constellations), nebulae, galaxies and planetary systems.
In the first, second and third cases, the question of how to draw the space is solved quite simply. On any dark background (even black or gray) are applied in blotches in the form of stars, differing in size and luminous activity. This is the easiest way.

As for nebulae, they often appear colored not only in the ultraviolet or infrared spectrum, but also in the visible human eye range. It is from this perspective that the question of how to draw space with watercolors should be considered. It is best suited for this due to the fact that when mixed with water, you can get smooth shades and transitions that are inaccessible, say, gouache or oil paints. But more on that later.
How do you get inspiration?
If you really think about how to draw space, or rather, get some kind of charge that can give an impetus for a splash of emotions, for a start you just need to look at the night sky in clear weather.
Alas, in our hemisphere, the sky looks only like darkness interspersed with stars. Another thing is the Southern Hemisphere, where Milky Way(this is the name of our galaxy) looks in all its glory.

On the other hand, music is a powerful enough tool to activate meditation. If earlier the so-called space music was associated with bands like Space or Zodiac, today it is enough to listen to compositions in the style of Ambient, Chillout or Downtempo, which use complex sound effects.
How to paint space with paints?
Now about the paints. Based on the above, the most solvable question will be how to draw space with watercolors.

Here you should pay attention to the paints themselves. First you need to apply a dark background to the sheet, let the paint and paper dry a little, and then dilute the depth with the usual addition of water. You yourself understand that outer space cannot be equally dark.
After that, you can start drawing images of galaxies or planets. By the way, it is with the help of watercolor that it is best to depict colored gaseous nebulae. But you can concretize some elements using additional funds in the form of gouache or oil.
How to draw space with a pencil?
The situation with pencils is somewhat worse. The fact is that it will not be possible to achieve the blur inherent in space.
Here it is better to use vertical, horizontal or oblique shading with a long lead. In addition, even rendering some global elements requires knowledge of additional effects.
Additional effects
In the case of paints, everything is clear. The usual dilution with water is quite powerful. But few people know what else is in Soviet times a method was invented to obtain smooth transitions when drawing with a pencil.

You just need to grind off the lead a little on a separate piece of paper, then take the powder and smear it over the image on the paper. The effect is amazing. By the way, this applies not only to simple, but also to colored pencils. This is called retouching.
Separately, it should be noted that in the question of how to draw space, some authors of paintings are not limited only to the use of standard tools. So, for example, adding sparkles to symbolize the stars is a pretty hot topic.
Which is better to use?
Now a few words about which is better: a computer program or hand drawing? Both. Of course, applications for creating and processing graphics have their own rather powerful capabilities, but many people first record the flight of thought on paper, after which they scan the drawing and translate it into the desired format.
However, programs like Adobe Photoshop or the same package Corel draw they suggest using complex gradient fills as templates, which are simply not possible to obtain with ordinary painting.
Based on this, you can simply advise, initially make a sketch of the future drawing or painting, and only then decide whether it is worth processing in computer program or leave it unchanged. In principle, both options are acceptable. Although the solution to the question of how to draw space with paints in the usual way seems preferable.
It's another matter if the artist does not want to digitize the picture. This is understandable, because a sheet of paper or canvas looks natural. Unlike computer images, when viewing a picture, you can touch the picture and see the paint application technique used by the author of a particular masterpiece.
We have launched a watercolor drawing contest. You can see all works by tag. We publish best drawings and give step by step master class how to learn to paint space with watercolors.

Photo by @ shagero.alled

Photo by @kamarkovskaya

Photo by @arlyapovaeireen

Photo by @katrin_is_art
Step-by-step master class
If you did not participate in the competition, but also want to learn how to draw space, save yourself somewhere these step by step instructions, what and how to do to get bright and beautiful overflows. We publish a lesson from Leonardo Pereznieto.
M materials
- Hot-pressed watercolor paper of A4 or A3 format;
- Masking tape;
- Easel or wooden board;
- Palette;
- Water container;
- A piece of cloth;
- Salt in large crystals.
Watercolor:
- Orange;
- red cadmium;
- manganese violet;
- delft blue;
- azure;
- indigo;
- Prussian green;
- green phthalocyanine;
- permanent green;
- dark cobalt green;
- shiny blue-violet;
- chrome orange;
- cadmium light yellow;
- black ivory;
- titanium white.
Squirrel Brushes:
- Mop brush;
- Brush # 0;
- Brush # 2;
- Brush No. 4;
- Brush number 8;
- Brush number 12.
Secure the watercolor paper to a wooden board with masking tape. Mix orange with light cadmium red. You should get a light scarlet shade. Next, mix deep red with manganese purple and a drop of indigo for a cherry red hue. Then add Delft Blue to Indigo for a deep blue. And the last mixture is Prussian, permanent and dark cobalt green, phthalocyanine to get a medium green.
If you don't have all of these colors, you can simplify the task and paint with just the colors you have. The result will still be interesting.

Place the easel at a slight angle and wet all the paper with water clean water with a mop brush. Apply dark red and light red colors to her in the upper left corner. Fill in the lower right corner with a blue tint. Brush # 8 apply green tint diagonally - from the lower left corner to the upper right corner.

You need to work quickly enough while the paper is still damp. With a # 4 brush, strengthen some areas and fill in all the gaps with whatever paint you like.
You should have an idea of what you want the final work to look like.

Try to avoid mixing complementary colors (such as yellow and purple, red and green, blue and orange) with each other, as this will result in a cloudy color.
Once the paint starts to dry, apply another coat of paint on top to enhance the color. Remember to blot the brush every time before taking on a new shade.

When you are finished applying the paint and are happy with the color combination and brightness, sprinkle coarse salt grains on the drawing. It will absorb water and take away some of the color, leaving beautiful streaks in the form of nebulae. Wait until it dries completely and gently scrape off the salt.

We've only done half of the work! Wet the entire surface again with water and fix the colors with their pure counterparts, use the # 2 brush for this. To get a pure bright color, add less water to the paint and do not mix paints on the palette, but take directly from the container.

While the paper is still damp, mix the azure and black ivory. With a # 4 brush, paint around the edges of the sheet, around the edges of the nebula. Just do not apply paint in the form of a black frame, remember what nebulae look like - in the form of an elongated ellipse. At this point, we need a fabric that can be used to absorb paint to soften the edges.

Wait for it to dry completely and use the # 2 brush for the final touches. To add stars to our space, place your easel on a horizontal surface. Take a stick (or other brush) in your non-dominant hand and hold it parallel to the paper. Put some titanium white on the brush in your leading hand and lightly hit the stick with the brush so that tiny white particles of paint fall onto your painting. Add "by hand" some stars with a thin # 0 brush.

Let the drawing dry, remove the masking tape. And here it is, your space!