Draw a portrait of acrylic paints. Portrait of butter paints for newcomers How to adjust drawing portrait painted by a child
Think about inexpensive, but creative gift? I have a solution to this problem. I suggest you make a portrait of watercolor with your own hands. Do not be afraid, there is nothing difficult about it, you just need to try a little.
Those who have already read my previous article about pastel portraits are already familiar with the drawing method on the grid. In this lesson, I will continue to tell about this technique further. The essence of this method is to srinkage images by cells.
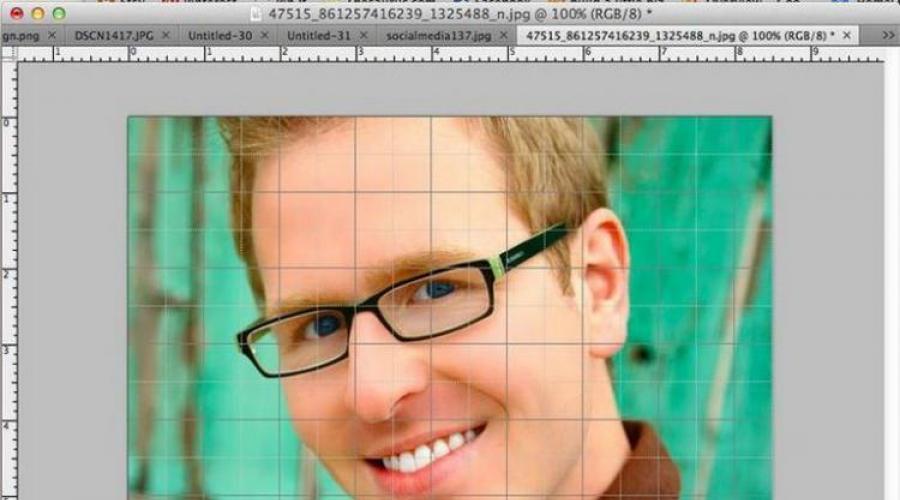
First create a grid over the picture. For this purpose, I use Photoshop, but other image editors will come. Photo taken with Facebook. Any photo is suitable, even low quality.

After switching on the grid in the program, draw it on paper. My cell size is 0.5 * 0.5 centimeters.

Having drawing the grid you can start with a pencil sketch. Concentrate your attention only to a single cell. The most important thing is to comply with the proportion. The grid helps you draw even the most complex elements of the face. By connecting lines in cells, we can easily get, for example, the ear.

I really like this drawing technique, since I often draw friends and members of my family. In my drawings, I always make an emphasis on my eyes, because it is the look of people best remembered.
You probably realized that the grid simplifies compliance with proportions.

Surely you have a question. Is it possible to draw a photo differently? Yes. Use copy paper. However, you will need a printed photo. Place the copy of the copy between ordinary paper and photography. Then circle on the photo all the contours that are copied on paper.
Now it is time in ink to circulate the black lines of your image.

I enjoyed a black feathered handle whose ink is not twisted when the liquid appears on them. You do not need to use the same handle, the main thing is that the ink is waterproof.

I won't supply the handle only the contours. Dark areas we will cover the watercolor.
That's what you should get at this stage.

When the ink is dried, we begin to wash the cells.

Now you can start painting with watercolor. For convenience, remove the grid from the original photo. So you will be clearer color visible. It is very convenient to work with watercolor, as it is possible to mix different paints. The most important rule when painting watercolor - start with bright areas of the image. If anything, then you can make a color at any time, but on the contrary it will not work.
I advise you to paint dark areas last. So with a smaller probability you mix dark shades with light. However, rain full drying of bright colors before you begin in black.

You should get something similar. I really like these blue eyes.

If you have any questions about this lesson, write questions in the comments. I wish you success! Remember the mother's day is already on the nose. Your mother will definitely like the portrait made with her hands.
master class watercolor
« The only expression allowed in portrait painting is expression, transmitting character and moral qualities and no temporary, mumbling, random grimace"(E. Burn-Jones).
The PORTRET-ART workshop offers you a master class on drawing a portrait with watercolor paints.
To create a portrait we will need:
· Paper or cardboard
Watercolor portrait is performed on a special watercolor paper, pre-stretched on the subframe. Such paper happens different types (you can find out in detail in any artistic store). Let's just say that the PORTRET-ART workshop advises to work on paper for watercolor painting Torchon.
· Brushes - brushes must be made of natural materials (Beliches, kuni, badger or ferret)
· Sponge
· Pure water
And, directly, watercolor paint.
building and machinery
Before starting work, carefully read the photo. Always begin construction from the shape of the head, the facial oval. First, determine the height (the distance from the chin to the top) and the width of the head. Then you need to find the average line, as a rule, this is an exemplary line of the eyes (but not in my case, since the complex angle is selected and there is a reduction). Make lines light, do not press the pencil (we advise you to use a soft pencil), do not forget that the main work will be performed by watercolor paint, explicit "black" lines can affect the accuracy and quality of your work.
After the eye line is determined, wealthing the nose, lips, eyebrows. We plan shadows and glare. At this stage, it is already possible to show schematically to show the shape of the nose, lips, eyebrows and eyes. Never start drawing a portrait from the eyes, eyelashes and other small details - in case of an error (and everything is mistaken) it will be difficult to fix something. We are looking for thin lines.
Work is carried out by common masses, it is impossible to run in advance. We work with the proportions of the entire spots.
detailing watercolor pattern

Draw parts. This stage is the most difficult, since it is now necessary to achieve maximum similarity. It is important to convey the character of a person. The main thing is not to forget to make measurements, allowing to determine the ratio of certain parts to each other (see).
Now, just, it's time to draw all small elements. In order not to overdo it with the detail, you can squint while looking at the original image (photo, nature). Thus, you will see those important moments that should be taken into account - the main large stains, features of the face and line. So you can easily facilitate your work. Do not forget to compare the details all the time - we achieve accuracy.
We plan shadows and glare.
Before moving to this stage, you need to get at least basic knowledge, pencil drawing and human anatomy.
for beginners

When all the constructions are completed, it is possible to proceed to the preparation of watercolor paint to work. With the help of a brush and clean water, we wet each color (in the future it will help to quickly mix colors during the work). However, this is done only for convenience.
We remove the auxiliary lines of a klyach or grater.
We take the palette (paper, plastic or glass). Sometimes you need to use several types of palette (for example, plastic, and paper) - such parts come directly during operation.
We advise you to start working as paint from laying shadows and dark portrait plots. Thus, the figure immediately acquires volume. Take a thick brush (as far as it depends on the format of your sheet), make large strokes, use more water (something like fill). Take into account that when the watercolor dries out - it brightens. As for the color and its receipt - there are no specific rules. In general, drawing watercolor loves individuality.
We pay attention to the darkest sections of the face, we try to get a three-dimensional image on this stage.
finding color. Work with planes

Now it is important to find the right color. Remember, watercolor - water paint. This is what makes the paintings by watercolor light and air, but at the same time saturated and bright. Therefore, overlapping the first layers, add more water - it will help to avoid the effect of "dirty work".
It should be borne in mind that white paint, the so-called Belil, not used in watercolor painting, although they exist in some palettes. The brightest places and glare are white paper that you leave untouched. In art stores, you can purchase a certain composition that you can cover places in the portrait and paint for these places will simply won't fall.
Over time, try to limit the number of colors in your palette - so your work will be more natural and lighter.
Important is the definition of light spots on paper, it is they who help us to perceive the plannedness and volume.
working with color

Of course, it is impossible to achieve realism, covering the skin in one color. The more different shades, the better.
Do not proceed to the next layer, without drying the previous one - it can lead to mixing of paints right on your work (although there is a similar technique "on wet", but now it's not about it). Artists of our workshop use a hairdryer. In this case, it is not necessary to turn on the hair dryer at full capacity and brought too close.
Remember - watercolor is friendly with water. And if you were mistaken, we went to the tone, the sponge and running water will always come to the rescue. Wash out boldly (but, of course, do not overdo it).
As for the technique - everyone has different, their own. Even trying to copy, as a result, individual notes will be visible. This is a matter of experience.
You can correct your errors, but it is even more important to comply with the sequence on the details of the face. Now you need to find color.
preparation for detail

At this stage, it is necessary to especially closely monitor the maintenance of similarities with the original. Do not forget from time to time to be distracted from the portrait (to move, turn away), since, sitting for a long time at work, after a large number of time, you will simply stop noticing your mistakes.
We start giving tone to eyes, lips, hair - prepare a portrait to detail. At this stage, as a rule, errors that were not visible before - become noticeable. If possible, remove.
We define the brightest and darkest places - work in them. Similar to your portrait make not only copied facial features, but also shadow shape.
Klyach remove unnecessary pencil lines.
We look more carefully on the darkest and bright portrait areas, correct, draw parts.
Detailed drawing. Completion of work

And finally, the most pleasant part of the work is a detailed drawing. Now we can see: where the shadow should be darker, where the reflex is more pronounced, where there is not enough color and so on. We refine these moments and take into hand thin (how much is at your discretion) brush and begin to draw small elements of the portrait, paying special attention to eyes, eyelashes, hair. We control the glare - without them the drawing will not be volumetric.
Do not forget, what is good in the photo is not always good in a watercolor picture. The same applies to nasolabial folds, mimic and age wrinkles and so on. Such nuances need to look at the situation. We make an emphasis on the eyes.
Add background. You can also darken the lower part of the portrait, and then the whole focus will go to the face (but in our case the background works so).
Now is the time to draw the smallest details of the portrait and seek final resemblance. The pattern of paintings underestimate, often he plays a decisive role in its perception.
The portrait will become the most original gift for your loved one.
Leave the application and the artist will contact you within an hour to discuss the details of the order.
With love and trepidation, workshop
Preliminary drawing for portrait of oil. The drawing demonstrates how the traits of the human face are located within the imaginary square. The width of the face at the level of cheekbones is equal to the distance from the growth line of the hair to the interguban line. The line of the eye passes in the middle of the square, and the tip of the nose is located halfway between the eyes and lips. (Fig.1)

At this stage, the hair is added color and tone and more saturated color is imposed on the face and background of the pattern. Now the sketch becomes less linear and (Fig.3)
.
This is a complete drawing ... it can be left and so or used as a sketch for writing an oil pattern.
This kind of sketch makes it easier to work on a real picturesque web. (Fig.4)
Modeling is a preparatory work to determine large bright and dark zones for drawing or pattern, a very important process in terms of composition.

|

|

|

|

Distribute light and dark places so that it turns out an interesting composition. Think over large planes and outlines that will create a pleasant overall effect. Details can be added later.

To simulate the portrait, when the zones are dark and light tones of different saturation are scheduled, it is very important to find the ratio of sizes and shapes. Goodness means the degree of brightness of the color. The tone is determined by the ratio of light and dark in the figure or picture, regardless of whether they are made in black and white tones or in color.
You should not draw a picture of an island in the sea of \u200b\u200bwhite paper, it must fill the entire sheet.

Partially covered face is interesting in terms of composition and painting design. Here, many possibilities provide accessories such as veil, scarf or high collar.

Tips drawing a head in the profile, leave a slightly more background front, and not behind the model. In this figure, the head is placed exactly in the center of the canvas, which is too narrowing the space in front.
Here the head slightly shifted to the right, which gives a more favorable effect.

If the head is placed too low, then the impression can be created that it "falls" for the canvas plane; If it is too high, then it will be how to "swim". When you think about the drawing or picture with the image of a man's head, from the very beginning, find its correct position from the very beginning. This figure is the head itself is successfully placed in the center of the image. But when the neck and shoulders are added to it, it can be seen that the whole composition becomes in the lower part of heavy. (Fig.1)

In this picture it seems that the head is placed too high, but there is enough space for the neck and shoulders. And it can be seen that the head is in its place and the image is balanced. (Fig.2)

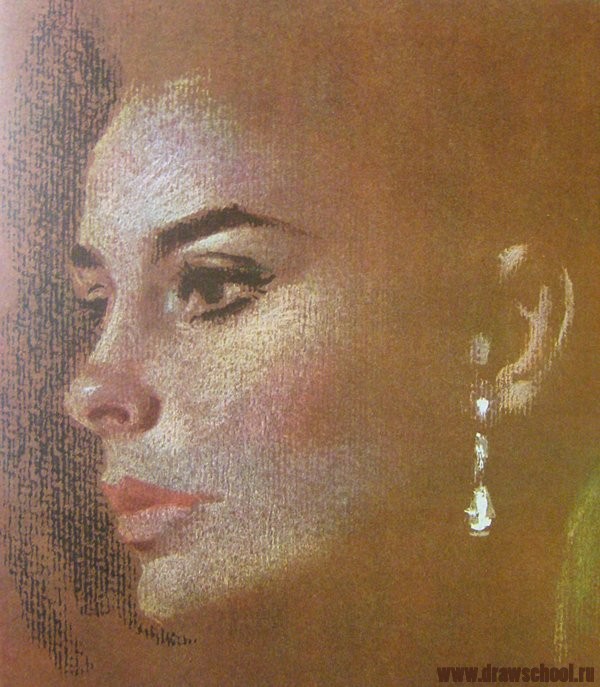
Oil for this work used limited palette of paints. Lugged Umbra, Luggy Siena, Natural Umbra, Natural Siena and Titanium Belil.

Initially, a light gray tone was imposed on the canvas, on which the contour was then sketched, using a column brush No. 5 with an acute end. After the drawing is completely afraid, on it with a flat brush "20 caused a transparent layer of magnificent umbra, diluted with a mixture of linseed oil and a digger. At the next stage, the face was covered with a bodily tint, which is a mixture of Luggy and Natural Umbra and Belil. The dark mass of hair is written by clean and magnificent umbra.

At the end, pink lips and cheeks are added with the help of Luzhen Siena and Titanium Belil. Gray background around the hair is made of a mixture of natural umbra and bleel. Thus, the finished picture is almost full of color, although it was written with a rather limited monochrome palette. Initially, notice the face features and determine the position of the eyebrows. Next, apply the basis of the body tone, the inexpretable places will serve you for shadows.

Observe the lips and add the details of the nose and eyes. Next ear with an earring. Apply the shadow near the front of the face to create a depth and soften the shadows on the face. Add color details: lips, cheeks, nose and eyes.

An important part of the picture is its background. However, it can conflict with the subject of the image if the color or model is too striking, if the background is too gray and smooth, the feeling of space and air between the background and the object of the image disappears. To give a larger and roundness of the head, you should dry the background in the places of its contact with the shaded side of the head and, accordingly, darken the background where it comes into contact with the bright side. It will also create a sense of space between the head and the surrounding background.

On the transparent tone of the pale green cadmium, diluted with a chippider with several drops of a sequivalent for rapid drying, is embedded with a flat column tassel number 20 over the picture. After drying (within 24 hours), a second transparent and thin layer of Luzhen Umbra is applied over the first tonor layer, which should also dry. This process is demonstrated on the illustration separately to show the color and saturation of the tinting layers.
Build the composition of the model. In nature, the shadows seem transparent, so dilute paint is applied to shadow places. When working on lighter places, paint should be superimposed more thickly.

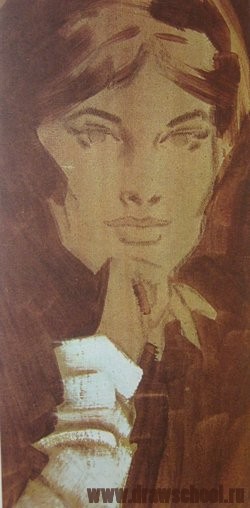
This drawing includes mainly dark and light tones. Some parts of the tinted canvas left remained impaired, becoming part of the image. This is a finished picture. The shaded side of the face seems to merge with the general background, which gives the image of the head roundness.

Here used column brushes (flat No. 20 and pointed No. 5) and the palette of paints, consisting of: Luggy Umbra, pale green cadmium, Venetian red, yellow ocher and Titanium Belil. This limited palette nevertheless gives a wide range of bodily tones.
The 20x50 canvas advice gives good opportunities for proportional to placement of the image of the head, but absolutely not necessarily limit themselves with a specific size or configuration. For example, the above-mentioned composition is high and narrow.

The top eyelashes are thicker and curved than the lower, so they should look darker. The lower eyelashes become longer and the volume is closer to the outer corner of the eyes. Placing glare in the eyes should be thoroughly respectfully, and the glare should not be too large (a large glare makes the wind in nature as if the chalky). The top eyelid discards the light (but noticeable) shadow on the eyeball. To achieve the desired "wet" look, place a small glare where the inner edge of the lower eyelid comes into contact with the eyeball of the eyeball. Do not make the protein too white - in reality, it should be very suitable for tone to the skin shade. The rainbow sheath of the eye has a softened edge - it is not just a color disk on the surface of the eyeball, and the color zone within it. In pupil, the edge gently goes into the iris. Sketch of scalp size 20x25 cm (canvas on cardboard). The sketch was covered with several light layers of the matte retainer.
At this stage, the facial features were outlined by a column brush No. 5, and then over his hair and the color background, they worked as a masticine.


It is not necessary to cover the paint all the canvas. In this picture, for example, open unwrapped places on canvas are part of the overall composition. The body tone is made up of a mixture of orange cadmium, yellow ocher and titanium Belil. Hair is made with natural blue and magnificent umbra; background in the upper part of the left - earthy greens; background at the top right - pale green cadmium; Dark places behind the face - clean Luggy Umbra.

The image demonstrates different color saturation pattern.
In the section: Drawing lessons with oil paints
Materials Blue Paint Paint Mountain Bleed BELIL Titanium Paint Cadmium Yellow Paint White 1 "Landscape Brush Knife for Painting, * 5 Ferry Brush, * 3 ...
An interesting alternative to the top-class oil canvases is a portrait of an acrylic portrait by our artists. Acrylic paints are used in different styles of fine art. Because, it is easy to choose an interesting and unique plot for the painting according to your taste and wishes. We write acrylic paints on canvas and paper. Each order - starting with a pencil sketch and up to the last smears - Made completely manually!
How much is the portrait of an acrylic on canvas and on paper?
Prices of portrait made by acrylic paints at the rate of 1-2 people.
Each additional person + 10% of the cost.


Acrylic (canvas)


Acrylic (canvas)


Acrylic


How to order a portrait of an acrylic in a photo?
Each our order begins with discussion of the composition of your future picture. You can tell us about your idea or send any image as an example. If you do not have any wishes, our artists will prepare interesting and creative layouts. As a result, you will get an exclusive portrait of acrylic, in which all your ideas and wishes will be embodied.
We offer acrylic works of two options:
Portrait on paper:
- preparation of the visual layout of the future picture before writing,
- You order a portrait of a completely handmade,
- ready work can be corrected if you have wishes and additions,
- maximum similarity
- realistic image.
Portrait of an acrylic on canvas:
(in addition to the above)
- more time is paid, thanks to which the details are written more carefully,
- the possibility of using a 3D effect (visible paint structure),
- the possibility of overlapping the paint side of the canvas,
- the possibility of using a canvas on a flat basis.
What to choose: Portrait Acrylic or Oil
 In addition to work acrylic, we also. Classic oil paintings visually similar to acrylic, however, have some pros and cons who distinguish them in appearance and price.
The advantage of work written by acrylic is less pronounced than oil in classical technique. Acrylic paints are diluted with water, which allows them to dry very quickly, almost instantly. Because, the artist will execute an order in a very short time, which meets the requirements of most customers. After all, it is often about choosing a gift for the anniversary, the new year or for any other occasion we are thinking immediately before the holiday. In addition, the cost of the picture with acrylic is significantly lower than that of an analogue written by oil.
If your expectations are very high, and the timing is limited, then the portraits of acrylic paints on canvas are what you need. We offer the speed of creating a picture, juicy paints, interesting visual effects, durability and guarantee the photographic similarity of the face.
Despite the rapid development of photography, the visual art still remains quite popular. It is extremely important to know how to draw one or another picture correctly. For example, portrait of paints.
Many artists familiarize the situation when the sketch created by the pencil looks just perfect. But when you need to give an outline color, everything goes not at all as it was planned.
How to learn to draw a man portrait with paints?
Many people who are enthusiastic art are interested in how to draw portrait paints. If an important minus, consisting in the fact that the smears applied with a brush, then you can not erase like pencil essayrs. They only have to smear that it does not always look aesthetically, especially if the error is allowed on the face. Then it can remain just an ugly stain.
So all the draws of the portrait better to draw correctly. To begin with, it is proposed to use watercolor and special paper designed to use this paint. She pulls on the subframe. Tassels are better to choose natural. For their manufacture use the wool of the curtain, ferret and proteins. Also need clean water and sponge.
The first stage of portrait drawing - Creating a sketch
Ricovka is usually carried out with a photo. It needs to be well explored. First build a form that the head must have, facial oval. It is worth dealing with the distance from the chin to the top and horizontally. It is searched for medium lines (eyes and nose). Draw the remaining outlines of the face. At this stage, you can not go into excessive detail, because it is only a sketch.
When it comes to the smallest detail, it should be a special attentiveness, so that the similarity with the original was not lost. Looking at the drawing, an third-party person must feel the depicted personality. To catch all the pressing details, you can squint. So when looking at the drawing, you can see what was first hidden from the view. Then the imposition of shadows and light glare.
 Light and shadow
Now it melts the moment when you can start working with watercolor. How to draw portrait paints right? For starters, all the colors are routine, so that the work went faster. Previously created auxiliary lines are eliminated. A cardboard or plastic palette is prepared. The first shadows and those sites, which should be dark. You can immediately see that the volume appears. Large brush strokes are carried out using a large amount of water. It is worth knowing that the watercolor will look somewhat lighter when he dried. The drawing should maximize the created feeling of the two-dimensionality, become volumetric.
Drawing shades
After that, the desired colors are selected. Watercolor is characterized by ease and airiness. In the superimposition of the first layers, it is better to use a large amount of water, thanks to which the work will not look slightly. Another interesting feature of this material is that white paint does not apply here. This is another important reason to do everything right from the first time. The brightest items, as a rule, simply do not paint. There are special compositions that cover these sites, so that the paint does not lie down on them. It is not necessary to use a large number of colors in the palette.
 Watercolor has such features due to which you can create a variety of shades, simply using a different amount of water. It is also important to know that before applying the next layer, the previous one should be completely dried. In case of errors, you can quickly remove unnecessary smears with a sponge. At each stage of the portrait, you need to look at the original and try to abide by the maximum similarity. When the main colors are applied, thin lines are drawn, the color accents are put on those places that especially want to allocate. It can be lips and eyes. If you follow step-by-step technology, the drawing must be high-quality and neat.