How to draw blooming sakura. How to draw sakur with colored pencils in stages
For your drawing, you will need:
Paper for watercolor (I use paper with a density of 300 grams per square meter, 28x35.5 centimeters) and, of course, watercolor paints.
My favorite - Honey semihow.
I used two brushes: Tolstoy, like in the picture, another flat firm and thin round.
In the photo, paint and brushes, which I usually use in my work.
Method 1.
Simple and fast
Start with an approximate image of a flower with five petals of diluted water directly on pink paper (Pink) paint. Use a wide brush to create one petal with each smear, as in the pictures below.

In the same manner, draw more flowers. You can "collect" flowers in inflorescences, as they would grow in a tree.
These flowers will be like a background, so they should not be too vivid - there are beautiful pastel pink and red shades (Pale Pinks and Reds).

After you finish drawing flowers, add a wide blue brush (Light Blues) and purple (Purples) shades for the background.

Draw a blue (Blue) and Purple (Purple) until you like the result. I recommend to wait a bit before applying the next layer so that the watercolor would dry out a little.

Using a thin brush, slightly mark the branches for your background flowers. Just as in the previous step, dry the paint.

Now, using the same method as above, draw bright, more "ferfious" crishes of the foreground. Picture a few not yet opened kidneys.

In the process of drawing, I accidentally spattered paint paper and realized that the picture began to look even better. Therefore, I scored several colors with a brush and shook her above the drawing.

Take a thin brush and a thick mixture of black and brown colorsStart drawing branches on foreground. They do not need to be perfect at all. Make them curved and funny.

Complete the branches by connecting all the colors in the background and the kidneys, also depict several empty branches.

As the final touch, mark the centers of the white tassel of white (White) or yellow (yellow) paint.

Method 2
Longer, requires more effort
This is a more complex version of Sakura's drawing, but I believe that all the works are worth it. You will need the same materials and tools as in the past instructions.
I drew a separate drawing to show how to approach the sketch.

Below are simple actions to create a sketch:
Start with drawing one flower of five petals. He should have dimensions from about 1.3 to 2.5 centimeters in diameter, although it depends on your preferences.
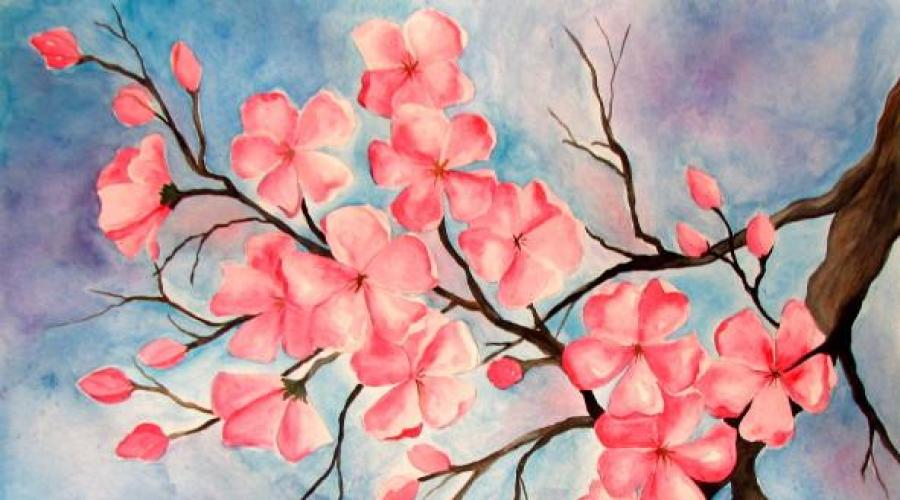
It seems to me that it will be easier for you to understand how big the flower should be, if you see the whole picture right away. So, look at the finished picture below to help you find out the proportion of colors in relation to the rest of your sheet.
We draw the first flower:
- Draw a petal in the shape of a heart.
- Draw a couple more petals concerning each other bases.
- Add more petals to make them only five.
- Add a crooked line on the edge of the petal to twist it a bit.
- Make the same thing in different places For the other four petals.
- Place in the center of the flower small lines.

Draw another flower next to the first one by the same algorithm. Remember that your colors will be collected in several inflorescences throughout the leaf.

And one more next to the first two.

After you draw a few front color to the viewer in the brush, it's time to add those flowers that you see from the side. The principle is the same as in the case of the front, but instead of all the petals you see only half.
- Came up the approximate form of the petal. Like a triangle or heart.
- Add the petal behind the first.
- Draw another petal on the other hand hiding halfway at first.
- Add some small leaves that are at the bottom of the flower, holding it together.
- Draw a thin wand, attaching a flower to the rest.

Draw even visible on the side of flowers in inflorescences. Below I will show the drawing of another "lateral" flower. Also add unscrewed buds - ovals with several lines indicating the leaves.

After completing the first inflorescence, continue to draw the rest using all the same steps as above. Do not be afraid to overlap your flowers with each other!

Now connect branches branches. Then go away from work away and take a look, in which areas of the sheet you can add more colors so that the drawing looks better.

Above, I painted the flowers with a pencil separately from the marker drawing for step by step instructions. I also advise trained on a separate sheet before you start a sketch for the picture.
So, I made another sketch in the way I described.
After the sketch is ready, I carefully paint the background around my Sakura in more dark blue (Blues), pink (Pinks) and purple (Purple) tones. Give the background to dry, then add more paints if required.

Then take the pink (Pink) paint for petals. Select the angle from which the light will fall. I have this upper right, which means that now all sides of the petals addressed to the upper right corner should be lighter than those that are addressed to the lower left. Overlay paint in different intensity to create bright and dark shades of pink (PINK).

Draw branches black and brown. Thick flat brush is perfect for thick branches, and thin round brushes - for thin branches. At your discretion you can portray several empty branches.

Draw small strokes in the center of each flower. Time to finalize the background, if you feel it needs to be done.
Picture ready!

Mix of sexuality I. martial art, refilled in childish innocent eyes ... Sakura ... There is something about this girl. And for sure in many moments of her life you understand the better me. But I still will tell some interesting moments:
- Real name?? ??? (Yap.)
- The Anime News Network Sakura website awarded praise for their development. From the film to the film, from the series to the series we see that the girl develops, learns and grows on itself. Really commendable. Agree?
- In general, Sakura is a decorative cherry such. Symbol of Japan. Flowers of this tree show us bright example Figure life: Quickly fall out beautiful Sakura petals, exactly like human life.
- The longest thing in the "" fight is the fight Tiy and Sakura against Sasori. Already 8 episodes! In my opinion, to watch so much, the power of will is already needed.
- The anime shows the thoughts of the girl, this is the so-called "real Sakura". But with its development, Sakura begins to behave more and more like the second person. Probably it is due to the fact that a person matures, becomes more confident. What do you think?
In general, Sakura is a worthy object for drawing. So I prepared a lesson how to draw sakura haruno pencil. Let's start.
How to draw sakur pencil stages
Step one. In the top of the sheet, we have a large oval - head. From it down draw the axis of the body: back, hands, hips and feet. We remember that the bending of the body and the position of the hands can already tell a lot about the nature and the mood of a person. The joints of the joints are flexing with small circles. This is more comfortable.  Step second. We carry out the contour of the hair. As long as the contour. Along the bend of the spine, draw the body. This is a short T-shirt to the waist. And down. Also short. We get legs and hands, the completing body contour along the already existing axes.
  Step Three. We draw hair in more detail. Note the middle of the forehead, and from it up in different directions we draw the waves of bangs. At the bottom of the hair is a zigzag edge. Smooth lines draw a blouse and a skirt with cuts. There is some kind of piquancy in this. Let's show elbar and glove (we only see one one, the second one's head).
  Step fourth. Face: big eyes, small nose and neat mouth. Well, here and the liveliness appeared with the eyes. Pupil, like the eye, is also large. (If you remember, we painted a small narrowing pupil. It showed us anger of heroine. And here - on the contrary). Add folds: on a blouse, in the area of \u200b\u200bthe elbows, a big fold on the skirt. Draw a buckle and stockings.
  Almost done. We just need to paint, leave it to you. On this own sakura drawing lesson Finish. And I also recommend.
In almost every corner of Japan: in the parks, in the gardens and decorative ponds grow beautiful Japanese cherries - Sakura. This tree is considered to be the main symbol of Japan. Many people at the end of March early April overcome not one hundred kilometers to admire the amazing spectacle - Sakura blossom. Cherry flowering holiday, o-khana, has been held for many centuries and includes not only a walk under blooming trees, but also a picnic. Today's master class we would like to devote to the drawing of Sakura watercolor. The lesson will help you step by step to master drawing air flowers Dead cherry.
List of drawing materials and tools very standard:
- paper for watercolor density 200-250 g / m2;
- set of watercolor paints;
- tablet and Scotch;
- eraser;
- pencil;
- palette;
- capacity with clean water;
- brushes (synthetics / columns) No. 4, 3 (flat) and 1;
- paper napkin.

Stages of drawing
Step 1. On paper we indicate the approximate position of the buds and branches. All the details are scheduled simple lines and circles. At the base of the branch, create large flowers, and at the end - small, not yet blossomed. 
Next, we gradually draw a rough sketch in a more detailed picture. In the blooming flowers, we highlight the middle, and five petals. At the tip of the branch, we draw small leaves and sewers. 
The sketch is ready and now you can start the color drawing.
Step 2. Let's start with the pouring background. The background will consist of small sections of the sky and the blurred sakura inflorescences. For the notation of the sky, we use indigo and blue tint. Flowers in the distance are planning the carmine watercolor, and the branches are sepia. The background strokes are blurred to avoid clear boundaries. 
Step 3. Umbra Zhezheny highlighting the branches, and after it is a neutral-black-in-color. 

At the end we prescribe green leaves. Maintenance of buds with gansey yellow. 
Step 4. Laying the tone of colors start from the top of the branch. Fill out closed buds saturated carmine watercolor. Then we dilute the shade with water and process them the edges of large colors. Shaded petals are shaking a pale blue tint. 
Step 5. Flat brush blur the contour of the branch in several places. 
Step 6. Zam from Sepia and Bordeaux highlight the inner part of Sakura flowers. Once again we deposit the cold tone of the petals of blue watercolor. 

Step 7. Sat the background of the picture so that the branch of flowering sakura is better stand out. We use the shades already scored on the palette. 
I didn't think that we were not alone! The process, of course, tedious and complicated, but it is worth it. In general, we found a picture in nete a picture with the greatest resolution. We have printed on a printer as a poster (it turned out a puzzle of 8 sheets As4)
You can, drawing a sakura on the wall, to make in this way. To begin with, prepare the wall itself so that there was a perfectly smooth surface. Simple pencil, Draw on the wall of the Sakura branch.
Drawings on the walls do it yourself: technique and ideas for inspiration
Mix the rope solution, put into a dense blade, cut off the corner and apply to our drawing, along the contour. Wait when it gets dry and carpet for cutting plasterboard, align branches and flowers. In the colors, make a deepening so that they are not flat, but tumors. Then, the sun polling, the smallest emery paper. And after, painting with gouashe paints.


Sakura on the wall with their own hands.
The first stage is a selection of drawing. These you are not an artist or a supporter of minimalism, then you can pick up simple drawings: Barrel and flowers. Such a drawing will also look spectacularly. But it all depends on your idea and interior solution.


The second stage is the preparation of the surface, in our case the walls, to drawing. You can make a drawing on a white painted wall, but you can stick the wallpaper for painting, paint white (or any other you like, but not just bright). It is necessary to prepare the wall as well as for sticking wallpaper: remove old wallpapers, rinse to remove wallpaper residues, primer, stucco (lining walls), grinding, primer and sticking wallpaper.
The third stage is the transfer of the picture on the wall. You can print the drawing and include your fantasy and artistic abilities. We draw a pencil, not strongly pressing. In the process of drawing, it is necessary to periodically retrieve and with watching what it turns out if the pattern adjustment is required. You can use the projector to transfer the drawing.
The fourth stage is to give the paint drawing, that is, the coloring page. You can use acrylic paints and brushes, but you can paint for airbrush. It is necessary to start painting from the tree trunk to branches, and then flowers. Wait until the drawing is dry.
1. When drawing leaves, please note that the vein goes into a stalk. Note also that the average vein of some sheets divides them exactly in half.
To draw a sheet, first draw oval. Then swipe the middle line and slightly take both halves. Check the drawing accuracy, and then draw half more clearly. Now add cloves on the edges.
Coloring sheet, remember that the veins are lighter than the leaflet itself. 
2. Oak Leaf You can start drawing from the eaten Book oval. In the middle of the oval passes a vein, turning into a sheet of sheet. The edges of the oak leaf remind the waves.
Painting "Sakura" on the wall with their own hands. Master class with step-by-step photos

3. Drawing maple leaves Let's start with the display of its shape. Then you need to find the knot of all vehicles of the sheet (the maple leaf has five major veins, around each of which is a separate leaflet) and outline their direction. Then draw the toothed edges. 
4. Now let's try to draw a branch with leaves. First consider it: how much the leaf on the branch, as they are located relative to the branch, what size they are, whether they are all visible entirely, what the leaves have a form, what leaves seem darker, what are the lighter, the same color leaves? Having answered these questions, proceed to the drawing in the first diagram.
Getting Started by the second stage, trace the direction of veins and edge zagnin on each sheet.
Painted drawing, display with light and shadow volume and color of leaves. 
5. Drawing of wood needs to be started from the barrel. The trunk is the thick of the tree. From above, the trunk is thinner, and below is thicker. The branches are located along the barrel and are directed upwards. The closer to the top of the tree, the shorter the branch of the tree.
After the trunk, we draw large branches of the tree. They are drawn just like the trunk: at the top thinner, closer to the barrel - thicker. The branches on the trunk are at different distances.
Then draw small twigs that depart from large. A lot of them. Small branches are drawn the same thickness - they are thin, but also many trees stretch up. 
6. One of the common trees with us is birch. Before drawing it, look carefully on it. A feature of bark branches is that they are pretty thin, bend, hang down, and the branches are softened to even thin twigs. In the wind, the bark branches swing from side to side. 
7. Silhouette of the tree resembles a triangle. Drawing it, it should be remembered that instead of the leaves of her needles. 
8. When drawing trees in the landscape, you should consider that being away from the tree, we only see it general shapewhich and you need to portray. 
Draw online \u003e\u003e
According to the materials of the book of P. Shalava "Learn to draw"
Sakura tree on the walls: how to make a drawing
general information
Often it turns out that the interior of the apartment after repair seemingly already ready. However, something in it is missing. As a rule - individuality and creative approachSince the wizards on the interior will most likely make all the work qualitatively, but without the "raisin", which will have to have themselves, with their own hands. One of the options to improve the interior is the drawing of Sakura on the room wall. It is suitable not only for oriental or ethnic style, but also for any other design.
Remember! As a rule, such work can be done on their own, not even possessing the talent of the artist.
Although, of course, you can invite and professional professionals To perform such a task. By the way, in addition to the very tree itself or Sakura branches, it is possible to do and additional drawings, For example, butterflies or birds.
We make a drawing: how to draw sakura
So what needs to be done to apply the drawing with your own hands. To begin with - do the preparation of the wall surface. Best of all, if you have a fliseline wallpaper under painting. After that, select a suitable drawing layout. Redraw the contours from this sketch on the wall. You can make it a simple pencil.
Then, the outlines obtained must be filled with acrylic paints. Use a whole range of colors and shades: from light pink to red and even gentle lilac. Experiment with paints by creating their combinations.
By the way, if you wish, you can add to Sakura drawings of flower petals, birds and other attractive images. These are the main stages of work on the branches of the Sakura tree on the walls or partitions in the room.
Drawing on the walls with your own hands. Sakura with butterflies. Master class with step-by-step photos
By the way, you can make such a drawing in almost any room: bedroom, children's, in the kitchen, and a hallway or living room (hall).
Other decor options in the interior
In addition to drawing Sakura on the walls of the room, there are other possibilities to make similar illustrations in design. A feature of such different from the painting of methods is that you are, in fact, use already ready-made solutions. At the same time, if you want, as a result, get something exclusive, existing in a single copy, try to find a relevant firm that is engaged in custom-made finishing solutions under the order.
One of the interesting options are Sakura stickers for walls. They can be applied in cases where to perform painting, due to certain reasons, is not particularly possible. The stickers are available the following featuresWhat you need to remember:
- Their use will help transform the interior of the room literally in a few minutes.
- They differ simplicity in the installation. Even a child can cope with such a task.
- The main condition when working with stickers with images of pink branches and sakura colors is strictly followed by the instruction.
In addition, you can use photo wallpapers with Sakura, as well as decorative panelshaving an image of this Japanese blooming tree. As the rules, they are equally woven. At the same time, an interesting and indicative is an example of using the interior design of paintings and other graphics samples, also having images of Sakura. Use them to decorate walls, corridor, as well as some furniture and life items. In any case, the sakura drawing, made with their own hands, will decorate your room.
The main thing is to know how to do it correctly and draw. Be that as it may, in addition to instructions and reviews on the Internet, you can learn a lot after watching the photo of ready-made interiors.
Sakura - fundamental symbol Fascinating and incomprehensible japanese culture, soul of this amazing country. A blooming twig with an elusive loop of the flowing gentle pink inflorescences - a sign of awakening nature, young spring and eternal female beauty. For the country's inhabitants ascending sun Sakura is life itself in all its most excellent manifestations.
Elegant cherry tree - One of the central elements of the interior in the mysterious Japanese style and not only: the motive of the blooming cherry will harmoniously complement the decoration of any room, regardless of the main idea of \u200b\u200bthe decor.
Little journey to history
A beautiful tradition of contemplation is connected with a delicate tree - Holiday Khan, whose roots run at the beginning of the 7th century. In the spring, when all the living and cherry Gardens In Japan, a white-pink cloud flourished, thousands of Japanese rushed to nature, admire the speedless beauty. Under the shadow of flowering trees, it is customary to arrange picnics with a warm friendly and family company. According to Japanese beliefs, the contemplation of Sakura brings harmony into the soul, and the particles of fragrant pollen, falling into the bowl of Sake, give health and vitality.
It is not surprising that in Japan, where everything is symbolic and has its own meaning, an image or an artificial tree of Sakura is an integral part of the home interior.
Bas-relief sakura and peacocks
The Japanese believe: the blooming twig of the cherry in the house is the key to prosperity, good luck and happiness.
Using Sakura Symbols in the Interior: Basic Decor Ideas
The air twig on the wall or the decorative tree in the corner of the living room is diverted into the atmosphere of romance, the harmony and peace are immersed in the corner of the living room. Supplement the design of the apartment of Japanese Sakura can help:
- Stylized photo wallpaper - The most popular version of the design, assuming a bright composite ideas: the motive of Sakura can be embodied in the plot of the cherry garden, a blooming tree against the background of a picturesque landscape, a lonely twig with a squeezing of flowing petals. Photo wallpapers with floral leitmotifs can be finished not only the walls, but also the ceiling.
- Decorative branches and trees - The artificial tree of Sakura can be represented by flowering cherry sprigs placed in an elegant vase or a neat bonsai tree.
- Vinyl stickers or interior painting on the wall - successful will be a combination of tender flowering branch And the interior performed in bright, gray and chocolate colors, with the darker surface, the brighter there should be flowers.
- Pictures and panels depicting a blooming Japanese cherry. Aesthetic solution will be stylized silk canvas or modular photocartines.
Making a sakura tree with their own hands
If you decide to add to the home furnishings of the Japanese grace and exotic notes, you can advise the decoration of the living room or bedroom with artificial interior colors. Sakura's decorative tree can be purchased in floral stores or make it yourself.
Method number 1. (Very simple) We will need:
- paper napkins gently pink or white color (You can show fantasy and not limited to traditional tones);
- any beautiful twig;
- threads and scotch.
Prepare inflorescences: To do this, it is necessary to fold on each other two layers of napkins, roll them with a harmonica and tidy in the middle in the middle - it will turn out a bow. Next, we separate the napkin layers, tailble the edges and gently turn the layer behind the layer around the middle, forming a flower. Fix with scotch. When a sufficient amount of inflorescences are ready, decorate the branch. It remains to put the flowering branch in the vase and decorate the interior with the chum.
Method No. 2.(more complicated, but a full-fledged tree is obtained) we will need:
- low dry bustard or tree;
- vazan;
- concrete composition;
- pebbles, shells, pink beads for decor;
- varnish on a tree;
- silk fabric for flowers;
- glue.
First of all, we prepare a tree: fill the vase on a 3/4 concreting mixture and put our bush into it. Upper layer Makeup decorate pebbles, shells - any elements of the decor, masking concrete. Tree and decorative details cover lacquer. While the tree dries (1-2 day) decor the flowers: for this, for this, we have a silk squares, 5x5 cm. Connect the loskutka together for three and twice to lay them in half. The resulting square will collect diagonally into the triangle, the lower angle of which (the center of the future flower) will remain as a whole, the remaining round in the petals. Expanding the composition, we get three layers of the future flower. The edges of each billet burn and glue layers with each other.
The resulting colors decorate the feeding tree, decorating each inflorescence by a bead in the center. A gentle tree blossomed Sakura is ready!
Making a decorative sakura process is fascinating, but labor-intensive. Those who do not have time for creativity will be more comfortable to buy ready-made artificial flowers in pots from the collection of our company.
Sakura in the interior is an idea, relevant at all times. The touching charm and airiness of the Japanese tree will give household atmosphere of lightness, coziness and tranquility.
how to draw a sakura branch on the wall
A mixture of sexuality and martial art, filled with childish innocent eyes ... Sakura ... There is something to tell this girl. And for sure in many moments of her life you understand the better me.  But I still will tell some interesting moments:
- Real name?? ??? (Yap.)
- The Anime News Network Sakura website awarded praise for their development. From the film to the film, from the series to the series we see that the girl develops, learns and grows on itself. Really commendable. Agree?
- In general, Sakura is a decorative cherry such. Symbol of Japan. Flowers of this tree show us a vivid example of the frequency of life: Quickly fall out of the beautiful petals of Sakura, exactly as a human life.
- The longest battle in Naruto is a fight Tiy and Sakura against Sasori. Already 8 episodes! In my opinion, to watch so much, the power of will is already needed.
- The anime shows the thoughts of the girl, this is the so-called "real Sakura". But with its development, Sakura begins to behave more and more like the second person. Probably it is due to the fact that a person matures, becomes more confident. What do you think?
In general, Sakura is a worthy object for drawing. So I prepared a lesson how to draw sakura haruno pencil. Let's start.
How to draw sakur pencil stages
Step one. In the top of the sheet, we have a large oval - head. From it down draw the axis of the body: back, hands, hips and feet. We remember that the bending of the body and the position of the hands can already tell a lot about the nature and the mood of a person. The joints of the joints are flexing with small circles. This is more comfortable.  Step second. We carry out the contour of the hair. As long as the contour. Along the bend of the spine, draw the body. This is a short T-shirt to the waist. And down skirt. Also short. We get legs and hands, the completing body contour along the already existing axes.
  Step Three. We draw hair in more detail. Note the middle of the forehead, and from it up in different directions we draw the waves of bangs.
Figures on the walls: Simple design for any apartment (51 photos)
At the bottom of the hair is a zigzag edge. Smooth lines draw a blouse and a skirt with cuts. There is some kind of piquancy in this. Let's show elbar and glove (we only see one one, the second one's head).  Step fourth. Face: big eyes, little spout and neat mouth. Well, here and the liveliness appeared with the eyes. Pupil, like the eye, is also large. (If you remember, the Baba Yaga, we painted a small narrowing pupil. It showed us anger of heroine. And here - on the contrary). Add folds: on a blouse, in the area of \u200b\u200bthe elbows, a big fold on the skirt. Draw a buckle and stockings.
  Almost done. We just need to paint, leave it to you. On this, I will finish my sakura drawing lesson. And I also recommend:
- Draw the main character of Naruto;
- Sasuke;
- Sasori;
- Kakashi Kakhaka;
- Itachi Uchiha;
- Avatar Aanga;
- Kurosaki Ichigo from Bleach;
- Hatsune Miku;
Soon there will be lessons and other Anime characters. Keep track of site updates and subscribe to our VKontakte group. And you can offer me to make a lesson about your favorite character. Write your suggestions in the comments! Waiting!
Especially for dayfun
Nina Minchenko
After a long winter, nature wakes up. In Japan, they love this time of year. From March to April, Sakura flowers. Sakura is a cherry tree. Flowers appear on the bare branches of Sakura. There are so many of them that it seems that the tree is shrouded in a pink cloud. Flowering is very short time. People specifically come to the park to admire this beauty. They admire the same way as we are snowdrops.
Drawing a branch of flowering cherry.
1. Prepare background. What color to fill the sheet? Imagine spring sunny day. This is the sun, blue clear sky. We use these colors. Pain the surface of the sheet "on wet" using a wide brush. Painted starting from corner yellow paint, then blue. We take over the corner of the leaf, and yellow paint spreads, goes on the blue background (rays of the bright sun).

2. Draw twigs of cherry. To draw unusual branched twigs, we will apply the blending method of blots. At the end, if necessary, we ascend, supplemented with sprigs.

3. Draw flowers. While the twig dries, fill the space around the twig in flowers. Flowers at the white cherry, pink colour. We choose the color for your twig and begin to draw using the familiar method of "adjustment". The end of the tassel is directed "out", unforgettable turning the brush. You can add flowers to the end of the sprig in the form of a semi-scratched ("adjust" twice with a tassel in one direction) and unconcerned buds. Thin tight brushing on the flowers of the stamens (white, yellow paint)


Pictures are ready. Our result.


Publications on the topic:
At the road Iris. Long-legged Iris, Iris Long-legged. The road has grown, grew by the road. Children are rejoiced: -We, look, Iris! Best Iris W.
Collective work. "Sunshirts come out, the sun show." Objective: Learning to create an image of the Sun using unconventional technology.
To draw sparrow from a conventional napkin, we will need: 1. Watercolor or white paper A4 format; 2. Gouache; 3. Wet wipes;.
Master class for teachers using unconventional equipment "Drawing for shaving foam" Master class "Development small Motoriki through unconventional technique drawing. " 2 slide. Purpose: introduce teachers with unconventional.
I bring to your attention phased drawing Rowan branches. We will need a landscape sheet, a brush of proteins or pony in size 7-10, 5, Gouache,.
Sakura - national symbol Japan, so called decorative Japanese cherry flowers. Sakura blooms in the spring, inspiring his unique.
Goal - to introduce children with appliances unconventional drawing Monotypia. Continue to exercise the skills of working with paints. Develop fantasy.