Simple children's drawings of the beauty of nature. Another beautiful landscape in stages
Spring nature, like a young girl, dressed in a luxurious dress and sing songs. In each flower, each blade, droplets of dew and swinging trees sounds the magic melody of spring. Do you hear these sounds too? Then grab a pencil, mastikhin or brush and. Master class on drawing landscape begins right now!
Spring in Ukraine.
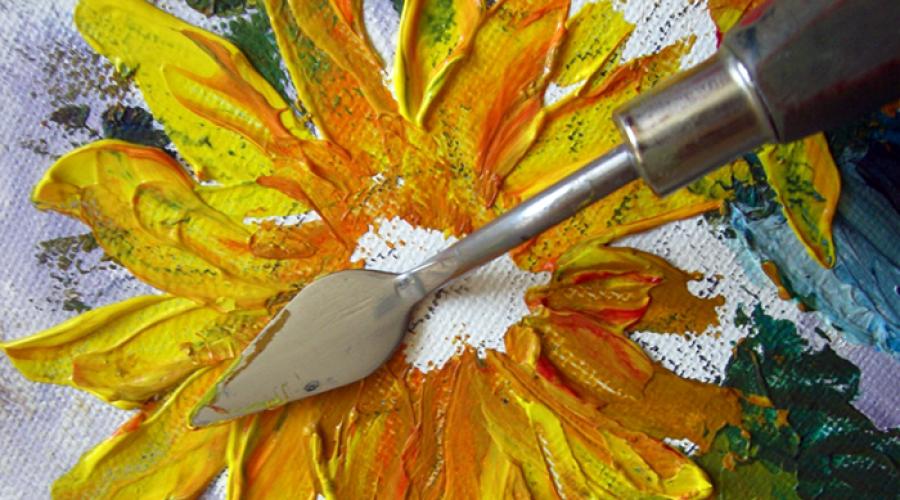
Drawing Mastichery - This technique of layer-by-layer applying paints of paint on paper or canvas with a special thin steel blade (Mastichene).

Taking advantage of the Mastichery, you will make your work volumetric, give it a special texture. Mastichein allows you to create an interesting texture on the surface of the picture and gives an unlimited field for artistic improvisation. Any landscape created by the masticine will become more emotional and expressive.
To draw a landscape of Mastichene, you will need:
- acrylic or oil paints,
- paper A3 or primed cloth,
- palette knife,
- thin tassel
- palette (or ordinary plastic plate),
- water vessel,
- a rag (for wiping paint with a masticine and tassels).
Do not regret bright colors - the landscape must be flown with juicy colors.
1. Simple pencil make out of trees and grass. Draw a cherry garden.

2. The edge of the blades take a small amount of blue paint from the palette and the side of the masticine smear at the top of the canvas.

3. Mix on the palette blue and green paint. The vertical movements of Mastichene inflict the turquoise background. These are the trees of the second plan, located away from the blooming garden. So that the drawing had a natural look, the background is better to make inhomogeneous.

4. Flowering crowns of trees Flood with pink paint of mastichene's sinking movements.

5. To create a yellow background between the trunks of Cherries on the tip of the Mastichene, take some paint and point movements to canvas. As a result of such manipulations, you will see how the drawing will gain the volume.

6. On the queue - the trunks of the trees. Apply the paints on them very carefully to correctly depict the shadows and glare.

7. Rare strokes bring burgundy stains on blooming cherries, slightly rubbing paint.

8. Add the crown of bulk pink, white and yellow smears. At the top through the branches should be shown blue skylocks sky.
We now turn to the drawing of grass and trees of trees. Do not be afraid to combine paints - add some yellow, orange, salad or blue.

Finally, wander the green grass with balls of shocking dandelions.

Sunny spring landscape drawn by Mastichean, ready.
The kneading artists say that landscapes are better drawing from nature. For inspiration, go to one of - it is there that can admire the most beautiful flowers and at the same time to write a luxurious masterpiece.
Learning to draw landscape with watercolors. Bird on a branch
If you like drawing with a brush and pencil, I propose to create summer landscape with a pan on a branch. Sunny picture in gentle tones - a great gift of ko or to the name of the beloved friend.
Let's start?
1. First draw a blue. Make parts of the body proportional to you will help ovals: two small - the head of the cinema and sketch of the wing, big - the future of the body.

2. Draw the outlines of the body of the bird. Image eyes, tail and thin paws. All lines do hardly noticeable so that they do not shine through the transparent watercolors.

3. With the help of a wide tassel, it is filming in a blue sky, bypassing the place of the clouds.
Mix blue and gray paint and float clouds, without touching the brush of the edges.

4. The tummy cinema is filled with yellow, and the head is blue. While the paint did not dry, slightly wet the napkin wet sections to create the impression of the fluff on the cinema body.
5. Eye contours and beak have seen black. The middle of the eye flooding the pale gray.

6. Wing float blue. When watercolors are well dried, clearly draw the plundering of the wings and the tail, as well as the legs. Do not forget about the pupil with a glare.
7. Arbitrary Tassel Movements Draw a tree branch and green foliage on it.

Summer is a favorite season of many artists. It was in the summer, when nature is replete with rainbow paints, and the sun does not bother to heat, it often comes inspiration to write bright, cheerful paintings. One of these today will try to draw. Armed with color pencils and proceed to drawing a landscape.
1. Remarking the horizon line and the point of the departure on it. Draw the outlines of the house so that all the lines converge at one point on the horizon. It is necessary to create the right perspective - a proportional reduction in the building as it deletes from the foreground.

2. Draw the window.

3. Make sketches of paths and trees.

4. And now, more detain the crowns and trunks of the trees.

5. The foreground will be decorated with Malva and Cat.

6. Responsible stage. Intension all contours of a gel handle. It is necessary to do it carefully, because the extra lines will make the landscape cluttered and spoil the picture.

7. Sotri Lines made by a pencil with a gum.

8. Flood grass and path. Places where trees shadows fall, do darker.

9. Trees trunks with shades of brown.

10. Well done! And now paint the cat and the leaves of Malla.

11. Forest in the background is painted with turquoise.

12. Salad and green pencils floating the leaves of trees. Sky shadow blue.

13. Malva Pink and lilac flowers. Make yellow meetings.

14. Brown and yellow pencils with a house. On the window glass and the foundation, make a stroking with a gray pencil.

Congratulations! Colorful summer landscape is ready to decorate your room.
Draw autumn colored pencils
Master class on drawing. Landscape "Native Prostors"
Kokorina Elena Yuryevna, teacher of fine art, MOU Slavninskaya secondary school, Tver region, Torzoksky district.
Appointment of work: The master class is designed for children of middle and senior school age, teachers of visual art and teachers of additional education. It can also be used in classes with children of older age, if you offer them ready to draw.
The pattern can be decorated with interior, or use as a gift, as well as to participate in contests and exhibitions.
Purpose: Fulfillment of autumn landscape with colored pencils on the topic "Native spaces"
Tasks:
- draw the autumn landscape with colored pencils;
- to promote the development of the creative imagination of children, the formation of the ability to transfer their observations and experiences in the drawings;
- to form the ability to see the most beautiful in the phenomena of the reality of the world's native land;
- to bring up interest in landscape painting and the process of drawing.
To work, we will need: Album leaf, set of color pencils, black helium pen or simple pencil.

... if you see the river is drawn in the picture,
Or spruce and white frost, or garden and clouds,
Or snow plain, or field and salas,
Necessarily the picture is called - scenery.
The landscape picture gives the opportunity to the artist to express his attitude to the world in a broad plan, to the world of nature, which surrounds us. Nature brings people, often gives rise to their similar sentiment, meditation and experiences.
How beautiful spaces are beautiful
Blue gave a calling spill,
Rustling herbs and birch me cute
Memory with tenderness in the heart stores! (Oleg Mandrakov)
Our beauty often changes outfits.
I love you native expanses,
The greens of the forest and the smell of fields,
blue lakes, magnificent mountains,
Many people of Russia.
And the dawn is the goer birch curly,
and sunset at the river blue,
The noise of acacia and clouds are tired.
Happy live, I am as a sideline.
Water spills,
Ile circles golden golden.
Good all quirks of nature,
I enjoy the weather any.(Alexey Lucin)
Golden autumn - a joyful magnificently cleaned, rich in harvest, love her for generosity, for the wealth of fields, gardens, for clear days of the casual blue sky, behind the beauty of forests, written by gold and crimson paint.
Today I suggest painting the autumn landscape with colored pencils. The main characters of our landscape will be birch on the banks of the river, and in the distant plan - the church.
To begin with, make a sketch of the main plot of the future picture. You can use a simple pencil, and I took the helium black handle.

Blue pencil start toning the sky and river. Strokes put horizontally.

Dark blue pencil, changing the direction, put the second layer of hatching.

We enter the purple pencil into the sky and the river, simultaneously paint and birch trunks.

Yellow pencil start drawing crowns by birch. Strokes put horizontally.

Yellow color to the ground under the birch, the closest hill on the opposite shore and two trees in front of the church.

Brown pencil withdrawal leaves in Krone Berez. Short strokes put in different directions. The same color is slightly introduced into the river under the birch and trees near the church.


We enter the green color in the birch crown.

Bordeed-brown pencils paint the far hill and enter this color in the river under the birch.

Dark green pencil draw the foliage of bushes, high grass on the banks of the river and paint the foreground of the shore, where birchs grow.

Brown pencil draw blades. The hatching is put in different directions - it creates a feeling of pegless herb. Sharchka emphasize the tops of the hills.


Light brown hatching and birch.

Black pencil make a drawing on the trunks of Berez.


We introduce black strokes in the crown birches.


Green pencil make a mesh hatching on the background, behind birch, and paint black background.

Making burgundy stains.

Red pencils in the foliage of bushes.

Decrade the church and trees in front of it.


Deactivate the river: Light blue pencil make horizontal and vertical touches. The space is painted uneven to create a feeling of water movement.


In the distant plan, behind the birch of the black pencil handed a spruce.


Now we paint all the crown with a yellow pencil with wide strokes. And I introduce the same color to the river.

I will take a pencil, painting forest,
Drawing fields and snake river.
To peace and peace be on this earth ... (Terente herbal)
The drawing is ready, but at the very beginning, for the outline, I used the helium handle. In some places, the drawing line the drawing goes to the fore. I suggest to smooth these transitions. To do this, using all the same black handle, we emphasize the hatching drawing on the barrels birch and the river line rushes into the eyes.
Nature is very beautiful. Each element is an individual with a unique design. Therefore, we will try to embody her on a sheet of paper. The finished picture can be placed in the frame and admire it at any time.
Necessary materials:
- color pencils of yellow, green, blue, brown tones;
- black marker;
- ordinary pencil;
- paper;
- eraser.
Stages of drawing:
1. Draw the horizon as a line. In the distance we will have, which we denote the sheet in the form of triangles. Next, erase between them line and leave only the contour.

2. Near the mountains in the distance will be visible shrubs and. Also draw and denote them in your drawing. From the mountains there will be a long and fairly wide path, which will bring to the green meadow with trees. On the right side of the leaf, we draw a small tree.

3. Now let's turn to the first plan and draw a large tree on the left side. He will have a wide and massive crown with plenty of branches. The number of foliage will be small, but despite this, the tree looks big, rather than the mountains in the distance. Do not forget about the petty foliage in the meadow.

4. We supply the marker every line, complement with small details. Unnecessary lines are erased by the eraser.

5. Deer, go to the trunks of two trees and paint their brown pencil.

6. Now color the foliage on the trees with a light green pencil.

7. For dimming, we use an emerald or dark green pencil.

8. With the same pencils to color the green glade and grass in our drawing.

9. Mountains are visible. They give the blue color, and the foot will have green shades. When mixing two colors, we will get a very beautiful and original look.

10. The path is crooked with a yellow pencil, and the contour line will be brown.

11. Finally, we draw a light blue pencil sky.

12. On this we finish our phased drawing. On it you can see the mountains, and a green lawn with a path, and trees, and a clean blue sky. Any of you wants to relax from the city bustle, I would like to be in such a wonderful place! Appreciate the world likes us!


"Art - like nature. If you do not let it be on the door,
it will enter the window. "
Butler S.
Poets and writers express their gratitude to nature through the word, composers - through a combination of sounds, and artists - through the image of landscapes, drawing nature. Everyone has its own unique and accessible tool, its own personality. One, perhaps, is an object of admiration (actual nature) and a unique gamma of feelings, which, or another work of art, causes in a person.
Nature! This is what always attracts, attracts look, makes stop, admire, admire.
In painting scenery - It may be a general view of any locality; Pictures or drawings depicting nature, various types and manifestations, separate natural phenomena.
Depicting any landscape of the artist, of course, puts his soul into the process. He does not seek to completely copy the plot, and skips it through his inner world, his vision, putting a part of himself into the process of drawing nature. That is why they say that a picturesque landscape is not so much picture, an image or copying of nature, how much the soul of the author himself.
That is why the same image made by different people will look and felt completely different.
This does not mean that in drawing nature there are no patterns and rules. They are. And it is paying attention to these patterns that you can easily repeat almost anyone who visited you, the plot of the landscape (definitely passing it through his inner world, your individuality) and get your unique, holistic and "live" picture.
With your permission, we would like to offer you some important lessons drawing nature. We hope they will help you create and express yourself, creating unique landscapes and mood around.
What is the drawing of nature begins?
First of all, you need to understand - what exactly do you want to portray. Find and decide on the plot, the composition of the future picture.
Here you can help: your own imagination, real image of nature outside the window, perhaps someone has already drawn plot or beautiful photography.
By the way, the idea to draw a landscape from the photo is very good. In any case, you can no longer worry about the fact that the weather changes and paint will change. You can calmly interrupt the process of creativity and easily dive into it again, not trying to keep all the details of the landscape in the head. Just look at the inspirational story of photos and you again in the process!

Skyline
As soon as it is clear - we plan and draw a horizon line on a sheet. Moreover, you spend it where you consider it necessary (it all depends on your idea or the plot that you have chosen). However, pay attention - it is better to carry out the horizon line just above or slightly below the middle of the sheet, do not divide the sheet exactly in half. If the picture is divided into equal parts - there is a feeling of artificiality and unnatural image.

Then all other plans are drawn. At the same time, remember that the closest to the viewer plan should be drawn in the latter. Accordingly, the back plan is first drawn, the plan is above the horizon line. During your masterpiece, you will naturally be able to add details on any of the plans.
Why are landscapes so fascinate? The look and we seem to be immersed inside the picture.
What causes the viewer then the most sensation of "liveliness", image naturalness?
What creates the integrity of perception, where does the feeling of depth and balance arise when we contemplate the landscape?

Pay special attention to our nature drawing lessons on the following points that will help add "livelism" and the naturalness of your picture. Believe, they will help you create your own unique plot.
Plans and Perspective
Far Plan:
- cool colors are used (usually with the addition of white and gray, gray-blue) - it exceeds the illusion of the depth of space in the picture;
- less bright, less saturated (including shadows from objects less saturated);
- details are more generalized, there is no clear drawing of objects (they are barely distinguishable, but recognizable);
- we see it as if in the smoke of the air, as if we look through the layer of air.
Very good is visible on the example of mountain (water-mountain) landscapes.

Medium plan:
- the image is less bright, less juicy;
- less clear, without excessive detail and drawing parts;
- significantly smaller sizes in objects;
- already intimately distinguishable details.
Middle Plan:
- as a rule, it is drawn in warmer paints;
- you can designate contrasting bright stains;
- smears can be more expressive;
- objects, objects are drawn more bright and more clearly, larger;
- dark shadows are used.

The front or near plan of topics is different that he, against the background of other plans, acquires clearer forms. And it can be achieved both due to a clear drawing of parts and due to light and shadow solutions.
If you draw including some kind of natural phenomenon, for example, snowfall or fog, it increases air Perspective. In this case, medium and far plans become even more homogeneous, more faded compared to the neighbor (main) plan, even more blurred with barely tangible contours.


Size and location of the object
This will be a certain object, the so-called point of attention, interest. All again depends on your idea!

As a rule, the main an object Landscape stands out with:
- colors - the object does not have to be brighter, but necessarily more diverse in color, more saturated;
- size - the object can occupy most of the paintings (but not necessarily - should, everything is very individual);
- location - an object is located in the near (front) plan, but not necessarily in the center of the picture;
- environment - area around the main object, on the contrary, should be a little less noticeable, less bright, less causing look,
The meaning is that attention focused primarily on the object!

In order for the landscape to play and came to life, there are several moments to pay attention to and bypassing these "sharp corners" in the image.
What should be avoided in the image of objects
In order for the attention not to be scattered and the view (as presumably, the author of the landscape) was chained to one object, so that there was a feeling of harmony (and not disharmony) follows definite to avoid:
- identical lines (for example, two completely identical straight or curved in one side of the tree, flower, bladeing and so on),
- same sizes and forms (for example, two identical vertices of the mountain, two completely identical windows in the house, two or more identical animals and so on).
If you have conceived a central object as consisting of several objects (for example, a pair of animals or people) - make different forms, give movement to these objects. One, for example, maybe more, the other is less. One can move, another stand or lie on the spot. The main thing is that they are in different poses, different magnitude and so on.

If you are as an object you use the river or road, please note that the lines are not straightforward, but on the contrary, more curved, as if "leaving the" look inside the picture.


Remember that water, roads create a sense of movement. Then when the lines are less direct, then the look is moving behind the line and is delayed in the image. If, on the contrary, the road is too direct - then the person's glance does not stop on it for a long time, but as if "runs up" and quickly slip away.
Regarding even straight lines are generally very interesting and separate history, with their rules.
Please note if you need to use "straight lines" as an object - for example, you draw some bridge, a pillar, a ship mast, the wall of the house or part of the roof - then you should not depict them too smoothly "according to the ruler". On the contrary, make them boldly crying (it will give a more natural look), disguise too straight lines (for example, a straight wall of the house can be masked with vegetation, bench). Straight pillars at the bridge can be sparking a little.


Squares, circles, triangles in "pure" geometrical form are better not to apply at all. This does not mean that you should always depict windows curves, doors, and in some places you can simply interrupt the geometric shape. For example, a flower in a pot can be put on a rectangular window, which will already bring a liveliness and harmony to the landscape.
Color
As for the choice of color, there are also several important tips here, which (very hope) will help you create a "live" and harmonious picture.
Major rule - Mix colors! Try never to use a clean color in that of his form in which you have it. Allow the brightness!

Boldly mix the colors with each other! The main thing is that the color did not dirty, with an incomprehensible gray tint. And everything else - welcome and quite acceptable.
Color selection should also cause you a feeling of harmony. When you choose it, you miss it through your inner world, through your vision of the landscape. Therefore, do not strive to accurately choose a color gamut that your eye perceives (if you carry the plot, for example, from the photo). The main thing is to you, first of all, liked the color that you get with you when you will mix paint.

Of course, Mother's Nature itself - teaches us a lot. Regarding forms, colors, saturation of natural paintings and objects. The most important thing is your observation and desire to create, draw. The main thing is to take and do something, even if not quite skillfully, and maybe at all for the first time. Just allow yourself - try, touch.
Inspiration, for a start, any landscape. Pick the desired colors, take a sheet of paper and define the horizon line, check the place of the main object ...
The main thing is that you can express your inner individual world in your work, in the image of nature. And maybe you will create something special and magical! Picture! Which will delight and admire not only you, but also someone else!
Remember, you have the right to creative liberties!

We wish you joy and creative self-expression! Give yourself pleasure, just let yourself be a painter!
Oksana! Thank you!
It's great that you were very informative and useful - the most important thing when the material can come in handy! Good luck to your landscapes!
Julia, thank you very much for the article! Very concise and clearly pronounced the main ideas on the image of landscapes, the illustrations are well chosen. Inspires!
Drawing with paints is a very interesting and educational activity. The image of landscapes in different techniques raises a sense of beautiful, soothes and configures on positive emotions.
Landscape selection
For or watercolor fit a variety of landscapes.
In this article you will learn paints in stages for beginners. Mountains are one of the most impressive plots for the drawing. Depicting them, you can show the contrast between high slopes and plains, sky and earth. Mountains can be both sharp and smooth, similar to a mountain range. The weather is also an important point in the picture. Winter mountains are one of the best solutions. In such a landscape, you can "play" with light and shadow, with reflexes and different shades on the snow-white snow. Owl, yellowish, burgundy, ultramarine, turquoise shades - all this can be in the color of snow, it is important only to choose the right color gamut.
Summer landscape with the image of the mountains is also a good choice for novice artists. The riot of greenery, warm shades in the grass, or cold - in the branches of the pines - these details are very picturesque - it is not necessary to draw them to the author. The more free and bolder will keep the painter's hand brush, the picture will be easier and easier will be perceived. It is important to remember that the landscape is not only nature, but also the atmosphere that we create by investing our emotions, mood.
How to start a landscape?
Start any drawing from the layout in the sheet. Let the Earth be less sky, or vice versa. Do not make these parts are the same.
If these are the mountains - think over what the vertex will be higher, and what is lower than others. Do not draw the same mountains, even if in reality it is. Composite is better to make them different, it will make the dynamics in the drawing.
Pay attention to the items that are in the foreground. This is what is closest to the artist. The foreground is always drawn in more detail and more diligently than the rear.
Landscape Guashew
There is a lot of technician for such a classes, how to draw landscape with paints. Phased for beginners to work much easier than other materials. The gouache is easy to use: mixed with water, easily dismissed, does not have a specific smell. In order to work gouache, any brushes are suitable, but it is better to stop your choice on synthetics or pony. This technique is recommended for beginners because, making an error, you can easily overlap it with the following layer of paint. Moreover: the next layer applied to the dried pigment is not mixed with the previous one. Unlike oil and acrylic paints, a gouache can be drawn more freely and not be afraid to make a mistake.

Parts of the picture can be drawing both individually and all at once. You can first block the paint sky and the earth, and then write clouds, trees and foreground.
Tip: To work faster, apply shades on items right away, and do not leave "for later." It is much easier to do it in one stage than wait until the picture gets up.
Watercolor landscape
This technique can approach you if you wondered how to draw landscape with paints in stages for beginners. Watercolor in painting can be very easy and fresh, if you know several rules.
- Watercolor equipment is art working with layers. Paint translucent, so every new layer will be mixed with the past.
- Minimum mistakes - the motto of everyone who takes in the hands of watercolor.
- Dense paper is a guarantee of a successful result. A special rough surface absorbs well and creates a good effect.
- Leave for neighbors. The rest should be pale mixed with water. Watercolor need to write liquid, unlike gouache, butter or acrylic.
- It is best for working suitable brushes made of natural pile of protein or pony.
In such a task, how to draw a landscape with paints in stages, a lot of difficulties arise for beginners. How to get one or another shade how it is better to highlight some kind of composition or how to place everything on a sheet - these questions ask everyone, and the answers to them come with experience. The best advice for everyone who is interested in painting is more training, drawing the most ordinary items. The sooner you begin to understand that realistic is achieved by the allocation of some elements and the creation of contrast, the sooner will begin to be obtained.