Draw leaves with a pencil. Drawing autumn leaf
Trees leaves are perhaps the most beautiful of natural jewelry. That is why, the leaves can often be seen in the pictures of various artists - from beginners, to professionals. If you do not know how to draw leaves - this article is for you.
Let you not confuse that the photo shows only one oak leaf. Having learned to draw it, you can easily draw any other leaves - the main thing is to correctly understand the principle.
How to draw leaves quickly and just
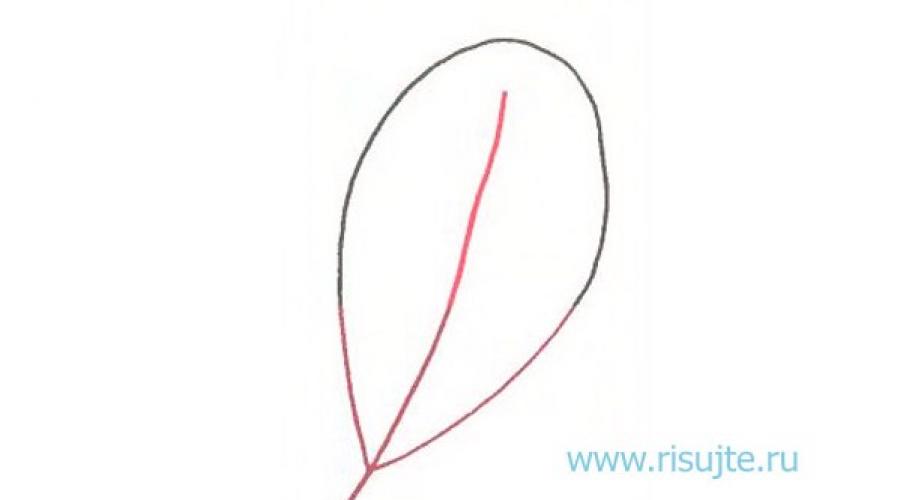
To begin with, draw the outlines of the leaflet. For this, approximately in the middle of the paper sheet, swipe the vertical strip, slightly curved - it will be a middle. And to it - draw a drop-like part. This is the basis of the future oak sheet.

Now, it's time to turn this sketch into a more detailed picture. For this, right inside the drop-like part, draw carved wavy lines - like a real oak sheet. Something can be slightly go out of the edges of the outline contours - or, on the contrary, do not reach them. It does not matter. Your drawing should not exactly repeat the photo. In the end, two absolutely identical leaves does not happen. And still you need to slightly change the lower part of the leaflet - from a simple line by making the stem.

It remains very little. Erase the extra pencil lines remaining from the outline, with the help of an eraser. And then - draw the lifts of the sheet. It is very simple - enough to paint to the vertical line in the middle of a few straight small lines on each side.

That's all! Now you know, how to draw leaves. And not only oak. Similarly, you can draw maple leaves, and birch and any other tree.

Draw with pleasure!
Hello everyone!
Today we will talk about how to draw autumn leaves (and not only autumn). I will show you the pattern of drawing leaves.
So how to draw a maple leaf?
I offer several options and several schemes.
First, I want to pay attention to the fact that all major veins should go into a stalk.
Moreover, the middle veil divides the sheet exactly in half.
Draw a maple leaf (Scheme No. 1)
To draw a maple leaf, start with oval. Divide it in half the vertical line by running out two halves. Draw every half clearer. Add cloves on the edges of the sheet and get a maple leaf.
Draw a maple leaf (Scheme No. 2)
Start by displaying the sheet form. Please note that the maple leaf has five major veins that converge into one "node". Note every accommodation. Connect them with lines so that the sheet turns out to be smooth. Then draw gear edges.
Draw a maple leaf (Scheme No. 3)
Let's start with a square. We divide it in half, depicting the root. From the middle of the sheet, we draw three veins, as shown in the picture. And then around each resolution - the cloves.

Draw a maple leaf (Scheme No. 4)
We start with strey. We reinstate them, as shown in the figure. Points noted the deepest cuts of the sheet. Then draw the root. And after - the most speakers. We smoothly connect them with the intended dots and get a maple leaf.

How to draw an oak leaf?
Very simple. We start with a narrowed book oval. In the middle of oval draw a veil, which goes into the root. Then the edges of the sheet, which are similar to the waves.
Draw a oak leaf (Scheme No. 2)
We start with the form of a sheet and divide it in half, drawing a veil, which goes into the root. We form boundaries with a wave-like arc. Give it a clear shape and edge.

In the previous lesson I showed. This lesson will be a supplement to it. Here we will look at how to draw leaves with a pencil phased. As an example, I will show how to draw maple leaf. The drawing process is not complicated.
Step one. I start with markup. Drawing something similar to the hieroglyph. Each of these lines denotes the main network of residents.  Step second. Draw the contours of the maple leaf itself. Remember that it is still a sketch, so you do not need to put pressure on the pencil. These lines will then move.
  Step Three. Take a color pencil. The choice of color leaves for you. I took green, even though autumn, but I like green. We supply contours and erase the auxiliary lines that I spoke about in the previous stages.
  Step fourth. We take another color pencil and apart our sheet at your discretion. I got completely green. But you can make any color. In nature, there are many diverse leaves, so there are no restrictions. As a result, it turns out something like this: but this is not the end. This time I decided to show how to draw leaves with a pencil Fully, from the sketch to coloring, and not just coloring as in the previous lesson about autumn. It turned out very realistic, what do you think?
And I also give you a crib (or just remind you as they look) leaves of other trees. The collection was collected personally. A classmate with a classmate passed through the park and narrowed the leaves. That is so having fun:  I also really wanted to draw the leaves of Chestnut, but I did not find a single good copy, everything was already falter. Therefore I give a picture from the network:
  But the entire harvest:
  This is probably all. You can also draw another vegetation.
The leaves of different trees look different, so they draw them easier from nature. But, if the winter and leaves outside the window have shielded a long time, you can use high-quality photos. To draw the leaves of trees, you can use an ordinary pencil, but color drawing will look much more effectively. With the help of adults to understand how to draw leaves, even a small child is capable of.
Before painting the leaves with a pencil in stages, and after decorating them, it is worth collecting all the most necessary:
one). Multicolored pencils;
2). Liner;
3). Sinking is washing;
4). Album sheet;
five). Pencil.
If all those stationery, which are listed a little higher, are already at hand, you can start learning how to draw the leaves in stages:
1. Doing light strokes, notice the outlines of the leaves;

2. Start drawing a bouquet of leaves. In the central part, the oak sprigs, drawing the leaves characteristic for this tree and acorns;

3. Above oak leaves. Picture birch leaves;

4. Above the leaves of oak and under them, draw the leaves of the aspen whose cloves have a somewhat rounded shape;

5. In the middle, depic linden leaves;

6. From the edge, draw a rowan sheet;

7. Bottom depict a ribbon tied with a bow, with which a bouquet of leaves is assembled;

8. Now you understand how to draw a pencil leaves. But that the image looks in the end beautifully and bright enough, it is recommended to color it. To do this, first circle the outline liner;

9. Taking advantage of an eraser, erase pencil lines;

10. Skelts crush brown. And acorns are squeezing with green shades, as well as yellow and brown tone;

11. Different shades of green siny oak leaves;

12. Green, as well as yellow tones coloring birch leaves;

13. Yellow and orange pencil, as well as in green tones, Pership rowan sheet;

14. Different shades of green color linden leaves;

15. Yellow pencil, as well as green tones filter aspen leaves;

16. Blue and blue pencil paint the ribbon that a bouquet is bandaged.

The image of the leaves is fully ready! Now you know how to draw leaves. For coloring a bouquet of leaves, not only color pencils can be used, but also almost any paints, for example, watercolor or gouache. The main thing is that as a result, the image is colorful and spectacular.


By the way, there is an interesting method of staining with color corrugated paper. It is necessary first to draw the leaves on paper at first a white wax shallow. After that, pour into small pieces of corrugated paper of autumn colors (red, yellow, orange, brown) and, well wetting every piece in water, stick them into a drawing. Watch that there are no two pieces of paper of the same color. Let the paper dry a little (but not to the end!), After that, remove it from the picture. You will have a wonderful multicolored background. Leave the work to dry finally, then put it under the press.

Method 2.
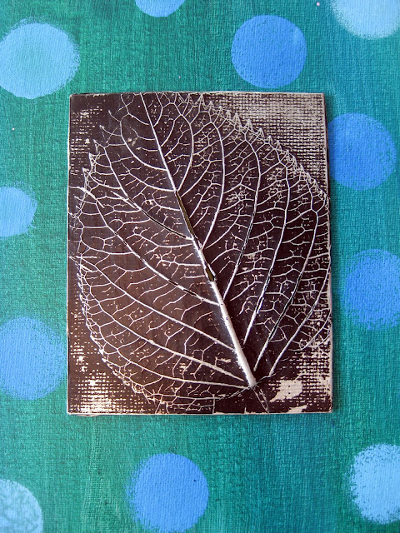
An interesting autumn handicraft will turn out if leaflets put under a thin foil. Foil at the same time it is necessary to place a brilliant side up. After that, you need to carefully smooth out the foil with the pads of the fingers to stick the drawing. Next, it is necessary to cover it with a layer of ferrous paint (it can be gouache, mascara, temperatures). When the paint is driving, very carefully pull the picture with a metal washcloth with a metal washcloth. The protruding bodies of the leaved at the same time will be slaughtered, and dark paint will remain in the deepening. Now you can stick the resulting relief on the sheet of color cardboard.
Autumn leaves. How to draw autumn
Method 3.
Very simple and at the same time spectacular technique - to print the leaves on paper, which is pre-applied to the paint. You can use the paint any, just apply it to the one side of the leaves, where the accumulation is attracted.

Link
Here is the prints of rowan leaves. And any kid can draw the berries of Rowan - they are made with a cotton wand with red paint.

Link
Beautiful autumn pattern will succeed, if on a sheet of dark color cardboard prints leaves white paint. When the paint is driving, you need to paint with colored pencils. It turns out beautifully if some leaves leave white.


The background can be left as it is, or to make color, coloring with paints with a sponge. At the same time it is necessary to leave a small incentive space around the leaflets.


If you decide to make the background with color, then the leaves themselves can be left white at the same time.

How to draw autumn leaves. Autumnal crafts
Method 4.
To give the volume to your drawings, you can take advantage of the following interesting technique. You will need fine wrapping paper or corrugated paper white.


Method 6.
Another original autumn drawing, made in warm and cold colors. The leaves themselves are drawn in warm colors (yellow, red, orange), background - in cold (green, blue, purple). To perform this work you will need a circuit.

1. Draw several leaves of different shapes on paper.
2. Now with a circulation, draw a circle of a small radius in the lower left corner of the paper sheet. Next, adding approximately 1 cm., Draw the circumference with an increasing and more radius, as far as the zirkul will allow.
3. Now all the same do in the upper right corner.
4. Finally, spread the autumn leaves with markers or pencils in warm colors (colors must be alternating successively), and the background - in cold colors.
Maple Leaf. Maple leaf pattern
Method 7.
Help the baby draw on a sheet of paper maple leaf. Divide it by streaks on the sector. Let the child color each sector of the leaflet in some special pattern.


You can combine two ways.


Autumn crafts for children
Method 8.
Another unusual autumn drawing.

1. Draw on paper leaves of different shapes. They must occupy the entire sheet of paper, but not touch with each other. Part of the leaves should begin from the borders of the paper sheet. Draw only contours of leaves, without residence.
2. Now, with the help of a simple pencil and ruler, you will read two lines from left to right and two - from top to bottom. Lines must cross the leaves by sharing them on the sector.
3. Select two colors for the background and two colors for leaves. Color them into selected colors in such a way as in the figure.
4. When the paint snacks, circle the outline of the leaves and the fired lines with a gold marker.
Figures on autumn
Method 9.
For the manufacture of this autumn craft, you will need a regular newspaper and paint (including white paint).
1. Draw on a newspaper sheet maple leaves.

2. Collect his paint and, after the paint dries, cut it out.


3. Take another sheet of newspaper and white paint. Draw and fidgeted a large square on it.

4. Enter your sheet on the paint and wait until it dry out.

5. That's what you should get in the end!