Draw the leaves. How to draw a maple leaf with a pencil step by step
Summary: DIY autumn crafts for children. Autumn drawings. How to draw autumn. Autumn leaves. Drawings of autumn trees. Pictures on the theme of autumn.
What's the most remarkable thing about autumn? Autumn leaves, of course! In autumn, the leaves are not green, as in summer, but bright, multi-colored. Leaves on trees, bushes, fallen and lying on the roads, on the paths, on the grass ... Yellow, red, orange ... At this time of the year, even if you are not a photographer or an artist, you just want to pick up a camera or a paintbrush with colors to capture this wonderful time of the year in all its glory. We will help you with this. In the second part of the article "Autumn crafts for children: how to draw autumn" we will teach you how to draw autumn leaves in different ways.
Autumn drawings. Draw autumn
Place the veins side up under a sheet of plain printer paper, and then shade it with wax crayon, placed flat. You will see how the drawing of a leaf with all the smallest veins will appear on paper.

To add some magic, you just need to take a white chalk and run it over the white paper, and then let the child paint over the sheet with paint using a sponge. See link >>>>

By the way, there is an interesting way of coloring using colored corrugated paper. You must first draw the leaves on paper in the same way with white wax crayon. After that, cut the corrugated paper of autumn colors (red, yellow, orange, brown) into small pieces and, wetting each piece well in water, stick them on the drawing. Make sure that there are no two pieces of paper of the same color next to each other. Let the paper dry a little (but not completely!), And then remove it from the drawing. You will have a wonderful colorful background. Leave the work to dry completely, then place it under the press.


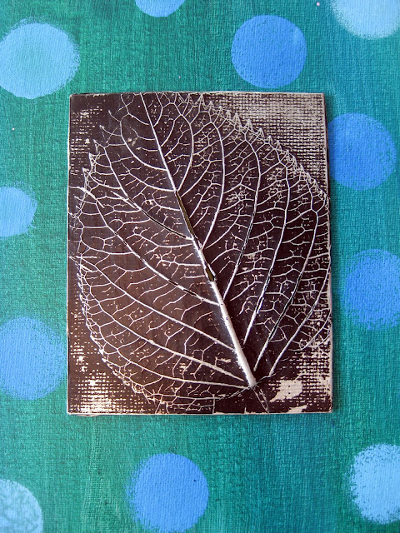
An interesting autumn craft will turn out if you put a leaf under a thin foil. In this case, the foil must be placed with the shiny side up. After that, you need to gently smooth out the foil with your fingertips so that the pattern appears. Then it is necessary to cover it with a layer of black paint (it can be gouache, ink, tempera). When the paint is dry, very gently scrub the painting with a metal washcloth. At the same time, the protruding veins of the leaf will shine, and dark paint will remain in the recesses. Now you can glue the resulting relief onto a sheet of colored cardboard.
Autumn leaves. How to draw autumn
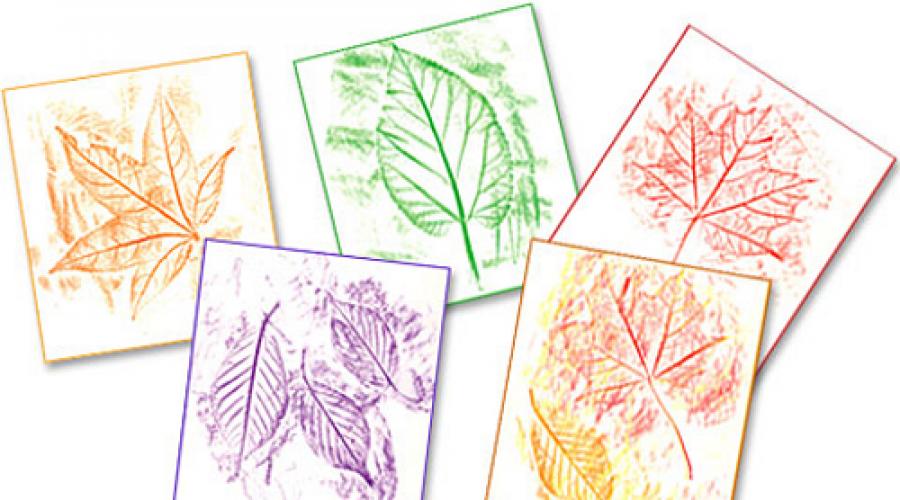
A very simple and at the same time effective technique is to print leaves on paper, on which paint is previously applied. Any paint can be used, only it must be applied on the side of the leaves where the veins appear.

Here are the prints of the rowan leaves. And any kid can draw rowan berries - they are made using a cotton swab with red paint.

You will get a beautiful autumn drawing if you print leaves with white paint on a sheet of dark cardboard. When the paint dries, you need to paint the leaves with colored pencils. It will turn out beautifully if some leaves are left white.


The background can be left as it is, or made in color by painting with paints with a sponge. In this case, it is necessary to leave a small unpainted space around the leaves.


If you choose to color the background, you can leave the leaves themselves white.

How to draw autumn leaves. Autumn crafts
To add volume to your drawings, you can use the following interesting technique. You will need white wrapping paper or corrugated paper.

1. Pull it into pieces of irregular shape and stick it on a thick sheet of paper with PVA glue. Try to get more "folds", "wrinkles" at the same time, they will subsequently give the picture texture, volume.
2. When the glue is dry, using a stencil, draw and cut three maple leaves (large, medium and small) out of this paper.
3. Paint them with colors in autumn colors, and then glue them on a sheet of black cardboard.
For more detailed instructions with photos, see the link >>>>
DIY autumn crafts


Another original autumn drawing, made in warm and cold colors. The leaves themselves are painted in warm colors (yellow, red, orange), the background is in cold colors (green, blue, purple). To do this work, you need a compass.

1. Draw several differently shaped leaves on paper. 2. Now, using a compass, draw a circle with a small radius in the lower left corner of the sheet of paper. Further, adding about 1 cm each, draw circles of a larger and larger radius, as far as the compass will allow. 3. Now do the same in the upper right corner. 4. Finally, color the autumn leaves with felt-tip pens or pencils in warm colors (the colors should alternate sequentially), and the background in cold colors.
Maple Leaf. Maple leaf drawing
Help your child draw a maple leaf on a piece of paper. Divide it into sectors with veins. Let the child color each sector of the leaf with some special pattern.


You can combine two methods.


Autumn crafts for children
Another unusual autumn pattern.

1. Draw differently shaped leaves on paper. They should cover the entire sheet of paper, but not touch each other. Part of the leaves should start from the borders of the sheet of paper. Draw only the outlines of the leaves, without veins. 2. Now, using a simple pencil and ruler, draw two lines from left to right and two from top to bottom. The lines should cross the leaves, dividing them into sectors. 3. Choose two colors for the background and two colors for the leaves. Color them in the chosen colors as shown in the picture. 4. When the paint is dry, trace the outlines of the leaves and the drawn lines with a gold marker.
Drawings on the theme of autumn
To make this fall craft, you will need regular newspaper and paints (including white paint).
1. Draw a maple leaf on a newspaper sheet.

2. Paint it with paint and cut it out after the paint is dry.


3. Take another sheet of newspaper and paint with white paint and paint over a large square on it.

4. Apply your sheet to the paint and wait for it to dry completely.

5. This is what you should end up with!

DIY autumn crafts
Method 10.

Autumn drawings. Draw autumn
Method 11.
In the article "DIY Easter Cards" we talked about an interesting drawing technique using wax crayons. See link >>>>
Autumn leaves can also be drawn in this way.

And here, in a similar way, autumn leaves are painted with paints.


Finishing our review article on the topic "How to draw autumn leaves", we will tell you about two more methods.
Autumn crafts for children
Method 12.
Spread the leaves out on paper, then use an old toothbrush or flower spray to spray the paint. In order not to stain everything around, you can do the above procedure in the bath.


How to draw autumn leaves
Method 13.
And finally - stamps of leaves with a roll of toilet paper. In this way, it is very cool to make gift wrapping with children.


Prepared by: Anna Ponomarenko
Other publications related to this article:
In this article, you will learn
This tutorial is a great exercise for aspiring artists to understand symmetry and construction basics.
Agree, the maple leaf is not very symmetrical, it is difficult to find perfect symmetry in nature. But the two halves are very similar, so we will conventionally designate them symmetrical. How to use construction to draw symmetrical shapes and how to draw a maple leaf pencil, learn from this lesson. I use photos processed in Photoshop, clearly demonstrating construction lines. However, remember, they are imaginary, they are formed live by applying a pencil and comparing with the help of an eye.
Construction. Compare the leaf shoots using construction lines
Construction is a term that denotes a set of actions aimed at accurately transferring the proportions, the shape of an object depicted from nature to a sheet of paper. In other words, it helps to depict an object as it is in nature. Construction lines are drawn temporarily to determine the shape and proportions of the subject.
There is no clear guide on how to draw a maple leaf correctly. Any object is depicted by the artist as he feels, understands it. I propose to consider the lesson in detail and step by step in order to teach you to disassemble any objects into elementary components. This will help in the future to cope with drawing complex objects in which it is difficult to understand what and with what to relate. Simply put, the more difficult it is to build the simplest form, the easier it will be to deal with the most difficult objects. In practice, some steps may be skipped in the future.
First, let's designate the dimensions of the maple, mark the height, width, compare these parameters relative to each other. Maple is slightly wider than tall.


We mark the middle of the leaf and the center of symmetry, find the point from which large processes come out in a fan.


The maple leaf has five main tines, four at the sides and a fifth at the top. The bottom two are located on the same horizontal line with the point we marked earlier.
The tips of the two superior processes are not in line. Draw an imaginary horizontal line from the left tip. Note that it is almost at the same distance from the top tip as the line through the fan point from the bottom edge.


We draw a fan of appendages, using the contour lines it is easy to compare the angles of inclination of the fan lines.


Detailed work detail
Now you can draw a maple pattern as similar as possible to the photographed leaf.

We clarify the details, draw the contours in more detail

Hatching. Putting tone on a line drawing
Before shading, remove the construction, clean up the imperfections with an eraser.

The left half of the leaf is shaded, the right one is highlighted by a light source. Notice how beautiful the drop shadow is on the left. We cover the entire area with a tone, distribute dark and lighter spots.

We detail the drawing of the foliage, draw the veins with an eraser cut at an acute angle.


Before finishing, slightly generalize in some places the veins drawn with an eraser, somewhere to correct them with a pencil, finalize the background. Finish off by emphasizing the tips on the lighter sides and adding contrast to the drop shadow and center.

If you understand the principles of how to draw a maple leaf in stages with a pencil, then you can draw shapes more difficult using a similar method.
In this lesson I will clearly show how to draw a maple leaf with a pencil step by step... This is a simple tutorial that even a beginner can handle.
Before drawing a complex shape, you must imagine how it works from the inside. For example, a maple leaf is not a simple figure. But if you study its structure, it becomes much easier. Here is a maple leaf:
How to draw a maple leaf - easy step by step drawing tutorial
First, take a look at the maple leaf in the picture above. Think about its basic shape. Look at the stem. Notice how it continues to the tip of the leaf. Look at the “ribs” of the leaf. Think about the corners where they meet the stem. Now you can draw the basic shape. Always try to see the basic shape first and leave the details for later. Follow the step by step instructions below.
- Draw a square .... then draw a stem going through the center.

2. Look at the ribs of the leaves. Imagine the corners where they hit the stem. Note that they fold into a "V" at the top and sides of the sheet.

3. Now draw the outline of the leaf. You can focus on the square that you drew in the first step.

To make it easier for you, the main lines are highlighted below in stages:
3.1 At the bottom of the sheet, draw a flattened "W" shape. At the top, draw an inverted V.

3.2 Now draw 3 letters "J" (2 upside down).

3.3 Now draw the number "7" on the right and the letter "Z" on the left side of the sheet.

4. Now draw the outer corrugated shape of the edges of the sheet.
If there is no imagination or you want to plunge into the autumn magic a little, spend time with your child drawing a maple leaf. This is an interesting activity with many bright colors and a positive charge of emotions.
The maple leaf is one of the most beautiful. Besides that it has original shape with five pointed ends, its color is very bright and colorful. It doesn't matter for what purpose you will need to portray this drawing, for a children's competition or an autumn landscape, this is useful pastime for any person.
Drawing a maple leaf is simple. This will help you step by step sketches:
- First of all, you should draw the frame of the sheet. To do this, you need to draw an arched vertical line - this is the leg of the sheet.
- Then draw two horizontal crossing lines by hand. This is the basis for its five-pointed shape.
- Trace the tips of the drawn lines, and then erase the sketch inside the drawing. The base is ready!
After that, start detailing your drawing. It is necessary to make sharp tips along the edges of the sheet to make it look realistic.
 Detailing the drawing
 After that, erase the extra sketch lines and draw characteristic veins on the leaf.
 Maple leaf veins
 After that, you just have to paint the sheet in colorful colors: yellow, orange, brick, brown, red, green. The sheet can be monochromatic, it can have many shades.

 Maple Leaf Coloring Option
 Maple leaf image and outline, pattern
If you do not have artistic skills, time or even the desire to painstakingly draw a maple leaf, you can the template will come in handy... This template can circle on a blank sheet of paper and then paint to your taste. So you get neat and beautiful drawing.
Patterns for drawing a maple leaf:

 Maple leaf, pattern. Option number 1
 Maple leaf, pattern. Option number 2
 Maple leaf, pattern. Option number 3
 Maple leaf, pattern. Option number 4
 Autumn maple leaf: drawings for children
You can get ideas for creativity and draw a maple leaf (one or a whole bouquet) with your child by studying ready-made works.
Drawings for kids with a maple leaf:

 Realistic drawing of a maple leaf
 Child's drawing: maple leaf
  Colorful maple leaf: drawing
  Maple and maple leaf: drawing
 Beautiful maple leaf: drawing
 As we love to draw nature, various landscapes, which often contain trees and shrubs, as an indispensable element of many landscape drawings. Trees and shrubs have leaves. They sit densely on the branches, rustle in the wind, sway, creating a pleasant coolness on a hot summer day. From the heat, lush foliage can shelter a tired traveler who has stopped to rest under a spreading tent of tree branches. Leaves are different in structure. Simple and complex, with different vein arrangements - they are usually an integral part of every herbaceous plant. With the help of leaves, plants receive nutrients, water is transported along the veins to all organs of the plant.
Acacia leaf. First, in the first part of our tutorial, we will learn how to draw a complex sheet. Let it be a leaf of a well-known shrub - yellow acacia. In botanical terminology, it is called unpaired-pinnately dissected. In a pinnate leaf, leaf blades are always located on the main petiole opposite each other.
Stage 1. First, let us designate the main petiole (leaf stalk) with auxiliary straight lines, draw additional straight petioles from it, two in different directions.
Stage 2. Draw a clear line at the base of the main petiole.
Stage 3. On the first two straight lines, draw many small leaves sitting on additional stalks.
Stage 4. On the two second straight lines and on the main stem in front, we also draw a lot of small leaves. An unpaired leaf blade is located at the top of such a sheet.
Stage 5. Erase the auxiliary lines, leaving only the main ones.
Stage 6. We outline the main contour of the leaves with a clear line.
Stage 7. Let's paint our leaves, of course, green.
Lilac leaves. Lilac is a very beautiful shrub with clusters of small lilac, purple or white flowers. Lilac has a very pleasant smell. It usually blooms in the month of May. And then a wonderful, unique lilac smell floats above the ground ... Let's try to draw the leaves of this beautiful bush.
Stage 1. Lilac leaves are single, simple, they each sit on their petiole opposite each other (opposite). We draw a small, not very plump petiole.
Stage 2. From this petiole we take two straight lines opposite each other. These are the rods of future leaf blades. On each of them we will depict a half of a half-heart-shaped leaf blade.
Stage 3. Now we depict the second halves of the leaf blades in the same way. They also remind us of half a heart.
Stage 4. With clear bold lines we mark the median veins of each leaf. They are the largest.
Stage 5. From the median vein of each leaf blade, we show numerous veins extending in different directions and creating a patterned network on the leaf.
Stage 6. Now we erase all auxiliary lines, outline the remaining drawing clearly.
Stage 7. Let's color our leaves. It is green in various shades. Veins can be made gray, brown or black. And you can also dark green.
