How to draw a light drawing on the theme of space. How to draw the planets of the solar system
We have launched a watercolor drawing contest. You can see all works by tag. We publish best drawings and give step by step master class how to learn to paint space with watercolors.

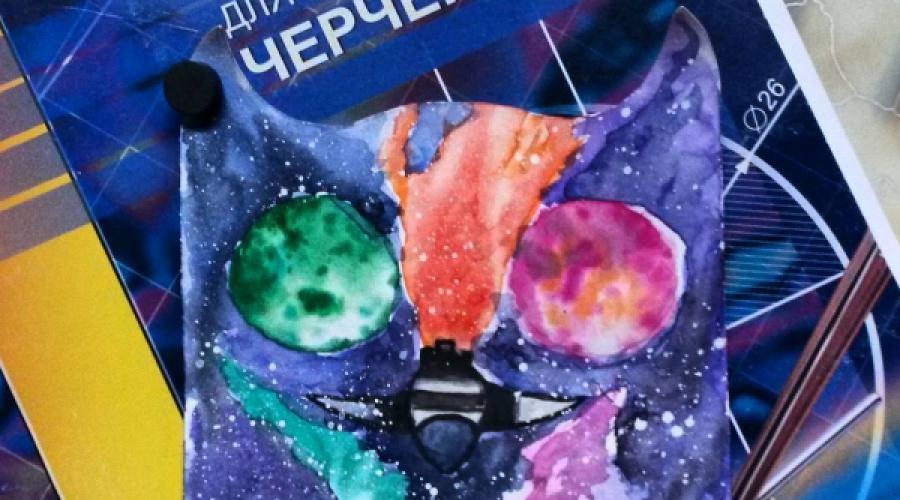
Photo by @ shagero.alled

Photo by @kamarkovskaya

Photo by @arlyapovaeireen

Photo by @katrin_is_art
Step-by-step master class
If you did not participate in the competition, but also want to learn how to draw space, save yourself somewhere these step by step instructions, what and how to do to get bright and beautiful overflows. We publish a lesson from Leonardo Pereznieto.
M materials
- Hot-pressed watercolor paper of A4 or A3 format;
- Masking tape;
- Easel or wooden board;
- Palette;
- Water container;
- A piece of cloth;
- Salt in large crystals.
Watercolor:
- Orange;
- red cadmium;
- manganese violet;
- delft blue;
- azure;
- indigo;
- Prussian green;
- green phthalocyanine;
- permanent green;
- dark cobalt green;
- shiny blue-violet;
- chrome orange;
- cadmium light yellow;
- black ivory;
- titanium white.
Squirrel Brushes:
- Mop brush;
- Brush # 0;
- Brush # 2;
- Brush No. 4;
- Brush number 8;
- Brush number 12.
Secure the watercolor paper to a wooden board with masking tape. Mix orange with light cadmium red. You should get a light scarlet shade. Next, mix deep red with manganese purple and a drop of indigo for a cherry red hue. Then add Delft Blue to Indigo for a deep blue. And the last mixture is Prussian, permanent and dark cobalt green, phthalocyanine to get a medium green.
If you don't have all of these colors, you can simplify the task and paint with just the colors you have. The result will still be interesting.

Place the easel at a slight angle and wet all the paper with water clean water with a mop brush. Apply dark red and light red colors to her in the upper left corner. Paint over the lower right corner with a blue tint. Brush # 8 apply green tint diagonally - from the lower left corner to the upper right corner.

You need to work quickly enough while the paper is still damp. With a # 4 brush, strengthen some areas and fill in all the gaps with whatever paint you like.
You should have an idea of what you want the final work to look like.

Try to avoid mixing complementary colors (such as yellow and purple, red and green, blue and orange) with each other, as this will result in a cloudy color.
Once the paint starts to dry, apply another coat of paint on top to enhance the color. Remember to blot the brush every time before taking on a new shade.

When you are finished applying the paint and are happy with the color combination and brightness, sprinkle coarse salt grains on the drawing. It will absorb water and take away some of the color, leaving beautiful streaks in the form of nebulae. Wait until it dries completely and gently scrape off the salt.

We've only done half of the work! Wet the entire surface again with water and fix the colors with their pure counterparts, use a brush # 2 for this. To get a pure bright color, add less water to the paint and do not mix paints on the palette, but take directly from the container.

While the paper is still damp, mix the azure and black ivory. With a # 4 brush, paint around the edges of the sheet, around the edges of the nebula. Just do not apply paint in the form of a black frame, remember what nebulae look like - in the form of an elongated ellipse. At this point, we need a fabric that can be used to absorb paint to soften the edges.

Wait for it to dry completely and use the # 2 brush for the final touches. To add stars to our space, place your easel on a horizontal surface. Take a stick (or other brush) in your non-dominant hand and hold it parallel to the paper. Place some titanium white on the brush in your leading hand and lightly hit the stick with the brush so that tiny white particles of paint fall onto your painting. Add "by hand" some stars with a thin # 0 brush.

Let the drawing dry, remove the masking tape. And here it is, your space!
Children are very attracted and attracted by everything new and interesting. Almost all contents like space, be it stars, planets or spaceships. In this article you will find schemes for drawing a rocket of varying complexity, some images can be drawn even by a small child.
Remember how many boys wanted to become astronauts and explore the depths of space. One has only to imagine how many secrets and mysteries are hidden among the stars and inevitably think about how to get there, look with one eye. Such trips, even for fun, are impossible without a rocket. I suggest you draw this space transport with your child.
How to draw a rocket for children: child's drawing
You will need paper, pencils and paints, and an eraser. Before starting drawing or in the process of creativity, you can also tell your child some kind of cognitive information. So the kid will be interested in the process and will remember interesting facts well.
Of course, with young children, it is better to choose a simple drawing option, where simple geometric shapes prevail, and the picture does not contain a large number small parts.
If you have already mastered the basics of drawing, you can start drawing with smooth lines.

If you draw a porthole in a rocket, then you can then finish painting the astronaut or paste in some picture.

Or you can use a simpler algorithm.

How to draw a rocket, video
How to draw a rocket with a pencil step by step for beginners?
- Draw 2 parallel lines that point upward.
- Connect at the bottom with a straight line
- At the top of the rocket, close the hull lines with a triangle
- At the bottom draw 3 cones - steps. Their bases should protrude beyond the lines of the body
- Draw a circle in the center - porthole
- Erase extra lines and color

You can also depict the rocket with smoother lines - then it will look more toy, cartoonish.
- Draw the base. To make it easier to depict the body of a rocket, imagine the shape of a carrot or a bullet
- Separate the rocket nose with 2 semicircular lines

- Draw additional elements at the bottom on the sides.
- Supplement the rocket with a frontal part
- Draw a porthole

How to draw a rocket with a pencil step by step in space?
It is quite easy to draw space against the background of a rocket. You can give free rein to fantasy little artist and he himself will draw the sun, stars, planets, and maybe even funny aliens.
For example, you can depict a meteorite or a comet. To do this, draw a star and draw an arc of its tail.

Or you can draw Saturn, which stands out in the picture with its rings.
 Drawing of Saturn
Unlike the previous "toy" examples, you can draw a real space rocket. It is somewhat more complicated due to the presence of small parts and their abundance, however, if you follow the instructions, you will succeed. To make things easier, you can use the templates below.
- Draw the curved body - the base
- Express the front wing in the form of a curved triangle.
- Draw a wedge shape in place of the second wing.
 Rocket. Step 1
 - Draw a tall wedge shape at the end of the rocket to represent the tail wing.
- Draw additional lines to add depth and realism
 Rocket. Step 2 - draw additional lines
 - On the nose, hull, and wing, draw curved rectangles to reflect the hatches.
 Rocket. Step 3
 - Now draw the engine at the bottom of the rocket. It is expressed in 4 different rounded shapes
 Rocket engine. Step 4
 - Draw rectangular windows in place of the cockpit and along the hull, add ovals on the bow
 Rocket. Step 5
 - Draw a flame. You just have to finish drawing the stars and planets, decorate the drawing
 How to draw a rocket in space
 Master class in drawing for preschoolers of the senior preparatory group on the topic: "SPACE" in stages with a photo

Sredina Olga Stanislavovna, educator, head of the art studio, MDOU CRR, Ph.D. No. 1 "Bear", Yuryuzan, Chelyabinsk region
Purpose:
Creation of educational, gift or competition work
Materials:
A3 paper, white or colored double-sided, wax crayons, salt, gouache or watercolor black, soft brush No. 3-5
Goals:
Creation of works on the space theme
Tasks:
Education different ways space images
Improving practical skills with wax crayons and watercolor
Education of patriotism.
Development of curiosity
Preliminary work:
1 Consider photographs of cosmic depths.


2 We get acquainted with the history of cosmonautics, with the names and achievements of our outstanding cosmonauts. Remember the names: Yuri Gagarin, Valentina Tereshkova, Alexey Leonov. The world's first astronaut, the first woman in space, the first person to walk into outer space. We look at photographs, talk about the difficulties and delights of the profession of space conquerors. How did test pilots become astronauts? What training did they go through? We dwell in more detail on the first manned spacewalk.


2 - Thinking about space, UFOs, aliens. We discuss films and cartoons. We think what they can be - aliens: good or evil?
3 - Literary living room:
Arkady Hait
In order, all the planets will be called by any of us:
One is Mercury, two is Venus, three is Earth, four is Mars.
Five is Jupiter, six is Saturn, seven is Uranus, followed by Neptune.
He is eighth in a row. And after him already, then,
And the ninth planet is called Pluto.
V. Orlov
Flies into space
Steel ship around the Earth.
And even though its windows are small,
Everything is visible in them at a glance:
Steppe expanse, sea surf,
Or maybe you and me!
Practical work# 1: "Distant Space"

For drawing space landscape we need stencils of circles of different diameters. You can use special rulers or various "improvised means".

We draw several planets with wax crayons, placing them at random on the plane of the sheet. You can apply the technique of superimposing nearby planets on the side planets, or depict one of the planets only partially.

After creating a space composition, we crush a sheet of paper, twisting it several times, and gently straighten it

Coloring the planets. To prevent the planets from becoming like grandmother's balls with threads, we draw very carefully with crayons, do not go over the edges.
Before starting to work in color, we remember how forests, mountains, deserts and oceans look from space, we think about whether all planets can look the same? Fiery and foggy, gritty, gaseous and icy - they can look absolutely fantastic. Coming up with complex color combinations.

Cover the entire sheet with black watercolor. Paint, accumulating in cracks, creates a mysterious depth of outer space.

Practical work No. 2: "Spacewalk"


For this work we need a figure of an astronaut in a spacesuit, circles of various diameters and a silhouette of a rocket.


We place all the figures on the sheet in random order. We start with a rocket and an astronaut. Then we add the planets.


We delimit the planes inside the silhouettes. We add portholes on the rocket, the spacesuit is divided into separate parts. We begin to paint the rocket, astronaut and planets step by step. In order to create a festive atmosphere, we take bright, juicy colors.


Add stars. We take yellow and white crayons. We place them in small groups, in the form of constellations, or line them up, (like Milky Way). Each star is a distant - distant sun, around which planets can revolve and there can be life on them.

We take a brush and black paint (watercolor or gouache) and start painting over the whole work. First, draw lines along the edge of the sheet, then work across the entire sheet.


Until the paint has dried, "salt" the drawing. In the place where a grain of salt fell, the paint seems to collect, and the cosmos with the help of this technique again becomes deep and mysterious.


Children's work (5-6 years old)


Drawing options
Flying saucers (UFOs) can be very diverse. Turning on the imagination, we depict aircrafts aliens.
Today we will teach you how to paint space in watercolor. This lesson is quite easy, which means that any novice artist can master it. In addition, drawing space will also be useful for beginners who have not had time to master the techniques "wet" and "graduated wash".
So, to draw space, you will need:
- watercolor paper;
- tablet and masking / stationery tape (for fixing the paper);
- simple pencil;
- round synthetic brushes No. 6 and 3;
- watercolor paints.

Stages of drawing
Step 1. Working in the "wet" technique, it is imperative to fix the watercolor sheet of paper on the tablet using strips of masking / stationery tape. Thanks to this, the paper soaked in water will not deform, and the applied shades of watercolors will fall beautifully on every piece of the sheet.
Draw an uneven horizon line with a simple pencil. 
Step 2. Thoroughly wet a sheet of paper with water using a large brush to a pencil line. After applying water, paint should be applied as quickly as possible in order to achieve smooth, beautiful gradations of shades. In the lower right corner, apply some lemon cadmium with random strokes. 
Draw translucent ocher along the horizon and the central part of the picture. 
Step 3. Saturate the drawing with cold shades. Apply ultramarine to the central and upper right parts of the sketch. Above the ocher-drawn horizon, add a little turquoise tone, and in the upper left corner - blue. With a clean brush, blend the borders of the shades, making them smooth. 
Step 4. Work out the upper corners of the sky with black. 
And we make the already applied shades more saturated, using the same shades of watercolor, but with less water. Blend all clear borders of shades to get a beautiful gradient. 
With purple or violet-pink, we process the borders of yellow. 
Step 5. Leave the drawing to dry, and then fill the unpainted island with black. 
With a thin brush, create the base of the trees, and then draw the small branches of the tops of the fir trees. 

Step 6. Now type on the brush white tone and select the light areas in the center of the picture. We blur their edges to avoid a clear outline. 
Well .. While I have a movie loading, I'm doing a lesson in drawing space .. Maybe it will come in handy.
How to draw space with a pencil step by step
Step one.
Draw a circular shape for the planet and the outline of the landscape.
Step two.
Let's correct the contours of the planet and its satellite. On foreground we draw two men, these are astronauts sent to the moon.

Step three.
Let's add some strokes.

Step four.
Let's draw a starry sky. Or to be more precise, it's open space. Draw some craters in the middle of the lunar landscape.

Step five.
And it remains to add some shadows. As a result, it turned out like this space picture:

How to draw the Earth with a pencil step by step
Step one. Drawing a circle by hand is very difficult. First, we need two squares, divided in half, so that we can already inscribe a colo in them. Of course, you can take a compass and draw a colo. But this is not a royal affair.  Step two. As mentioned above, we draw the outline of our planet, draw four arcs at the corners of the square.
  Step three. It will now be easier to draw even circle... We combine the arcs so that everything is as clear as possible.
  Step four. Now we sketch on our ball all the continents, oceans, islands and peninsulas. Anything that fits and will be noticeable.
  Step five. We remove the auxiliary lines. We stumble around the planet of dots - an image of distant stars, move a pencil, depict space so that the planet does not look lonely.
How to draw the planets of the solar system with a pencil
Step one
We draw the orbits of the planets. Their shape is an ellipse close to a circle. But, if we look from one point, then visually we see not circles, but arcs, parts of ellipses. Such as in the picture. Let's outline the positions of the planets on the lines.

Step two
We draw circles - planets. We start with a small Mercury, then Venus and the Earth are larger, again a small circle is Mars and further, as in the figure. Show the edge of the Sun in the lower left corner.

Step three
Erase the auxiliary lines - the axes of the circles. Let's make the orbits brighter.

Step four
Let's add others celestial bodies: comets, asteroids. Let's draw "rings" for large planets.

Step five
Let's do the shading. With the help of it, we must turn our circles into a sphere. We remember that we have the Sun in the center, and light falls from its side. But the opposite side of the planet will be darkened. The result should be something like this:

How to draw an astronaut with a pencil step by step
There are four steps ahead.
Step one.
At the top of the sheet, place a round big head... She is big because she is wearing a helmet. Draw two curved lines downward - this is the outline of the body. We will draw an astronaut in zero gravity. And this immediately sets his position. Let's draw the contours of the arms and legs. The spacesuit is wearing a belt. We outline the backpack behind the shoulders.

Step two.
We begin to draw the details: the helmet, fingers, all sorts of bells and whistles on the "suit". Moreover, all the elements are large enough.

Step three.
Draw a hole for the eyes on the helmet and make it three-dimensional. Let's start drawing the shoes. Let's show the pocket-bag on the belt. Look carefully at the picture and add the missing piece on your sheet. Rivets, folds on the fingers, and more.

Step four.
Show the horizontal shading on the belts. Let's draw the shoes: a drawing on the sole, a fastener. The astronaut has a small electronic device on his thigh. Now let's outline the main elements of our drawing. Almost ready. You can "revive" our hero with the help of shading, or add color with the help of paints!

How to draw a space rocket with a pencil step by step
Step one. Our rocket is not just some kind of apparatus with an engine, but a whole spaceship. We draw two oval shapes - this is the ship's hull. Below we will have noticeable one wing of the rocket, and behind - the tail.  Step two. We connect the ovals. The structure of the rocket, its structural parts have complex shape, which does not make sense to describe. Therefore, try to repeat as you see in the picture, or you can come up with your own rocket.
 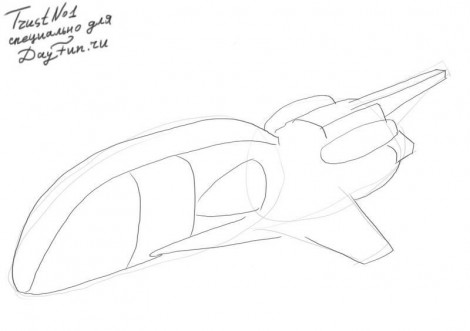 Step three. The ship should have many different parts on the hull, plates, guns, portholes.
  Step four.
 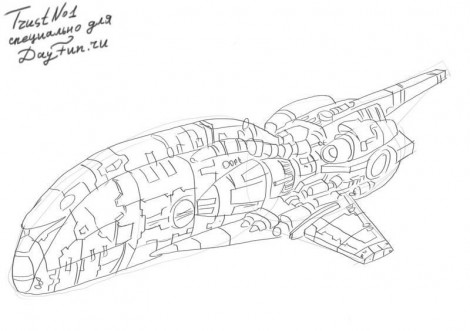 Step five.
How to draw a lunar rover with a pencil step by step
Step one. Let's divide the device into structural parts, depicting them on paper in the form of rectangles.  Step two. Let's sketch out the astronaut sitting in the car.
  Step three. Add a small antenna in front of the vehicle, sketch out the person behind the wheel in more detail.
  Step four. Delete the auxiliary lines and outline the contours more clearly.
  Step five. To show the effect of movement, we will make shadows under it, and also add shading to the wheels, astronaut and other parts. Here:
How to draw a spaceship with a pencil step by step
Step one. Sketching the template with geometric shapes for the ship, display the hull and engine locations.  Step two. Let's draw the jet turbines, tweak the hull lines a bit and add a small cannon underneath.
  Step three. You need to highlight the borders with a thicker line with a pencil, add a lot of details to the wing, circle them, and also add the number 09 for the view.
  Step four. Light movements we shade the entire area of the ship horizontally, and completely obscure the windows, turbine outlets and the gun.
How to draw the moon with a pencil step by step
Step one. Let's mark the location of the moon on paper using a square.  Step two. Let's draw a circle, preferably even. Although the surface of the moon is not even, it will seem different from afar.
  Step three. Add craters, mountains and depressions to the surface.
  Step four. Let's add shading.