Drawing geometric shapes in CorelDRAW. CorelDRAW lessons: draw eyes in Corel Draw How to draw an image in Korel
Read also
Did you draw a character on paper and now it needs to draw in the vector? Then this lesson is for you.
So, proceed.
1. First of all, you need to scan (take pictures) drawing. Then you need to import it in CorelDRAW. Select Menu item File -\u003e Import ... And specify the path to the scanned (sfotograph) file.
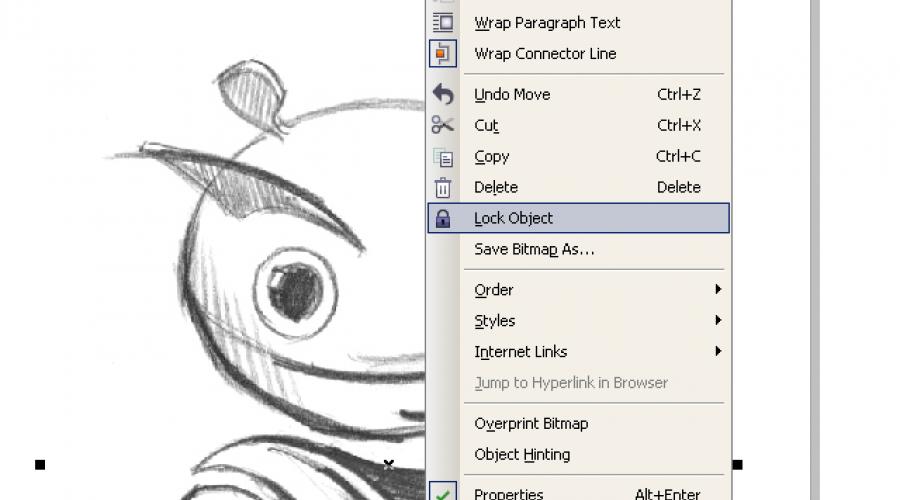
2. Place the imported file in the working area of \u200b\u200bthe document and right-click on the object, select item Lock Object. This action will block the object, which will make the work more convenient.

Now using tools Ellipse and Bezier, Combede the contour part of the body of our character.

If you recently use CorelDRAW or tool Bezier, and the contours are not completely even - nothing terrible. Use the tool Shapetool And right-point point per point. You can change the type of the reference point or by clicking on it with the right mouse button and selecting the desired type, or, highlighting the point and changing it type on the panel Property Bar..
3. Here is our hero already refined. In the circuits now we remove the scanned drawing so that it does not interfere with perception. Click on it right-click and select Unlock Object., then move the drawing to the side.

The next step is to fill with color. Choose part of the body and pour the desired color, clicking the left-click on the color pattern for changing the fill and the right mouse button to change the contour.

4. Now the character is colored, but it looks flat and uninteresting. To give volume, draw your own shadows and glare. Typically, the lighting is taken to the left-top, it means that the shadows will be right-bottomed, and the glare to the left-top. Shadows and glare are created by the tool already familiar to us. Bezier. Or you can use another admission. For example, to make a shadow on hand, twice duplicate the hand itself and the upper duplicate shift to the left, so that the part of the lower duplicate becomes the size of the shadow. Next, we allocate both duplicate and on the panel Property Bar. Choose manipulation Back Minus Front.
The resulting shadow set the color slightly darker. The glare are made according to the same principle, only the color must be set lighter the main.

Remember! When creating shadows on the objects of a complex shape, the shape must repeat the form of the object. For example, on the head shadow in some places the shadow will pass as meridians on globes.
When the shadows and glare are arranged, there remains a small barcode - a falling shadow. To do this, draw oval tool Ellipse and with the tool Drop Shadow. Create a falling shadow. Configure shadow parameters on the panel Property Bar..

From the oval group + shadow we need only a shadow. To remove oval, open the palette Windows-\u003e DocKers-\u003e Object Manager, click right-click on the oval group + shadow and choose the item Break Drop Shadow. We remove oval, placing the shadow under the character.
Character Ready!

5. It remains to save the image in a raster format for a more convenient viewing. Select Menu item File-\u003e Export..., give the file name, specify the type of file, such as JPG. In the next dialog box, specify the RGB color scheme and click OK.
To secure the lesson materials to repeat the drawing stages
1. Scan pattern. Imports in CorelDRAW
2. Recruitment of contours
3. Filling color
4. Giving volume
5. Export to raster file type

Guided by these uncomplicated rules, you can create very quality work. Remember that Corel products are created not only for entertainment or disclosure of their creative potential, it is also a convenient professional tool with which you can earn. The character of this lesson was created in CorelDRAW for the competition, which announced one very large automaker. Our hero managed to go to the final. So stuff your hand and dare!
Good luck to all.
Did you draw a character on paper and now it needs to draw in the vector? Then this lesson is for you.
So, proceed.
1. First of all, you need to scan (take pictures) drawing. Then you need to import it in CorelDRAW. Select Menu item File -\u003e Import ... And specify the path to the scanned (sfotograph) file.
2. Place the imported file in the working area of \u200b\u200bthe document and right-click on the object, select item Lock Object. This action will block the object, which will make the work more convenient.
Now using tools Ellipse and Bezier, Combede the contour part of the body of our character.
If you recently use CorelDRAW or tool Bezier, and the contours are not completely even - nothing terrible. Use the tool Shapetool And right-point point per point. You can change the type of the reference point or by clicking on it with the right mouse button and selecting the desired type, or, highlighting the point and changing it type on the panel Property Bar..
3. Here is our hero already refined. In the circuits now we remove the scanned drawing so that it does not interfere with perception. Click on it right-click and select Unlock Object., then move the drawing to the side.
The next step is to fill with color. Choose part of the body and pour the desired color, clicking the left-click on the color pattern for changing the fill and the right mouse button to change the contour.
4. Now the character is colored, but it looks flat and uninteresting. To give volume, draw your own shadows and glare. Typically, the lighting is taken to the left-top, it means that the shadows will be right-bottomed, and the glare to the left-top. Shadows and glare are created by the tool already familiar to us. Bezier. Or you can use another admission. For example, to make a shadow on hand, twice duplicate the hand itself and the upper duplicate shift to the left, so that the part of the lower duplicate becomes the size of the shadow. Next, we allocate both duplicate and on the panel Property Bar. Choose manipulation Back Minus Front.
The resulting shadow set the color slightly darker. The glare are made according to the same principle, only the color must be set lighter the main.
Remember! When creating shadows on the objects of a complex shape, the shape must repeat the form of the object. For example, on the head shadow in some places the shadow will pass as meridians on globes.
When the shadows and glare are arranged, there remains a small barcode - a falling shadow. To do this, draw oval tool Ellipse and with the tool Drop Shadow. Create a falling shadow. Configure shadow parameters on the panel Property Bar..
From the oval group + shadow we need only a shadow. To remove oval, open the palette Windows-\u003e DocKers-\u003e Object Manager, click right-click on the oval group + shadow and choose the item Break Drop Shadow. We remove oval, placing the shadow under the character.
Character Ready!
5. It remains to save the image in a raster format for a more convenient viewing. Select Menu item File-\u003e Export..., give the file name, specify the type of file, such as JPG. In the next dialog box, specify the RGB color scheme and click OK.
To secure the lesson materials to repeat the drawing stages
1. Scan pattern. Imports in CorelDRAW
2. Recruitment of contours
3. Filling color
4. Giving volume
5. Export to raster file type
Guided by these uncomplicated rules, you can create very quality work. Remember that Corel products are created not only for entertainment or disclosure of their creative potential, it is also a convenient professional tool with which you can earn. The character of this lesson was created in CorelDRAW for the competition, which announced one very large automaker. Our hero managed to go to the final. So stuff your hand and dare!
Good luck to all.
website. Vector graphicswhich we study with you will help you create beautiful drawings, and then earn good money. Because in this way you can get a new profession - Web designer.
I told about it in the article "Circle of salvation for immersing. Part 2" . So engage with us and you are easy to learn how to work in the program CorelDraw..
Today we will start drawing the simplest vector drawings.
In the last lesson, we have learned to draw the main figures, paint them into different colors, rotate and copy.
We will learn in this simple lesson to create straight lines, broken, curves and move various objects from place to place.
To begin with, open the CorelDRAW program and create a new document. Before you will be just a white sheet. You can work in an old document, it was called with us if you remember, "Figure No. 1". In this case, simply press the plusion at the bottom of the page to add a new page. How to do it, I already talked in Lesson number 2.
We find in the left menu a small pencil (it is the fifth above) is a very useful tool called "free shape." The program always suggests the name of the tool when hovering the cursor.
Click on a small triangle at the bottom, after which a whole line of new tools opens.
You can bring the cursor for each of them and read the name. The first is a free form, we will return to her today. And now we are interested in the fifth in a row, which is called a "broken line". It resembles a flat brush.

Click on it, we translate the cursor onto the white sheet and see that the cursor turned into a cross, under which there is a small broken line.
Press the left mouse once and lead to the right so that the straight line appears, after which you press the left mouse again, only now twice. Our first drawing is ready.
What will happen if you press not twice a second time, but only one? Then our line will not interrupt, but will go further in the direction where you yourself want. For example, so.

At the end, do not forget to press twice to interrupt the line.
Suppose we want to paint these lines into different colors and change the thickness. What should I do for this?
The top menu has a window with a thin line. If you bring to the mouse, the window pops up, in which you can read that this is the thickness of the abis.

We open this window by pressing the arrow, and choose any thickness. For example, the most recent.
The order is: first we allocate the line, and then begin to change something. As you can see, our lines have become much thicker.
If you first not highlight the line, it cannot be painted. In the same way, we always do with any pattern or detail on it. First we highlight, and only then start working with it.
Now paint them in red and blue colors. We highlight the desired line, for this simply click on it, and then you will bring the cursor on the color on the palette and click the right mouse button. If you click the left mouse, nothing will change. You must do so.

Straight and broken lines we have learned to draw. And what if we need to draw something consisting of curves, that is, objects of any form?
For this, the "Free Form" tool is suitable.
You can click on it directly in the left menu, after which the cursor will turn into a cross, under which the curve will appear.
What can be drawn? For example, leaf. The most ordinary leaf, although then you can draw oak, and maple leaves, any.
Color it in green. Pay attention to how many shades of green offers the color palette. For each of your drawing, you will need to select a certain shade.
When you draw the "Free Form" tool, you must make sure that the first point of your drawing and the most latter coincide. If they do not match, it will not be completely able to paint the drawing, because you will not have a drawing, from the point of view of the program, but a simple line.

See, what is the difference between the first and second drawing?
What to do if the points did not coincide and turned out to break the line?
We carry the cursor to one of the small squares at one end, press once with the left mouse and stretch to the second small square on the other end of the line, press again once. The curve is closed, and now we can paint in any color.
Thus, we will end any complex drawings when we use the free form.
Now let's try to draw with the tool "Free Form" flower.
Draw as you have to stop on the details. You can get a chamomile or bell, sunflower, whatever.
I will do this: Drawn forget-me-not.

Just repeat the shape of the petals, just definitely connect the first and last points. Then color in the lilac color, choose the contour to your taste.
What we miss? Of course, the middle. To do this, in the left menu we find the ellipse and draw a small circle. If you need a circle, press the Ctrl key with your left hand, and right. Strace this circle into a pale yellow color.
You can draw directly on the flower or draw aside, and then move.
How do we move objects in the CorelDRAW program?
We highlight our circle, bring the cursor on it, after which the cursor turns into a cross with the arrows, and drag and drag where we need. In our case, - for a middleware of forget-me-not.

The "Free Form" tool is drawing the skeleton and two petals. For the stalk choose the desired thickness and stain in the green color.
We draw petals, and then neatly substitute them on the stalk.
Bouquet in a vase. Figure in CorelDRAW.
Merzlyakov Andrei Valerievich, teacher MBOU DOD "Children's Art School", city of Solikamsk.Description: This master class is designed for children from 10 years, teachers of additional education, teachers of visual art, computer science, computer graphics and all who do and are interested in computer graphics and graphic design. The master class is designed for 1 lesson. The result of the classes is a drawing of a bouquet of flowers in a vase that can be used as an ornament or a gift on March 8.
Purpose: Create a drawing in the CorelDRAW program.
Tasks:
- introduce modern technologies in the educational process;
- master the skills of work in the CorelDRAW program;
- bring up artistic taste, spatial and combinatorial thinking (working with color, create a composition, plan a sequence of actions).
Equipment: Computer with CorelDRAW installed.
Progress:
1. Open the CorelDRAW program. Create a new document ( File - Create), on the toolbar, in the upper left corner we specify the necessary dimensions and location of the sheet.2. In the toolbar, take the tool "Rectangle" And draw 2 rectangles.
Fill with help gradient fill. Remove contours.


3. Create a vertical guide in the center of the sheet, it will help to monitor the symmetry of the composition and the location of the figures in each other ( the rules are located on the left and above, you need to bring the mouse and pressing the left key, pull).

4. Using tools "polygon" draw a hexagon ( so that the polygon is correct, it is necessary to hold the Ctrl key)

5. Using tool "Distortion", I pull from the center to the left, forming petals. Copy the resulting flower 4 times, having copies in approximate places of further colors. We shift the middle of the first colors about the help of the same tool. "distortion".


6. Select flower and tool "Fill", "gradent fill", "radial" Fill the resulting flower. It is worth noting that the "center" of the radial fill is shifted depending on where the flower center is shifted in the previous step. It is worth using Warm Tone Flower Filling.

7. Using tools "ellipse" Draw the middle of the colors. Distorting the sediments depending on the displacement of the flower center. Tool "Fill" Fill the middle of the colors, grouping in pairs every flower with its middle and remove the abis.


8. Using tools "ellipse" Draw a bottom of the future vase. In the dialog box "Gradient Fill" We switch the color transition from the "two-color" to "setting". Create another point closer to the left side, pour it white, well, and the extreme points are poured with peach color.

9. Copy the resulting ellipse and have 3 copies above 3; We reduce the second top and increase the third copy of the copy with the "SHIFT" button to not disturb the proportion. Copy the upper ellipse, we move it to the side and "fill" horizontally, so that the glare was on the right.

10. Using tools "Flow" We connect all the ellipses of the vase. Ellipsed with another glare put on top of the top ellipse to create a vase depth. To create the thickness of the vase walls, with the "SHIFT" button, we reduce the very slightly ellipse.

11. Using tool "free form" Draw the stalks from each flower to the neck of the vase. Next, with the tool "the form" Correct the stalks and drive the edge to the edge of the vase. We highlight all the stalks. Color Abris Customize Green, Well, using the tool "Abris" We increase the thickness to two. We remove the stalks for flowers using the right mouse button, "on the back layer."

12. Draw leaves.
Using tools "free form" Draw leaves. Also edit them using the tool "the form"Flip "Gradient Fill" From light to dark green. It is worth noting that the angle should be set up so that the light falls on the left, as on the vase. We group the resulting vase with flowers, their stalks and leaves.

13. Using tools "Interactive Shadow" Create a shadow on the lower plane from the vase with flowers, so that it does not go beyond the boundaries of the bottom plane.
Good day, dear site visitors. The subject of this article is a quick and simple manual translation into the vector of complex drawings, ornaments, drawings in CorelDRAW X8. Before we proceed to the study of tools and technologies, I would like to say that the ability to quickly and efficiently build complex vectors is the main skill for a person creating control programs for CNC machines in woodworking. All programs for complex curvilinear milling, samples, etc. are built on the basis of vectors.
So, what tools will we consider in this lesson? Let's start with a very simple and at the same time an indispensable tool "Curve in three points" see Fig. 2.
Fig. 2.
Using this tool, you are simple, without unnecessary manipulations with the "Bezier Curve", you can build curvilinear vector of any complexity.
We will learn to work with this tool in practice. Download Figure 3 to your computer and drag it on the CorelDraw X8 working field. 
Fig. 3.

Fig. four
Next, take the "Curve Three Point" tool and start translating the drawing with arcs (curves). Try the first and last point of arc to put on the minimum or maximum point of the pattern circuit. Curvatina arcs. Set the mouse movement from the center of the segment (not releasing the left mouse button after the second point of the curve). Also, if you are mistaken with a location of a curve point or with an arc number to a translated pattern, you can always press the F10 hot key and add the missing point (double mouse click on the curve segment). Also, via the shoulders and the support points of the node can be the "Form" tool (F10) to correct the curvature of the curve segment. See video 1
Video 1.
As can be seen on the video, the "curve of three points" tool is quite easy to learn. Also note: the video is noticeable to the video of the use of this tool - a small fracture at the junction of different curves. This fracture can be removed by removing the node. Sometimes the removal of the node can lead to the distortion of the initial form of the curve. In this case, I recommend adding a tool shape (double click left-click) on the sides of the problem node. Additional nodes are further distinguished. Thus, you get rid of the unwanted fracture of the curve. See fig. 5-7

Fig. five
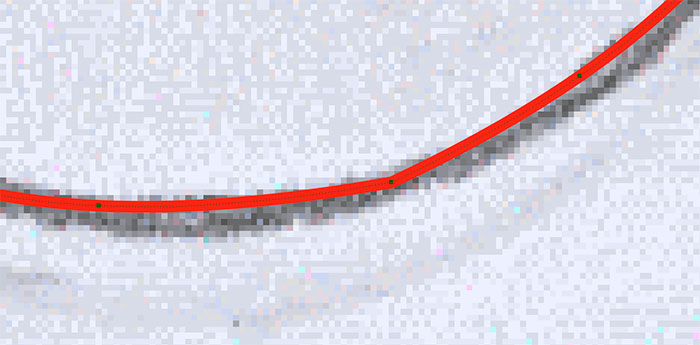
Fig. 6.

Fig.7.
Note . The "Curve Around three points" tool also works in combination with the hot keys, see Fig. 0.

Fig.
The "curve of three points" tool for building complex curvilinear vectors will be more than enough. But still I recommend also to draw your attention to the B-spline tool. This tool is very convenient and rational in building splines having a smooth form. See video 2
Video 2.
As you can watch from the video, the construction of B-spline in some cases is superior to the "Curve Three Point" tool. Please note that the "Form" tool when working with the B-spline allows you to set two control points mode: "free control point" and "attach control point". Using these control point modes, you can create both a smooth B-spline and a sharp angle (direct segment). See fig. 8-9

Fig.8.

Fig.8.
You can add and delete control points when working with the B-spline can be double-clicking the "Form" tool. You can also convert a B-spline to a regular spline and continue to edit it curvature already familiar Bezier curves (right mouse button on the B-spline, in the selection menu that appears "convert to the curve").
Consider another tool required to us in the construction (translating from the raster) of complex vectors. The fact is that in most cases to create vectors for control programs, drawings for CNC machines, we can not do without building smooth segments both vertically and horizontally, or segments at a certain angle. Also, we often have to build smooth arcs. So, the main tool that we will use to solve the above tasks are the "broken line" tool. There is nothing complicated in the application of this tool, but you need to know that this tool is used in combination with hot keys. Consider hot tool keys. The "broken line" + Ctrl is the construction of a broken line with increment (reference), equal to 15 degrees (it is convenient to build exactly vertical and horizontal lines. "Loan line" + Alt - activates the arc construct mode without leaving the tool "Loaveline "See video 3
Video 3.
Note.
When using the "Loaveline" tool for more accurate and convenient construction, you need to enable dynamic and step-by-step tools. .
Note 2.
. I would also like to add that you can always automatically remove the chamfer, rounded and make a recess using a vertex formed by two broken lines (diameter, chamfering lengths will accurately match the parameters you specify). To do this, you need to use the attached window "Round, Recess, Face". Fig. 10-12
So, we reviewed the basic tools that will help you in the raster image of the raster picture in the vector image (drawing) for the subsequent creation according to the vectors of the control program for milling machines with CNC. I hope the lesson you were useful and you learned something new.