Learning to draw a person with a pencil: step-by-step instructions. First steps in drawing: Learn the child with creativity Interesting drawing classes for children
Read also
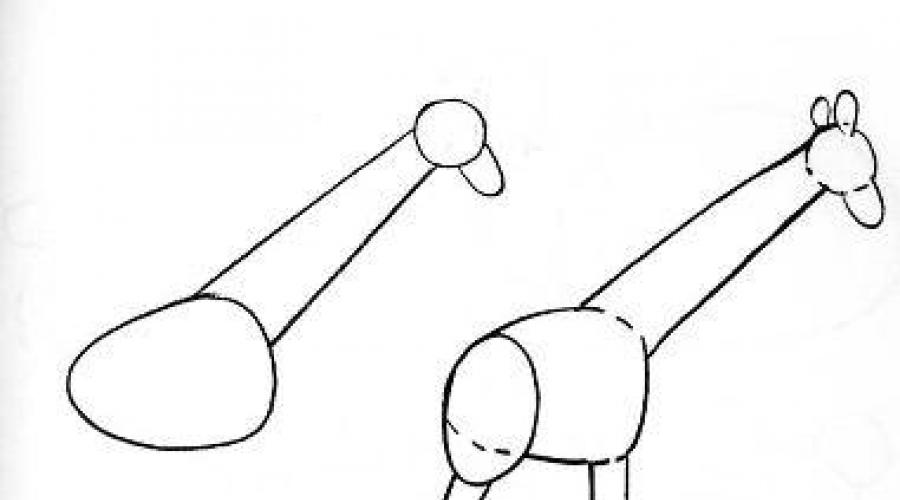
Drawing is the favorite case of many kids! Some children can not get up for hours from the table, drawing their masterpieces. But very often they come to us, parents, with a request to draw something. For example, a cat or a dog, or even worse - a cow, a giraffe ... And here we begin to include all your knowledge and skills, remember how we were taught in school, I try, try and depict another something, a little similar to the animal ... But to understand who It is: a cat, a dog or hippopotam, is almost impossible ...
We suggest you do not lose heart, and use the schemes selected by us, learn to draw with us. With these detailed schemes - lessons you can easily and just draw a wonderful cat, rabbit, pig, kitten, dog and other animals in a few seconds. We think your baby will be very happy with such drawings. And imagine with what pleasure it will paint these images. Obviously with great than the usual printed coloring.
Believe me, it's worth you to draw an animal for this scheme several times, you will remember it and then you will do it in memory. You can draw a child of animals not only at home, looking at the scheme, but also, for example, on the street on asphalt.
Learn to draw animals. We wish you a pleasant creativity!


Master class "Drawing for the smallest".
Shatokhina Rita Vyacheslavovna, teacher of additional education MBU to the "House of Children's Art of Kalininska of the Saratov region".
This master class is intended for educators of additional education, supporters of the Dow. The master class will also be interesting to small artists from 4 years old and their parents.
Purpose: This master class is a small drawing course for the smallest, which shows the methods of drawing by geometric shapes.
Purpose: Creating conditions for obtaining drawing skills.
Tasks: teach a child how to draw familiar images using geometric shapes;
Skill to accurately work with paints and tassel;
Develop creative fantasy and fine motility hands.
The guys come to the classroom in my union, but they really want to draw. From the experience of working with children, I realized that it was easier for them to draw geometric shapes. They draw children in my show, stepdown. Starting the occupation, I never tell the children that we will draw today. According to the experience, I know that they are so interesting. In the process, they guess who they draw, and it delivers much joy. And the drawings are obtained from all different.
Master class on drawing for children "Snail"
Prepare: album sheet A4, watercolor paints, brushes of different sizes, jar for water and napkin.

Before starting to draw, I tell the children that the paints are sleeping and they must be wake up, carefully stroking them with a tassel, I will wake yellow paint and start drawing.
Draw in the center of the leaf of a bun, gradually spoiling a brush, and then draw a brown paint arc.

Turn the arc into the loop.

Draw horns and paint.

Decorating a snail house.

Draw your eyes, snail's mouth. Next, the children themselves come up with and decorate the background of the picture: where is the snail?

Children's work:


Master class on drawing for children "Turtle".
We draw in the center of the sheet of yellow paint "Kolobok", brown paint draw 4 hinges.

The fifth loop is drawn more in size, all the loops are painted.

Draw your eyes-circles, from the beginning of white paint, then black.

Decorate the shell shell. A child can come up with his pattern.

Master class on drawing for children "Fish"
Draw a yellow paint "Kolobok", draw arcs: from above and below, it turned out like an eye.

Draw a triangle tail-triangle fish. Then decorate the fish using red paint. Draw applying brush: Rotik, fins.

We draw scales, decorate the tail.

"We print" with a brush: we draw pebbles and water, carrying the lines of green waterproof.

Draw a black paint eyefish. Black paint loves to foolish, so we are especially accurate with it.

"Winter Polyanka".
Take a sheet of blue, A4 format. Draw spools white paint. We carry out lines, draw the drifts.

Brown paint drawing trunk and twig trees, hands, eyes, mouth and brooms of a snowman.

Decorating the drawing with snowflakes. Decorating the snowman: draw a bucket on the head and scarf. Children complement the drawing, decorate.

By the same principle, you can draw the autumn forest, only the originally bunks will be yellow, orange and green, and leaf fall, draw applying tassel, printing. Works of children:


Master class on drawing for children "Hedgehog."
We draw a "bun" brown paint.

Draw a spout triangle.

Baby work.
Paint the hedgehog clearing, children fantasize.


Baby boy work:

Master class on drawing for children "Frog".
Take a sheet of blue, A4 format. Draw in the center of "Kolobok" green paint.

We draw another "bang", and from above two "bridge".

Draw a frog of the paws, we draw the attention of children that the legs of the frog differ in their structure, which helps the frog to jump well and hold even on the most skiing surface.

Draw a frog mouth, eyes. Decorating the picture, after having talked with children: Where does a frog live?

Master class on drawing for children "Cockerel".
Draw a big bang-torso, a smaller bun. We connect them with smooth lines, the neck is obtained.

Draw a foot-triangles and tail, arc lines.

Red paint draw a rooting crest (bridges), beak and beard, apply a brush.

Draw a foot root.
The question "How to teach children to draw a person?" Many adults puts in a dead end: not everyone can realistically convey the proportions and portrait similarity, and even more so, explain the stages of drawing a person's figure to a child. We will show simple schemes and give recommendations how to draw a person in stages - even a child's child will cope.
shkolabuduschego.ru.
Most adults, not engaged in professionally artistic activities, stopped in their development at the stage of "chasing". But this is not a reason to give "From the gate" to the baby with a pencil, who wants to know this world and learn everything.
Drawing, the child fantasies, develops his abilities, trains the visual memory. Of course, draw a person much more difficult than a tree or hedgehog, but even the most difficult thing can be divided into simple stages so that it does not seem so terrible and impracticable. Learning together!
How to teach a child for 3-4 years to draw a person

pustunchik.ua.
For 3-4 years old, you can explain the principle of drawing a person's figure on the example of a simple scheme: head, torso, hands and legs, be sure to neck, brushes and feet.

Let boys and girls be drawn to draw in this way. It is important, first of all, not so much similarity, how much testing of the sense of proportions, the presence of all the "components".
 razvitie-Vospitanie.ru.
Then you can try to draw men in motion. To visually show the child, how our hands and feet bend when walking, jumps, turns, etc., demonstrate all these movements in front of the mirror.
It is convenient to make a wire frame and bend it in different directions.
 www.kukolnihdelmaster.ru.
Let this wire model be your benefit when teaching a child to draw a person in motion.
 pinimg.com.
It is useful to make quick schematic drawings. Specified the wire model the desired pose - immediately painted it. Later you explain to the child how to "wear" the little men. Now it is more important to understand how the position of the arms and legs changes with a different movement.
 fB.ru.
So that small artists distract anything from the main thing - the transfer of movement in the picture - suggest drawing a moving person with the help of a silhouette. To make it easier, make a cardboard model with movable elements.
 iNFOUROK.RU.
Another advice for those who want to teach a child well to draw a person: Look! Yes, yes, in the amount of child it is easier to perceive the proportions, it will understand the faster, as correct. If he learn to a good and quickly sculpt a person, to draw it to him will not be labor - verified.
How to teach a child 5-6 years old to draw a person: proportions
Teach a child to see invisible. Before drawing a dressed figure, you need to scale the frame, to understand the position of the hands and legs, the direction and rotation of the body relative to the head, etc. Use the schemes, unnecessary lines from the picture can always be removed by the eraser.
 iNFOUROK.RU.
When a child learns to think precisely by schemes, he does not have difficulty drawing a figure of a person.
Preschoolers 5-6 years can be safely explained than the figure of an adult differs from the figure of the child. The module that we "measure" the figure is a head. From how many times the head is "placed" in the scheme of building a person's figure, much depends.
 artresspt.com.
Show a photo where the child stands next to the adult. Suggest measuring (ruler, strip paper or other), how many times the child is "placed" in his figure entirely. Do the same with an adult figure. The child will conclude that children have more (relative to the proportions of the whole body).
 soveetunion.ru.
The adult head "placed" is 7- 8 times (ideally). If we take into account this when drawing a person, the figure will come out proportional, similar.
 profymama.com.
It is enough to draw a simple scheme several times to draw thick and thin people, men, women and children.

Male and female figures are different. In the diagram, these differences easily show geometric shapes. Men have wide shoulders, women have a hip.

Very soon your child will comprehend the aza drawing a person and can depict the whole family!
How to draw a person in stages: video
Dear readers! Tell us in the comments about the funny drawings of your children. Do you know how you yourself draw a person realistic? Did our schemes and advice help you to learn how to draw people?
The first attempts to draw appeared in early childhood when the child takes a pencil into the hands. He still does not understand that this is a drawing, but the process itself is interesting. As you grow and awareness of the surrounding world, there is a need for more detailed environmental mapping. One of the key figures are people. To help the child to transfer the desired image on the paper, even parents who do not have art talents can simply studying such a technique as a phased drawing for children of 7-9 years. It is not worth neglecting such creative classes with your chance, because through the picture the child shows his feelings, emotions, attitude towards others.
As already mentioned above, one of the ways of the image of a person is phased drawing. For children of 7-9 years old, it is most accessible and easy enough to understand. At this age, the need for not only a schematic image, but also to achieving similarity with the original. You can help the child, explaining the basic rules and clearly demonstrating the image process.

Basic rules for drawing a person
It is best to start drawing with a pencil. For children, this method is most appropriate, since it is possible to correct the error, erase the lastic lines.
Before proceeding to work, it is necessary to explain the difference between an adult man and a child. One of the mains is the growth and proportions.

Simple rules:
- The measurement criterion is the head. From its own observations, the child at this age is already known that adults are higher, but at the same time proportions are not violated. This is due to the ratio of the head to the body. In children, the head in relation to the body will be greater, respectively, in adults less.
- The length of the hands should not be larger than the length of the legs.
- The elbow is at the level of the belt, and the hand can not be lower than the knee.
- Palm less feet.
- In men, the wider shoulders, in women - the hips.
Stages of drawing a person figure
The phased drawing of a person begins with the definition of the size and location on the sheet. Noting the upper point (head of the head) and the bottom (feet) to carry out auxiliary line by connecting them. Now it should be noted if it is a child, it should not be less than the fifth of the whole line, if an adult should not exceed the sixth. The head is depicted in the form of an oval. The remaining part of the auxiliary vertical line with small dishes is divided into parts equal to the size of the head.
Deciding with your head, we draw with the children in stages other parts of the body.

Features of drawing kid
Between the neck and the belt conditionally fit 1 - 1.5 sizes of the head (it is approximately the middle of the auxiliary line). At the same level, elbows will be located. We celebrate.
The knees will be located at the level of the second hole below (the first is the end point).
The width of the shoulders at the child almost does not exceed the width of the head. A slightly retreating from it, hold the line of the shoulder (length not more than 1.5 from the size of the head).
Conduct lines from shoulders to the line of the belt and the same size below - it will be hands.
Recovering the belt, conditionally halflons, carry out the pelvis line.
From the pelvis line and the lines of the legs are carried out.
"Frame" kid ready.
Now, knowing where various parts of the body should be located, you can proceed to the drawing. At the same time, it is necessary to take into account the muscles of the hands and legs, the chest, and when drawing the pants - the distance between the pelvis line and the end of the body. To make it easier to determine the width of the chest, you can draw oval from the head to the pelvis line, slightly taped to the bottom.
Approve the volume of the frame, draw clothes. It may be tight or spacious, it no longer matters.
When working, it is important to take into account the phased drawing. For children of 7 -9 years, an understanding of the need for alternate image is quite available.
Draw adults
Drawing an adult is carried out by the same principle.
After separating the central line to parts equal to the size of the head (7-8 parts should be obtained, depending on the growth of the person's image), the belt line marks. It is, conditionally, on the third mark from the head (or the fourth from the top point, the crown). Like the baby, the elbows will be on the same line.
Location of the knees at the level of the 6th screenshots (if the person is high) or between the 5th and 6th (with average height).
Thus, in an adult, in contrast to the baby, part of the body from the belt to the feet is longer.
The width of the shoulder on average accommodates two heads. In men, they will be a little wider, in women - already.
The designation of hands and legs passes through the same scheme as in the baby. Apparently and draws clothes.
Phased pencil drawing as the basis of the future composition
Schematic phased drew by a simple pencil makes it possible to portray the child most believable. Using the initial framework (schematic image in the form of lines and cigro), the figure can be given any position. Thus, in the figure, a person can move, sit, etc. This will help build the right composition and get a full drawing.

Phased drawing for children of 7-9 years is it possible to properly form a child's idea of \u200b\u200bthe structure of a person's figure. At this age, children are capable not only to master this technique, but further improve their skill.
Drawing for children is 4 years old - a favorite occupation, where there is an opportunity to express. Therefore, it is important to use the kids as often as possible to this exciting case.
What do children paint?
Most often, drawing for children is 4 years old due to the fact that they are surrounded that they are well known, familiar and interests. In addition, the skills and capabilities of the children should be taken into account. After all, in case of failure, many kids are deeply worried about their imperfection, the inability to do something well. Therefore, drawing for children 4 years is best emphasized on what is around: nature, pets or beloved toys. There are many images on the picture of the selected plot.
Drawing for preschoolers by template
The easiest way is the image of selected objects using templates. Speaking in other things, it is practically coloring, only the outlines of the object are not given a child ready, as in the so-called coloring, and they are applied independently when using drawing using templates, it implies self-applying patterns of the pattern inside the contour itself, for example, an image of an animal muzzle, shell Turtles, human face, etc.
Drawing a bear using geometric shapes
The guys receive the first drawing lessons. Children 4 years old can be offered to portray a beloved teddy bear using circles and ovals. And you should not focus on the fact that the drawing will be built using geometry. But during the work, you can call the details by their scientific names.

- Bear's head can be depicted using a circle.
- The second round may be slightly larger - it will be a torso. Both figures should come into contact in the place where the head is connected to the body.
- Two small circles, located in the top of the head, are the ears, they also come into contact with the circle of the head.
- All four legs are better to draw oval. They are attached to the body, so they are drawn in such a way that the ovals come into contact with the lower circle.
- Now there are eyes and spout on the muzzle, arcs are underway from the spout - it is a mouth.
- Color painted in brown, leaving white oval near the nose with mouth, circles on the ears and a big talker on the tummy.
Game-occupation "Dorisuy Picture!"
An interesting technique in teaching visual creativity is to give the dressing made by adults. For such a classes, you need to prepare pictures for drawing children in advance, transferring the picture through the glass. It is necessary to draw the lines of the outline of the object, but not completely, making them in some places intermittent.

Fairy Tale of the Bug Francoise
You can make such an occupation more interesting and even fabulous, told the kids in an amazing story.
"The boy Fedi lived-had a drawn turtle named Francoise. They were very firmly friends, together went to walk in the park, together watched cartoons, together in summer bathed in the river. But somehow, Fedor forgot to remove the drawn turtle on the album. A playful silly kitten was played, loosened with an eraser and the stirre almost the image from the picture. The next morning the boy was bitterly: from Francoise on a leaf, only a pale contour was left, and even then in some places and it was a stuff. Guys, let's help the boy and give his expensive turtle, paint it with paints and return the fate of a beloved friend! "

It is important along with sketches to give and sample pictures for drawing to children so that they can compare their drawings with the original.
Master class "Drawing a turtle"
It is appropriate after a fairy tale about Francoazuz and Fedya to offer the kids to portray a new girlfriend a boy. Such drawing children 4-5 years perceive as a fun and exciting game. To portray the turtle, the guys will not be much difficult if they are offered a master class. The drawing can also be built on geometric shapes.

- First, the oval is depicted.
- The lower part of the oval is cut off by a straight line, more superfluous erased by an eraser. It will be the body of the turtle in the shell.
- Just above the bottom segment of the shell should draw the head of the turtle. Its form can be round, oval or uneven, but it is, like a shell, is limited to a straight line.
- At the edges of the lower part of the shell, you need to depict the paw with short sections of the straight lines, which below is slightly wider than top. They can be made not even, but with several fingers.
- Behind the reptile, it is necessary to draw a short tail.
- Be sure to apply to the muzzle of eyes and mouth, otherwise Francoise will die from hunger and will not be able to see his best friend Fedya!
- An animal armor has a drawing, so you need to ask children to apply the ornament in the picture.
- For coloring, the shades of green and brown will fit.
From simple - to complex

After absorption of the simplest drawing skills, it is appropriate to move in this direction further. Take, for example, an object for the image of the cat Maruska, which lives in the neighboring yard and often gets very good in the sun side with the playground at a time when children are on a walk. The kids probably have long considered it well. And so that problems with drawing were less, you can offer young artists master class, where detailed step-by-step instructions are given. Although great benefits will bring joint drawing. For children, 4 years old is very important from the side to observe how adults themselves do what they ask to make kids.