Photoshop how to make a photo with a simple drawing. How to make a realistic painting effect in Photoshop
Many would like to learn how to make a real drawing from photography. Indeed, this is how, sometimes, combinations look beneficial beautiful photos and pencil drawings. This business has its own charm.
But, the catch is that making a good, real, high-quality drawing from a photograph is not so easy. Most of the existing plugins and programs do not make a pencil drawing, but some kind of semblance. Yes, it seems, but the real drawing is far away.
Consider two approaches to solving this issue:
Let's start to master the first option.
Enough caught my eye interesting video lesson taken by Alexey Kuzmichev. Indeed, the result is a good pencil drawing from a photograph.
How to convert a photo into a pencil drawing
Well, we met. I hope you enjoyed the result. To me personally, yes. But, there is a small catch. Remembering this whole thing is not so easy. So I decided to make a small cheat sheet, in which all the steps are painted necessary actions.
Making a pencil drawing from a photo step by step instructions
Here is the image I got with this approach. There is a certain similarity with a pencil drawing, but, you know, you still need to work on the final result. Hover your mouse to see the starting photo.
1. Make two copies of the selected photo - Ctrl + J... Turn off the visibility of the first top copy.
2. Go to the second copy and click Ctrl + I- invert the layer. Convert the layer to smart object... Making the blend mode - lightening the base... Go to Filters - Gaussian Blur - make the blur radius 15 px.
- - add an adjustment layer to this layer Saturation- lower the saturation to –100 (desaturate the image);
- - second adjustment layer - Levels, in the left window, set the value to 95 (add contrast for the photo);
- - group all three layers (select the layers with Shift held down and press Ctrl + G), name this group The foundation;
3. Go to the top layer, turn on its visibility.
- - convert it to smart object, select black on the color palette, the background color should be white;
- - choose a filter Filter Gallery - Sketch - Photocopy- detail 3, blackout - 20;
- filter Filter Gallery - Strokes - Slanted Strokes- Direction balance - 78, stroke length - 50, sharpness - 10; Change the Blending Mode to Darken; Name the layer Circuit;
- - duplicate this layer Ctrl + J, change the blending mode to Darkening the base, reduce the opacity of the layer to 80%, name the layer in Contour - copy;
4. Create a copy of the Contour copy layer Ctrl + J;
- - filter Filter Gallery - Imitation - Fresco- size 10, detail - 10, texture - 1;
- - filter Filter Gallery - Sketch - Postage Paper- Tone ballast - 50, grain size - 5, relief - 25;
- - we change the transparency by 60%;
5. Copy the main, bottom layer with the photo Ctrl + J, move the copy to the very top;
- - filter Filter Gallery - Texture - Texturizer- Texture - brick, scale - 100%, relief - 15, light - on the right, a tick opposite Invert;
- - filter Filter Gallery - Exiz - Halftone Pattern- size - 4, contrast - 4, pattern type - line;
- - filter Blur - Motion Blur- angle 45, offset 40 px;
- - Blending mode for this layer - Hard light;
- - we call the layer Halftone;
6. Duplicate this layer Ctrl + J;
- - filter - Grain, intensity - 45, contrast - 45, grain type - splashes;
- - change the transparency of the layer - 85%;
- - we call the layer Corn;
7. Duplicate the Outline layer Ctrl + J and place the copy at the very top;
- - filter Filter Gallery - Imitation - Fresco- size -10, detail - 10, texture - 1;
- - Layer Blend Mode - Darkening the base, transparency - 60%;
8. Duplicate the Halftone layer, place the copy at the very top;
- - filter Filter Gallery - Texture - Grain- grain, intensity - 45, contrast - 65, grain type - splashes;
- - filter Filter Gallery - Sketch - Coal- intensity - 6, detail - 5, tone balance - 88;
- - filter Filter Gallery - Sketch - Halftone Pattern- size - 1, contrast - 0, pattern type - line;
- - filter Blur - Motion Blur- angle 45, offset 100 px;
- - layer blend mode - Usual, layer transparency - 70% ;
8. Duplicate the main photo Ctrl + J, place the copy at the very top, convert to smart object;
- -filter Filter Gallery - Sketch - Photocopy- detail -3 (sometimes it is better to put 2 for a more graceful line), shading - 20;
- - blend mode for layer Multiplication, transparency - 50% ;
9. Add a paper texture to the drawing:
- - download the image with the paper texture to your computer, here;
- - drag the image with the paper texture onto our image, it should be on top;
- - stretch to fit the entire photo across Transformation;
- - change the blending mode to Multiplication;
- - change the transparency to 60% ;
For myself, I made a file in Word and printed it out, on one sheet on both sides the whole thing easily fit. With this approach, mastering this technique is much easier and more convenient.
Here's another picture that I got. Hover the mouse over and see the original. Here, however, I had to work a little with masks for additional blurring of the background:
For those who want to apply this approach in their work on a regular basis, I recommend making an Action for Photoshop in which you can record all the necessary actions, as a result, the process of turning any photo into a pencil drawing will take a couple of minutes.
This is one way. The result, in principle, is not bad, it may be suitable for certain tasks, but, alas, it is far from the real drawing. To fully master the technique of translating a photo into a pencil drawing, I suggest another method in which there are no filters and the final result will depend only on your artistic taste.
Pencil drawing from a photo without filters
This option is more like drawing and you will have to rely on your inner sense of proportion and harmony. From the same picture, you can get completely different results... But, as they say, the more interesting.
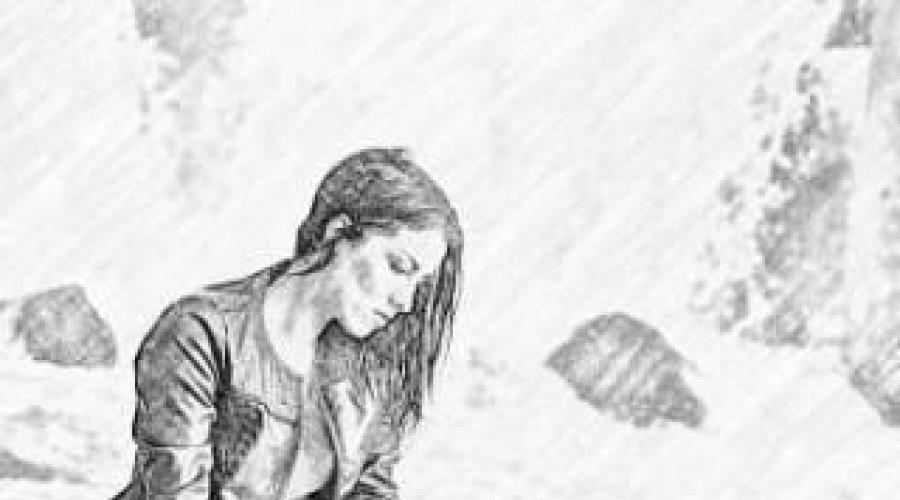
It is important to choose a good, high-contrast photo. The more expressive the eyes and facial features are, the more likely you are to get a high-quality drawing at the output.
I chose a photo of a girl with a snow hat. The contrast is good, the eyes are expressive. In my opinion, translation into pencil can give a photo lightness, airiness, great consonance. inner peace child. Which, in the end, happened. On mouse hover, you can see the difference between the original and the final result:
Now let's look at what needs to be done for this.
- Take our photo and make two copies with a keyboard shortcut Ctrl + J, on the palette of colors Main color- white, background - black;
- The top layer is called Crib, keys Ctrl + Shift + U we decolorize it, Layer transparency install on 40% ;
- The second layer is called Drawing, Ctrl + Shift + U we decolorize it, Layer - Layer Mask - Hide All- make a layer mask;
- Create a new layer above the Main Image, fill it with white;
- Highlight Layer mask on layer Drawing, we will draw on it;
Here's what we should get at this stage:
How to create the desired layers for a pencil drawing from a photograph
First brush - Pencil line
To select the most expressive elements of the image, we need a Brush that looks like a pencil trail.
- Choosing a tool Brush- key B, turn on Brush control panel F5;
- Choose a regular, hard-edged round brush and set the size to 2-6 pixels. I put 4 px;
- We put a tick in the paragraph Form dynamics (Shape dynamics) – Fluctuation in size (Size Jitter) put on 60% ;
- Diffusion (Scattering) – Diffusion put 43% ;
- Broadcast (Other Dynamics) – Fluctuating Opacity (Opacity jitter) put on 10% ;
- Upper right corner of the Brush Control Panel - select New set of brush options- Save our new brush under the name Pencil line;
You can start with the initial sketch. The task at this stage is to carefully select the necessary parts of the drawing for greater expressiveness. Start, preferably as carefully as possible, set the transparency from 10 to 30%. Here it is better not to finish drawing a little, then, towards the end, you can make the necessary selections again.
Don't be afraid to make a mistake. Remember, we are working on the Mask, and in this mode the white brush only develops the image of the lower layer.
This is what I got at this stage with the layer turned off. Crib... I deliberately did not finish drawing all the details, it is better, in my opinion, later, on final stage add the necessary finishing touches:
Initial sketch of a pencil drawing
Second Brush Pencil Hatch
Now it's time to move on to shading. For this you need a special brush.
- Turn off the visibility of the Picture and Cheat Sheet layers;
- We do main color Black Transparency put on 100% ;
- Pencil line brush, make the thickness 2px and draw a line with the key pressed down on the white layer Shift, the length of the line is approximately 80px;
- Magic Wand (W) select this line;
- Editing - Define Brush- save this new brush under the name Temporary, remove the line from the white layer;
- We include F5 Brush Control Panel and we carry out desired settings for a new brush;
- Form dynamics (Shape dynamics) – Fluctuation in size (Size Jitter)60%, Angle Fluctuation ( Angle jitter) – 3% ;
- Diffusion (Scattering) – Diffusion — 43% ;
- Broadcast (Other Dynamics) – Fluctuating Opacity (Opacity jitter) — 10%, Fluctuation of the amount of paint ( Flow jitter) – 80% ;
- Brushprint shape (Brush Tip Shape) – Intervals (Spacing) - 70%, Angle ( Angle) set the value (-20 degrees);
- Save a new brush with the name Pencil shading;
Adjusting the transparency of the brush Pencil shading by 5-10% and we begin to carefully hatch our drawing. You can turn off the Cheat Sheet layer so that you can immediately see what appears on the white sheet.
Gradually changing the brush size, opacity and angle of the brush can achieve a very good result. Do not be lazy, change all these values more often, thereby you bring your creation closer to a real pencil drawing.
If necessary, the necessary areas can be additionally processed with the Pencil-line brush.
And do not forget the simple truth, it is better not to finish a little than to overdo it. Gradually, with mastering the technique, a stable understanding of when to stop will be formed.
This is the technique. There is nothing difficult, you just need a desire and a little time to master. And the results can be quite interesting.
Good luck to everyone and unusual creative solutions.
What if you don't know how to draw either with a pencil or with a computer mouse, but you want to create a digital drawing? Today, many people are interested in the question of how to take a photo as drawn. The answer to it is quite simple: all that is needed for this is to carefully study the material provided in this article and apply the knowledge gained in practice.
Let's talk about art
IN old days Capturing the moment required an artistic talent and a long learning curve, but nowadays there is such a thing as photography, so it is not necessary to be able to draw. Thanks to modern technology we can instantly create our little works of art. Well, the presence of all kinds of graphic editors opens up a wide range of possibilities for creativity by drawing and processing photos and applying a variety of effects.
How can you draw a photo?
There are several different ways how to turn a photo into a real drawing. The easiest one is to convert photos directly in your browser online. It is clear that all the settings available there are general and cannot be adjusted for each photo. The second, more productive way is to use programs specially created for such purposes. On the Internet there is a large number of different editors aimed precisely at turning a picture into a semblance of a drawing. The number of available settings will already be greater, and you will be able to achieve an acceptable result. The best way is to use a graphics editor like PhotoShop (hereinafter - "Photoshop"). In this case, photo editing takes place under your personal control, which means that the final product will be optimal.

Of course, you will get the most impressive result by ordering a portrait or landscape from an artist, but our goal is to familiarize yourself with the work of the editor so that everyone can easily understand how to take a photo as drawn. So we will leave the work with the brush to the artists, and we ourselves will deal with the principle of work of "Photoshop". There is nothing complicated in the task at hand: if you carefully read the instructions and step by step perform all these steps, then everything will work out easily. The end result will be pleasing to the eye, and you will be able to learn something new.
drawn in pencil, in Photoshop?
There are many possibilities to make from using Photoshop tools. First, let's look at the easiest way, after which the photo will turn into black and white drawing pencil.

Working with paints
How to take a photo as painted with paints? With the help of a special filter developed by Adobe, which is freely available on the Internet - Pixel Bender. In the Ps6 version, it is already preinstalled, and in the Russian version it is called "Oil paint" and is located in the top menu in the "Filter" column.
This effect looks especially good on photographs of some places: old buildings, landscapes and still lifes. You can also apply it to photographs of a person, but the result can be ambiguous.
Using this editing method is even easier than the previous one: you just open the desired photo, then go to the top menu "Filter - Oil paint ...", after which an additional filter window opens, in which you can immediately see the future result by changing the settings. Two main parameters change - brush properties and lighting. The final picture turns out to be very beautiful, and most importantly, it seems that it is really drawn with brushes and paints.

And finally
As mentioned above, there are many options for how to take a photo as drawn, how to create a truly memorable drawing in the way of photo manipulation. You can achieve the effect of a cartoon, caricature, comic, painting, sketch. The list can be continued as long as your imagination lasts. The possibilities in the environment of graphic editors are almost endless - you just need not be afraid to learn. Install PhotoShop, start simple, work your way up gradually, and you will achieve great results!
FotoSketcher is a free graphic editor with which you can turn a photo into a drawing using a large number of effects. The program converts images into drawings, made with pencil or paints, in a different style. Instead of a regular photograph, you will get a picture painted by the artist's hand
With FotoSketcher you can discover the artist in you, turning photo images into paintings. Photos taken in FotoSketcher will be noticeably different from pictures taken with a camera, if you try, then in this wonderful program you can create a real work of art.
The name of the program FotoSketcher in Russian can be translated as a photo sketch (sketch or sketch). A photograph (image) as a result of modification becomes a drawing, or painting.
In FotoSketcher, you can create images not only in the form of drawings made in different techniques, in the photo editor, you can improve the original photos: add or reduce brightness, increase contrast, color saturation, resize, crop the image, sign the picture, add watermarks, send to print, etc.
You can download FotoSketcher from the developer's official website. The program works in the operating room Windows system, the application has a Russian interface language.
fotosketcher download
After launch, the main window of FotoSketcher will open. In the upper part of the program window there are two panels: the menu bar and the panel with buttons. The program is controlled from the menu bar.
The buttons provide access to the most demanded functions of the program. Almost any graphics editor has similar functions: open an image, save an image, copy to the clipboard, paste, undo, crop, resize, add text, send to print, etc.
By default, in the main window of the program, to demonstrate the possibilities, the initial image is open on the right side of the window, and a processed drawing made in the form of a picture drawn by hand is on the left side of the window. You can practice with this image, or add a picture from your computer to the editor.
The program can be controlled not only with the mouse, but also with the help of "hot keys". Click on the "Edit" menu item. In the context menu that opens, you will see which commands correspond to the keyboard keys.

Creating a picture in FotoSketcher
Select the initial image, open it in the program, and then click on the "Picture Options ..." button. This will open a new "Drawing Options" window. Here you can load the parameters (if the parameters were saved before), save the parameters, or reset the parameters to default.
First you need to choose a drawing style. A wide variety of effects are available in FotoSketcher:
- 6 pencil sketch effects
- 2 ink pen sketch effects
- 10 painting effects (watercolor, oil)
- 7 stylized effects (cartoon, mosaic)
- 3 other effects
- 1 option without effects (frame, texture, text)
In the "Drawing Style" setting, you must select one of the presented styles: pencil drawing, ink drawing, painting, cartoon, mosaic, etc.

Moving the mouse cursor over a certain style, you will see that a fragment of the image made in this style... This makes it easier to choose the right option.
After choosing a style, a fragment of the picture will be displayed in the "Drawing options" window. This snippet can be enlarged by showing full size images in a reduced size of the window. This thumbnail can be moved with the mouse in order to see different areas future drawing.
Now you can modify the image in accordance with the selected style: adjust the color intensity, contrast level, etc. Each style has its own settings. Using the Brush Guide button, you can change the size of the brush with which the drawing will be made.
Apply various filters to give the image the desired look. Experiment in order to create a painting done in a certain style based on your ideas. First, try to create a simple drawing, and then, after acquiring the necessary skills, you can move on to creating more complex images.
After choosing the settings, click on the "Draw!" Button. The project has been processing for some time, so wait for it to complete.

After finishing the processing, the image is on the computer. If the result is noticeably different from what you intended, then you can try to create several options before settling on a more suitable drawing.
This image shows that this is no longer a photograph, but a painting painted in watercolor. The author of these lines studied in childhood art school, so I tried to make the drawing look like watercolors(I liked watercolor the most).
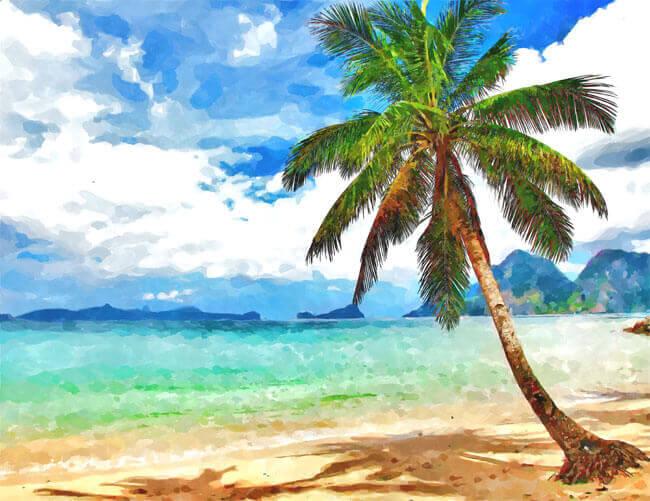
Likewise, you can be creative by converting photos into paintings painted in different styles.
In the final version of the image, you can enclose it in a frame, add a caption to the picture. Try, create, create portraits, landscapes, etc. good pictures, independent experience in the program is required.
Conclusions of the article
Free program FotoSketcher is a graphic editor for image processing. With the help of FotoSketcher, ordinary images are transformed into paintings by the artist's hand. The program has a wide range of effects to turn a photo into a drawing made in different styles of painting and graphics.
It is very easy to make a drawing from a photo.
There are several ways to give a photo the look of a pencil drawing or stylize any image to look like a picture painted with watercolors, gouache, oil, or using other materials.
If the quality and realism of the image are not particularly important to you, but you just need to do it quickly, you can easily get by with online image editors, which are enough on the Internet, for example, these: PhotoFania , Photo Pencil Sketch or on this site Free online services from Pho.to... There are many more similar ones, but all of them have one significant drawback - low quality of image processing, and the choice of stylization effects is very small and transformation tools cannot be customized. I do not use online services for this reason, monotonous, poor quality and not interesting. Elements of your own creativity missing completely.
The second method is also very simple, but it gives a chance to add some individual, author's shades to each new image. This is a way using small special programs and applications. There are also a lot of such programs, from very simple ones, in which the quality is not much superior to online editors, to quite professional ones. Of very simple programs i can advise FotoSketcher and Dynamic Auto-Painter.
In a programme FotoSketcher it is very simple to work, there are few settings and by changing them you can achieve a completely realistic result.
In a programme Dynamic Auto-Painter it is even easier to work, but more interesting, the whole process of changing the picture can be observed in real time and stopped when you are satisfied with the result, there are quite a lot of profiles in it, under different styles painting. If you install additional programs for screen recording and conversion, you can also make animated GIFs, for example, like this:
Another very good and powerful program, professional level - AKVIS Sketch... This program is not difficult to use, but its capabilities in stylizing images for a drawing are comparable to those of Photoshop but. This program can work as a plugin for many graphics editors. Understand the tools and settings of the program AKVIS Sketch very easy, but if you still have difficulties - look at the office. developer's site, there are many understandable reference materials and lessons.
From the same series and a program that is designed to simulate different art styles... Using programs AKVIS Sketch and AKVIS ArtWork you can make very realistic photo stylizations in a variety of art styles in a few minutes.

And of course the same thing the best quality in processing bitmaps can be obtained in a graphic editor of all times and peoples - in Photoshop e ( Adobe photoshop). I am using version Adobe Photoshop CS6 13.0 Extended but even earlier versions will achieve very High Quality and the realism of the images.
It is very difficult to master all of Photoshop on your own, but you can quickly learn how to use some of the functions and filters. Watch these video tutorials, exactly on your question and you will not have any problems to make a drawing from a photo.
- use graphic editors, special programs that need to be installed on your computer, these programs are used to edit images, including turning a photo into a drawing with watercolors, paints, pencil
- use graphic editors online
- use programs that are used to transfer photos from the camera to HDD computer, they can also be used to edit images and turn a photograph into a drawing.
You can do without Photoshop, there is a lot on the Internet free photos editors and photomasks, into which you just upload a photo, and on exit it is displayed with the effect you want.
One of them is http://funny.pho.to/ru/ (but there are a lot of them)
The portrait effect will look something like this (but this is not the only portrait template, there are better)


There are also a bunch of templates for postcards, but of course your exclusive one needs to be done in Photoshop.
Today this is no longer a difficult task, because there are many programs in order to turn an ordinary photo into a painted portrait. you can use Photoshop, FotoSketcher, Paint, Dynamic Auto-Painter... These programs can be downloaded for free from the Internet.
Everything is very simple:
there are special filters in Photoshop that will make your photo not only drawn but also embroidered and wrinkled and whatever
The main thing is that you have photoshop installed, and it's easy to figure it out
Hello! nowadays, in order to find the answer to our questions, you just need to go to the Internet. And to the question that bothers you there are a lot of different and most importantly free photo editors, with the help of them you can easily learn how to turn photos into painted portraits! I myself often use this site and I do not have any problems. With the help of this site, you can turn your own and another photo into a painted portrait!
To create one that looks as believable as possible, and can be used to create various graphic works, it is not enough to use standard filters or programs. You need to master the principles of Adobe Photoshop.
We decided to simplify your work and have collected several lessons that tell you in detail how to make pencil drawing in Photoshop to make it as realistic as possible.
Pencil drawing effect
This is perhaps the most The best way of those that have happened to be found on the Internet. Using this video lesson to achieve pencil drawing effect you can literally within 5 - 10 minutes.
Draw with colored pencils
In this tutorial, you will learn how to turn any photo into crayon using Adobe Photoshop. For beginners, it will take a little effort to complete this lesson in this program.

Pencil drawing from color photo

Making a pencil drawing
Our craftsmen also decided to keep up with fashion trends in the world of Adobe Photoshop. therefore do a pencil drawing in Photoshop together with you on the pages of our site.


There are several ways to do pencil drawing in Photoshop... This program even has special filters to create a similar effect. However, in this lesson, you will learn how to create a sketch with a pencil without resorting to them.

It is not at all necessary to be able to hold a pencil in your hand or be professional artist... This tutorial will show you how make a pencil drawing in Photoshop with the most realistic imitation of living materials.

A great example of how you can quickly and easily turn photo to pencil drawing (sketch) in Photoshop... In this video tutorial, you will find all the necessary information, so even a beginner can handle the implementation.

To convert any pictures to drawing executed simple pencil , there are many plugins and programs. However, the opinion of the author of this lesson is unambiguous: "We have not yet created such a button to make a pencil drawing in Photoshop with one click."

Pencil drawing in Photoshop
Many professional designers and wedding photographers use the effect of drawing with a simple pencil from a photo in Photoshop to add a graceful and artistic touch to your photo. There are a lot of methods to transform a photo into a sketch with a simple pencil.
Use photoshop too. There are corresponding filters that make the photo look like a painted one, and there are still several options for a portrait, even a watercolor. And it's easy to do, although there are video tutorials for this.
there are special editors for example olympus the master there are functions for painting with watercolors, oil paints, with a pencil only need to adjust more real option manually
If the question concerns the creation of a drawn picture from a photo in the Photoshop editor, then I propose the following video selection (excluding the videos that have already been answered):
Ate this question involves the creation of a drawn portrait using third-party programs (this method is especially good for those who do not know how to use Photoshop), then here is another plot (and there is even online programs, where you can make a drawn portrait or still life from a photo - the video is just about such a program):
And there is also such an option (using CorelDRAW)
Well, I like to do a similar effect automatically on the site - http://www.imgonline.com.ua/cartoon-picture.php (where it is called cartoon)
Even with the default settings, it works out very well!
In order to change real photo to drawn, you just need a photo editor for this.
I myself personally always use This Site.
Here you can change All your photos to pictures, that is, on this site you can turn a Photo into a painted portrait.
There are many ways how to give a photo the effect of a painting... The most common and probably the most in an easy way which I know is the use of the program Dynamic Auto-Painter... This program will automatically do whatever it takes to give your photos a pencil drawing imitation.
You can do everything manually by yourself, having mastered Photoshop. But this is a little long and requires some effort.
Turn a photo into a painted portrait or turn a digital image into a painted one different styles painting or drawing, in several ways: