System rollback in Windows XP. Restoring Windows system

The method is suitable if the system is stable running and included The function of creating points without user participation or there is a backup collected by the system independently.
To start the process, you need to open a special software utility. To run it, use the instructions:

In the window that opens select Discunder protection against data loss. It is usually chosen by the one on which the OS is installed.
After, you need to press the button "Restoration ..."
A program will open to restore the previous OS state. Click the button " Further"And we see the menu in which you want choose a point Recovery. The menu presents those that were created by the operating system independently.
To see all the available kickback points, check the tick " Show other recovery points»
We follow further instructions, agree with reboot Systems and the fact that it will be impossible to cancel the recovery in the future. System reboot And there will be a rollback.
It should be remembered that after the rollback will be exposed passwordwhich was used at the time. To avoid problems with the entrance, take care of you have utility password reset. When will occur return OS To the previous state, previous points will disappear, but a new one, created immediately before attempting to reset, will appear.
Return of source settings
If paragraphs recovery missing, or return to previous states did not help, then you should try to return the PC in factory condition.
Often, such an opportunity is available from most laptops on Windows, regardless of the version, the instruction can be found at the manufacturer.
If you are owner stationary PC, with installed Windows 7, it is unlikely that the way will be operational, since it is usually an OS in this case requires a disk.
For the latest windows, starting with the eighth version, You can use the following algorithm:
Open the menu " Parameters»- Go to section" Update and security» — « Return the computer to the original state»→ Button" To begin» 
System rollback with disk
This option is suitable if the OS is categorically refused to start. A disk can be almost any external data warehouse, even a USB flash drive. 
For create The recovery carrier will need to go to control Paneland in category " system and safety»Select item" Archiving computer data". After that click on the inscription " Create a recovery disk". In a new window, select the disk you want to use, and then click " Create disk».
Now you will always have the opportunity to correct the system problem without resorting to a complete reinstall.
Creating an image
This method is also suitable for those who have lost the possibility of launching OS, important honors this option from the previous one is that with full image Disc, absolutely all user settings, files and applications are restored. Recommended Making the image at the moment when all the basic drivers and programs are on the PC, but there is no unnecessary software. 
To create an image, follow the same instructions as described in the previous method. Only at the last stage should go on the link " Creating a system image«.
In the window that opens offered Select the location of the image. A typical location of saving is a DVD, since it can be used when a hard disk is damaged, which is very convenient. The best way is to record in network storageIt would be better to use this particular item, since in this case, the probability of losing the image will be reduced to zero. 
The restore itself begins while restarting the computer: " Diagnostics» — « Extra options» — « Restoring the image image».
Restoring the system, this is one of those functions on the computer, which, as I think, should know each. After all, sometimes, even an experienced master, it can not always determine for what reason, one or another computer crash happened. However, the developers of the Windows system have provided it and it is for such cases that the function was invented such as system rollback Until that moment until it was all right.
In which cases it is necessary to do the restoration of the Windows system?
I will not go far and give an example on my situation.
Once it happened that I "flew" the Microsoft Office Word program, there was some kind of failure in it, and she stopped running! For me, it was really a problem, because in this program I very often work and who my husband, this program I had licensed. That is, I lost not only the program, but also the money that paid for it. At first, I started panicing, but one familiar computer tells me - " Why don't you make the system restoration?", I say - " Does she help return the program?", is he - " Sure!" I thought, an attempt was not torture, as a last resort, I won't lose anything. As a result, I performed windows 7 system recoveryAnd about the miracle - the program has earned!
So do the system rollback, you can not only if anything is not installed (before that moment I used it only in such cases), but also when "flies" any serious program.
What principle does the Windows 7 and Windows XP system roll back?
The principle of restoring the system is pretty simple. Your Windows OS makes the recovery points of the system. What is this point?
Points are a conditional name, because in fact, the recovery point is a saved copy of the system, at the time when your system is working normally and without errors. That is, OS, herself remembers its normal working condition and makes himself a mark that if some failure occurs, or we will install something on our computer, it must return to such a point . Hopefully the answer is clear. By the way, from this answer you can find another question - and where does it store a copy of the system? And the truth is where, who is the husband of such copies, is somewhat, where are they all fit? Let's figure it out.
To do this, we will return a little by the time you just. Most often, when installing, disk space to share into two sections (if you have one partition, then it is necessary to scatter it, how to do it, I told in the article) one systematic and the other for the rest (games, movies, your videos, photos and photos and etc.). But, if you ever paid attention, then several gigabytes, after installation, somewhere disappear. Those. For example, when I bought a computer, I was stated that the hard disk has a volume of 720 gigabytes. And now look at the picture below.
One disc has a volume of 98 gigabytes, another 600, total - 698, then you disappeared a 22 gigabyte somewhere. It is these 22 gigabytes that are the same memory in which all my system restore points are stored. By the way, this is not a limit on many computers to this case, much more disk space is given, for example, on my laptop, which I did not bought so long ago, for the "Restoring system of Windows 7" function, it is already 40 gigabytes!
And now, let's tell you how to make the Windows 7 and XP system rollback. By the way, if you notice, I say that rollback, then restoration, do not be scared, it is the same. So, proceed.
How to recover Windows 7 and Vista system?
Since these two system Restore It happens the same, then I will show everything on the example of Windows 7.
- First you need to press the Start menu, and select All Programs
- After that, almost at the bottom you will find the item Standard. After you find, open it.

- In the Standard Point, again almost at the bottom, there will be a service tab.

- Opening this folder, you will see the long-awaited system restore system. Click on it.

- After that, you have a small window to start restoring the system on the monitor. I will not show you, because It was loaded very quickly and disappeared, did not even have time to read.
- Now you will have the main program window, click Next.

- After that, you should open a window where you can choose a recovery point for the number you need. By the way, if you click on the item to show other recovery points, you will see all the points for all the numbers that are on your computer.


A slight retreat. If you see on, screensate above, under the title Description, the reason for the recovery point is made, this is the reason for the Windows Update Center. Those. If some incomprehensible errors began after the update, or the OS began to boot longer, then you can do rollback of the Windows 7 system Before she worked without this update. But the reason for the appearance of the point may not only be updated, also, in this line you can see the inscription "Planned Recovery Point" or something on the like "Installing such a program", "Deleting such a program". Of course, on the site of such a program is the name of any serious program, such as Microsoft Office Word.
We were distracted, we continue

After that, in fact, the process will begin. Do not restart the computer until it all end. At the end, the computer is rebooted and you should jump out the window about the successful completion of this special operation.
In Windows Vista, everything is almost also. Only the first window that opened is very different.

How to restore Windows XP?
To begin with, I would like to warn the owners of computers who have old versions of Windows XP, they may not be such a function as system Restore.
Unfortunately, I can't show you on screenshots how to perform the same operation in Windows XP. But I know for sure that it is done on the same path, i.e.: Start -\u003e All programs -\u003e Standard -\u003e Service -\u003e Restoration of the system. How do you see everything just, then you just need to choose for what number you want to do switchless Windows XP SystemAnd then the process itself will go.
All let me out.
P.S. For clarity, I recorded a video lesson, it goes only five minutes, so look for fixing the material.
The bulk of Windows 7 failures and problems, to the joy of fans of experiments, is easy to "treatment". To do this, in Windows, starting with XP, a special tool is enabled - "Restore System" or or or tool to roll back, as some users call it.
To have the ability to roll back the Windows 7 system to a previously saved state, you must create control points. This can be done in automatic and manual mode. Automatic more convenient, as you do not have to remember it constantly, but manual will help you when you need to change anything in the system: put or delete the program, change the topic of registration, make edits to the registry, etc.
In Windows 7, the system rollback can be made from a normal, secure mode, as well as from the Windows Re recovery environment.
How to create control points
- Open the Context Menu of the Computer folder and click Properties.
or click the "System" applet in the control panel.
- Press the "System Protection" button in the properties window transition panel.
- On the properties tab of the same name, in the "Protection Parameters", select the disk for which you are going to create a checkpoint and click "Set up".
- Next, check "restore system parameters and previous file versions" and set the disk space to store backup. By this you configure the automatic creation of recovery points.
- To remove previously created points, in the same window, click on the "Delete" button.
- To manually create a checkpoint on the "System System" tab, click Create. In the next window, enter a brief description and click "Create" again. The current state of Windows will be saved.
Running the system recovery from normal and secure modes
- Open Start \u003e\u003e All Programs \u003e\u003e Standard \u003e\u003e Service. Select "System Restore".
The same can be done by typing the command in the start line rstrui. And running the same file.
- Opening the application, in the "Restore system files and parameters" window, click the Next button.
- The next window will display a list of one or two last created checkpoints. To see more, put the label "show other recovery points".
- Clicking "Search for affected programs" will help you to navigate whether the existing problem will solve the existing problem - you can see which application and drivers will be deleted or changed.
- Choose one of the appropriate checkpoints and click "Next". To confirm the selection in the next window, click Finish - the program will start work. After a few minutes, the status of the registry and Windows files will return to the saved state.
How to restore the system from Windows Re
This method will help roll back the system when it does not start.
- Before starting Windows several times as quickly as possible, press the F8 key. Select from options for downloading "Troubleshooting Computer".
- By entering a user password, get to the selection of recovery parameters. Choose this list the second top view. Next, everything is done as described above.
Rollback of Windows 7 to the status, as after installation
Function Factory Reset - Recovery to the factory settings of the computer, there is on most laptops with Windows 7. A copy of the system is stored in a special, hidden partition of a hard disk, where there is no access to the access user.
Restoration to the factory state on different machines is performed in different ways. On one for this, special utilities that allow you to start the rollback process directly from under Windows.
On other recovery program, it starts from the Windows Re Environment (the last item in the recovery parameters).
Thirdly, to roll back the system needs to press one or some keyboard shortcut after the computer starts:
on ASUS - F9
on Acer - Alt + F10
on samsung - f4
on Sony Vaio - F10
on Toshiba - F8 or 0 (on the latest models)
on Packard Bell - F10
on Fujitsu Siemens - F8
on Dell Inspiron - Ctrl + F11
After starting the recovery tool, follow the instructions and watch the course of its work. It is important that during a rollback, the laptop battery has been fully charged to the case of power supply from the power supply. Since the current disconnection at this time may irreparably damage the system.
At the end of the recovery, the Windows 7 initial setup window opens. It will not remain anything from the previous system - neither user accounts, nor activation, nor user documents or programs.
After the appearance of this window, you will be coming the same actions as if you just installed Windows from scratch.
Full removal of windows 7 from a computer
If the "seven" tired of you so much that you decide to delete it, you will need an external bootable medium. It can be an installation disk with a distribution kit of any operating system, Live CD with a portable version of Windows (for example, Distribution Bart PE), disks with programs like Acronis Disk Director or another copy of the system running on the same computer.
To delete the system, you need to upload a PC from one of these media and format the partition of the hard disk where Windows files are located.
However, there are more often situations when you need to remove the old system after installation in the same section of its new copy. If you do not format the section during the installation process, all the files of the former system will be placed in the Windows.old folder. It is located in the root directory of the disk C - the same place, where the newly created Windows folder. Just remove it.
If there are several operating systems on the computer, a remote "seven" can remain in the download options list. To remove it from there, run a new copy of Windows, open the system setup utility MsconfigBy entering its name in the starting line of the start.
In MSCONFIG, open the "Load" tab. In the window of this tab, there is a list of operating systems, which is displayed in the start menu.
Mark Windows 7, which is no longer on the disk, and click the Delete button. After that, it will not be displayed among the available download options.
All computer owners periodically face problems of Windows after installing incorrect drivers or making changes to the operating system. Solve this problem allows the creation of system recovery points.
Windows 10 recovery point allows you to return the computer to the last stable state of the computer. When creating a Windows 10 recovery point saves a backup of system files. Thus, instead of fully reinstalling Windows after installed some incorrect driver or ratified the virus, you can simply roll back the system.
Recovery points are created before installing Windows updates, as well as automatically with the frequency you specify. The more free space on the hard disk you reserve under the recovery points, the more recovery dates you will have to choose from.
The system allows you to manually create Windows 10 recovery points. This may be required, for example, before installing programs that can somehow disrupt the system. In case something goes wrong, the owner of the computer can always roll back the system on the date when everything worked properly.
Please note the recovery points contain only backup copies of Windows 10 system files that affect the operating system boot. Personal folders and files are not included in backups. If you want to reserve more and personal files, then you need to make a complete image of the system.
Windows 10 recovery settings
In order to watch the current recovery settings on your computer, right-click on the Start menu and go to the Control Panel.

Go to the "System and Security" section.

Go to the "System" section.

Click on the left column "System Protection".

The window that opens shows the protection parameters for your disks. The status is disabled means that the recovery points for this disk are not made, but turned on when the recovery points are made.

In my case, the recovery points are made only for the C disc on which the operating system is installed. In order to change the settings of the security settings, select the disk you are interested in and click the "Configure" button.

At the top of the window, you can enable or disable the creation of windows 10 recovery points, and at the bottom specify which amount of disk space you are ready to reserve these backups. The larger volume you specify, the more recovery points will be stored. As this volume is filling out, the old recovery points will be stitched to free the place for new ones. Usually, it is enough to store 2-3 recovery points of the system.
In order to free up a hard disk space, you can click the Delete button to delete all saved recovery points.
Creating a Windows 10 recovery point manually
In order to create a Windows 10 recovery point on the previous "System Protection" tab, click the Create button.

A window will pop up in which you must somehow call the recovery point, in my case for example, I called it "Restoring point before installing an incomprehensible driver." At the same time, the date and time of creating a point will be added automatically. After that, click the "Create" button.

The process of creating a recovery point will begin. Usually it takes less than a minute. After completing the "Recovery Point Successful" window appears (see the picture above). Now you can install that incomprehensible driver, because of which I worked and in case of problems, roll back the system using the recovery point.
Customize automatic creation of recovery points
As already written above, Windows 10 automatically creates recovery points before setting up updates, and also makes it possible to do it manually. But for the safety net, it makes sense to configure the automatic creation of points recovery to the time you specified, for example, every day.
Right-click on the Start menu and go to the Control Panel.

In the "Control Panel" in the upper right corner, select "View" - "Minor Icons" and click on the "Administration" section.

Open the job scheduler.

Alternately, click the double click of the job Planner Library - "Microsoft" - "Windows" - "System Restore".

In the System Restore branch, the SR rule has already been created to create Windows 10 recovery points. We can only specify the interval through which this rule will work. Click two times on SR rule.
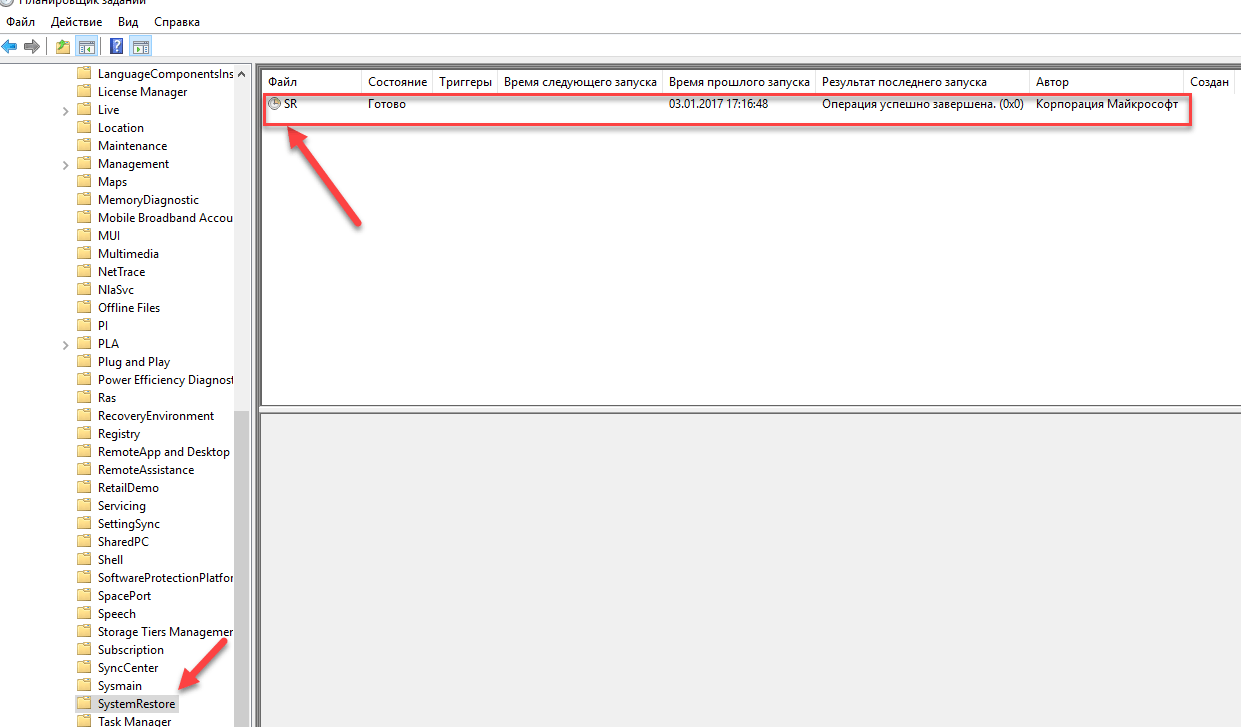
In the window that opens, go to the Triggers tab and click "Create".

In the next window, you can set the period when Windows 10 recovery will be created. You can specify a daily creation, weekly, monthly, when you start a computer or when it is turned off and so on.
You should choose a period of creating points on the reserved area on the hard disk for storing backups, since when filling out this volume, the newest recovery points will wash the oldest.

After you have selected a period of creating recovery points, click OK.
Rollback of Windows 10 to the recovery point
Now, when we learned how to create recovery points manually and automatically, tell you how to restore the system after a failure.
You can roll back the system with the help of recovery points in several ways - using the Windows 10 interface, using the command line, as well as with the diagnostic tools.
System rollback via Windows interface
The easiest way is when you can run Windows 10. In this case, we do everything as at the beginning of the article. Right-click on the Start menu and go to the Control Panel. Next, go to the System and Security section - "System" - "System Protection". In the System Protection window, click the Restore button.

The system file restore wizard opens. Click "Next".

In the next window, put a checkbox at the show "show other recovery points". This list displays all possible recovery points. The left column shows the dates of creating recovery points. In the middle column, the description is described so that we can identify the point.
As can be seen in the screenshot below, the recovery point called "Point Recovery to the Unclear Driver", which I created in the second chapter of this article is present in the list as the last created.
Finally, the right column indicates the type of recovery point (manually, system or installation), that is, under what circumstances a backup has been created.

Also, you can click on the recovery point of interest and click "search for affected programs." The window that opens will display a list of programs that will affect rollback to this recovery point.
When you chose a recovery point to which we want to make the system rollback click "Next".

In the last window, we must confirm the selected recovery point. After pressing the "Finish" button, the system will start the recovery process.
System rollback using diagnostic tools
If Windows 10 does not start and the desktop does not load, the system rollback can be performed using a special Windows 10 environment to restore the system. When the computer starts, instead of the desktop, you will see a warning that the Windows system boot incorrectly. Click "Additional Recovery Options".


In the "Advanced Parameters" window, click on the "Restore System" item.

You will fall into the already familiar window for selecting recovery points where you should choose the last stable state of the system and click OK.
System rollback using the command line
If Windows 10 is not loaded, you can roll out Windows 10 to the last recovery point using the command line.
To do this, during your computer, press F8 until you appear a list of computer boot options. Select "Safe Mode with Command Line Support".

In the command prompt write write rstrui.exe., After that press ENTER.

As a result of this command, you have to start the standard system recovery wizard to the recovery point in the graphical interface.
Video on the topic Creating a Windows 10 recovery point
Well, finally, I suggest you to see a few videos, how to create a recovery point and roll back to Windows 10 to the last stable version.
Running back the Windows 10 system means to return the settings to an earlier state, but does not mean returning to the seven or eight from which it may have been updated to dozens. Rollback can be done only if the recovery point is created, and it is disabled by default.
How to roll back Windows 10
To make you need to get into the recovery section, for example, through a classic "control panel". In this panel you need to find the recovery section, click on it. After that, there are three links for which you can go. You must select "Running the system recovery" by clicking on it.
Then put a box next to the string "Select another point of recovery", a large selection of kickbacks will open, after clicking "Next". 
Then the window will appear in which all previously saved points will be displayed. You need to choose the desired, highlighting it with the left click of the mouse, to choose "Next" again. 
Then the Windows 10 system will do everything independently. It remains only to wait a while. If system files were deleted before the procedure, then return everything will fail. This can be done, only having an image of its operating system, for example, on a disk or flash drive.
How to make a rollback of Windows 10 system
To do this, it will be needed to go to the "Control Panel", select the "System and Security" section, open the "System" item, then click on the "System Protection" (left above). After that, the "System Properties" window opens, in the "System Protection" tab, click the Restore button. 
In the window that opens, select the appropriate point, click "Next". 
It will be shown to what date will roll back, click "ready." 
How to make a rollback of Windows 10 through the recovery environment
For Windows 10 resuscitation, a special recovery environment has been provided, implemented as a selection menu of various actions on a blue screen background. 
If the computer is loaded, you can get into this environment by holding the SHIFT key and pressing the reboot button. 
If not loaded at all, you can try to get into the recovery environment, while holding the SHIFT + F8 key during loading system. As soon as the computer starts to boot, you need to quickly press the SHIFT key, and then quickly press the F8 key.
It is easier to enter this environment using the installation disk or a specially created recovery disk. To do this, you will need to insert the installation DVD into the computer drive, or connect the loading flash drive. In BIOS, set the boot from the corresponding media. Click "Next" in the first window of the OS installer.
In the window that opens, select "System Restore". 
Thus, the recovery environment opens, you need to open the "Diagnostics" section. 
Press "Advanced Parameters". 
Next choose the recovery section. 
If two OS installed on the computer, you will have to choose the necessary one.
The process of roll back the system back. Press "Next". 
In the recovery point selection window, you must install a check mark on the display options of other points. Then it will be possible to choose a suitable date. After selecting the optimal point, click "Next". 
Then "Ready". 
Confirm the decision to roll back. 
Upon completion of the process, restart PC. 
After that, the recovered OS should be launched.
How to roll back the system
How to roll back with Windows 10 in the OS recovery process and delete all user data, including account settings, personal settings and files will later consider.
Taking advantage of this method after reinstalling Windows 10, it turns out a completely new computer in which important information will not be saved, which was stored there before.
To return the OS to the initial state, you will need to click on the Start button and execute the "Parameters" command. The "Parameters" application window will appear.
Then click on the "Update and Security" icon. Go to the left panel, click on the "Restore" section. On the right pane, find the "Return a computer to the original state" subsection, click the "Start" button. 
In a new window, it will be prompted to choose one of two ways to restore the original state of the computer. 
You need to choose one of the options ("save my files" or "Delete everything"), click "Next".