Volume composition made of geometric shapes. Composition from geometric bodies on the entrance exams in the marchs
Any drawing begins with composite image placement on a piece of paper. The general impression of the drawing largely depends on the compensation of this or that image. It is necessary to study the principle of location of objects on the plane.
Word composition Translated from Latin, literally means compilation, binding, connection of parts. The construction of a artistic work due to its content, character and appointment and in many respects defining its perception. The composition is the most important organizing moment of the artistic form, which gives the work of unity and integrity, which is coented with its elements to each other and in a whole. In the process of creating a decorative composition, the placement and distribution of the visual elements occurs according to a specific scheme in a logical sequence of the author. Fine remedies And the style features must be agreed, subordinate to the whole, and it is impossible to forget the details that play a very important role.
In other words, the composition is the correct distribution of objects on the sheet: allocating the main object, filling out the entire plane of the sheet, the equilibrium of the right and left edge, the presence of a common plan or idea. Before drawing something, the artist should come up with it.
1st Tip:
To create an emotional and shaped composition, you need to watch and see interesting events, characters, motives and different states of nature in the surrounding life. All this makes it possible to build interesting and original compositions.
2nd Council:
When choosing a composition of the composition, it is necessary to take into account that:
Extracted up format will make an image of slim and sublime;
The horizontal format transmits the sensation of ponoramnia, latitude and irritability of the expanses;
The format in the form of a square is better to use to create balanced, static compositions;
Oval format is used for the image of a person's portrait, since its configuration is easily correlated with an oval of a person or a curtain image circuit;
In a round format, a flower or vegetable composition is well combined.
3rd Council:
Avoid the following errors:
Do not put anything to the edge of the sheet, the exception is an object starting with the edge of the sheet and made fragmentary;
Items should not touch the side and upper edges of the sheet;
Do not draw everything too small;
Do not fulfill the items too large.
4th Tip:
Remember the laws of perspective. The object that is closer to us in the future is depicted on the sheet plane below. And the one that is further from us is higher. So, closer - below, further - above.
5th Tip:
Working in color, think about the laws of the air perspective. Select the stain and color of the Composition Center. Work in detail items in the foreground and highlight them with brighter, juicy colors, but not a call center of the composition. The closer to the horizon line, the more weakens the brightness and temperament of the color, is made more cold and transparent. Write long-range plans with bluish, purple, blue, gray, silver colors.
6th Council:
Getting started to the last stage of work - generalizationCheck:
Whether the composition of the composition is isolated by color or tone;
Whether the first plan is worked out in detail;
Whether the first plan is highlighted;
Does any of the general idea of \u200b\u200bthe composition, do not fail;
Whether both parts of the composite sheet are balanced;
Whether the laws of the air perspective are observed;
Does the composition attract a look, is it nice to look at it.
A properly constructed composition cannot cause doubts and feelings of uncertainty. It should have a soothing eye clarity ratios, proportions.

Choose one or two best sketches and enter them into the framework, the proportions of which correspond to the proportions of the future picture. Thus, a leaf of the A-3 format of 30 per 40 centimeters is propor 3 to 4 (Fig. 172) in search of the most successful sheet composition, you may have to adjust the point of view, and in some cases even make changes to the formulation itself.
Component sheet, you should also take into account the location of the illuminated and shadow surfaces, as well as the boundaries of incident shadows. Remember that the light may disrupt the compositional harmony of a linear pattern.
Stage 1.
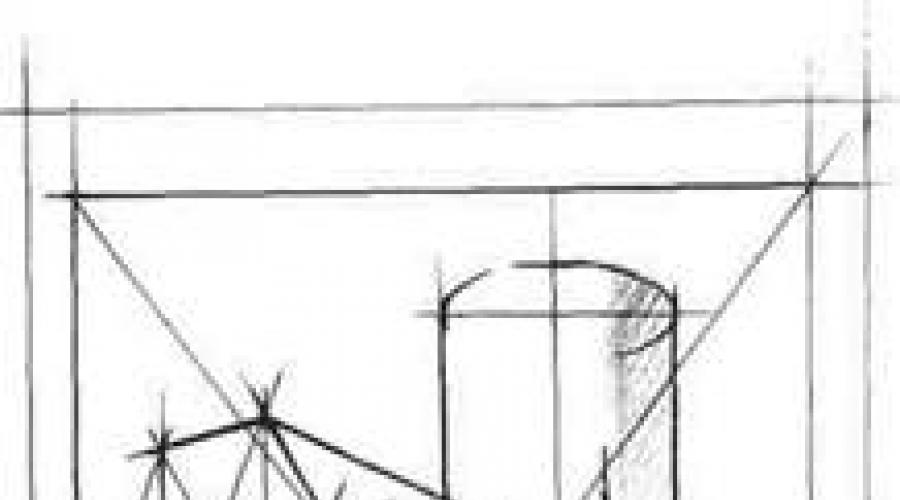
Figure 173 Starting a drawing on a large sheet, try to accurately move it to it location of items fixed in the best sketch. Note the place of each geometric body with light lines. Once again, check the size of the entire composition, as well as its compliance with the size of the sheet. Make the necessary changes in the drawing and continue to work, specifying the size of each geometric body with respect to other bodies and to the entire composition as a whole.
Stage 2.
Figure 174. Picture linearly all geometric bodies. During the work, pay special attention to the correspondence of the opening of squares and ellipses lying in horizontal and vertical planes.
Stage 3.
Figure 175. At this stage, it is necessary to strengthen those lines that are closer to the viewer, so you will create the effect of the depth of space already in a linear-structural pattern. Note the line of our own and falling shadows and cross all the shadows with a light touch.
Stage 4.
Figure 176. Continue working in the shadows, making them more intense towards the viewer and to the light source, and the incident shadows are also to the subject discarding the shadow. Gradually go to work in the light. Carefully modify the form using knowledge about the distribution of lighting on geometric bodies. On round surfaces, create smooth black and white transitions; On bodies formed by planes - sharp and clear.
Comparing the bright and dark tones of gypsum in kind, you need to strive to correctly transfer their relationship in the picture, but you need to know about special techniques that help the draftsman create a feeling of three-dimensional space on a flat sheet:
1. Separation of a tone scale on the light and shadow part: in the figure the lightest place in the shade should be the darker of the most dark place in the light, in other words, the shadow should always be darker than the light. In kind this is not always the case. For example, when a fairly well-lit surface is located next to the production, reflexes from it on nature can be the same bright as light. They need to "be seized" by making darker, otherwise they will destroy the form of the items depicted on your figure.
2. "Air Perspective". This phenomenon about which we have already mentioned in nature can be observed at large distances, when items significantly removed from the viewer look less contrasting due to the thickness of the air medium, weakening shadow and the premises light. With minor sizes of the depicted formulation, this effect cannot be observed. It is created in the figure artificial: geometric bodies that are in the foreground have a greater contrast between light and shadow than the bodies in the distant plan, while on nature the difference in the illumination of the near and distant plans can be almost imperceptible.
The main task of the architectural picture is not the transfer of the state of the object, but if possible
image form, creating volume. That is why, drawing, we do not copy nature, but the old
To see, select and transfer only certain features to your work that help us
Sew this task.
Stage 5.
Figure 177. Tell the drawing. Once again, take care of the tone solution of the illuminated and shadow surfaces. At the final stage, the drawing is not working with separate subject, detail, part of the image, but with all the sheet at the same time, achieving the integrity of the work, the harmonious coented ™ parts. For this, if necessary, reinforce the tone of the illuminated surfaces on distant plans and shadow surfaces in the foreground.
70 Chapter III
72 Chapter III
black and white pattern of simple geometric tel 73

74 Chapter III
Linear structural drawing of the composition of geometric bodies by representation.
Make a sketch of the composition, observing the given proportions of geometric bodies (Fig. 178). Determine the general nature future composition, position of the horizon line, direction of horizontal ribs, the main cuts. Immediately warn you about a characteristic error that the one who works on its first composition is often accomplished. Placing on the sheet geometric bodies, a novice draftsman puts along with round of round bodies (for example, a ball and a cone) or round bodies and bodies having inclined planes (for example, a ball and a hexagon prism). The inserts of such bodies in each other are very complex. Given the limited time to perform an examination task, it would be more correct to use simple inserts in the composition when round bodies and bodies with inclined surfaces intersect with horizontal and vertical planes.
It is not necessary to draw the sketch thoroughly thoroughly - in a small scale you still can not solve all composite questions. Even a very detailed sketch is impossible to accurately move to large sheet. Secondary and minor elements in size will be inevitably subjected to fairly serious changes, and therefore should not be given to them excessive attention at the stage of the thumbnail. Exclude a sketch into the framework of the corresponding proportions (3x4), make the necessary adjustments to the composition and proceed to work on a large format sheet, trying to preserve the main idea defined in the sketch, the basic patterns and movement of large masses.
Continuing work on the composition, specify the dimensions and proportions of geometric tel. Track out the correspondence of the opening of squares and circles lying in horizontal and vertical planes, as well as the uniform context of parallel lines in the perspective. Carefully sit the inserts of geometric bodies, depicting the crossing lines not only visible, but also invisible viewer surfaces. Working on separate elements, try to subjugate their overall composite idea, achieve wholeness and harmony in work.
The drawing must be performed with clear, expressive lines and easily worked with a conventional tone: determine the position of the light source and cross several layers of the surface strokes, which are in the shade. Consider the figures 179,180,181,182,183, depicting examples of such compositions.

black and white pattern of simple geometric bodies

black and white drawing of simple geometric tel 77


 |
black and white pattern of simple geometric tel 70
80 Chapter IV
Chapter IV. Figure architectural details
Architectural details include architectural profiles (Gusek, heel, shaft, fourth shaft, fillet, vigorous), geometric and plant ornaments, capitals, sockets, vases, ionics, brackets, support and castle stones arches, antables. From all this manifold to perform training drawings on the evening preparatory courses Marhas chosen Vase, Kapitel and Ionik.
Getting Started with the architectural detail figure, first define its geometric base, imagine complicated form In the form of a combination of simple geometric bodies. By portraying a simplified scheme in the future on a sheet, gradually complicate it, saturately and carefully studying individual elements in a linear-structural pattern. Watch paired symmetrical volumes at the same time, and the condition is easier to trace for promising abbreviations. If an image of any part of the architectural part causes you some difficulties, make it small sketches on the fields of your drawing - promising sketches with different points and orthogonal projections. Completing the linear stage, enter a light tone in drawing, pre-running the line of own and incident shadows: this will allow you to clarify the main masses and reveal possible mistakes Before starting tonal work.
Light in architectural details is also distributed under the laws of drawing simple geometric bodies. On the curves surfaces, the transitions from light to the shade are soft, gradual, on faceted - sharp, clear. The closer the light and the shadow on the subject to the drawing and the source of the light, the stronger the black and white contrast, and, on the contrary, the remote parts of the objects have more dull light and the gluttony shadow. Falling shadows are stronger than tone, their own - light reflexes, and therefore more air and transparent. And in linear-structural and in a black and white drawing, try to work evenly throughout the sheet, constantly comparing separate parts of the image with the whole. At the final stage, specify the tonal decision and summarize the work, seeking a feeling of completeness and harmony.
Figure vase.
As an object for drawing, you are offered a gypsum cast from a Greek vase (amphoras) dated IV century BC. Masters of that time distinguished the amazing sense of proportions and constructive logic.
Start the drawing of the vase, like the drawing of any complex architectural part, with the analysis of its shape. Carefully consider the vase (Fig.184). Mentally dismember it on separate volumes and compare them with simple geometric bodies. The body of the vase has a complex drop-like shape, which can be conventionally represented as a combination of two balls and cones, thus the body contour of the vase in height can be divided into three parts, each of which has its own curvature. The cervical vase is similar to a cylinder having a noticeable refinement in the middle, and is limited from above and below narrow shelves. Walking a massive neck in the form of a fourth shaft. The reference part (base) of the vase consists of two cylinders of different diameters connected by the profile in the form of a Guska. Vase handles have a complex three-part structure and thicken in places of their attachment to the neck and body of the vase.
Continuing the study of nature, make a drawing of the front projection of the vase. To do this, you will have to take advantage of not only the way to sight, but also a long strip of paper and even a ruler. The projection should be large enough, only then you can reflect all the information you received: the proportional ratio of the main masses, the size of individual parts in height and
figure architectural parts 81
rena, their relationship, coinlability and functional validity. Try to accurately transfer the proportions of the vase, tick how many times its width is laid in height, how many times the neck is stacked in the body of the vase horizontally and vertical, etc. (Fig.185).
Posing the facade of the vase, you will notice that on this projection the neck of the vase looks too thick, the body is more massive, the base is easier and more graceful than in kind. Of all the images of the image, the perspective is closest to real perception. human eye. The orthogonal projection of the object is always different from its perception in kind. But it is orthogonal projections, due to their accuracy and informativeness, will help you now. the best way Examine a complex architectural form, and in the future will become a convenient and natural means of your professional communication.
Let's return to nature. As you have already noticed, the bulk volume of the vase is a symmetric form. All its horizontal sections are circles of different diameters with a center lying on one vertical (VAZ axis). In a promising figure, these circles are depicted as an ellipse different size and disclosures. The small axes of these ellipses coincide with the axis of the vase, and the big one is perpendicular to it.
By changing your position regarding the vertical nature (and, therefore, the level of the horizon line), follow the reduction of the vertical sizes of individual elements and the entire vase, as well as the same parts of the vase overlap others.
Select a point when viewed with which promising vertical abbreviations will be insignificant (for example, when the horizon line passes slightly above the throat of the vase or below its base). The position when the horizon line passes through the body of the vase is not recommended due to some of the difficulties that may occur from a novice draft with the definition of the disclosure of the ellipses. In addition, this position is the least successful to create an expressive drawing.
 |
82 Chapter IV
Stage 1.
Figure 186. Determine the dimensions of the vase onto the sheet, in the middle of the sheet, take it out of its axis. We break the total vertical size on the segments corresponding to the large parts of the vase: the neck, neck, body, base. Note the width of these elements.
Stage 2.
Figure 187. Indicate position and sizes in the figure. small details Vases.
Stage 3.
Figure 188. Make a vase circuit in orthogonal projection. Such a contour does not take into account the promising changes, but is a clear constructive basis for further work.
Stage 4.
Figure 189. On the horizontal axes, in the places of characteristic sections, depict the ellipses. Remember that the disclosure of the ellipse is the greater the further it is from the horizon line. Connect the ellipses by outer arcs in the pairing places of one form on the other. Make a vase handle, summarizing them to a simple rectangular shape, and just making sure the correctness of the main relationships, work their details.
Stage 5.
Figure 190. Final stage - Tonal study. Start, as usual, with the definition of lines of your own and incident shadow. To do this, use the nature and already obtained knowledge about the nature of lighting on simple geometric bodies. Own shadows on the neck of vases, belts, ground shelves, as well as handles - similar to the shadows on the cylinder; The shadow on the neck is similar to the shade on the ball; The shadow on the body of the vase can be represented as a complex combination of shadow on two bowls and a cone. Carefully consider the falling shadows on the vase. Analyze, from which form shadows on the neck of the vase, her body, base, handles fall. Sometimes it is convenient to do with a pencil. If you slowly move the edge of the pencil along the line of your own shadow on a vase, the shadow from the appearance of the pencil will also move along the falling shadow line, fixing at every moment of this movement some pair: point and shadow from it.
After determining the position of the lines of its own and incident shadows, continue the tonal pattern in the usual sequence. First, dial enough tone strength in the shadows, separating them from light. Then it is necessary to strengthen its own shadows towards the viewer and the light source, and the incident shadows are also towards the source of the incident shadow. Continuing work in the shadows, gradually go out into sow, creating smooth black and white transitions on spherical and cylindrical surfaces. Completing the drawing, summarize the black and white relationship, trying to harmoniously subjugate all the elements of the image with a total tonal design.
The work of work proposed for you is not accidental: it is concluded an important ruleMandatory for all, and especially for beginner drawers: the performance of the drawing from the common to the private and from the private to the common one. Always start the drawing with a common mass and only then proceed to the details. But do not work out one of the details at once. Drive the drawing throughout the sheet, moving from one of its part to the other, the twisting parts with the general, constantly embracing the gaze. This rule is true for both linear-structural and black and white pattern.
Naturally, your desire to see the final result as quickly as possible, jump on the next step, without finishing the previous one. If you want - try to do it - and you will see how logical and calm work will turn into a chaotic throwing from one piece to another in the desire to collect together the "scattering" in your eyes in your eyes.
Remember that the design is based on any forms.Errors in the construction can not be hidden by the most virtuoso tone elaboration. Therefore, the error detected during the work in the construction and proportions must be immediately correct.
figure architectural parts 83

86 Chapter IV.
figure architectural details 87

88 Chapter IV.
Drawing doric capitals.
The capital is called the upper part of the column, which, in turn, is part of architectures, a warrant. Warrant - strictly verified artistic systemexpressing the essence of the work of the shoe and beam design. The name of the order comes from the Latin "Ordo" - the system, order. Classic orders - Doric and Ionical - formed in antique Greece. Somewhat later, in the architecture of Rome they got their further development. The order consists of carrying and irrevmed elements, the load is transmitted from the overlying elements to the below. From the antablemer (incoming part) to the column (carrier), the load is transmitted through the cap, which becomes one of the most important components of the entire order.
As an object for drawing, you are offered the Capel of the Roman Doric Orders. Roman orders are somewhat landed in their forms than Greek, however, like all order systems, they are distinguished by the strict logic of formation, the resulting proportions and simplicity. Doric order is the most laconic, strict and courageous of all. A beginner architect needs to be learned to understand and feel the logic of the design of the structure, expressed in artistic form, which in architecture is called tectonics. Try to feel in the drawing capitals, as a form varies from the upper, square in terms of parts, to the bottom, round, as each of the profiles are designed to support the elements located above and the pressure from top to bottom.
Start drawing with the analysis of the form of the capitals (Fig. 191). The upper part of the capitals is square in terms of Abaka (abacus) - a stove with a height and shelf. Echin is a quarter of the shaft and matches the cervical column through three consistently decreasing belt. Astragal, consisting of roller and shelf, goes into the barrel of the column through the fillet. The barrel of the column is decorated with twenty-long semicircular in terms of furrows - flutes having semicircular completions.
Make a picture of frontal projection Capitals. The drawing should be large enough so that the details are clearly visible. Sign in the picture the title of all parts of the capitals. So you will be easier to remember them. Analyze the main proportions of the capitals, select the total height of echin and belt as a unit of measurements. Compare your drawing with Figure 192.
 |
| Fig.191 |
Continuing to study the form, go around the capitate around and consider it from different points. You will notice that the main volume, which is a circular symmetric form, remains unchanged. Only the position of Square Abaki is changing. Choose a point of view for the picture so that one side of the abaci is revealed for you more, and the other is less. Optimal ratio 1/2-1 / 3. The horizon line should take place just below the capitals, then its proportions will be close to orthogonal. If necessary, make a sketch to more accurately determine the sheet composition.
figure architectural details

Stage1.
Figure 193. Place the future image on the sheet by defining its dimensions vertically and horizontally. Note the Abaki corners, the main axis, and also determine the size corresponding to the main parts of the capitals. It is very important at this stage of linear drawing to find the correct ratio of the opening of the upper echin ellipse and the Abaki square. Traditionally, draftsmen are depicted at first Abacu, and then experience significant difficulties in the enclosure of ellipses. Do otherwise: Deciding with the size and disclosure of the ellipse, draw it. Then describe the square around the ellipse, checking the directions of its sides with nature. Stage 2.
Figure 194. Follow all parts of the capitals vertically and determine their horizontal dimensions. Draw the main masses taking into account promising cuts. Depicting the ellipses of the belt, cervix, the astragala and the lower cutting of the column, relate their disclosures with each other and with the already drawn upper ellipse echin. Stage 3.
Figure 195. Draw the flute. Competently to portray them will help you the plan of the trunk of the column. If you do not have the ability to put a plan on the very pattern, then auxiliary sheet of paper to your work. Transferred from the plan to a perspective image of the point will make the drawing with accurate and convincing. At this stage, the drawing is mainly linear, but when clarified the main elements, the use of tone, which helps graphically identify the "movement" of the main surfaces. At the same time, the tone should be very easy, involving the further constructive elaboration of the form. Stage 4.
Figure 196. Remove the shape of the capitals by means of lighting. A clear idea of \u200b\u200bthe mutual location in the space of the light source, object and drawing, makes it possible to understand the geometry of own and incident shadows, as well as identify the main tonal relationships. Determining the lines of their own and falling shadows, take advantage of the nature of the nature of lighting on simple Forms:mentally dismember the cap on individual volumes and compare them with the already known geo-metric bodies.
Stage 5.
Figure 197 In detail, work in shades in the shadows and in the light, summarize the black and white relationship
images harmoniously coenm them with each other aerial Perspective.
92 Chapter IV
figure architectural details 93

 |
94 Chapter IV
figure architectural details 95
Ionic pattern.
Ionique is an architectural ornamental element consisting of cut from above the egg-shaped shape framed by the "shell", a profiled roller, as well as handled down the downward leaves. In the architecture of ionics are widely used on the capitals and the eaves of Ionian and Corinthian orders. Ionique has two axes of symmetry, one of them passes on the egg-shaped form, the other - in the middle of the fitted sheet. Studying form, make a plan, facade and side facade (Fig. 198). This will help you to better understand the structure of the ionics, and also greatly facilitate further work on the drawing.

Stage 1.
Figure 199. Antellic the dimensions of the future image on the sheet. Picture a rectangular plate in the perspective, which is the basis for ionics.
Stage 2.
Figure 200. Suggest the ionics base plate diagonally and sitting the vertical middle line - the main axis of symmetry. Imagine the generalized form of ionics in the form of a solid quarter shaft with a beveled riding, to which a small roller is adjacent from below. Draw on the upper surface of the ionics of its plan, separate the central egg-shaped volume from the side volumes, take the axis of the symmetry held in the center of the fitted leaves, and specify the main axis. At this stage, pay special attention to a perspective reduction of equal in the length of horizontal segments.
Stage 3.
Figure 201. Draw parts - egg, shells, profiled roller, leaves. Depicting the leaves, make them on the fields large view Front (Fig.202). It will help you correctly draw leaves in the future.
Stage 4.
Figure 203. Apply the lines of our own and incident shadows. Start, as usual, with shadow places and print them several times, separating from light. Then it is necessary to increase the incident shadows towards the subject, throwing the shadow, the viewer and the light source. At the same time strengthened lines own shadows, Forming reflexes zones. At this stage, do not get carried away by the details, "Lepit" general shape In accordance with the law of the air perspective and the basic principles of distribution of lighting on simple geometric bodies.
Stage 5.
Figure 204. Continuing the work, cross the riveting of a large form in the light and then to the details. Complete the drawing with a generalization of the shape, the harmonious coenting of all its parts.

 |
 |
98 Chapter IV
drawing Gypsum Head 99
Drawing gypsum head
Human head is the most complex natural structure. This is due to its complex function in the human body. You can start the picture of the head, only having a fairly developed spatial representation, solid knowledge general provisions Figure and good practice in the image of simpler forms.
The practical section "Drawing a gypsum head" starts with the study of its external form in the "Introductional Figure". This first experience will be the basis for further, more detailed analysis. In the figure of the skull, the structure of the bone base of the head is analyzed. In the figure, Hudon is studying the location and principle of operation of the main muscles, as well as cartilaginous fabrics. For detailed consideration The skulls and muscles will appropriate to appeal to anatomical atlas and benefits. In the following drawings, special attention is paid to the main details of the head: nose, lips, eyes and ear. And finally, returning to the drawing of the gypsum head at a new level of understanding of its architectonics (i.e., the relationship of the internal structure and external form), you can consolidate and gradually improve your skills in the drawings of plaster casts from ancient sculptures: Caesar, Aphrodites, Dorifera, Diadumen, Socrates, Antinea and Apoxiomen, traditionally offered for drawing on entrance exams In the Moscow Architectural Institute.
Drawing "Antikov" - the continuation of old academic traditions. The plastic perfection of a classic sculpture, its static and extraordinary expressiveness will allow you to understand the total volume-spatial structure of the head faster, understand its details and the main proportions.
24. Introductory drawing. Head of Dorifera.
The sculpture of the Dorifora was created in the V century BC Greek sculptor with a policle, a representative of the Peloponess School. The polyclet was not only a sculptor, but also the theorist of art. They were created by the Treatise "Canon", where ideal proportions were developed very detailed. human body. The figure of the Doryifora - the young men of the warrior-Goplite (spear) - was the embodiment of this canon. At the same time, she had to become an impersonation of an ideal citizen of the Greek policy: a person similar to the immortal gods is equal beautiful body and the Spirit, courageous defender of the hometown. The face of Dorifora schematically, it is deprived of individual traits and expressions, which is why the head of Dorifera is offered for the first "introductory" work, as a result of which you get the initial, largely simplified idea of \u200b\u200bthe form of the head.
The head has a brain and facial part. Its outer plastic is familiar with the help of a number of anatomical points - nodes (reference points or lighthouses) and lines. So, the head is clearly visible: the chinful bumps, the line of the lower jaw, the angles of the mouth, lines, the limiting area of \u200b\u200bthe mouth, the lip cut line, filter, base, tip and wings of the nose, transport, cheekbones, zylovy arcs, and eyelashes, tear, eyebrushes , Lines, Limiting Eyebrow Arcs, Frontal bugs, temporal lines, Mc, ear sinks, Hearing holes, Summer beaches, Darken and occipital bumps, Novelty, neck and chin border, juggling and ledge of the seventh cervical vertebra. Find all these points and lines in Figures 205 and 206, and then on the gypsum head.
Knowing anatomical points - lighthouses and characteristic lines, you never get confused in detail and can always distinguish the main thing from random. For a better understanding of the external spatial bonds of the head points, they often use a simplified scheme representing its structure in the form of an incorrect polyhedron. It is impossible, however, abuse similar schemes in the figure. They are needed only as visual manuals For competent and convincing image of a person's head.
100 Chapter V.
figure architectural details 101

Draw from Figure P.I. Churilina
of tutorial "The structure of man's head"
102 Chapter V.

Parish with Pichurilina
from the tutorial "The structure of the head of man"
The human head is also taken to study, analyzing its cuts in three mutually perpendicular planes: sagittal, horizontal and frontal (Fig.207).
The sagittal plane is the plane of body symmetry. Her name comes from the Latin "Sagttta" - arrow. The incision in this plane gives us an average line, which is the basis of the prof "shine line of the face and is very important for the picture of the head.
The horizontal plane passes through the base of the nape and the base of the nose.
Frontal planeperpendicular to the first first and "cuts" the head in the widest place. It passes through the top, dark bugs and skull support points for the spine. Study of these cuts, as well as orthogonal projections of the head: the appearance of the front, behind, the side and from above will help youit is better to understand the outer plastic head and more accurately pass it in your drawing.
drawing Gypsum Head 103
The task of "Introduction" drawing - good composition On the sheet, the correct transmitted total volume, as well as the accurate place found and the size of each head of the head.
Stage 1.
Figure 208. Starting work, determine the position of the horizon line and angle. To do this, mentally conclude a head in the cube. Find overall dimensions and place the future image on a sheet with short serifs. Remember that if you draw a head in the FAS - the spaces on the left and on the right should be equal to the image not "wounded", but if you draw a head into the profile, 3 \\ 4 or 7 \\ 8 - the space of the sheet before head (from the side Persons) must be greater than from the side of the occipital part. Light lines back down the contour of the head (Abris).
Stage 2.
Figure 209. Draw the main major parts: separate the mass of the head from the neck, take the front part, its front plane and easily apply the axial profile line. Clarifying the profile line, find the characteristic points lying on it: the turn point of the forehead (on the hair growth line), the point between the eyebrows, the point of the base of the wings of the nose and the chin fracture point. These points define the main canonical proportional relationship of parts of the head. According to the Greek classic canon, the distance between these points should be equal. Spend the horizontal lines through these points (in the figure flowing to the gathering point on the horizon) and mark on them, respectively, the width of the forehead, the base of the nose and chin. For right choice Directions of these lines, use the way to sight.
In accordance with the ancient canon, the antique head is divided into two equal parts of the eye of the eye to the eye line and from the eye line to the base of the chin. The segment from the surveillance arcs (points between the eyebrows) to the base of the wings of the nose is divided into three equal parts - the eye line passes along the upper division line, the base and wings of the nose are separated along the bottom line. The segment between the point of the base of the wings of the nose and the chin fracture is also divided into three equal parts. Upon the upper division line passes the middle line of the mouth, which is also called the lines of the lip cut, the lower line divides the chin in half. The distance between the eyes is equal to the length of the eye, i.e. The eye line is also divided into three equal parts. The height of the ear is equal to the length of the nose.
© 2015-2019 Site
All rights to belong to their authors. This site does not pretend to authorship, but provides free use.
Page Creation Date: 2016-02-13
Very often in the world of artists there are paintings, largely different from oil and pastel canvases. They resemble drawings, patterns, sketches and are completely incomprehensible to a simple viewer. Now we will talk about compositions from geometric figuresLet discuss what they happen which load is carrying and why they are at all occupy such an honorable place in the art of drawing and painting.
Simple compositions
Every wizard brushes that started his way with art school, Answer what exact lines will answer, and their combinations are the first thing to teach there. So there is our vision and brain that if you initially learn to harmoniously combine simple formsthen in the future draw sophisticated paintings will be simpler. The compositions of geometric figures allow us to feel the balance of the paintings, to visually determine its center, calculate the drop in light, determine the properties of its components.
It is worth noting that, despite the clarity and direct images of such images, they are drawn exclusively by hand, without lines and other auxiliary items. The parameters of the figures are measured using proportions that can be located in a two-dimensional measurement (flat picture), and can go into perspective into a single point of departure of all lines.

Beginners artists paint compositions from geometric shapes in two dimensions. For such pictures, one of the parties is selected - a plan or facade. In the first case, all the figures are depicted in the "view from above", then the cone and the cylinder becomes around, Prism acquires the form of its base. If the figures are depicted in the facade, one of their sides is demonstrated, most often the front. In the picture we see triangles, squares, parallelograms, and so on.
Three-dimensional paintings
In order to develop and the feeling of perspective, artists learn to portray the compositions of the geometric figures of the volume, which go into perspective. This image is considered three-dimensional, and in order to transfer it to paper, you need to imagine everything clearly. Similar drawing techniques are relevant in construction and architectural universities, they are used as exercises. However, students often from these "picturesque etudes" do real drawing incredible shapes of figures, cutting compositions with planes and semi-positions, depicting pictures in the section.

In general, it can be said that clarity, linearity is the main properties that any composition of geometric shapes possesses. The drawing at the same time can be static or dynamic - it depends on the type of figures depicted and on their location. If the picture is predominantly cones, triangled prisms, balls, then it seems to be "flies" - it is definitely dynamics. Cylinders, squares, tetrahedral prisms relate to statics.
Examples in painting
Geometric forms found their place in painting, along with romanticism and other destinations. The bright example of this is the artist Juan Gras and his most famous picture "A man in a cafe", which, like a mosaic, consists of triangles, squares and circles. Another abstract composition of geometric figures - Pierrot canvas, artist B. Kubist. Bright, clear and very peculiar picture.
Subject: The patterns of contrast, the nuance as a means of organizing elements into a single stable system (clause 1.2.8).
Task execution sequence:
Sheet is conditionally divided into two parts. In the first part of the sheet:
1. Perform the composition in black and white graphics By imposing simple elements (geometric shapes) to each other using contrast in size and form.
Fig. 29. Organization of plane with similar elements

Fig. 30. Organization of plane with similar elements

Fig. 31. Patterns of meters and rhythm as a means of organizing elements into a single sustainable system

Fig. 32. Patterns of meter and rhythm as a means of organizing elements into a single sustainable system

Fig. 33. The patterns of meter and rhythm as a means of organizing elements into a single sustainable system
2. Perform a composition in black and white graphics by overlaying elements to each other using nuissary ratios in size and form.
On the second part of the sheet: to create an application by applique the shaped composition with the use of contrast or nuance. The composition must be clearly pronounced. Examples of performing this work are shown on (Figure 34, 35, 36, 37).
Typical errors:
the contrast or nuance is not expressed successively. The composition is borderline;
no equilibrium forms.
Materials: Sheet format A-3, colored paper, PVA glue, mascara, rapidograph, scissors.

Fig. 34. Organization of a plane with the help of contrast and nuance relations

Fig. 35. Organization of the plane with the help of contrasting and nuissary relations

Fig. 36. Organization of the plane with the help of contrasting and nuissary relations

Fig. 37. Organization of a plane with the help of contrasting and nuissary relations
Creativity & Hobbies.
Examine the basics of architectural drawing
The cornerstone in architectural education - knowledge of the basics of architectural pattern. Although I did not go for the architectural this year, I did not drop the thought of becoming an architect and I will slowly, but confidently go to my goal.
So, in front of me the book "Drawing on the presentation. From geometry to architecture." FROM today's day I will begin to study this book thoughtfully and diligently, every day training in the picture. I undertake to spend 1.5-2 hours a day on a drawing on a book (exceptions: unforeseen circumstances, weekends, trips and situations, when I can not use tools and a textbook) and show a community your work. I won't hurry to hurry, and I will install the timeline approximately with a large margin. Deadline - March 6 of the next year.
Goal Accomplishment Criteria.
The book has been studied: all tasks are completed, photos of work are posted on the site.
Personal Resources.
Time every day, paper, tools, book.
Part 1. Initial exercises
Section 1, drawing of straight lines
- Drawing of straight lines
- Drawing parallel straight lines
- Drawing of direct lines "From point to point"
- Dividing direct on equal segments
- Corner division on equal parts
- Figure linear organment
Section 2. Figure Curve Lines
- Drawing of curves lines
- Drawing of crooked lines by reference points
- Circle-based ornament drawing
- Ellipses drawing
- Figure ellipses
Part 2. Perspective of the Square and Circle
- A promising image scheme
- Square drawing in perspective
- Drawing of the square described around the circle in perspective
Perspective of simple geometric bodies
Section 5. Perspective drawing of a cube and a tetrahedral prism
- Perspective drawing Cuba
- Figure nine cubes
- Linear-structural pattern of compositions from cubes according to plan and facade in front and corner perspectives
- Linear constructive pattern of compositions from cubes in perspective
- Linear constructive drawing of the compositions from cubes and tetrahedral prism in perspective
Section 6. Perspective of the Pyramid and Hexagon
- Linear constructive drawing of the pyramid
- Linear-constructive drawing of a hexagon prism
Section 7. Perspective of the cylinder, cone and ball
- Linear constructive drawing of the cylinder
- Linear constructive pattern of cone
- Cylinder cross section and cone planes parallel to bases
- Cone section parallel planes perpendicular to its base
- Drawing of cylinders of different diameters set on each other
- Linear-structural pattern of the ball
- Bowl section parallel planes
- Drawing of a bowl standing on Cuba
- Cuba drawing described inside a bowl
Part 4. Tonal Figure
Section 8. Tone. Initial exercises
- Tonic stain hatching
- Hatching flat figures
- Tone scale made in hatching techniques
- Trench of flat figures
- Shading in the technique of "wide stroke"
- Plane composition of polygons
Section 9. Black and white drawing of simple geometric bodies
- Tonal drawing cube
- Tonal drawing of a four-headed prism
- Tonal patterns
- Tonal drawing cylinder
- Tonal drawing cone
- Tonal pattern of ball
- Tone drawing of a step cone
- Tonal drawing of illuminated surfaces
- Tonal pattern of shadow surfaces
- Tonal drawing composition of four cubes
Part 5. Boxing geometric bodies
Section 10. Simple Cuts
- Box Cube and Quadruple Prism
- Cube Cube and Pyramids
- Cube Cube and Hexagon Prism
- Cube Cube and Cylinder
- Cube and cone
- Bowls and Cuba on specified orthogonal projections
- Cube and ball with shared center
- Bowling and cube, when the sectional plane cube does not pass through the center of the ball
Section 11. Complex partitions.
- Inclined section of the hexagon prism
- Insert two hexagon prisms
- Pyramid inclined section
- Box pyramid and hexagon prism
- Contact cylinder cross section
- Inserting cylinder and hexagon prism
- Pyramid and cylinder
- Inclined cross section of cone
- Snoring cone and hexagon
- Cone cone and pyramids
- Inclined cross section of the ball
- Snoring hexagon prism and ball
Composition from ordinary geometric bodies
Section 12. Composition from simple geometric bodies on the entrance exams in the marchs