Hard skull, process with explanations. Circular, as the basis for understanding complex volumetric forms head head academic drawing
Read also

In this lesson, I prepared the material so that the key principles of drawing the human head are visible. To learn how to draw a portrait, you need to understand the shape of the head, and this is possible with the help of simplifying and summarizing unnecessary details. For this purpose, I used a schematic image of the head with the name "Cube", an academic pattern of skull, a phased picture of a man's head and additional schematic drawings that allow you to understand the features of an anatomical structure.
1. Validity of the form. Simplification and generalization.
At the initial stage of learning drawing, people most often see the outlines of the object instead of its volume. It is so novice and draw a portrait: Sweep the contours of the eyes, the nose ... But the head of man, eyes, nose, lips - they all have a volume, it is not just contours. In addition, they have a rather complicated form. Therefore, at the beginning of the training you need to be able to generalize the secondary and realize the volume of each form.
Initially, let's try to draw a person's face with ahead of the nose and forehead represented in the form of rectangular geometric shapes.

2. The skull is the basis of the shape of the head.
Next, you need to learn one important lesson. All the main bends and contours of the face are formed from convexities and bends of the skull. After all, it is the skull that is the basis on which the shape of the head is built in the portrait. Try to trace this relationship, comparing the shape of the skull with the head pattern. This is a very important point in learning.
Since the skull has a complex form, then it will not be easy to understand this relationship immediately. Therefore, first we draw a skull generally.
The skull consists of two main departments: brain and facial.

In addition, the shape of the skull can be conventionally present in the form of a cube. The skull has the front side, two side, occipient and, so-called skull or roof.

After conditional, generalized drawings, I bring a training academic drawing of the skull as an example. With a multitude of parts, it can be seen frontal, occipient, side sides and arch. Also can be seen as the details are grouped into two main divisions - cerebral and facial.

It should also be noted that the widest part of the skull is closer to the back of the head. It is clearly visible in the picture below.

For those who learn to draw a portrait, the following anatomical names of various parts of the skull can be useful:

- abrasion arcs;
- frontal bone;
- parietal bone;
- occipital bone;
- temporal bone;
- zyloma process;
- cheekbone;
- topper bone;
- lummy bone;
- nasal bone;
- ore or eyefline.
3. "Oruruk" is the key to understanding the shape of a man's head.
In addition to the skull, the muscles, cartilage, fat deposits, etc. affect the shape of the head and face, etc. In order not to get confused in the details, hardware will help to understand the anatomical structure. Circular is a conditional image of a man's head, consisting of faces. With such planes, the volume of the entire head is formed. Thanks to these faces, the main bends of the skull and major muscle groups of the face are clearly visible. In any portrait, any person has a head shape based on these faces of hardware. Of course, each person has its own features of the person, their proportions, but key points in the construction of the head correspond to the corp. Therefore, in drawing a portrait, the artist always keeps in memory these key facets.
Try to trace the main plane of the climb in the figure of the skull and in the tonal picture of the head made by the pencil.


4. Formation of volume by means of lighting on the front, side and upper sides of the head.
So that the picture of the head was voluminous, it needs to be worked out with a hatching. The hatching creates the desired tone. By changing the tone (lighter-darker), we see the volume and shape. According to the law of lighting, the light is distributed on the surface of the form in the following sequence: glare, light, half, shadow, reflex, falling shadow. If you draw a ball or similar simple geometric shapes, then everything is much easier. But how to show blue thymus in a tonal figure of a man's head? In the portrait, light thump is also paced by hatching as in the figure of a ball. But with the difference that the artist should trace the light and shadow on each individual fragment of the person in particular and on the whole head as a whole. That is necessary to show the light, halftime, shadow - on the nose, on the forehead, on the eye depressions, on the lips, chin, etc. But besides this, the light and shadow need to show on the whole head as a whole, that is, on her major major faces or sides. For example, one side of the head may be darker than another. This is an important point when creating a scalp in the portrait.
For a better understanding of this topic, I cite as an example, visual schemes and drawings of gypsum climb, skulls and human heads. In them, you can clearly see the frontal, side and upper facet of the head. The schemes and drawings with a pencil are designed in such a way that with the help of them you can gradually trace the main facets of the head, which will help beginner artists to see the light on the surface of the head as a whole.


5. Brain and facial heads.
Above, I have already given a schematic drawing in which the brain and facial skull departments were visible. But, how to practice these areas in the drawing portrait? This can help a number of drawings and schemes below. Here you can trace the boundary between the front and brain parts of the head in the usual drawing of the pencil, gypsum hardware and the learning picture of the skull.

6. Phased tonal drawing with a pencil.
After studying the main anatomical features of the structure of the head, you can proceed to the phased pattern with a pencil. Here you need to learn this sequence. First we draw a generalized. Then complicate the drawing by adding details.
but) Since the shape of the head resembles the shape of the egg, then at the beginning we draw the line the corresponding figure.

b) After that, we perform the construction of the head pattern. We draw the axis of symmetry, which will pass through the middle of the head. This is very important as the axis will allow to compare the left and right side, which will help to avoid mistakes and irregularities. Further, we plan levels on which eyebrows, eyes, nose, lips are located. We plan them with light lines. About how to determine these levels I wrote in the lesson

in) At the next stage, you can outline the eyelabies, eyes, nose, lips, as well as the bone, frontal shares, major muscle groups and folds on the face.
The technique is represented by the World Contest of Pictures and Methods Art Lesson
Opening part
The teacher's artist should not only own a sufficiently high level of skills, the skills of realistic drawing, painting, compositions, deeply understand the essence of creativity, it is clear to represent the process of forming an artistic image, but also be able to convey their vision to the disciples, understanding, pass the skills.
I, Andriyanova Elena Nikolaevna, I am a teacher of drawing, painting, compositions, made up in MBOU DOD "Children's Art School" Dimitrovgrad, Education - Samara State University with specialty Fine art and drawing, specializing world artistic culture, general pedagogical experience - 20 years.
After reading the Status of the International Pictures and Methodology of Art Lesson, I realized that we were with Himatdin Renata, my student, should participate and cope with the task of the competition.
In fact, every teacher dreams of an ideal student. This competition provided me with the opportunity to demonstrate the creative potential, my, as a teacher, and my student.

Gimatdinova Renata is the gold medalist of the 4th regional stage of the Delphic Games in 2013, held in the city of Ulyanovsk, became part of the Delegation of the Ulyanovsk Region to participate the XIII Delphian Delphic Games of Russia and I of Open European Delphic Games, in 2015 received a governor's award for high Achievements in study. She is a winner and the winner of the Competitions of the Interregional and All-Russian Level, in its portfolio there are a lot of and Grand Prix for Fine Arts. Renata always properly distributes its work in time, constantly actively learns something new in different fields of science and culture, sometimes at the request of comrades talks about their actual achievements and shares its experience. Renata always achieves the fulfillment of the intended, even if long-term effort is required, it does not hurry before difficulties.
An important point in our communication is that the learning process is to "meet". Figure training is conducted on the basis of fundamental academic principles and developments. They are in textbooks. There are no special discoveries, I will study on the accumulated methods, based on many years of experience. Discovery occur in the process of communication. I, as a teacher, I try to open various verge of tiping in my student, and she, in turn, helps me "catch up" the skill of the teacher. In my opinion this is mutual cooperation when the student and the teacher "move" to meet each other.
Methodical part.
Topic: Building a gypsum head climb on Hudon.
Objective: Send the method of analyzing and expressing a large form when building head climb.
Tasks:
1. Develop a figurative and technical thinking, spatial vision.
2. To logically comprehend and clearly represent the image of this plastic head.
3. Create an artistic image in the figure on the basis of solving technical and creative tasks.
4. See the proportions, design and volume of production.
5. Use expressive techniques for the detection of light and the depths of space.
6. Transmit volume with lighting.
The work is designed for 6 academic hours.
Material: Pencil, ½ Watman.
Hardware - Gypsum head of generalized planes, made on the basis of Ecrache Hudon, French sculptor, outstanding masters of a psychological portrait. This tutorial gives the idea of \u200b\u200bconstructing a volume-spatial structure of the head, lightning patterns, promising cuts.
Circular is useful at first training when the demonstration of the basic laws of formation and the prospects helps in the construction of the volume, the identification of the form.
If the student does not comprehend and represent the features of the shape of the head, and will be limited only by its sensations and perceptions, he will have to go along the path of passive copying of nature, drawing the appearance.
The study of the method of analysis and expression in the figure "Big Form" for students is often accompanied by difficulties. Starting to portray the general shape of the head, students are usually limited to the linear abras of the head and immediately go to detail, without specifying the nature of the form of the head or its volume. From here and details they begin to draw not from identifying the base of the form, but from drawing the configuration of the nasal form, eye, lips.

It is necessary to build a head with more generalized forms, such a method of construct is called ironing and the head of climb will help us.
Many famous masters began their masterpieces from this method of building. The ironing method was developed in the era of the revival of Albrecht Durer. Following A. Durer, artists-teachers for learning, the head pattern began to develop their schemes for expressing the structural base of the shape of the head, with the help of which helped students faster and better absorb the training material. In the future, developing a human head drawing methodology, each author of the benefit tries in its own way to interpret the method of using a constructive scheme. Some took as the basis of the scheme of A. Durera and offered to immediately schedule all the structural lines. Others preferred the scheme of the city of Golbien, which was limited to the "cross" - the line of incision of the eyes and profile, the third tried to combine both.
The structural pattern of the ironing head makes it possible to generalize and simplify the forms for a better understanding and analysis - the initial stage of building an image.
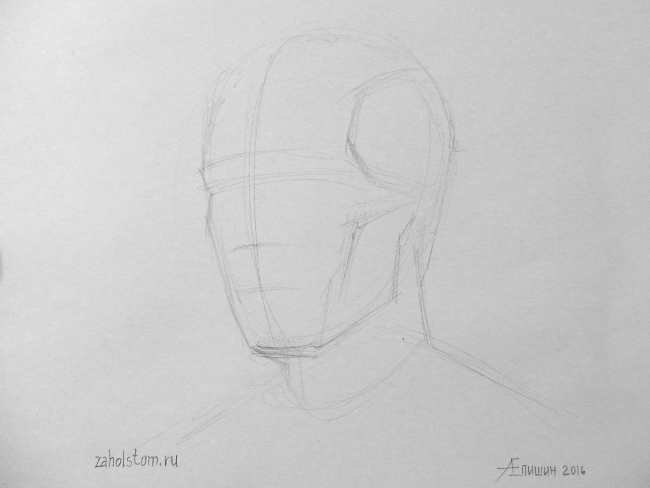
Hard head is a diagram of the main structure of the head.
Harvester divides the head into many plans and planes, which can be consecrated in six large plans: front, rear, two side, upper and lower.
After examining the location of plans on a circular head, you can then see these plans and on the gypsum head and alive.
To learn how to see it all, it is necessary to know from which items this whole consists, how these parts and parts are coented with each other. Mastering the method of analyzing and expressing a large form gives a student experience to visually predict the result of building an image, that is, to present in advance how his drawing will look in the ultimately.
The basis of this task is the analytical method. Depicting the generalized shape of the ironing head, the student must learn how to see how the structural base of the form is organized from individual planes, it should seek the form of visually, and the movement of the hand with a pencil to compose the plastic expression of this form, and generalizable, without smalfall.
Creative part
Constructive construction
1) It is necessary to determine where the head will be in the Watman sheet of the A2 format. To do this, schedule overall dimensions, finding the ratio of the width and height of the object depicted. It is necessary to leave more space from the front side.
2) Note the total volume of the ironing head.
3) We define the heads of the head.
4) Find the facial parts in our perspective.
3) We share a person on proportional parts of the person. Note the profile line.

Knowing the location of the profile line, Renata easily determined the position of the head in space. To do this, it is necessary to mentally connect the direct line to the point of contacting the profile line with the overhead arc line and the point of contact with the profile line with the line of the chin and determine which angle is formed between this line and the vertical, in the same slope there will be the whole head.
Since the profile line divides the head into two symmetrical parts, the Renate easily monitors the location of the paired forms (protrusions of the zoom bones, orpads, the corners of the Hy6, the wings of the nose), which in the figure are scheduled simultaneously. She outlined the tip of the nose, the bridge, the abnormal arc, the average mouth line, chin.
Horizontal structural lines are parallel and the head member to proportional parts. The lines of the surveillance arcs, the bases of the nose and the chin divide the head into three equal parts. This regularity of proportional membership of the head was established by more artists of antiquity. Three-part division of the shape of the head we find both in the canon of the proportions of Ancient Egypt, and in artists of ancient Greece and Rome. Artists of the Renaissance on the basis of mathematical measurement also came to the conclusion that the facial part of the head is divided into three equal parts.
It must be remembered that the fact that closer to us seems more, which is further - less, that is, it is reduced.

Tonal work (minimal).
1) We define the light from which side.
The faces of which the bright light falls the brightest, on which the sliding light is slightly darker, the darkest faces are turned off from light.
You should not forget about reflexes.
2) It is necessary to achieve whole image.
Research part
The Durarian scheme of the structure of the shape of the human head is not the absolute truth, but it is definitely correctly reveals the structural base of the form. The canon of ancient about the membership of the head into three equal parts is not an absolute proportion for each person, but as the general pattern of proportional membership - it is true.
Building a burger head helps not only to explore the methodological sequence of building an image, but also seize the language of realistic art. When a student determines the direction of planes in space and tries to correctly convey them in the figure, it is studying on the graphics tools to transmit the image of the object, therefore, mastering the language of the figure.
Renata with this task coped easily.
FINAL PART
Interaction and cooperation, are specific means of solving productive tasks and the condition for mastering students of cognitive activity. A student who is observing nature, so that the head does not get a curve so that there is no gross violation of proportions, should use the ways that facilitate work - he must know the rules, rules and laws that artists used to him and who helped them in their work.
Knowing all this, Renata should not constantly check the proportional relationship in the figure using a ruler and a circulation, which sometimes do students.

Repeating the words of the great artists of the Renaissance, I would like to say that the ruler and the circular should be in the eyes of the artist, and not in the hands: the hand causes an image on paper, but the artist's eye checks its actions.
Figure teachers should be remembered that special tasks on the linear-structural construction of the image of the head shape help the student better absorb the training material, they teach it during drawing to constantly think and reason, we are learning from passive copying of black and white effects, since with the help of these tasks, the draftsman begins to understand that the form structure always remains constant.
List of quoted sources
Aksenov K. Figure. To help the novice artist, the designer. M., 1987.
Barsh A. Figure in the middle school. M., 1957.
Lee N. Basics of the educational academic pattern. M., 2003.
Lee N. Head of Human. Basics of educational academic pattern. M., 2009.
Radlov N. Drawing from nature. 3rd edition. L., 1978.
Rostovtsev N. Academic drawing. 3rd edition, supplemented and processed. M., 1995.
Rostovtsev N. Drawing from nature. L., 1962.
Rostovtsev N. Training drawing. M., 1976.
Rostovtsev N. Methodology of teaching visual art at the School M., 1983.
Hogarth B. Draw a human head MN .. Poturry LLC, 2002.
Hogarth B. Dynamic anatomy for the artist M., 2004.
Ideally, of course, it is worth drawing from nature. But, unfortunately, there are few houses who have gypsum heads, arms, legs and skulls. And when you draw at the computer, it is even more complicated to draw from nature, as the computer does not drag with them into the right room, where the light and still lifework stands.)
Therefore, often you have to fill your hand, drawing with photos. In order for the drawing does not turn into a thoughtless copy process, you need to draw with analysis.
Here is the original photo (taken from the Internet expanses):
Before starting work, it is necessary to study and analyze the source.
"Program minimum":
1. The form and lighting is analyzed. We draw attention to what the edges look at the light, and which are turned on from light.
Lighting comes from above. Therefore, the upper part and the protruding parts are the brightest. Then there is a gradation from light to the half, then the shadow and on the bottom of the jaw reflex - again light gradation to lighter. So go common forms. At the same time there are parts that are stronger from light, and therefore darker. (Pelical, cheekbones, chin)
The cranial box itself, despite the fact that it is climbing, looks like a bowl. The edges of the head are rounded, which affects inhomogeneous lighting of both the upper faces and side.
In the photo, this gradation is not so visible, because The photo "eats" at least half of the tones compared to kind, but, nevertheless, it is present. In the picture, this gradation can and even need to be done more explicit.
It may seem that the sides (head + cheekbone) is a cast form. In fact, it is not. The face of cheekbones and the verge of the skull itself is in fact different facets. I attach a file in the side angle so that you can see how it looks.

2. The proportions are analyzed.
The main part of the skull is conditionally fits into the square. In this case, the entire skull is divided into three approximately equal parts. The third part of him occupies the jaw.
After we analyzed the general form, lighting and proportions, begin laying and building.
Pre-layout and primary constructions.

Subsequent constructions that are repelled from the primary.

During the constructions, it is important not to forget to check the left and right side of symmetry.
After construction, there is a study of volume.
At first I plan the total volume and lighting, on the principle similar to the ball.

Then I pay attention to the protruding parts and on the parts that are turned on from the light.

I move from common to the private. Glare leave for later.
Build lines can be transferred to the top layer so as not to lose the proportion during study. At the same time, layers with buildings should be made translucent so that they do not greatly interfere with the tone set. And you can also remove them at all if they interfere (they often interfere with me, so I rarely use them).
Each new stage start on the new layer so that, in case of failure, this layer could be removed without regrets. \u003d)
Then the final stages, on which I specify the details of the lighting and add contrast. The construction lines are no longer needed, they can be made invisible, remove or leave a layer with buildings with a density of about 5 percent so that they slightly delimit the brinks from each other, and then draw the work on top of them.

The last stage and goes to the final.

I hope it was interesting.
Thanks for attention. \u003d)
In any process, it is always necessary to highlight the initial base with which further training will be followed. For the primary study of the human head, the best foundation is drawing head harness.
Circular, according to artistic terminology, is called the sculpture of the human head with a constructive structure. The carcass is emphasized in the corps, on which the faces and the plane are located, of which the human head consists.
Cubovka - This is a diagram for drawing and analyzing the structure of the head, where a clearly designated structure gives a clear idea of \u200b\u200bthe formation of the head and a clear arrangement of lighting on the surface.
Thanks to novice artists need all the same Jean-Antoine Hudon, which at the end of the XVIII century created the best allowance for studying the human body. Hardware, this is the head of the famous work "Ecoshe" 1776, which was created for the preparatory stage and got a name - head of generalized planes.
The goal of drawing head head:
- Examine a constructive scheme for building the human head and the location of the main elements, such as eyes, nose, mouth and ears.
- Remember the ratio of the main masses and nodal points of the compound volume.
- Disassemble and learn to use planes, plans in building a picture.
- Learn to correctly apply the touch and distribute the tone throughout the scalp.
Having mastered the construction of the climb, the student will be able to launch the faces and the main tones on any subsequent formulation with the participation of gypsum heads, and on, and on nature.
In the work of Hudon, the head is divided into many plans and segments, which, in turn, are constructively connected in a single form. The spectacular membership of the faces often distracts the disciples from the purpose of the task. You should not start working with faces markup, try to catch the location of individual planes. Here, as in every picture, the principle is valid: from common to private.
Hardware with a geometric basis will help properly work with tone and plans, using the skills obtained in. The direction and intensity of the stroke will set the logical design segments, which clearly demonstrate where the barcode should be located, where darker, and where is lighter.
Skills obtained when working on hardware will be suitable in subsequent tasks. Especially, the ability to use the scheme of plans and faces designated on the sculpture, it will be useful when working with antique heads, and in the future, and with simulators.

The technique of pre-iron sketch was used by the most famous artists since the beginning of the XV century. The earliest preserved example of the simplified pattern of the human head dated 1404 year and was created in the cradle of the Renaissance - Florence. This technique is used by artists for many centuries for preliminary layout of volumes and plans. Thanks to Jana-Antoine Hudon, she acquired an embodiment in the image of a methodological manual and became the standard for building a head. This technique is very convenient for analyzing and building any productions.
The program exists tasks that are starting points, vertices, where the student rises in the learning process and from where it goes to the future path. Drawing hardware is one of the most important tasks in the program where it is desirable to pay more attention and try to portray the production from different angles.
A month ago, I scored a small group of students who trusted complex, but a grateful thing - preparation for the portrait.
As you know, we adhere to the classic school of drawing, so the first serious work has become a drawing of a climb. Circular is a gypsum head, as if "cut down", that is, not elusive in full accordance with the human anatomy, but made of planes, which adds it a certain difficulty, but at the same time, as they say? "It's hard in teaching, easy to fight!"
Tasks that solve a high-quality drawing of this tutorial a lot, and most importantly, they need to decide with all seriousness, here the lies at the level "I see" will not pass at all, because any viewer will notice any of the mistakes, from portrait nonsense, which is called Artists "did not get into character" before violations of the prospects.
I specifically entered the search engine to find examples of drawings of different people. Look at yourself: completely different people are depicted on them! The reason is simple. Pupils are considered physically ready for man drawing if they have passed a consistent rate of academic pattern, starting with simple still lifes and performances of geometric bodies, to gypsum sockets and capitals. It was all with us.
Nevertheless, we, too, despite the many years of training of some students, faced the same problem. The flair suggested to me - even before the setting of the head on the sheet, suggest drawing a sketch. In other words, for the first time to meet and "feel" pencil. The result was upset by: no one "found" the character of the harness. It meant that you can give them to complain, and they will cope, they are competent, give them knowledge of the antique canon, and they will also put them on the sheet, you can tell about the formative planes, and they, yes, they are able to build, this is confirmation - Pictures of art. But the most important thing is that it is necessary in the portrait, the character will remain "for the scenes". And this would be a non-disabilities in the curriculum, so we agreed to devote more to "tackling", and the results were satisfied to a greater extent, although not quite. The head was learned, but it was all different. We chose a standard for our school - short sketches in my method.
Here I distracted and make a little digression from the topic, because I ask this question, they are interested in this, and once you need to answer. So, what goal to put in front of yourself, drawing outline. I, Olga Rubtsova, will answer, without thinking: it is most important to grab the character. Here is an agility of the hands necessary by the artist. Then anatomy, then literacy, and even the design then, if you want to become an artist ... not an architect, not a designer, and a drawrower, an embodiment of the image, thoughts, fantasy ... You need to learn how to extract from our own inner world, the most important thing is that You are disturbing than you want to share. And here for this you need artists. True, my husband, teacher of Skketing, considers otherwise. He leads an outline with focusing on the dynamics, teaches to recognize streams, stains, in one word, this work is more intellectual than I propose, and it is directed rather to the development of logic and proportional to the eyeball. Of course, you can combine two types of sketches, and you can even find our own tasks for yourself and make out the sketches in your own way, for our purpose, but one thing is important - the amount goes into quality, otherwise we already draw no sketch. It smells like a sketch, sketch, anything, but not fleecely captured by the breeze ...
So, we started working with your head precisely with sketches. For our art, it was an average number of outline minutes, 5 minutes. Four years ago, we began to reduce the time and the result did not make yourself wait: from one to three minutes there are such pictures.
And now, yesterday was the third day with a cloud. I asked to bring stretched tablets and was morally ready to tell once again about the canons of construction, about the characteristics of the model, about the supporting points and ... let go in swimming ... But my guys were asked to give them another day to study the head.
Do you know what I love an adult apprentice? For what he can be responsible. Do not need a stick, you do not need to persuade and look for an approach. The rigor is also needed, but it goes into criticism and in the desire not to move away from the principle. And my principle, I would have a little one, because I demand a lot, because it is difficult, but they will have a maximum chance of success, in other words - they will be able to learn to draw themselves ...
And here you are pictures from the scene.
Start. Psychological training is already in sharpening a pencil. It should be sharp, obedient, flexible :). Do you know the boxes in the frame? :)) There is already half filled with chip! This is a good indicator, the same Labor Indicator!
Head awaits. Like any nature with which you have to work, it must be attentively thinking about, to fishe, try, about ... You have to guess about it :), because everyone knows that we can see only one side of the moon, and therefore, if the nature Not a child, not an animal, not a free bird - use, draw, draw mentally and truly, a lot!
This time Sasha sat down, it was near the door, but soon he moved to his beloved place, next to the classroom)). See how watercolor jars are curious, and for sure the patterns of drawings from books want to jump and look closer on Sashino creativity ... Sasha, show?
Is it really like it?! A week later I will start building on a large sheet. The main goal is wage - with your head we met, although, of course, on "you" to move it too early :)). Educational situation ... Everyone is serious ... on the first drawing, Elena Nikolaevna. She is a beginner and still draws a cylinder. In our groups it is possible to solve different tasks on the same lesson, since the approach is individual. This means that we are waiting for students of any level, and they will be able to work at their stage of teaching a slave with those who are a little ahead, in this I see even somehow incentive to grow, develop, catch up ...
By the way, behind the pupils are two cabinets filled with the requisite :). ABOUT! This is my special pride! Probably, it is necessary to somehow write a story about how I collected it, how it is interesting on topics ... but in general, here on the site three photos with Maaalny particle of our collection of jugs and old kitchen utensils :).
So ... yeah, Sasha again moved to the door and sat down next to Alsu. It is right. It is necessary to look from different sides to nature, it is necessary to draw it in different ways, perhaps it will be released ...
And that's what we came to the end of the lesson:
In my opinion, already recognizable comrade!
A report from the scene will continue with the next stage of drawing and with the following successes, be in touch, write, come to meet and learn :). And, by the way, to join the group drawing head too, it is also not too late!
P.S. I apologize to those who did not get into the frame. However, you did not rush especially :))