How to draw a portrait of a simple pencil. Portrait of a child can be performed according to the scheme proposed below
Hello, dear friends!
Today we draw a person's face. Many mistakenly believe that only selected talents can draw. It is not true: learn how to draw correctly everyone who has a desire and patience. Correctly depict the person's face will help you know the knowledge of the basic proportions and rules of construction. Read the following material and try to draw a face in stages.
Axis and proportions
Drawing a person's face, be sure to learn and constantly easily apply axial lines.
With experience, it will be possible to do one or two guides, or at all without them. Do not think that the axes are boring and uninteresting, they will help you quickly and correctly build a face with correct proportions, identical eyes, symmetric parts.
In the future, visually imagining these axes, you can work with the faith and emotions of a person. After all, to show sadness, you need to lower your eyebrows and corners of the mouth, cover your eyes, and for this it is necessary to represent at what level all these parts are in a state of calm.
Eye line
The first and main axes that must be remembered by:
All adult people are in the middle of the head.
Symmetry and eye axis
We divide the head into two equal parts horizontally - the eyes will be located here. We also plan a vertical line of symmetry.
Man's balance in motion
Initially, it is difficult to do it on the eye, so check yourself, measuring the same segments with a pencil or ruler.
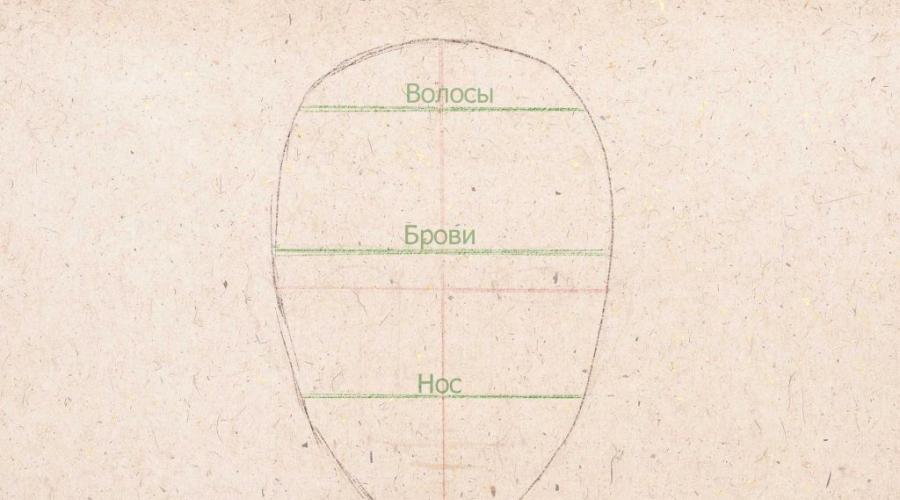
Nose hair eyebrow line
Next need share oval head horizontal lines for three and a half. The upper axis - hair growth, in the middle - the level of eyebrows, below - the axis of the base of the nose. The distance from the hair to the eyebrows is equal to the altitude of the forehead. In fact, the face (if not to take into account the hair) consists of three equal partswhich are equal to the altitude of forehead.

Mouth and lip line
Further designate lips. For this, the lower part of the face (from the nose to the tip of the chin) should be divided into half - so we will find the line of the edge of the lower lip. To determine the level of rotation of the mouth, you will have to divide the segment from the bottom lip and to the nose to four equal parts. The first quarter and the mouth line will be.

Mouth and lip.
The incision of the mouth among most people is on the same level, but the size of the upper and lower lips are completely different.
How to draw a hare
Where to place the ears
No matter how strange, but very often with a more or less successful building of the face, the ears are attached at all in the place where they should be located. Therefore, we will pay a separate attention to the abnormalities.

Correctly place your ears
At the top of the ears are attached to the axis of the eye, and at the bottom at the level of the nose. They can be big or small, highlighting or lay down to the head, but they are attached to all people they are on the nose and eye.
How to place your eyes
How to find out the width of the eyes and the distance between them? For this, the eye line should be divided into 8 equal parts.

Weekly eyes
- Another eye should be placed between the eyes (2/8).
- Each eye width in 2/8.
- From the external corners of the eyes to the contour of the head, we leave 1/8 (half of the eyes).
These are approximate guidelines. W. different people These proportions differ slightly. Optionally, each time to share the axis on 8 parts, simply check yourself.
Draw the ears of man
Also read the article on how to draw your eyes realistically and correctly.
Make sure that your eyes are not too close to each other, or, on the contrary, too far. These parameters will help control the size of the eyes so that they are not excessively large or small. The inner corners of the eyes should always be located on the eye line.
At first glance, all these lines are cumbersome and difficult, but for the beginning you can practice paint face taking into account only horizontal axes. In the course of work, you will have questions and you will come to what you need also vertical guides. With the acquisition of small experience and skill you can easily draw faces without prior markup and axes.
Eyes, Nose Wings, Rot
The inner corners of the eye are at the level of the wings of the nose. The corners of the mouth are on the same level with the center of the eye, or the pupil, if a person looks straight. 
On this photo lungs lines and shown that:
- eye corners lie on the same level with the wings of the nose
- and the center of the eye lies on the same line with the corners of the mouth
Draw a dog
Face drawing scheme
Actually, if you will schedule all the guides, then you should get this scheme. You can print it as a sample, because immediately remember everything is difficult and to train a person's face with the correct proportions.

Schematic image of a person's face
Later you can give to individuals the features of concrete people and draw portraits of all who are interested in you.
On this with axes, proportions and guides, we will finish and begin drawing.
Draw Phatepno
Today we will not draw a portrait of a particular person, and we will learn to create quick sketches with the correct proportions and the placement of all the main parts.
Face drawing is the skill that improves with experience. If you have never painted portraits of people important first just at the level of mechanics and repetition, as at what level to place your eyes, nose, mouth, eyebrows, ears, and the ratio between them. To do this, select the scheme in the previous section, and easily apply guides.
How to draw a bird owl
Repetition Mother teaching 🙂
We indicate form
The first stage is the easiest, we need to designate the form of the face, it is easiest to enter it into an oval, ovoid or other rounded figure. Vertical axis will help create symmetrical pattern, Horizontal - Show your eyes correctly.

We plan the basic elements of the face
All previously scheduled lines will help us build a face. These axes should be applied very easily, it is hardly noticeable that then it can be easily and unnoticed to erase them. 
There is no special difference from what exactly you will start drawing the features of the face, the main thing is that you are not stuck and not concentrated on something one: nose, eyes, lips, eyebrows.
First quickly and easily mark all parts of the person without going into the detailswithout trying to be too accurate. All lines are applied very easily, so that it is easy to fix.
If something happens is curved, inaccurately, you can fix it in the next step.
We specify forms and sizes
At this stage, we correct the size and shape of the eyes, ears, eyebrows, nose, lips, we specify the form of the face. Correct everything that turned out to be incorrectly at the previous stage. 
In addition to drawing portraits is a beautiful hobby that is able to keep in the life of an artist's memories of expensive and loved ones, this is also a kind of earnings. Indeed, talented masters significantly increase their income, doing a favorite thing and honing skill.
Step-by-step guide to drawing portraits.
- If you want to learn how to draw portraits, but at the same time did not come across this kind of creativity, start with yourself. More precisely, start drawing yourself. We are talking about a self-portrait. So Van Gogh was done - drew his portraits. In order for you to see the details of your face, pay fairly attention to the lighting. For the right hand, for example, the light source should be located on the left side and slightly above the artist.
- First drawing Create 1: 1 scale. To do this, take care of the canvas (or other material where you will draw) was more your head so that it can fit completely.

- Try to unnecessarily not twist your head using the eye in drawing. By the way, with one of the eyes you can start drawing. Examine it carefully, draw and move on, measuring the proportionality of all parts.

- Having chosen the portrait how to draw the least sophisticated way (That is, self portrait), you still need to pay attention to the details. For example, when drawing the eye, you should pay attention to all small folds, leaflets, shape. You will have to be objective, even though it is not always easy.

- Drawing a second eye, do not copy a mindlessly previous element. IN biological world Full symmetry is a big rarity. See what your right eye is different from the left, and try passing these differences in the picture.

- After the basic unit - the eye is drawn, use its sizes to comply with the right proportions. With this unit of measurement, you can qualitatively measured the distance between the eyes, the distance from the visible edge of the face.

- Pay attention to the height and shape of your eyebrows. Often, it is they who make a person recognizable, so try to convey them objectively.

- Keep the mirror behind the easel to slightly raising your eyes, see the original at any time. Try not to do extra movements, so as not to lose the original head of the head. The novice artist is able to confuse even a slight discrepancy.

- To comply with symmetry, swipe the vertical auxiliary line dividing the space between the eyes in half. On this line you will navigate, drawing nose and lips. But remember that the world is not obliged to be perfect, and if in real life Your nose is issued to the left line of the center, this feature should be transferred on paper.

- Match the unit of the measurement of the width of the eye with the distance between the bottom of the nose and the inner side of the eye. Transfer the resulting compliance on paper. Next, measure the distance to the upper lip and make the size and shape of the lips. In the case of correctly executed proportions, you already receive at this stage high level Portrait similarity.

- Next, you need to determine and draw the shape and height of the cheekbone and ears. It's not easy, because these parts human face Unique and not easy to brush a novice wizard. But if you succeed, then you are undoubtedly ready for subsequent difficulties.

- Note the chin and the jaw from the first time, too, not everyone under power. In addition to the fact that the professional rice of the protruding bone - the occupation itself is not from the lungs, people tend to idealize their appearance. Not everyone can recognize an excessive square of their jaw or chin bulge. However, artists see beauty differently than ordinary people - Just in these imperfections, distinguishing people from each other.

- Start drawing hair. In your first self-portrait, pay attention not to detail, but to general similarity: height, thickness and hairstyles. Do not waste time on the rice of individual strands. At this stage, such a goal is not worth us.

- Now pay attention to the game of lighting. Let's proceed to the darkese of the desired sites, as well as to the clarification where necessary. So you make a drawing volume and natural. Start working from the darkest sections (Rainbow Eye Shell) and then move in descending order, on the palette - from the dark to the brightest.
- Try to pay sufficient attention to the location of light spots to achieve the greatest nature of the drawing. Check even small and seemingly insignificant details.
- With the help of clarification and darkening of the plots, mark the bones of the skull under the skin so that the person depicted in the portrait was obviously created from flesh and blood, and not from marmalade and ostrich feathers (if you, of course, draw a self-portrait in a classic style).

- Sharite one of the wings of the nose and try as it can be more correct to convey the form of your tanging organ. With all its features: size, shape and possible imperfections.
- Also worry the shadows in the nasolabial partition and the chin checly. Do not focus a lot of attention on the shadow under the bottom lip. In case you are overdoing, risk distorting the correctness of the understanding of the portrait.

- Final strokes - light spots and shadows in the neck area. Here is your first self-portrait and ready.

What you read above will help develop the basic skills and come to general understandingWhat is important to pay attention when drawing a portrait. To improve what you just have learned, you will need practice, a lot of practice. And every portrait will get better and better.
Drawing portrait - This is one of the most complex species visual arts. To learn to draw correctly portrait of man, You will have a lot of time and effort. The complexity of such a picture is that you will need to convey the emotional state of a person, his depth of view, facial expressions, smile, thoughtfulness, etc. For it, it is necessary to very accurately and correctly draw the shape of the lips, eyes, nose and other features of his face.
How to draw a portrait of a man with a regular pencil?
Learn easy and usual technique drawing Persons perhaps independently. You just need to gradually draw face simple pencil. Do not be upset if you do not come out to draw a portrait from the first time.
1. Building a person, general contour
So that the portrait came correctly, you need to very accurately draw the contour of the face, building a person. Try to repeat this oval person's faces on your paper. If you did not succeed, try again and again until you come out the contour of the right form.
2. Basic parts of the face and their markup
Draw a smooth horizontal line in the center, which divides a portrait into two parts. Draw a parallel line slightly below. From the center of the bottom line, you will need to draw perpendicular line, as well as mark where the nasal tip will be on the face of a person.
When you Draw these lines Do not pusya very much on the pencil and do not forget to draw ears.

3. The main part of the portrait - eyes
Eye drawing is very restrained and neat work. Cock the pencil fighter and draw smooth, oval eye lines. Next, draw the line of mouth, pupils and primary contours hair.

4. Drawing of contours of mouth, eyebrows and lips
Initially, try to draw the easiest - eyebrows and hair contour. Now draw an item a bit more complicated - Lips. Draw a lower lip, as it is easier to draw it, you should not draw too thick lips. The upper lip must be a mirror reflection of the lower.
On the tip of the nose, draw a tick and on the edges two small arcs. Next from the right eyebrows, spend a line that is easily deviated to the right.

Now take the eraser and remove from your portrait unnecessary contour lines. That's what should happen:

5. Final stage
At this stage you will need to make a drawing volume, that is Add shadows and contrasts. On hair and face most Plots need to be strained with thick and dark color - it will give the face to the face and greater realistic.

Now you know how easily and in several stages can draw a portrait of a man. I wish you success!
Good day, friends!
Today we learn how to draw a portrait of a person in stages, as an example we will use the image beautiful woman. In this article you will find tips that will certainly be useful for novice artists.
Preparation
For any task, you need an appropriate attitude, and to create a person's portrait you need to have access to it. appearance Nature or photo. Even until you pested a pencil and try to think about:
- what will be the background;
- will something shown in the background;
- it will be a horizontal or vertical format;
- and other important points.
Nature and light
Even if you are familiar with proportions human bodyAnd it is not bad to draw abstract portraits, to achieve portrait similarities you will need to be needed. You can also use photos as a nature.
To the image that you will use as an example is one very important requirement - this is the light. It is desirable that in the room or in the photo was one dominant light source. Simple lighting will allow correct, without errors, show the volume, especially if you do not have experience. Lighting, this is not all that we need - but the correct, good light can help you well.
Here are all the guides: line of symmetry, eye, nose, eyebrows, mouth, etc. If you are not familiar with the proportions of the head, look, please, our lesson :. 
At this stage, we learn to draw a portrait rather rudely and not quite carefully, but you need to try to correctly convey all forms: nose, cheekbones, chin, and others, the most distinguished and characteristic features of the person. Stroke can show falling shadows.
Draw the ears of man
Several tips:
- If you draw a pencil, the draft sketch make it very easy, so that later on top of the applied fine beautiful lines.
- If you create an oil portrait, the sketch can be made on canvas with a small brush, designated only the form of the face, and several guide lines. It is not worth drawing in more detail, since the oil layer will block all your pencil lines. Immediately go to the next further stages of working with paints.
We specify all lines, try to make a beautiful clean sketch.

This is about such an outline you can stop and then continue to work already in color.
Shadow and Light: Big Brushes
Most the best way Make a picture volume - at first, to darken it as much as possible, as the bright tones are added, it will become more and more painful.
First, the person needs to "paint" into a fairly dark shade, sometimes you can even make Mulatto out of man.

The point shows the size of the brush with respect to the size of the head, and the color that will be used as the main one.
Draw a parrot

Then take the shade of the turn of the main color of the skin and go through the large plots to which the light falls.

You can repeat the application of shadows and light a large brush several times. Try as long as you can not take thinner brushes in your hands. The transition from large brushes to thin should be gradual. For example, to work with paints: Brush No. 20, then No. 16, hereinafter No. 12, 10, 6, 4.
A little more accuracy
In order to draw a portrait correctly, move away from the canvas, every time you're going to use another shade or show new form. Get distracted from work, more often translate your eyes, especially if you feel that we are tired or confused.
Manipulation with the application of shade and light during work repeat several times, you can gradually move to the smaller sizes, thus specifying the image on the canvas. Naturally, it should be done consciously and accurately.

We refine the shadows, the point shows the size of the brush and color
At the stage of clarifications, you can draw a little eyes. Thus, the face will immediately revive, and you will be easier to navigate what else needs to work.
Dry Brush Technique in Painting
Important advice: as an example, do not use models with huge number makeup. It is strongly confusing, it is difficult to determine where the model is actually a century, and where the drawn arrow; where the defill from the artificial shine, and wherever the light source.

We carry the shadow, glare, shine. We specify the brightest glare and the darkest shadows. For example, it is the shadow under the chin on the neck and the contour of the face on the left side. Gliding on the hair show a lighter tone. Add a glare to the right on the nose, near the eye, and under the eyebrow.

Through three quarters
Draw portrait of a young woman

So that everything happens as it should, start with the basics. Let's try to figure out how to draw a pencil portrait - for this, a portrait of a young woman with big expressive eyes.
Initially, it is necessary to make a workpiece - it will be a circle divided into 4 equal parts and a small elongated part below. In about the midst of the bottom half of the circle, they will make two oval - eyes. It is important that the distance between the eyes is equal to the length of the eye itself, and the distance from the edge of the face to the outer corner of the eye - half of this length. Immediately sketch and the mouth line - it will be below the circle, at a distance equal to the width of the eye.

Add upper eyelids and eyebrows. The eyebrow must have a bend. It is best to be guided by such a rule: the beginning of the eyebrows should be at the level of the inner corner of the eye, the end is slightly diagonally from the external one.

And now we will deal with your nose - it will be on the bottom of the circle.

And the mouth is on the very strip just below the circle, which we noted in advance.

When drawing lips, it is important to remember that the lower lip must be a little more fully than the top. Also, you should not make the lines of the lips perfectly direct - she has a kind of bending. And still make the basic form of the ears. Bottom part The ear will be about one line with the nose, and the upper one on the same line with the upper century.

We work out more detail. It is important here to remember that the bright spot should be on the iris - the glare, and the top line of the eyelashes is slightly more expressive than the lower.

Invision and other contours. At this stage, all auxiliary lines are also wiped. We still need to draw ears - a cartberry, a lobe, etc.

It remains to portray hair. In no case can not be made by their monolithic bilyb - it looks very unnatural. Separate hairs laid with light carelessness should be visible. You can also add a slightly volume: for this, it is very easy to stroke the shadow part of the face.
Excellent, our portrait is completely ready. In order to learn more details, you can view this video:
How to draw a male watch - the main nuances

If in the previous section we studied how to draw female portrait Phased, now we will practice the creation of a male portrait.
Let's start with eyes. They must be quite elongated and be from each other at a distance of another eyes:

Then add your eyebrows. You should not make them one whole line - eyebrows consist of separate hairs, often growing speed.

Let us work in more detail with your eyes: we will make expressive line of eyelashes and a little as followy the iris. On the iris, we leave a small white spot - a glare. Also, you need to portray your nose: To select the right height, set off the distance from the eyes, one and a half times more than the length of the eye.

Now the mouth. It is slightly lower than the nose. What is up to the width, then you need to focus on pupils. Mentally lower the vertical lines from pupils down - this is the distance and there will be a mouth line.

A little shadow - that's what you need now. Stroking the shadow side of the nose and the upper lip.

Now you have to schedule the oval of faces and ears. Do not forget that this male portrait - Cheeks should be clearly pronounced.

Now hair. No need to make them "under one comb" - the direction of the hair on the head can be very different. It is best to draw separate hairs, and not try to make a hairstyle with a monolithic piece.

And, of course, the head can not just hang in the air - you need to try the neck and shoulders.

And then - enhance the shadows. The direction of each new hatching layer may not coincide with the previous one - it is not worth it to be afraid.

The bristle will add more masculinity, and the glare in the eyes will look more alive.
Playing a girl - Benefitful benefits

In this section we will learn to draw a portrait of a young girl. Absolutely not necessary to be for this professional artist: Now we will deal with how to draw a portrait for beginners.
The first thing to depict oval is the general shape of the face.

Then place it: it is necessary to spend the vertical axis of symmetry, as well as three horizontal lines - for eyes, nose and lips. Also sketch the basic form of the ears - in height they will be between the line of the eyes and the nose.

I draw a nose a little more detailed - it is necessary to celebrate its wings, a nose, front part.

Now the eyes and eyebrows. To do this, you will need two more auxiliary lines located symmetrically on both sides of the main eye line. It is important to remember that the distance between the eyes should approximately equal to the length of one eye.

Add details. It is necessary to draw our girlfriend a line of hair growth line, outline cheekbones, outline folds near the eyes.

General sketches are made, so you need to carefully post all the auxiliary lines and draw your hair. In order for the hairstyle to look natural, do not make all the strands of the same, licked - they must go to bed a little carelessly, swear. In the ears, the girl can insert earrings.

Now you need to add volume - shadow shadow parts, enhance the contours.

We must not forget about falling shadows: from the hair, from the nose, shadow on the neck. It's all gently shrinks. Light pieces on her hair can additionally clarify with elasty.

A little more effort shadow and add bright tones on strands of hair, lower lip, eyes.
All, portrait of a girl drawn. If you are interested in this lesson, you can additionally see this video:
Classroom drawing lesson for small artists

Kids often love to draw different characters: Heroes of books or cartoons, just abstract people. In this lesson, it will be described in detail how to draw a portrait of a young girl, so even the most young artist It can easily cope with this task.
First you need to outline the oval of faces and divide it into 4 parts.

Then - B. general features Set the shape of the eyes, lips, the location of the tip of the nose.

It is necessary to add details: in the eyes we draw the iris, give a more natural shape of lips, draw the nose.

And now it is necessary to bring eating faces stronger, draw the upper and lower cilia, pupils and eyebrows.

And, of course, what girl will cost without beautiful long hair.

In order that the drawing looked more alive, you need to apply some shadows. It is necessary to do it very easily and gently.
On this all - a portrait of a girl ready. For a more complete understanding of the lesson, it will be useful to get acquainted with this video:
Portrait of a man - learn to draw together

Drawing portraits is a fairly difficult, requiring attention, accuracy and accurate compliance with proportions. And with the help of this lesson, we will learn how to draw a portrait of a man.
Starting with Azov - I will depict the oval of faces and divide it into three parts. Attention - the upper point of these three fragments should be slightly lower than the top point of the oval itself - there will be a hair growth line.

In the field of separation it is necessary to spend three horizontal linesAnd then - two more. One will be slightly lower than the central mark, and another one is slightly lower. Also symmetrically axis from the second base marker (eyebrow line) to the bottom (nose line) you need to spend two vertical lines - blanks for the front of the nose.

On this workpiece, we draw a nose - with a bridge, a small hill and wings. And still placing your eyes - they will be on the line, located just below the eyebrow line. In the width, it should be conditionally divided into 5 parts - in 2 and 4 parts there will be eyes.

You must also portray lips - they will be on the line located under the nose line. The width of the mouth will be determined in the middle of the eyes - from the middle of the left until the middle of the right. It is important to note that the lower lip must be a little wider upper.

Slightly more details: in the eyes we draw the iris and pupil, add volumes of eyebrows.

Now draw your hair along the already marked lines and start working with the ears.

We work on cheekbones - they are especially pronounced in men. We also draw a neck - it will be quite massive.

Everything, at this stage, you can erase all extra lines. By the way, you can add a shirt gate to the drawing.
Portrait of a girl - Turn in three quarters

Before that, we painted faces mostly in the Fassus - that is, a person looks right on us. Portraits in profile are also pretty common - when a person is located to the artist sideways. But much more complex and interesting is the turn of three quarters - something average between the face and the profile. Let's try to portray this option.
at first general forms - Extracted, extended uphold and symmetry axis. Unlike the position of the Afas, the axes will not share an oval into almost equal parts - they will follow the line of oval, leaving a little less space from the side of the rotation. So far, we are interested in lines of eyebrows and eyes.

Then you can schedule a hair growth line, mouth and start drawing the nose. As can be seen, his left wing is almost unnoticed, but left part The back of the nose is very less right.

Now the eyes - they have a rather big girl, with a wide overlay century.

Now draw eyebrows. They are quite thin and spread out.

Take the mouth and chin. The mouth will be small, slightly ajar. Also at this stage will be depicted lower eyelids - they are also wide, because of what it seems that the eyes are a bit hang.

Add strands of flowing long hair.
All, now our sketch is ready. We had a real forest nymph - a wary, elegant and very beautiful. In order to deal with the lesson better, you can read this video:
Learning to draw portrait of a teenage girl
The face of an adult is quite palpably different from the face of a child or a teenager in terms of proportions. Therefore, for the full, multifaceted development of you as an artist, it is important to learn how to draw portraits not only adults, but also adolescents, children.
Initially, you will depict the circle and divide it into 4 equal parts.

On the central line We will make a basic form for eyes and eyebrows, and at the bottom - for the nose and mouth. On the sides at the height of the eyebrows to the nose will be ears.

The nose in children is usually quite wide, without a pronounced back.

And lips are rather chubby. That up to the width, then the mouth line should be between two pupils. For convenience, you can even spend the vertical lines from them. And do not forget about the fold over the upper lip.

Now a little lengthens the oval faces and start drawing the hair.

Hair should be dropped by waves, separate major strands. And here in these major strands it is necessary to draw individual hairs. Also at this stage, you can erase all auxiliary lines and start working with shadows.

It is necessary to stroke easily and very carefully. It should be remembered not only about natural shadows, but also about falling.
All, now our drawing is entirely ready. More nuances I. small details You can see here on this video: