How to quickly learn to draw portraits with a pencil. The final stage of the drawing of a female portrait
Draw a pencil portrait It is not very difficult, as it may seem at first glance. We will remind that the photos have not appeared yet, then it is necessary to draw portraits in school. This article will help you to learn.
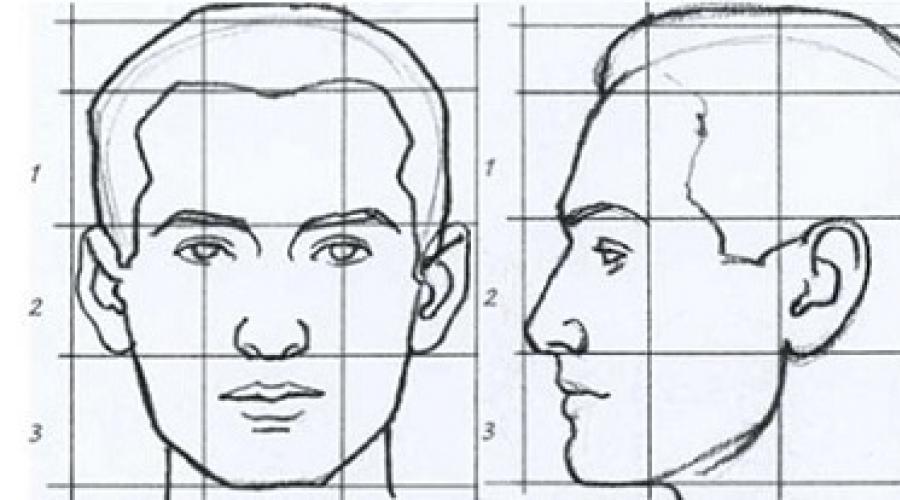
When you depict a man's head, you need to make sure that proportions Between his mouth, nose, ears and eyes are indicated accurately and correctly. Pay special attention to the structure of the head, appreciate its main features, if you do not do it, you can hardly have a really standing portrait.
Below are pictures with the proportions of the average head. But this is just a standard. But it is the discrepancy with the standard give a man of uniqueness and originality. It is worth comparing it with your model, what they differ in and what is converging.


Survive in the metropolitan: how to be healthy all year round?

What features make a woman attractive

What are the most regretting people at the end of life
Eyes are the most expressive element of the portrait, which is why it is necessary to observe the accuracy of the form and the correctness of the situation. Uchieto wants to note that the scler (part of the eyeball does not need to be made snow-white, it must change the color due to the shadow thrown in the eyelid and the effect of one's own shadow. It is also necessary to pay attention to the glare of light in the lower eyelids, in the inner corner of the eye and on the iris. They are the shadows that make eyes more "alive."

In the pictures, the spherical structure of the eye is depicted, how to show the eyelids on them and the very stage of drawing.
Draw Eyes S. different points Vision and B. different positions. W. female eyes Mostly dense and long eyelashes, and the eyebrows are thin and well outlined. The child has a rainbow shell looks large compared to the century. Olders eventually appear in deep wrinkles, which begin with corners of the eyes, eyebrows become thick and grow up, and at the lower eyelids a baggy look.


Benefits of coffee consumption

What happens if you look into the eyes of a person for a long time


An ear Formed cartilage tissues. It may look in different variations, but all ears resemble sea shell, which women and men are practically no different. In the ears portraits or partially, or completely hidden by hair, and expressiveness depends on how exactly you will place them on the sides of the head. See sketch.


The height of the ear of an adult is approximately equal to the length of the nose. In adult ears less about the heads than in children. In the elderly, the ears are lengthened due to the weakening and thinning of the cloth of cartilage.
Nose Correctly portray it is quite difficult, because it is ahead of the face, and therefore his form changes quite strongly depending on the point of view. Try to determine the areas of light and shadow (usually the maximum amount of light is present at the tip of the nose and on the nose, while the most intensive shadow is at the base of the nostrils), try to transfer only this contrast, so that your drawing was not overloaded (if the nose is not a key part Persons).


After eye draw mouth. It is the second most expressive element in the portrait. The pinky shade of the lips is a consequence of the transition between the skin and the mucous membrane. When you portray lips, you should make sure that the transition boundary correctly determined correctly. Lips are on the semi-cylindrical surface of the bones of the jaw. The sketches presented below indicate the main features of lifting morphology. Uchieto wants to note that the upper lip is thinner.
On these sketches, you are presented with options for smiles that are usually painted on portraits. Old men's lips and covered large quantity vertical folds.


Video lessons
Portrait reports not only external characteristics Persons but also reflects inner world man, his attitude to reality and emotional state in certain moment time. In fact, a portrait, like any other conversation piece- this is the location of lines, shapes and colors on canvas or paper so that their final combination repeats the form human face.
He sounds almost like magic? To correctly place the most lines, shapes and shades on paper, you must first of all study the proportions of a person's face (when drawing a portrait, they must be observed in obligatory) And their dependence on movements, directions and shapes of the head.
What is a portrait?
Regardless of the level of skill, work on it scares any artist. A wonderful painter John Singer Sargent gave a portrait of two characteristics with which every artist will agree:
- "Every time, drawing a portrait, especially to order, I lose a friend."
- "The portrait is a picture on which the lips look like something wrong."
Portrait - one of the most complex genres of drawing and painting. The reason is that the artist often works to order, and the pressure from the side interferes creative process. The portrait in the presentation of the customer is often different from what the artist creates. In addition, special knowledge and a fair share of patience are needed to work on the image of the human face.
Why learn proportions
The proportions are needed in order to understand how objects are located relative to each other in the dimensional, flat and intermediate ratio. If at least a small proportion of realism is important for the portrait, without knowing the proportions of this. On the other hand, abstract portraits no one canceled.

Knowing proportions helps to transfer not only the features of the face, but also emotions and the facial expressions of man. Knowing the dependence of the change external view From the position of the head, the emotional state of the model and lighting, the artist can transfer the character and mood of man to canvas, thereby creating a subject of art. But for this you need to know right proportions Persons and be able to build a composition in accordance with the rules.
Perfect proportions
During High rebirth Rafael created paintings that were considered the benchmark of perfection. In fact, all today perfect proportions They originate in the Oval of Persons Madonn Rafael.
If you hold a vertical line in the very center of the face and divide it into three parts - from the line of hair growth to the eyebrows, from the eyebrows to the tip of the nose and from the tip of the nose to the chin, then the perfect person will be equal to the perfect face. The figure below shows the ideal proportions of the person's face, the drawing scheme and the construction of the ideal oval of the person, as well as the ratio of the main features. It is worth considering that the ideal of a male face is characterized by more angular features, but, despite this, their main position corresponds to the scheme represented.

Based on this scheme, the ideal proportions of the face during portrait drawing correspond to the following formula:
- Bc \u003d Ce \u003d EF.
- Ad \u003d df.
- Or \u003d kl \u003d pk.
Form face
Correctly built proportions of a person's face while drawing a portrait depends largely and on the form of this person. Rafael, created a perfect oval, and nature does not limit the perfection of only one geometric shape.
It is likely to study the construction of proportions and their change when moving is most conveniently on the perfectly oval face, for this there is a mass of methods and techniques that will be discussed below, but the essence of the portrait is not in creating an ideal, but in the image of a person with all its features and imperfections. That is why it is important to know which form of the face and how it affects the construction of proportions when drawing portraits.

Rounded forms of persons
An extended face It has rounded shapes of the hair growth line and chin. The vertical middle line of the face is much longer horizontal. The characteristic of the elongated persons is usually high forehead And a large distance between the upper lip and the base of the nose. Typically, the forehead width is approximately equal to the width of the cheekbone.
Oval face Simulate in shape with an inverted sharp face down with an egg. Its wide part of it are cheekbones, then there is a slightly less wide forehead and a relatively narrow jaw. The length of the oval face is a little more of its width.
Round face It is characterized by almost equal average lines of the vertical and horizontal cross section of the face. Wide cheekbones are smoothed by a smooth round of chin line.

Corner forms of persons
Rectangular face It is characterized by a wide jaw, underlined by an angular chin and a straight line of hair growth line. The middle line of the vertical section is much longer horizontal. The width of the forehead of a person with a rectangular face is about equal to the width of cheek.
Triangular It differs from the heart-shaped hair line, the triangular is straight. Feature This form of persons - high cheekbones and very narrow, sharp chin, while the cheekbones are almost as wide as the forehead. The vertical line of the triangle section is usually slightly longer horizontal.
Square shape It is characteristic of persons with low, wide cheekbones and angular chin. Square length is equal to its width.
Trapezoidaldetermined by broad jaw, low cheekbones and narrow forehead. Usually, on such a face, the chin is angry and wide, and the cheekbones are much wider than forehead.
Rhombid shapethe face is given in proportion to the narrow forehead and chin, and the latter is usually pointed. High cheekbones are the widest part of the rhombid face, and its horizontal cross section is much smaller vertical.
Proper face building
Proper construction when drawing a portrait is based on the measurement of the detachment of the model and the distance between them. Each portrait is individual, as well as there are no two absolutely identical persons, with the exception of twins. Formulas for calculating the proportions give only the main tips, following which you can easily facilitate the process of drawing.

For creating own characters Or drawing persons by memory is extremely important to know the correct transmission of proportions. It is important to remember that the shape of the head is much more complex than an inverted egg or oval, and therefore it is worth following the rules to avoid eye on the forehead or too little mouth.
Face outlines
To begin with, draw a circle - it will be a wide part of the skull. As you know, the main features of the face occupy a place under the circle. In order to roughly define their place, we divide the circle in half vertically and the line continue down so that the bottom outline of the circle shared it exactly in half. The bottom line will be a chin. From the sides of the circle to the "chin" you need to carry out lines that will be preliminary outlines of cheeks and cheeks.
If the portrait is drawn from the face of the model or by memory, you can correct the shape with several light lines, determine the exemplary chin width and hair growth line. It is worth noting that the hair in the portrait will take some part of the circle, which was drawn at the very beginning.
Eyes and eyebrows
At the base of the circle, we carry out a horizontal line, perpendicular to the first. On this line there are eyes. It is on it, not higher, no matter how much! The horizontal line must be divided into five equal parts - Each of them is equal to the width of the eye. The central part may be slightly wider. Eyes are located on the sides of it. To further calculate the proportions, it is best to indicate where pupils will be located.
To determine how highly above the eyes should be eyebrows, you need to divide the circle into four equal parts, from the bottom up. The horizontal line passing right above the eyes will be placed eyebrows.
Nose and lips
The vertical line of the bottom of the person needs to be divided by half. The middle mark where the nose base should be. The width of the nose is easy to determine by spending parallel lines down from the inner corners of the eyes.
The remaining part is from the nose to the chin - you need to split back again. The middle line coincides with the line of the mouth, that is, right above it is the upper lip, and below it is lower. The width of the mouth can be calculated by spending parallel lines down from the middle of the pupils. The width of the chin is usually equal to the width of the nose.
The construction of the proportions of the human person described above is a simplified method and suitable for perfect personswhich are not so much in nature.
how to start a picture of a person's portrait styardly? How to learn to shoot a person's face. How to properly lay the half and achieve the desired similarity in the portraits of the pencil. How to stroke a portrait. Tell artistsWorkshopPORTRET-ART.
Most portrait artists working in the "Pencil" technique were created in various schools, where the man's image was trained. All artists, based on their education, have created their own foundations for themselves how to work on creating a portrait. In this article we share our own secrets of the most common drawing technique.
getting started and building head
Artists of our workshop work mechanical pencils, because they provide purity while working, unlike classic pencils, they do not need to sharpen long, they allow you to cope with small details much faster. To draw a portrait, we will need "Klyach", it is such an artistic eraser, with which you can correct your mistakes and do not spoil the portrait. For a picture with a mechanical pencil, we will need rods. We recommend using the rods softness of the HV, B, 2B, 4B and 7B (where in - means soft, and H is solid). Now we need to take the usual A4 leaf and put it under your working hand so that it closes the surface that you have already shrink.
First of all, you must learn a photo, namely general form Heads, as it turns relatively horizontally and vertical. To draw a person portrait of a pencil correctly, we need to know some features of the structure of the skull. It can be viewed in any anatomical atlas. Based on the shape of the head of the man whom you depict, you need to apply light lines on paper general contour Hair, oval faces and designate the lines of lips, nose and its height, eye and eyebrows.
work with planes

Now that the common lines are applied, we can proceed to the analysis of the faces of the face. We must designate the height of the nose to the plane (if desired it can be shaded to see the volume, so you can do with all areas that are in the shade), the plane of the cheekbones, which is closest to us, the lip plane and the plane of the eye connecting with the eyebrows. At this stage, we do not pay the face with smooth lines, we try very easily. geometrical features Person of man.
face detailing

At this stage of work, we take klyachu and, spending it on the plane of the sheet, remove upper layer Pencil, that is, we make lines applied before, almost invisible. In this, there is the difference between the drawing of portraits from the photo from academic portraits, in the second case, the construction line is supplied and will remain in the ultimate portrait, which is why it can get dirty. It does not fit us. After we made the lines of building invisible where it was necessary, we start to draw all the features of the face, rounding them and attach to the person similarity from the photo. In order to achieve similarity, it is possible to measure the size and relationship of them to other sizes of the face, thereby selecting the optimal proportions. For example, how much the width of the nose is fixed in the width of the face, etc. You can freeze anything, there are no restrictions here.
start hatchovka

For the patching, you must finish all the build and wipe all unnecessary lines in the figure, because After starting the tone laying, you will not have the opportunity to do it carefully. There are no uniform hatching rules, each artist does it as it is convenient. It may depend on how you are accustomed to keep a pencil / handle, from whether you are right-handed, or left-handed, etc. We advise you to start hatching with the darkest domains of the portrait. Since they can later repel from them, not daring too skin, clothing and eyes.
overlapping Haltone

Next we must go to the halftone, that is, give the tone of the skin of the face, hair and clothing, if it is not black, since on black clothes most often it is worth focusing, (even if clothes white colorIt will necessarily be present halftime to identify relief and texture). At this stage, we should not wipe that either klyach (if only not put a spot or did not smear something). Start an intense halftone hatching costs (if you are right), from the left top corner of the sheet, so as not to smear your hand what you have already done, and, accordingly, if you left everything you need to make a mirror. At this stage, a small study of the background of the portrait is allowed.
work with flames

When you finished with a hatching, you must have an almost ready-made portrait, but it will not look like a volume. Do not be upset, one of the most pleasant stages in drawing a portrait of a pencil, this is the stage when you are laving the brightest places on your face. Most often it is the tip of the nose, eye proteins, the upper part of the cheekbone, the abnormal arcs, the lower lip and in some cases the chin. Also, with Klyachi, you can make folds on lips and minor wrinkles that will make your portrait more alive. Hair needs to be lit on the greatest fractures, then they seem shiny and alive.
dimming the depths and cleaning

After lighting, you need to darken places where you need to show space, it can be: neck, hair edge, ears, folds on hair, background. With this dimming, we will feel that the person we draw is not "glued" to the sheet, but looks from there. This is very important factor Create a portrait of a pencil.
Our portrait is ready. But you will definitely have any unnecessary strokes or stains from your fingers, because they will be dirty in a pencil (by the way, in order to avoid dirty portrait, we advise you to flush your hands several times and wipe them well), so you should take a crumb in the last Once and wipe everything that you are visually unpleasant. Even with the absolute similarity of the portrait with a photo, we always leave a place for creativity, you are not obliged to redraw what you do not want to draw in the portrait, you can create and invent new clothes, hair color, eye, etc. The photo is not always successful in all respects, so we think, correct and make something that the photographer could not make, because of the specifics of their work, namely, create a perfect image.
With love and trepidation, workshop
One of the most complex species Art is. The physique needs to be studied in detail in parts. We have already considered some elements. Before starting work, be sure to read these several recommendations of professional artists:
- First you need to consider the approximate location of all elements.
- For sketches, take an acutely sharpened pencil of medium stiffness (I used HB and 2B, write in the comments, which pencils you used), which will pour thin lines.
- Do not erase the outline lines until the desired result is clearly visible.
- Observe the proportions
- Note that the person has a decrease in a pointed shape, and from above more rounded
- Practice! The more you exercise, the better you will learn to transmit the necessary emotions and nurses of human facial expressions.
And now let's go to the lesson.
How to draw a person's face in stages:
Step one. The face of this oval form. First we make oval and divide it with lines. The vertical line is intersecting it exactly in the middle, and horizontal lines Located as follows. The first one shares the face just below half, and the second one else from the remaining bottom of the face. We can not specify the exact dimensions, since everyone has different faces. But the task of these lines is to outline (this is vertical), as well as the location and lips (horizontal bottom line). Do not forget that they will later have to erase, so do not press the paper very much about paper. If it is strongly pressing on paper, it is deformed, and the picture will become like a girl who is preparing for plastic surgery. (Will be )  Step second. Make indicative touches in place, where. And also add lines for, and halfway between the nose and the chin. A line that indicates the bottom lip is wider.
  Step Three. Go to the drawing. They are located just above the nose. The outer edges of the nose indicate where the inner corners of the eyes will go. Sketch, as shown in the figure. Here, take into account another important factor. The human anatomy is designed so that the distance between the eye is equal to the size of another eye. In the figure it is indicated by a red arrow. Now add eyebrows. Tip: Even if one eyebrow rises, and eyebrows have the same height, start drawing from the inside (point closer to the nose). To get an idea of \u200b\u200bhow highly arranged eyebrows should add another imaginary eye over the left eye - this should give you more or less correct height for eyebrows.
  Step 4. Add your mouth. In the previous lesson, we already cleared some moments. For example, we tried to portray. But there is one more important moment, Many questions from novice artists about how much the mouth should be? Spend mentally two lines from the inner edges of the eyes down. It will be an approximate company size, with a smile can be slightly wider.
  Step 5. Now we are erased by the auxiliary lines that we did in the first two steps. We look at us. In principle, the sketch is ready. Now it remains to decoke, add shadows.
  Step six. Apply more specifics to face. Pay attention to the cheekbones and the shape of the chin. This woman has a strong chin, but try so that it is not too much, otherwise it will turn into a man. Draw black pupils, and add a century. requires concentration. This is the mirror of the soul.
  Look carefully on the animation. You will see in what sequence it is best to do it.
  Step is the last. Simple pencil add shadows to give the volume pattern and make it more realistic. That's all. More about other parts human body We will look at the following lessons. Leave also your work, and write comments about whether we only have such lessons with us, see ourselves.
If you start from scratch - full zero like meAnd they wanted to learn to draw a pencil - read the chronicle of a lazy inflated artist. Last time Drew back at school. Drew like everything, medium.
How can you draw a pencil after 50 hours of practiceAnd how to learn this. I started drawing from scratch. I did not paint regularly, on average 15 minutes a day, for six months. And you can learn and in a couple of months, drawing 60 minutes a day!
Drawing - Copy Skill
The following pictures began to draw in the confidence that I am a talentless to drawing. But since I know that almost everything I know about yourself is not true. I decided to double-check myself: I really have a hand curved or it was injured in school.

Sphere
The main element of drawing. Drafting the shadows and the field of sphere.
The time is indicated taking into account the reading of the textbook. Drawing itself takes a time two times less.


Cubic
Basic building brick of any drawing.


Modifications Cuba


Draw a pencil texture


Flags and Rosa


Draw Cubes - advanced level


Draw spheres - advanced level
From this stage you we must buy Establishment - paper pencil. In the previous lessons, I was growing with my finger, then essay # 3.
All the magic seats: volume, small shadows in the corners, when painting the eye and portrait - thanks to the erection. Your drawing capacity will seem to be multiplied by three! Outside themselves when compare your results.


Flags, scrolls


Cylinders: volcano, cup

Draw a live tree

Room in perspective

Street in perspective

Draw in the central perspective: castle, city


Inscription in perspective

Learning to draw a portrait

Learning to draw a hand

Exam: First portrait!
Draw people much more difficult than roses or anime. The face cannot be distorted - every error is immediately noticeable. Learn to draw people you need when you feel the confidence that you can recognize the outlines and sketch of the face.
Portraits cannot be drawing quickly, hardship is required and attentiveness. That's what I got a portrait of my wife:

Learn to draw pictures from scratch
Eight paintings drew a total day, half of time. Pencil was also practiced alone day. Learning to draw to the same results, even if "the hands of the ass grow", it is possible for 50-150 hours. In terms of serials - this is 2-3 seasons of Dr. Haouc.
The first picture acrylic "I like you" Vasi Lojkin painted 6 hours. What acrylic is and how to manage it - I did not know. The brush also kept for the first time after school.
The knead the desired shade is not easy. Throw everything because it does not work - I rushed every half an hour. Need a person who will support. I went to study at the art studio and painted under the artist's supervision. A year later, a couple of times took the lessons of drawing online at the same teacher.

He learned to draw a pencil, and Snorzka turned out to be comprehensive. I took a brush for the first time after school and drew. Long 6 hours, curved, but how cool! Now I can make an extraordinary gift - draw a picture to a friend, bookmark in a notebook, caricature for work. Even did a small cartoon.
The first picture: pastel, acrylic, gouache and butter. All techniques from scratch, and hang on the wall - not ashamed.

How to learn how to draw - algorithm
Training Paint with a pencil is a base: To remove the corners, the size of the lines, comply with the proportions. Just learn not afraid to draw. Lighten the initial level, and then only more fun and easier.
What to learn to draw
Draw a gouache.
Matte color, more thick than watercolor, is also diluted with water. Great for newcomers: it is easier to correct inaccuracy than watercolor. Cheap material.


Draw acrylic paints .
The most affordable professional material. Acrylic dries quickly, 5-15 minutes. They are easy to apply the second layer, fix the flaws. If high-quality, then resistant to water.
Acrylic painted on canvas. You can also describe anything: wall, stool, cup, helmet, ashtray, T-shirt, photo frames. I recommend to open the work with a varnish from the canister.

Draw pastel - Dry and Oil.
The technique of drawing pastels is unusual - you need to draw shameles, rubbing them about paper.

Technique drawing oil pastel Looks like painting with pencils, but has its own characteristics.

We draw oil.
Complex professional paints. Durable, but it is impossible to buy cheap - crack.
Long dry, about 2-10 days. This is a plus - you can always remove the layer, try, growing. But minus, you need to very carefully apply the layer on top so as not to spoil what is. I do not recommend their use for beginners.

Draw simple pencil .
Fundamental tool for drawing. Almost all the illustrations, sketches and pictures are drawn first with a pencil. Next, it rubs to barely visible lines, or on top of the paints. Errors are easily corrected. №1 for beginners.
Draw gel handles.
Simple drawing tool in color. Drawing technique is similar to a pencil drawing technique - all the same handle, not a brush. You can fix errors only in Photoshop.

Draw felt-faucers. Analogs: markers and professional "copies".
More variety of colors than gel handles. The set will cost cheaper. After 1-2 years, the markers dry and need to buy a new set.

Feltolsters are a little impregnate paper and it begins to rip out, because of this I do not like to draw them. You can hinder 2-3 times and the line becomes more saturated, you can draw a half.
We draw watercolor.
Cheap materials, and familiar from school. Diluted with water, so the new layer of paint blurs the previous one. It is difficult to master how it will behave. From scratch, independently, not just learn to draw parts. Advantage - accessibility.
You are able to learn to draw a pencil . Find "Why?", Buy a tutorial and refill in pleasure. In a month - surprised by your abilities.
