Human face drawing. Useful lesson for the proportions of the human head
Read also
Each novice artist sooner or later wants to learn how to draw portraits. Of course, to create a full-fledged portrait, you will need limitless patience and long workouts. For beginners, it is important to master the technique of drawing the main components, to work out the correct proportions. A human face can be depicted in arbitrary form, and then work on the details and components.
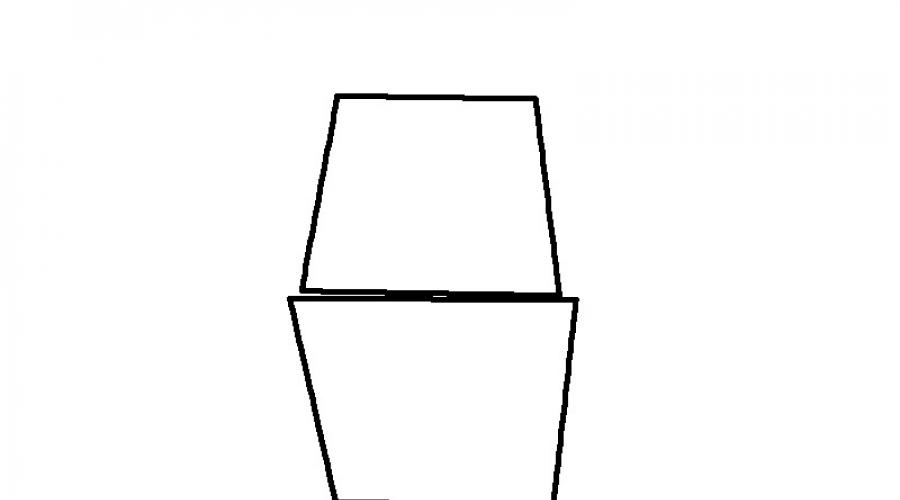
For such a difficult work, like drawing a human face, stock quality materials. You will need a sheet of paper, eraser and several pencils. Pencils should choose different hardness that can be distinguished by labeling. The solid pencil is marked with a label "H" or "T", soft - "in" or "m". Using a solid pencil, you get a thin light line. When drawing a soft pencil line will be darker and thicker. Let's start drawing. Carefully look at yourself in the mirror or consider any images of a human face. Look at the proportions. The narrowest part of the face - chin, wider - cheekbones and temporal zone. Any human person can be depicted using the following three figures: two trapezoids and a triangle. The line of contact of the trapezoids indicates the eye line and the top point of the ears. The line of contact of the triangle and trapezium is the line of the lower lip.


Drawing a person is a difficult task that, by the forces, those who are not afraid of hard work. Before starting the process, carefully examine the methods of applying shadows, drawing eyes, lips and other elements of the face. Observe the proportions, but do not be afraid to experiment and do not cease to improve your skills.
The study of the foundation in the future will help you become a good painter. In people who only master the basins of drawing, often there are difficulties with how to draw a simple pencil. In this article we will talk about those receptions, with which this complex process will become interesting and not so frightening. At the heart of the lesson will be simple for which we will "wear" face. We will gradually understand, the face of the girl in Afas will not be a very difficult task. So, proceed.
Of course, without anatomical knowledge, tell how to draw a person's face is difficult, so we will use the so-called foundation that will help us determine the exact location of the eyes, nose, ears and mouth. In the future, if you decide to continue the exercise of the picture, it will be necessary to master the anatomical figure of the human body.
Face oval
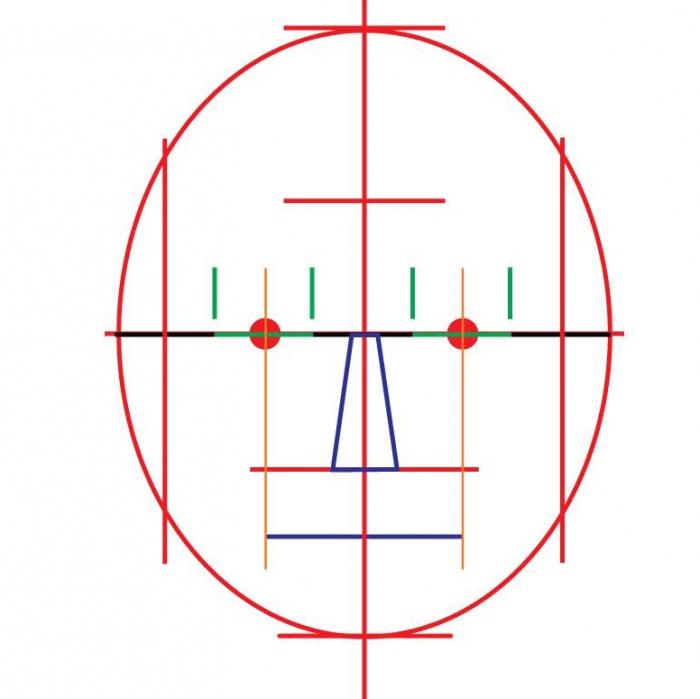
So today we learn to draw the face of a person, and begin your drawing with an oval of the head. If you miss all the anatomical details and look at the human head schematically, we will see the oval, resembling a chicken egg. We divide it on symmetric halves of the vertical line, and then - horizontal (line of pupils). From these lines we will be repelled.
Auxiliary lines

Ears
In the scheme, the place where the ears should be, marked with yellow. Extend the nose line to the intersection from the width of the head, at these points we will have the uche. Height we adjust a little later.

At this stage we are planning the contours of the eyes, eyebrows, the tip of the nose, lips and the ears. Here you can already see where your ears will end, it will be an eyebrow line. Draw a little head head in the area of \u200b\u200bears.

The final stage
Slowly erase unnecessary and interfering lines and add details. Draw more stronger, add shadows, make a drawing three-dimensional. Hairstyle is already your taste.
When you draw a drawing and remember how to draw a person's face, check the proportion parallel. The location of the eyes and the mouth fits into the equilateral triangle. The vertices will be located in the corners of the eyes and in the lower edge of the lips. The height of the mouth will be equal to half the width of the female eye, like the distance from the tip of the nose to the lips. And the chin in the female face will be equal to the width of the eye.

Now you know how to draw a face of a person without knowledge of anatomy. This method is one of many who help to master the basics of the drawing. Try, and you will succeed.
(Portrait art for beginners)
Basic portrait drawing skills can master any person. Training Methods are designed for observation and ability to build an image according to the rules, knowledge of anatomy and the theory of lighting are not mandatory. How to learn to draw a person's face with a pencil? We need patience and attention to detail.
Necessary materials
To create a pencil drawing required:
- paper;
- black-graphite pencils (Sanguine or coal require the skill of use) HB ... 6H hardness (up to 9V);
- auxiliary tools - eraser, fixing device or cutter.
Basic principles of construction and markup
The head of a person is proportional and symmetrical (not complete symmetry) relative to the vertical line. Using the markup, the position of the details is determined and the portrait similarity is obtained. Averaged face is built according to the general scheme, the difference in racial and personal features of the structure of the skull makes adjustments.

An example of building a scheme using a base circle (the center of the circle coincides with the central point of the forehead).

The construction of the face in the profile can also be started with the basic circles, for the correct structure of the skull (without anomalies), the displacement of the centers is ¼ diameter.

Attention! The profile drawing shows about half the eye length, it should be considered when calculating.
Detailed drawing face

To learn how to draw a person's face with a pencil, the difference between a particular person's portrait or a generalized image is taken into account. In the first case, the proportions are determined by the peculiarities of the structure of the person, including racial, special signs (asymmetry, scars, incorrect bite or characteristic form of eyebrows). In the second - comes up with the desired type and the estimated character of the character.
An important stage of the drawing is the detail of the eyes. The shape of the eye is set, the position of the corners (raised or lowered), the height and volume of the century, the length of the eyelashes, the size of the iris and pupil.

The illustration shows a consistent drawing from a schematic to a detailed, with shadows and a glare on pupil, hairs of eyebrows and eyelashes, with a decisive hatching.
Nose and mouth are drawn similarly, taking into account the anatomical features.


For the drawings "in the FAS", the ear shells are built simplified, for a portrait in profile - more detail.

Drawing of shadows is performed after building a structure or in parallel - depending on the skills and manners of drawing the artist. To work skills, training is needed on realistic models under the guidance of the mentor.
Important! The decisiveness of the shadows is performed as needed, using a paper or finger bar.
The effect of anatomical and racial features on a portrait pattern
Characteristic racial features - the width of the nose, the position and shape of the eyes, lips, forehead - are shown on a comparative figure of a male face below.

For a clear understanding of the reasons for differences, it is desirable to explore the anatomy of the human skull under the guidance of the teacher, since the nuances of hand drawn images is difficult to understand.

An important stage of awareness of the features of the structure of the face - drawing "chopped" of the head from the layout. The lesson gives an understanding of the position of the main planes of the skull, taking into account the facial muscles.

When creating a picture of the head, you can apply shadows to the entire image or work with separate areas in turn. To obtain a photorealistic image, the peculiarities of a particular picture, including sharpness of the shadows, clarity of the feature, contrast.


Phased learning drawing, master classes
Learning to draw a person's face with a pencil, you can independently, but the process will go faster with personal training from the wizard of the portrait. Full-time classes:
- accelerate progress due to the correction of typical errors and consultations;
- improve drawing technique;
- save time to search for information - it is served in a convenient form for perception, compressed;
- make it possible to use visual benefits and pattern samples.
In our time you can learn how to draw photo-realistic portraits under the guidance of an experienced artist and a teacher, a portrait pattern masters. Comfortable furnishings, individual approach and professionalism of teaching - the key to the rapid development of a new type of creativity.
To correctly draw a man's head, you need to know its proportions.
The head has an oval shape, which is divided by the eye line into two approximately the same parts, that is, the eye line is approximately in the middle of the face.
The face draw quite difficult. Conditionally, it can be divided into three parts: from the beginning of the hair to the line of eyebrows, from the line of eyebrows to the end of the nose and from the end of the nose to the chin.
The top edge of the ear is located at the level of eyebrows, the lower - at the level of the nose. An eye line can be divided into five identical parts, of which the second and fourth occupy eyes.
The width of the nose is equal to the length of the eyes, and the mouth is a little wider than the nose.
The distance between the eyes is equal to the width of the eye or the width of the nose base. The ears are located from the eyebrow line to the base line of the nose, the incision of the mouth is one third of the distance from the base of the nose to the end of the chin.
The head is symmetrical, and it is possible to draw it on the basis of the conditional line, which begins on the back of the head, passes in the middle of the forehead between the eyes, along the nose, in the middle of the mouth and chin. This line is called middleand serves to build paired symmetric forms.
Knowing these proportions will help the novice artist in working on a portrait.

The shape of the head can be different types.

Now see how to draw a different expression of a person's face.

The drawing of the head starts with the construction of its egg-shaped shape, while it must be remembered that the shape of the head should be outlined so that its mid-horizontal takes place slightly above the middle of the sheet and that the head is not very shifted to the right or left. Only after that we are planned part of the person. They need to be learned very carefully: the similarity of the portrait with nature depends on this.
The main parts of the person belong to eyes, nose, lips and ears. Of course, each person has their own, unique eyes, nose and lips. But it only seems to be in fact they can be generalized and simplify their shape.
Human head paints in full face(when he looks straight)

in profile (when the head is turned sideway),

and in the half turn.

Draw your eyes
Eyes play a very important role in portrait similarity with kind. You can start painting the eye from its generalized shape - a ball inserted into the horizontally located oval (eye depression). Therefore, starting to draw an eye, you need to outline the eyelabies, while remembering that they are not very close to the nose. The distance between the eyes is equal to the length of the very eye.Next, by chateating the pupil, we begin to draw eyelids.


R  isuu profile, you need to remember that the upper eyelid is advanced a little more forward than the lower one. And the pupil from the round turns into a flattened oval.

Drawing face in half turn, pay attention to the upper eyelid eyes raised.
The reliability of the portrait depends on the greater or smaller strengthening of the shadows, and not from the direction of the strokes, so first of all you need to try to put the shadows and do the hatching only when it is already purchased.

Conduct a line passing through the eye, watching its direction carefully. Find the length of the eye, which is indicated by two vertical lines. Draw contours of the eye, remembering that the front convexity or roundness of the eye is visible in the eyes drawn in profile or half turn.

Draw lips
Before starting to draw lips, you need to outline the middle line of the mouth (this is a line where the upper lip is connected to the bottom), then to determine the length and thickness of the lips on this line (usually the lower lip is thicker than the top, but it happens that they are equal in thickness ). It should also be remembered that the mouth is below the nose base line. Next, you need to begin to outlines the outlines of the lips, trying to convey their characteristic shape (thin, thick, medium, smooth along the contour or with a bend on the upper lip).

When drawing lips to the profile or in the half-turn, you need to mark the amount of the rotation of the mouth, its tilt, as well as the degree of thickness (that is, the extension of one of the lips).

The incision of the mouth is located on one third of the distance from the base of the nose until the end of the chin.

Draw your mouths in Afas and profile. First, you will schedule a line intersecting your mouth, then we define the length of this line with two screws,

Then we will find the middle of the mouth and denote its line parallel to the lines denoting the length of the mouth.

Then we denote the thickness of the lips and denote the teeth if the mouth is discontinued.

Draw nose
Drawing a nose, you must first carefully examine its characteristic features: the noses are straight (1), drinks (2) and with a hubber (3).

Also noses are long, short, narrow and wide. The base of the nose is equal to the width of the eye. Outdoor nose, you need to remember that the middle of the front line of the nose passes through the middle of its base and tip.

Drawing a profile or half turn, you must not forget that the stronger the turn of the head, the further the tip of the nose is from the median line.

Now let's try to draw your mouth and nose together.

Now draw nose and eyes.

Draw your ears
Ears are usually located at the level of eyebrows to the base of the nose. In order to properly outline ears, you need to draw an imaginary ear axis that passes parallel to the nose line. Then outlines the general shape of the ear and draw the details.

Draw a continued quadrolon and divide it across two equal parts. Cut out the outer circumference of the ear, then outline it with a thickness and draw the middle (ear cavity).

Place your hair
Hair is beautifully framed and start in the middle of the distance from the eye line to the pattern (the top point of the head). All hairstyles can be reduced to the most typical.


Draw a neck.
The neck is a support for the head and firmly strengthened on the shoulders. Before starting drawing, you need to determine the height of the neck and its attitude to the height and width of the head. First, the middle line of the neck, passing from the bottom of the jaw to the cervical depression, is scheduled. The neck itself consists of some of the three conditional figures: a rectangle and two triangles.


In this lesson, we will learn to draw a beautiful face of the girl with gradual tips. On our site you can find a few more lessons drawing girls in the section "People". Draw the face of the girl, which is represented in this lesson, it will be quite difficult. It will not be easy to cope with it, but still it is possible to try well and make maximum effort and time.
We will draw a beautiful girl with a mysterious look. Let's start drawing with phased tips:
Stage 1. Draw a circle. Just do not draw a circle, but it is a circle that is completely stretched up and down. Then we draw curves in this circle. Try to save all the proportions as accurately as possible to achieve a good result.
Stage 2. Add some auxiliary elements, namely points and two lines diagonally. We look at the picture below, and draw all these items

Stage 3. We currently need auxiliary lines and circumference are ready. Go to the face of the face of the girl. First, draw contours of the face and the neck of the girl as follows:

Stage 4. Now with the help of auxiliary lines and within the limits of suitable points, we draw the expressive eyes of our girl here is this way:

Stage 5. Add beautiful long eyelashes to both eyes as shown in the figure below. Now the look has become even more expressive

Stage 6. Now draw eyebrows. With the help of auxiliary lines, which are diagonally located, we draw eyebrows as follows:

Step 7. Starting from the top point on the vertical line, we draw a nose to the nearest point

Stage 8. At this stage, we draw our girls's lips, also focusing on the horizontal auxiliary line and four points

Stage 9. The face of our girl is ready. Left just a little bit. Draw the body of our girl, it is painted schematically, since the main task of the lesson was to draw a beautiful face of the girl

Stage 10. Gently erased by the eraser all auxiliary lines, trying not to hurt the main lines

Stage 11. We left the girl's hair left. To do this, you first need to draw here such approximate lines, within which we will draw hair.

Stage 12. We start drawing our hair here is this way:

Stage 13. Add a few more strands
Step 14. And remove the approximate lines. You can leave them if they merged with you with a common hair background. All, our face drawing girl is ready!
Related drawing lessons:
 |
 |
 |
 |