The proportions of a person's face when drawing a portrait: a diagram. Perfect face proportions
Read also
We can now take a close look at the details. And we'll start with the face. The human face is the first thing we pay attention to in any situation, and this also applies to art in a certain way: the observer will first of all consider a face with your characteristic features. Transferring your face to paper, especially drawing lively expressive expressions, is undoubtedly worth the effort.
In this tutorial, we will get to know the main components drawing a face - proportions, features and foreshortening, and in the next lessons we will analyze in more detail the various facial expressions.
1. The proportions of the face
Full face:
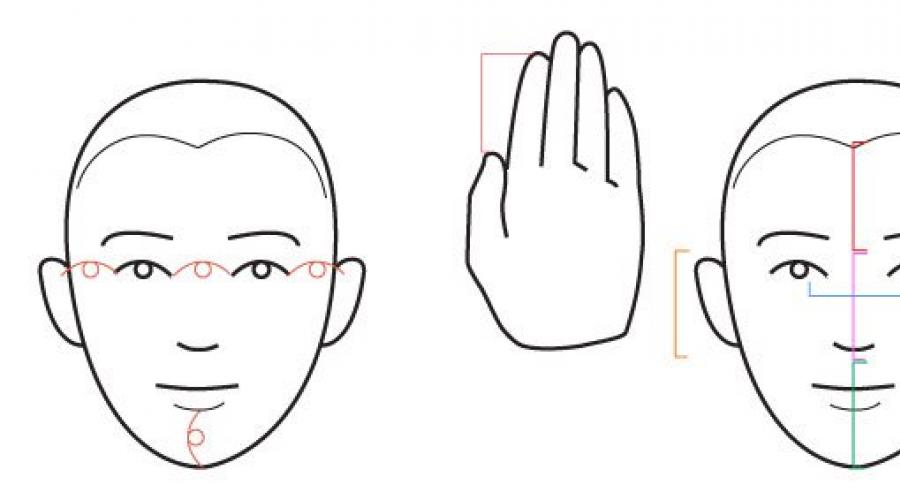
In this position, the skull will be a flat circle, to which the outline of the jaw is added, which generally forms the shape of an egg, pointed at the bottom. Two lines, perpendicular in the center, divide the “egg” into four parts. To distribute facial features:
- Mark the midpoints of the left and right halves of the horizontal line. There will be eyes at these points.
- Divide the vertical bottom line into five equal parts. The tip of your nose will be at the second point from the center. The lip fold will be at the third point from the center, one current down from the tip of the nose.
- Divide the upper half of the head into four equal parts: the hairline (if the person does not have bald patches) will be located between the second and third point from the center. The ear will be located between the upper eyelid and the tip of the nose (if the face is level). When a person looks up or down, the position of the ears changes.
It is useful to know that the width of the face is the width of five eyes or slightly less. The distance between the eyes is equal to the width of one eye. It is not typical for people to have wide-set or too close-set eyes, but this is always noticeable (wide-set eyes give a person an innocent childlike expression, and narrow-set ones for some reason arouse suspicion in us). The distance between the lower lip and the chin is also equal to the width of one eye.
Another criterion for the measure is the length of the index finger above the thumb. In the diagram below, all lengths are marked according to this criterion: ear height, distance between the level of hair growth and the level of eyebrows, distance from eyebrows to nose, distance from nose to chin, distance between pupils.

Profile:
From the side, the shape of the head also resembles an egg, but pointed to the side. The center lines now divide the head into front (face) and back (skull) parts.
From the side of the skull:
- The ear is located just behind the center line. In size and location, it also sits between the upper eyelid and the tip of the nose.
- The depth of the skull varies between the two separated line points (as shown in Step 4).
From the side of the face:
- Facial features are located in the same way as in full face.
- The deepening of the bridge of the nose either coincides with the center line or is located slightly higher.
- The most prominent point will be the eyebrow level (1 point from the center).

2. Facial features
Eyes and Brows
The eye is constructed from two simple arches, shaped like an almond. There are no strict rules here, since the shapes of the eyes can be completely different, but there are also general recommendations:
- The outer corner of the eyes is higher than the inner corner, and not vice versa.
- If we compare the eye with almonds, the rounded part of the pupil will be from the side of the inner corner, decreasing towards the outer corner.

Eye Details
- The iris is partially hidden behind the upper eyelid. It crosses the lower eyelid only if the person looks down or squints (the lower eyelid rises).
- The lashes curve outward and they are shorter on the lower eyelid (in fact, you don't have to draw them every time).
- If you want to depict the oval of the lacrimal canal in the inner corner of the eye, as well as show the thickness of the lower eyelid, it depends entirely on your preferences; too much detail doesn't always look appropriate. The addition of such details is proportional to the complexity of the drawing.
- The same can be applied to drawing the crease of the eyelid - it adds expressiveness and makes the look less disturbed. I think it's best not to add a crease if you are doing a stylized drawing or your drawing is too small.
The eye in profile resembles the tip of an arrow (the sides can be concave and convex), with a small indication of the upper eyelid and, optionally, the lower one. In life, we do not see the iris in profile, but we see the white of the eye. When I was working on the lesson, many said that "it looks strange", so the iris still needs to be marked.
As for the eyebrows, it is easiest to draw them after the eyes to repeat the curve of the upper eyelid. Most of the length of the eyebrow looks inward, and its tip is always slightly shorter.
In profile, the shape of the eyebrow changes - it becomes like a comma. This "comma" continues the level of the lashes (where they bend). Sometimes the eyebrow appears to be one with the lashes, so you can draw one curve for the top of the eye and the border of the eyebrow too.
The nose is usually wedge-shaped - it is easier to visualize and render three-dimensional before adding details.
The septum and sides of the nose are flat, which will be noticeable in the finished drawing, however, already at the sketching stage, it is necessary to designate them in order to subsequently correctly distribute the details. In our wedge, the lower flat part is a truncated triangle connecting the wings and the tip of the nose. The wings curve towards the septum, forming the nostrils - note that when viewed from below, the lines forming the sides of the septum are in the foreground, parallel to the face. The septum protrudes lower than the wings (when viewed straight ahead), which means that when viewed from ¾, the distal nostril will not be visible, respectively.

The most difficult part of drawing a nose can be deciding which parts of the nose are best not to depict for a natural looking result. You don't always have to completely draw the wings of the nose (where they connect to the face), and in most cases the drawing looks better if you just draw the lower part of the nose. The same applies to the four lines of the septum of the nose, in the place where they connect to the face - in most cases it will be better if you draw only the lower part of the nose (wings, nostrils, septum) - you can alternately close the lines with your finger to make sure of this ... If the head is turned by ¾, it becomes necessary to draw the lines of the bridge of the nose. It takes a lot of observation and trial and error to recognize the unique features of the nose. Cartoonists have this feature - you need to carefully consider the outlines of the noses in order to understand why they are depicted in this way. We will come back to this question again in the next lessons.

Lips
Tips for depicting mouth and lips:
- First you need to draw the lip fold, as it is the most linear and darkest of the three almost parallel lines that form the mouth. In fact, it is not a solid line - it consists of several implicit curves. In the picture below, you can see exaggerated examples of the movement of the mouth line - note that they follow the line of the upper lip. This line can be "softened" in several ways: the depression above the lip can be narrower (to distinguish the corners) or so wide that it becomes invisible. It can also be the other way around - the lower lip is so full that it creates the feeling of pouting. If you find it difficult to maintain symmetry at this stage, try starting from the center and draw one line on each side.
- The upper corners of the lips are more visible, but you can soften them by depicting two wide curves, or soften them so much that they are no longer visible.
- The lower lip certainly resembles a regular curve, but it can be almost flat or rather rounded. My advice is to mark the lower lip with at least the usual dash below the lower border.
- The upper lip is almost always narrower than the lower one, and it protrudes less forward. If its outline is outlined, it should be more pronounced, since the lower lip already stands out with its shadow (it should not exceed the size of the lip in size).
- In profile, the lips are shaped like an arrowhead and the protrusion of the upper lip becomes apparent. The lips are also different in shape - the upper one is flat and located diagonally, and the lower one is more rounded.
- The lip fold in profile deviates downward, starting from the intersection of the lips. Even if a person smiles, the line goes down and rises again in the area of the corners. Never raise the line level when drawing in profile.

Ears
The main part of the ear (if drawn correctly) is shaped like a letter WITH on the outside and the shape of an upside-down letter U from the inside (border of the upper cartilage of the ear). They often paint less U above the earlobe (you can put your finger on your ear), which goes further into the smaller letter WITH... Ear details are depicted around the ear opening (but not always), and their shapes can be completely different from person to person. The drawing can be stylized - for example, in the drawing below, the ear in its general appearance resembles the elongated symbols "@".

When the face is turned in full face, the ears are depicted in profile, respectively:
- The lobe, previously designated as an inverted U, is now visible separately - the same when you look at the side of the plate and then see its bottom as if it was closer to you.
- The shape of the ear opening resembles a drop and stands out against the general background of the ear.
- The thickness of the ear from this angle depends on the proximity to the head, this is another individual factor. Nevertheless, the ear always protrudes forward - it happened in the course of evolution.
When viewed from behind, the ear appears to be separate from the body, mainly a lobe connected to the head by a canal. Do not underestimate the size of the canal - its function is to protrude the ears forward. From this perspective, the canal is more weighty than the lobe.
3. Angles
Since the head is based on a circle, where the contours indicate facial features, changing the angle of the head is easier than it seems at first glance. However, it is even more important to observe the position of people's heads from different angles in life in order to remember all the ridges and depressions that overlap each other in the most unexpected way. The nose undoubtedly recedes significantly from the head (eyebrows, cheekbones, center of lips and chin also protrude); at the same time, the eye sockets and the sides of the mouth form some cavities in our "circle".
When you and I drew a face in frontal view and in profile, we simplified the task to a two-dimensional image, where all the lines were flat. For all other angles, we need to rearrange our thinking in a three-dimensional world and realize that the shape of an egg is actually an egg, and the lines that we used before to position facial features cross this egg like the equator and meridians on a globe: at the slightest by changing the position of the head, we will see that they are rounded. Positioning facial features is just drawing intersecting lines at a certain angle - now there are three. We can again divide the head into upper and lower parts, "cutting" our "egg", but now we need to keep in mind: the components closest to us look thicker. The same applies to drawing a face in a raised or lowered state.
Man looks down
- All features are bent upward, and the ears "rise".
- Since the nose protrudes forward, its tip drops below the original mark, so it seems that it is now closer to the lips, and if the person lowers his head even lower, the nom will partially close his lips. From this angle, you do not need to draw additional details of the nose - the bridge of the nose and wings will be enough.
- The arches of the brows are fairly flat, but can be arched again if the head is tilted too much.
- The upper eyelid of the eyes becomes more expressive, and it is only enough to slightly change the position of the head so that they completely hide the orbits of the eyes.
- The upper lip is almost invisible and the lower lip is enlarged.

Man looking up
- All lines of facial features tend downward; the ears also move downward.
- The upper lip is visible in full (which does not happen in full face). Now the lips appear pout.
- The eyebrows are arched more and the lower eyelid is raised, which makes the eyes appear narrowed.
- The lower part of the nose is now fully visible, both nostrils are clearly displayed.

Man turns
- When we see a person almost completely turned away, the brow ridges and cheekbones remain from the visible features. The neckline overlaps the jawline and is next to the ear. When the person turns, we also see the eyelashes.
- Also, when turning, we can see part of the eyebrow line and the protrusion of the lower eyelid; the tip of the nose also appears right behind the cheek.
- When the person turns almost in profile, the eyeballs and lips appear (although the fold between the lips is small), and the neck line merges with the chin line. We can still see the portion of the cheek covering the wing of the nose.

It's time to practice
Use a quick sketch technique to sketch out the facial expressions that you notice around you in a coffee shop or on the street.
Do not try to detail all the features and do not be afraid to make mistakes, the main thing is to convey features from different angles.

If you find it difficult to draw in volume, take a real egg (you can boil it, just in case). Draw three lines down the center and add dividing lines. Observe and sketch the egg with contour lines from different sides - this way you will feel how the lines and the distances between them will behave in different angles. You can sketch out the facial features on the surface of the egg along the main lines and trace how they change in size as the egg rotates.
Now, to get a complete picture of creating female portraits, let's talk about how to draw a girl's face in profile.
Immediately I bring to your attention a simple scheme.
Draw a circle and a vertical axis that will bisect the head and outline the width of the face in profile. Now divide the ball with horizontal lines. Line (1) just above the middle will represent the brow line. The line just below the middle is the line of the eyes. Half the distance from this line to the bottom of the ball will define the bottom line of the nose (2), which coincides with the line of the earlobe. Double the distance 1-2 and find point 3, which defines the position of the jaw. Now sketch out the rest of the elements of the girl's face in profile, according to the picture shown.
Here are some more examples of pictures of a girl in profile: 

I will say a little more about what I think. It seems to me that, in addition to possessing purely technical knowledge, an artist should treat with great trepidation the construction of individual features of a human face, which give it beauty, originality and individuality. He should feel the beauty in the process of creating a drawing and not let creativity sink to the level of ordinary craft. A real artist simply cannot allow his technique to become a routine procedure - a hackneyed guide, thanks to which a drawing of a person's head will always be performed in the same unchanging manner. You need to constantly experiment with all sorts of options for self-expression. Some images of a human head turn out to be the most successful at the level of a sketch, while others require complete detailed elaboration and reliable resemblance to a real character. Thus, both the contour drawing of the head and its tone elaboration can be interesting. There is only one thing that is indisputable: the result of your work should in no case resemble stamped products - an author's drawing cannot look as if it "came off" the assembly line. Remember that the most important thing in drawing a head is to develop your own style, since this is not only a depiction technique, but also your own way of thinking.
Good theoretical training at the very beginning of training is able to create the most favorable conditions for the development of the artist's creative potential. However, with no approach it is impossible to achieve a reliable image of a human head if there is no correct construction and three-dimensionality is not reproduced. Portrait resemblance is born from an understanding of the anatomy of the human head and their own specific analysis. My goal is to demonstrate the general principles of such an analysis, as well as talk about certain nuances that accompany the construction of a drawing of a woman's face.
Greetings!
Today we will look at a popular topic - how to draw a woman's face in profile. We will learn the basic rules of how to draw a person's face in profile and, of course, watch a video tutorial.
The structure of the human face in profile
In the previous lesson, we learned from the example of a man's face, and today we will draw a person's head in profile in stages using the example of a girl's face. Consider the basic rules and stages of this process, in order to learn how to correctly draw men and women with different facial features.
Step one
We fit the head into a square. In order for the head not to crumble, you need to enclose it in a simple shape. A person's head in profile is best inscribed in a square, or in a rectangle, the height of which is 1/8 greater than the width.
How to draw a hare

Easily draw a square and divide it into 4 equal parts, as shown in the picture above.
By analogy with the rules by which we built the full face, we outline the lines: hair growth, eyebrows and nose. To do this, we need to divide the square into 3 and a half parts horizontally (in the picture this is shown in green).
The horizontal axis that bisects the square is the line of the eyes.
Step two
In a rectangle, from the line of the nose to the upper edge of the head, we inscribe a tilted oval, or rather, even an ovoid shape, it will show the shape of the head and forehead. 
This ellipse will further help us determine where the neck is attached and how the hair lies.
If you are going to draw a person with a lush hairstyle, then you may not need this shape. It is important to remember that the oval of the skull is slightly downward in profile.
How to draw bright lips
Step three
- From the upper extreme point of the oval, draw a line inclined forward, to the level of the eyebrows. it superciliary arches.
- We outline the bridge of the nose. From the central horizontal axis of the eyes, we begin to draw a nose, the tip of which extends slightly beyond the intended boundaries of the square. Naturally, nose must end at the appropriate level. Our separate publication will help you to draw the nose correctly in stages.
- Easy to outline jaw, the shape of which is concave inside the square. This is underlined with a red arrow in the first part of the illustration.
- The chin on the contrary, it protrudes slightly forward.

We are looking for and planning mouth line... To do this, the segment from the chin to the nose must be divided in half - this is how we get the level lower lip... Further, we divide the distance from the lower lip to the nose in half - we get the level upper lip... And, once again, we divide the distance between the upper and lower lip into two equal parts and we get the line of the mouth. ( This division process is shown in red in the first part of the illustration.).
- More clearly mark the lips, mouth and the chin.
- We outline the guides from the wings of the nose to the inner corners of the eyes. From the corners of the mouth to the center of the eye.
How to draw poppies
Step four
- Add an eye, and an eyebrow at their respective levels.
- Ear outline on the central vertical axis. We begin to draw it from the line of the eyes, and end at the level of the nose.
- We outline neck... The back is attached to the skull at the level of the nose line, in front, approximately opposite the outer corner of the eye.
Wipe out the previously marked layout, square and guides.

- Draw the eye pupil and eyelids.
- Show the shape of the lips, shadow on the upper lip and below the lower one.
- We draw the ear.
- We show the relief of the jaw under the ear.
Step five
Add a hairstyle and emphasize the shadows. We clarify the facial features, the shape of the nose, chin, forehead, draw the eye, add eyelashes, highlight the lips. We get a portrait of a girl in profile: 
Scheme for drawing a human head
Using this scheme you can paint various profile portraits, female and male. When you practice enough, you will be able to draw a person's face correctly and beautifully and without preliminary markup and diagram presenting it in your head. Although, a square with center lines helps to avoid mistakes and is a reliable support in the construction of a human head.

schemes for drawing a human head
You can print these diagrams and use them to practice drawing different faces with a pencil, try to give them different features. For example: a large nose with a hump, or small lips, two chins or frowning powerful eyebrows, large ears ... 
The profile of the face is amazing outlines that can convey the whole essence of an individual, create a sketch of the entire human appearance. But this is a painstaking and complicated matter. Therefore, in order to draw a face profile, a novice artist needs to know how to do it.
The connection between and the shape of his head
Interested in how to draw a face in profile, the artist should first determine the type of head shape of the person whom he chose as nature. Often this fact depends on the race of the individual whom the draftsman is going to portray. How is this expressed?
Facial angle
This angle is determined between the imaginary lines, which are auxiliary in the figure, the horizontal and the line connecting the point directly under the nose with the protrusion of the eyebrows.
In Caucasians, this angle is almost right, in Mongoloids it is sharper, somewhere around 75 degrees. The sharpest angle is in Negroids, it approaches 60 degrees.
Nape shape
In Caucasians, the shape of the occiput is rounded, almost close to the correct circle. In Mongoloids, it is more elongated, reminiscent of an oval. In Negroids, the back of the head in profile has the shape of an even more elongated oval than even in Mongoloids.
Although race may not always be an accurate criterion, these data are rather generalized. Individual features are inherent in each individual person: there may be a European with a significantly sloping forehead, and an Uzbek with a Caucasian skull. Negroids are also different: the shape of the head of representatives of one nationality of Negroids can be close to Caucasoid, while for another nationality the shape of a skull resembling a Mongoloid will be characteristic.
Master class: "Draw the profile of a child's face"
To portray something correctly, an artist must not only have the skill of drawing, but also carefully study the structure of what he is trying to convey to the viewer. For example, when depicting the profile of a child's face, the draftsman needs to know that the facial angle in children is different from that of an adult. In particular, for the boy, this angle will not be straight, but obtuse, that is, the line connecting the point of the eyebrow protrusion with the point under the nose with the horizontal forms

- Before you start depicting a child's face in profile (pencil drawing), you need to make auxiliary constructions. First, a circle is drawn.
- Then three horizontal lines are drawn, they should not be absolutely parallel to each other, but the angle of inclination upward is very small. The bottom line is the tangent to the circle, and the top line is the diameter.
- Now you need to build vertical lines: one is the diameter, and the second is the front angle line, which is 115 degrees with a vertical diameter (its value depends on the boy's age and his individual characteristics). The face angle line is tangent to the circle - this is important.
- It is necessary to draw a profile line in such a way that the chin and forehead lie on the line of the facial angle, the ear is located between the upper and middle auxiliary horizontal, the nose is between the middle and lower.
- The eye is depicted approximately at the same level as the ear.
- The auxiliary lines need to be removed with an eraser, and the main outlines should be outlined with a pencil. You can finish painting the hair, apply shadows on the face - it already depends on the artist's skill and the goals set for him.
Girl profile
You need to draw a female face profile in almost the same way as a male one, only it should be more graceful. Auxiliary constructions are made similar to constructions for the image of a child's profile: a circle, three horizontal lines, three vertical lines. Moreover, the extreme vertical and upper horizontal are diameters, and the lower horizontal and the extreme vertical opposite to the diameter are the tangent circles.

Note that the vertical tangent is the face corner line. And if the artist has set himself the task of depicting the profile of a girl of European appearance, then this angle should be as close to a straight line as possible. The younger the girl being drawn, the dumber the face angle will be.
Nose line in human profile
You can conduct such an experiment: make a person count, and then quickly, without hesitation, give an answer to the question: "Name part of the face!" 98% of respondents will answer that it is a nose.
This is because this part of the face defines almost the entire image. You can use cosmetics to enlarge the eyes, give a different shape to the eyebrows, paint the lips, but it is almost impossible to change the nose without the intervention of surgery.
It is no wonder that it is the image of the nose in the profile that artists attach the most importance to. The nasal line is also associated with a person's nationality. Physiognomists argue that a nose in particular can tell more about a person's character than he knows about himself.

For example, it betrays a conservative, highly intellectual, often arrogant person. And open, outgoing and friendly people have short noses.
Pointed nose tips indicate a vindictive person with laziness. The long tip of the nose hanging over the upper lip betrays a traitor, a hypocrite and a liar - this is what physiognomists say. However, as in all statements, here, too, generalized and approximate results are given, and among individuals there are often people who do not correspond to the specified characteristics.
Drawing a face in profile, each artist should be careful, study the structure of the human skull, know the rules of its image - this is what this article is about.
In this tutorial, we will learn how to draw a soft illustration using a mechanical pencil and colored pencils. In just a few steps, you can complete a wonderful profile drawing of a girl. Let's start!
The end result will look like this:

Lesson details:
- Instruments: Mechanical pencil, colored pencils, eraser, paper
- Complexity: Advanced
- Estimated execution time: 2 hours
Instruments

- Mechanical simple pencil
- Faber Castell Classic Color Pencils. Numbers: 370 - Lime, 330 - Flesh, 309 - Royal Yellow, 361 - Turquoise, 353 - Royal Blue, 362 - Dark Green
- Eraser
- Paper Type: Double A
1. Draw the profile of the girl
Step 1
Draw an ellipse for the head. Divide the ellipse in half. Don't press too hard with the pencil, the soft lines will be easier to erase later.

Step 2
Draw a straight line from top to bottom, dividing the ellipse into 4 sections.
Begin to draw a profile around the edges of the ellipse. The horizontal line is where we will draw the eyes. The chin is in the lower left section of the ellipse.

Step 3
We start drawing the eye and ear.

Step 4
Add details to the eyeball and ear.

Step 5
We start adding small details, such as eyelashes (eyelashes must be drawn for the other eye as well - this is the only thing that will be visible from the second half of the head).

Step 6
We make the face more expressive.

Step 7
We start drawing the hair. We use spinning curls. Pull one curl behind your ear to soften the pattern. We give the general shape to the hair.

Step 8
Let's add some accessories to her hair, otherwise the picture will look incomplete.

Step 9
Add more curls of hair to add volume to the hair.

Step 10
Erase the original lines of the ellipse and add more details.

Step 11
Finish the details of the accessories and the hair on the forehead.

Step 12
The more detailed the hair is, the better we can define the shadows.

2. Adding color
Step 1
Color #: 330 - Flesh
We start by adding color to the face. Apply the color wherever there will be shadows: on the eyes, nose, lips, neck, on some parts of the forehead, under the hair in the ear area.
Press lightly on the pencil. If you want the color to be darker, just add another layer of color.

Step 2
Use this color a little on the forehead and under the lips. More for the eyes and around the eyes.

Step 3
Add a blue color to the hair as shown in the image below. Basically, this is the designation of the shadows, where the folds of the hair strands go.

Step 4
The head looks a little wide, so let's add one more stroke to draw the head up.

Step 5
Color #: 361 - Turquoise
Add this color to almost all of the hair except for the top of the head.
Also add this color to the eyes.

Step 6
Color #: 330 - Flesh
Let's strengthen the areas that we painted with this color earlier: eyes, eyelashes, ear, nose, lips and chin.

Step 7
Color #: 361 - Turquoise
Add a turquoise color to the inner circles of the accessories.

Step 8
Color #: 309 - Royal Yellow
We cover the rest of the hair and some parts of the accessories with this color. The hair from the back must be made more expressive, so we paint in two layers.

Step 9
Color #: 370 - Lime
Add this color to the eye tips and hair jewelry.

Step 10
Color #: 361 - Turquoise
Add a shadow using this color for the bottom of the hair and jewelry.

Step 11
Color #: 370 - Lime
Use this color to create a smooth transition from yellow to blue.

Step 12
The hair looks a bit hollow, so let's add some details.

Step 13
Color #: 362 - Dark green
Use this color to fill in the shape of the pearls.

Step 14
Color #: 362 - Dark green
Continue adding this color to highlight and contrast the eyes and hair.
Use a mechanical pencil to add dark lines for the eyes.

Step 15
Color #: 353 - Royal Blue
Add more contrast to our image. We draw hair on the forehead, eyelashes, some parts of the hair and accessories.

Step 16
Color #: 362 - Dark green or #: 361 - Turquoise
You can use one or both of these colors to add detail to accessories and hair.

Step 17
Finally, use pencils to add more depth to: eyes, eyebrows and lips.

That's all! We're done!
We hope you enjoyed this quick and easy tutorial!

Translation - Duty room.