Photography machines for boys colored. How to draw a cool car: step-by-step instructions
Drawing - Favorite children's occupationSo they express their vision of the world. The child is full of ideas about drawing. Often the rate tries to portray favorite fabulous heroes or cartoon characters; family members, toys. But it is difficult to implement an idea. At this point, parents come to the rescue. They are talking step by step, explain how to achieve the desired result.
The boys of all ages adore cars, so since the small years they have a question: "How to draw a car?". Sometimes girls preschool age have the same preferences in themes visual arts. Talking to make a drawing, you need to take into account the age of the child than it is older, the more complex technique you can choose. Below, it is described how to draw a pencil machine in stages.
How to draw a machine to children under 5
If your child is already beginning to ask the question "How to draw a machine", offer to start from the simplest option.

You should begin with an image of a passenger car, because it is better than other sign to small artists.
- For starters, supply a child required tools: Paper sheet and pencil.
- Offer him to draw a rectangle, and on top of him - a trapezium.
- The trapezium is the upper part of the car, so at this stage the child must draw the windows in the center of the figure. And at the bottom of the rectangle you need to paint the wheels.
- Make sure that the artist does not forget to portray the headlights in front and rear, as well as visible parts of bumpers in the form of small squares.
- Can not imagine vehicle Without doors, so now it's time to go to their image. To begin with, let the child applies vertical lines. To give greater realism, the baby can draw a small strip in the front window, it will be the visible part of the steering wheel. Remind the tires, and ask to highlight arcs above the wheels. This will give a picture of greater realism.
- On the last stageYou need to erase all unnecessary lines. Give the baby the opportunity to do it yourself. And only if nothing comes out, offer assistance.
The image is ready. If you wish, it can be decomposed with the help of color pencils, paints or markers.
For those who have already mastered the previous drawing, you can learn depicts more complex models of machines, such as a truck. The child will delight the opportunity to master this technique, as any boy in the toy collection has a cargo or dump truck.

As in the previous case, the process will consist of several stages.
- First you need to portray two rectangles: one is a bit more than the other. At the bottom of the left, you need to draw semicircular shapes.
- It is easy to guess that the excavations are needed for the wheels. Therefore, at this stage, their image should be taken. The child must draw two small circles under the excavations.
- After that, you need to extend the semicircles and get circles bigger size. It will be tires. The top small rectangle is a cabin, so the figure must be corrected accordingly. For realism, do not forget to add windows in the cockpit.
- In the appropriate places behind and in front of the rectangles, mark the headlights and visible parts of the bumpers.
- The work is over. Now the baby can show his creative fantasy, and decorate the truck at its discretion.
How to draw a car for children over 5 years
The guys of older who are already familiar with simple technicians Images, you can try to portray more complex models.
Children over 5 - 7 will be interested to learn how to draw racing Machine, Cadillac or other complex car.
We offer to learn to depict a pickup:

- As in the previous cases, it follows from a rectangle, but this time, but must be long enough.
- Below in front and rear in the form of circles we indicate the wheels. In the top of the rectangle, the cabin is denoted near the left edge.
- Now inside the circles, two more similar shapes of smaller diameter are depicted. When it is finished, you can begin to give the shape of the bumper and the sketch of the wings.
- We must not forget about the windows in the cockpit. The process begins, too, from a rectangle, one side of which will be under the tilt. The straight line is designated windshield.
- To give a pickup realism, do not forget about the details: the mirror and the door handle. And within each of the wheels, five semicircles are depicted.
- The child must designate the door and molding to their taste. Optional young artist Can trust the benzobac and headlights. Through the window can be visible part of the steering wheel.
When the kid will create all the above techniques to develop it creative skillsResort to training video lessons.
If you are not a professional, but an ordinary parent who needs to somehow entertain a restless son, then this article is for you. Highly useful occupation is drawing. Most children love to do it. Often they want to get good result quickly the first time. For mom and dad that do not understand the learning process, it is rather difficult to help the baby. However, there are simple and visual ways. After studying the article, you can explain the child how to draw a pencil in a phased machine.
What is the benefit of such a hobby
FROM early childhood It is worth learning a child to draw. This is an excellent way of development. small Motoriki, as well as the opportunity to know the world and yourself. As you know, the formation of speech in children directly depends on the ability of the hand to perform a variety of movements. Early classes Artistic creativity is positively affected by the kids. From this article you will learn how to draw a car. Photo will clearly demonstrate the process. Taking the base outlined material, any parent will become an excellent teacher for his crumbs.
Already up to a year you can give children pencils, finger paints, markers. At first it is enough to show simple lines And forms on a sheet. Gradually, the child will master new and more complex things. Preschoolers already want to portray those items that they like most: girls - dolls, boys - cars. Children dream of being the best in everything, so the drawing should be as a real. Make a beautiful and correctly without a sample in a child is unlikely to succeed. Need a visual instruction. Parents can buy benefits in which it tells how to draw a pencil in a phased car, a ship, a plane, a helicopter and many other interesting objects for boys. The same books are sold for girls.

How to stimulate a child
Girls are usually more prepicable. They like to paint, sculpt. Boys prefer active games: run, jump, do on the horizontal studies. If your son loves artistic creativityHe probably asked you more than once how to draw a pencil in a phased car. In this case, you can simply offer the boys to work with your benefit. Perhaps the baby does not even want to be present near during creative process. He would prefer to please you with the finished picture.
If the child does not paint very well or not too happily, you need to interest it with it, showing yourself how it is easy to draw a car. Even if you do not know how to do it, you definitely definitely follow the task. Any step-by-step instruction makes it possible to phase out any object. The meaning of these actions is to make a complex item to decompose on simple lines by running which you get the desired image.

Practical lesson
Now let's tell you how to draw a pencil in a phased car. The first option shows sketch image. In the second case, drawing tools will be applied. You can take a ruler with ready-made variations of a circle, oval and other geometric figures. It will greatly facilitate work.
Significant artist will be a special grid in drawing in the drawing. It helps to observe the proportion of the subject without measuring the sample. This is done as follows:
- On a transparent film, the draws vertical and horizontal lines at a certain distance, for example, 1 cm. The smaller this length, the more accurate the drawing will be.
- Overlay the grid on the finished sample.
- See how each image contour crosses the cells.
- On your sheet, where the cell of any size is also drawn, try to repeat the template.
In this method, you can scale objects, increasing or reducing your drawing relative to the original.
Making a bulk car
Picture a parallelepiped that limits the shape of the machine from all sides.

Specify where the wheels will be located.

Suitable windshield, side windows.

Draw a headlight lines.

Make side racks.

Suitable rearview mirrors.

Draw the door line.

Smoothing car silhouette.

Detail image.

Erase extra lines.

Now you can paint the picture with a marker or watercolor.

Draw by stencils
The easiest way to portray any item without volume. The second example shows how to draw a car on the side.

The sequence of actions will be next. Take a ruler and draw the rectangles, as shown in the sample. Challenge the contours of the machine.

Circle or using stencils draw the wheel circumference.
Who among us does not like cars? Luxury models are sitting from pages of magazines and television screens. And what if you yourself could create a certain copy of the magnificent four-wheeled transport, albeit reduced? The technique drawing a pencil, on the one hand, is simple, on the other, it requires zeal, skills and inspiration. To your attention a selection of step-by-step instructions on how to draw a car of any class, including a car drawing algorithm for the baby.
If you want to know how to draw a car, and any other item must first get acquainted with the Aza drawing. It is important to learn how to correct the main lines. The machine is a matter with a very clear contour consisting mainly from straight lines. Therefore, the ability to draw them to a large extent will affect the end result.
In order not to spoil too much paper and pencils, remember several simple rules Drawing:
- Pencil stylus should always slide on paper, and not scratching it. Depending on the lines drawn, the pencil must be selected by the corresponding one. For example, a semi-solid pencil is suitable for thin auxiliary lines, but for basic or thick lines it is better to choose a soft, but well-sharpened pencil.
- During the movement of the pencil, make sure to spend the line in right point, so that it is smooth.
- As for the method of drawing lines. Artists know that if it is necessary to draw a straight line, it does not have to be solid, especially if it is difficult for you. Try to draw a flat line with strokes, moving the pencil smoothly and gradually drawing the next one from one stroke. The final result is drawn soft pencil. At the same time, forget about the eraser. Never use it if you want to achieve a standing result.
- Well, and last. How to keep a pencil. Remember - a pencil during drawing never holds like a handle. First, keep it needed slightly higher compared to the handle. Secondly, the fingers holding a pencil should be slightly bent. Yes, it may be inconvenient at first. But over time you will feel more confident, perhaps even improve the handwriting.
After you are leaning with a pencil in your hands, try practicing in drawing lines. This will help you a couple of exercises.
Exercise 1. Connection of points. Take a sheet of A4 format. Put several points on it (10-15), there are more or less uniform. Draw? Now try to spend direct lines from each point to all the rest. Do it carefully, without a rush. Perhaps you will leave for this exercise not one sheet of paper, but the result will be worth it. The goal can be considered reached if you are obtained stresh lines, coming clearly from point to point.

Exercise 2. Drawing of the eight. Place a sheet of A4 format horizontally. Do not rush to draw the eight in the left side of the sheet. Continue to draw eights, moving gradually to the right. The distance between the numbers should be about 5 mm. The result is achieved if:
- the numbers have almost identical in height and width size;
- figures are symmetrical;
- the figures obtained as a result of "overlay" are almost identical among themselves.
How to draw a machine: a lesson for children
Children in most cases are not yet able to master the drawing technique of direct lines. The car in real form may seem to them quite complicated. Therefore, the following are presented the most simplified options, thanks to which the child will understand how to draw a car.
Option number 1. Easy to execute, but very fascinating for a child drawing a typewriter. Let's proceed:

- Begin non-standard way - From the roof. Draw a horizontally semicircle.
- Gently teamed to the semicircle on the left bumper, right - hood. The lines at the same time should be smooth, slightly rounded.
- Draw 3 horizontal lines: one exactly in the middle (more) and two (smaller) - along the edges. Make sure that the lines on the edges are symmetrical to each other.
- The edges of the lower lines we combine interferith in pairs, drawing two semicircles, rounded upwards.
- Drawing carefully two wheels and a horizontal line at the junction level of the hood with a windshield.
- Add a few additional elements. We draw rims from the wheels, headlight, and the outlines of the glasses.
- It remains clearly to read the entire contour of the car and paint it.
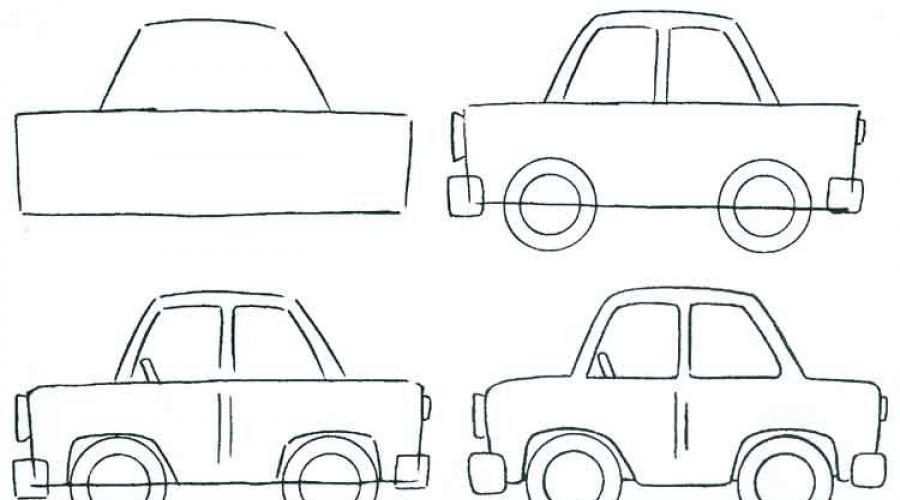
Option number 2. But this machine is already drawn by extremely smooth clear lines. So, first draw a rectangle. Then we draw another line, parallel to the side of the rectangle, but less than the length. Testing two wheels downstairs, and on the sides of the rectangle - headlights. Add two glasses.

It remains only to remove extra details: carefully draw the edge of the body over the wheels in the form of two arcs, doors (just paint two small vertical strips in the middle of the body) and the steering wheel.
How to draw a car with a pencil
Your attention instructions for drawing cars of different levels of complexity.
Options for beginners
So, you caught fire to draw the car, but do not know how to do it. Below, we present to your attention a simple sketch represented by step by step instructions.

Step one. First draw four thin, barely noticeable lines, outlining the borders of the future car. After, we draw the outline of the car. We start below: we draw two horizontal lines at some distance from each other. The upper has a smaller length (approximately half of the first). Next, go from top to bottom. From the upper horizontal line, we draw two small lines, inclined at an angle - windshield and rear window.
Draw vertical contours at the edges of the resulting figure to fully connect it. We get the contour of the car.
Step second. Below we draw two wheels. Do not forget to draw wheel arches and side glass, divided into front and rear vertical jumper. On the left, give me a headlight.
Step Three. We approach the final stage of the lesson of the drawing of the car. It remains to draw the front and rear headlight and the doors of the machine. If you wish, you can try to draw wheels. For this, inside each wheel, we draw another circle, at a distance of several millimeters from the first. Coloring ready-made drawing can be taste.
Options for those who have already known the basics of drawing
Well, then the most interesting thing: a few steep and powerful models of cars that will be able to draw those who are already able to keep a pencil in her hand. Newbies can also try, but you have to sweat. Remember, act in a pencil smoothly, without pressure and short lines.
Aston Martin Virage.
To make the drawing turned out to be similar to the real model, it is important to competently observe the proportions and avoid sharp corners in the car lines. So, proceed. First of all, it is necessary to draw a sketch of the car, focusing on which we will draw the main outline. There should be a kind of slightly bevelled down a rectangle, as an example.

Following actually along the contour of the drawn sketch, form the body. We start from the roof and gradually moving to the right, spinning the line on the hood. Then at the bottom draw the wheel arches and finish on the trunk.

The next stage is the windshield and side glass, headlights and the door of the car. Do not forget about the details: Door handle, side mirror.

We draw the final strokes: radiator grille and some bumper lines. The wheels are drawn very carefully, remembering that the wheel model should be three-dimensional. It must have an external and inner rim.

Chevrolet Camaro.
Luxurious and rather complicated machine. It is quite difficult to draw it because of the complexity of the geometry of this car, as well as large number Small details, in particular on the hood and radiator grille. But it's still worth trying. Go.
As usual, begin with a sketch. It is always needed for a clear understanding of how it is better to have the elements of the machine.

Draw a rectangle. Inside it, we draw one vertical line and two horizontal, one almost at the bottom edge, the second - closer to the top. This line must be slightly at an angle.
Draw at the top of the rectangle windshield and janitor, as in the example. Then, moving from the windshield, smooth lines draw the top of the hood and a small part of the bumper.

Perhaps the most difficult part: the radiator grille and the lower part of the bumper. We plan the lattice and head strokes. Before drawing in detail, draw the manufacturer's emblem.

Well, the final stage. Draw low part Bumper, fog lights, wheels (do not forget, the model is three-dimensional) and draw discs especially in detail. Drawing ready.

On that, our article came to the end. Thanks to the examples presented in it, you now know exactly how to draw a car with a pencil carefully, right and beautiful. Successes in your work!
Video instruction - how to statenly draw a car with a pencil
Machines in pictures. Print for coloring
Some parents mistakenly believe that Boy's interest in drawing and painting is much more complicated thangirls . However, the problem is not at all that the boys do not show interest in these important for comprehensive development child classes, and in an incorrect selection of objects for drawing orcoloring . According to many drawing teachers in younger grades, boys with great diligence and genuine interest paint the contour drawings machines, airplanes, robots, tanks and other typical "boys" objects on a sheet of paper.
Coloring children's pictures can be offeredboy during developing classes Already at 3 years of age. Complex and detailed contour drawings little child It will be difficult to carefully paint. But large simple pictures Without detail, the kid will completely be able to paint on his own. The easiest of everything in 3-4 years old learn how to draw a gouache with a soft tassel. Do more often with the boy painting contour drawings and with time the baby will learn how to hold the pencil correctly in hand, canstrip details clip art horizontal or vertical lines, will not get out the color abroad. Coloring machines for boys is not just an exciting occupation, but also a way to replenish vocabulary names different shades and colors, develop perishability and accuracy, and also - aesthetic taste and imagination.
Below you will find contour pictures for coloring - machines and cars from the cartoon "cars". All free high-quality photos can be deployed by links and print images on a suitable paper format.
Children of junior preschool age it is enough to choose suitable colors for coloring. As a rule, the baby paints drawing The first color pencil fell on hand and takes for the next when this gets bored. To help the child learn how to combine colors and choose more suitable, we offer parents to familiarize yourself with useful recommendations:
Useful tips for parents of a small artist:
If the child is completely small (3-4 years old), then offer it to paint the car not more than 3 different color pencils. A sample of the already painted pattern of the machine as an example will also be very useful;
One pencil can in different ways to paint a certain area Images of machine, changing pressure on a pencil. Show the child how separate parts coloring can be distinguished in this way;
If the boy has already been 5-6 years old, he can easily paint sophisticated drawings Machines S. small details. On the contour drawing can be signed simple pencil Auxiliary lines and strokes. But before coloring coloring with colored pencils be sure to erase all unnecessary or erroneous lines with a soft eraser;
You can help the baby execute interesting background or apply to a certain area contour drawing Light shade as follows: With the help of sharpeners, grind a pencil's griffel, and the baby is neatly the crushed neck along the surface of the paper sheet.
Print for coloring. CARS

Click on the link from the list (below) and deploy a picture for coloring.
Press the right mouse button and select from the list: Copy (Copy) or Print (Print).
Option number 1:
♦ Lightning McQueen (cars). Print for coloring.
Option number 2:
♦ Sally (cars). Print for coloring.
So, now I will tell you and show you everything that I know about how to draw a car with a pencil in stages!
Scheme 1.
This scheme is suitable for the smallest. We start drawing from the wheels. Try to be more or less identical.

Now connect the wheel horizontal line. But what is the car without headlights? it mandatory elementthat you should not forget about. I propose to portray the headlights in the form of two ovals, as shown in the figure below.

Add the semicircle above the wheels. Connect it with the headlights of the car.

But how to manage this car? The steering wheel is just necessary! Two parallel lines, oval - and he is ready. In general, ready now and the whole car! Prettyly paint it - and you can go on the road! \u003d)

There are other schemes that explain how to draw a car step by step. Perhaps they are a little more difficult, but I am sure that you will definitely handle them. Try!
Scheme 2.
Drawing a car on paper, we defined those details, without which you just can not do. This is the body, cab, wheels, bumper, headlights, steering wheel, doors.

Scheme 3.
Oh, not want to try to draw a racing car? I have a light and understandable scheme, but the car is just amazing.

Scheme 4.
Here are some more schemes that will tell you how to paint the car.

Scheme 5.
We draw a convertible a simple pencil.

How to draw freight car Phased.
