We draw a Christmas tree in stages. How to draw a Christmas tree

Read also
Drawing is great for children. In addition, the child has the opportunity to express his emotions on paper. Creative classes help to instill aesthetic taste with early age, cultivate perseverance.
Children try to draw what is familiar and interesting to them. Many people like to portray animals, cartoon characters, flowers, nature. Guys of different ages it will be interesting to know how to draw a Christmas tree with paints or pencils in stages. After all, this tree is well known to every kid.
How to draw a Christmas tree beautifully?
There are many different ways depict a forest beauty. You should figure out how to correctly draw a Christmas tree with a pencil, felt-tip pens or other methods.
Option 1
You can offer your child a simple way to depict a fir tree in a few steps.

- First, you should mark the trunk of the tree. To do this, draw a straight vertical line in the middle of the sheet. Older children can do this on their own. Parents should help the younger ones. Draw small stripes at the top and bottom of the line.
- The next step is to draw branches that extend from the trunk to the sides.
- Further from the main branches it is necessary to draw smaller ones. Let the child determine their number and length.
- On final stage the baby can independently draw with a green pencil small needles that should sprinkle each twig.
- You can add colored balls to this spruce, then you get a New Year's picture. If you have a question how to draw winter tree in the snow, you can simply add white or bluish footprints to it on the branches.
- In order to depict a spruce forest in warm time year, you can draw several trees in this way, and finish painting the grass, flowers, sun.
Option 2
Another method is also within the power of a preschooler, moreover, this method requires a certain perseverance and diligence.

- You need to start work with the image of a vertical line. This must be done to indicate the axis of symmetry. From this straight line, it is necessary to outline the location of the tiers of branches going down at an angle.
- Next, you need to begin to carefully draw each tier, depicting branches, needles.
- After processing the whole picture, you should erase the extra lines.
- Next, you should decorate the drawing with paints. Around it is best to apply a background of your choice. If the kid asks how to draw a Christmas tree in the snow, then you can simply apply a brush of white paint to the picture with a brush. And you can depict mushrooms, flowers and everything that reminds you of summer time next to the forest beauty.
If the child likes to work with paints, then you can tell him how to draw this tree with gouache in stages. In this case, the contour is drawn with green paint using a thin brush.
Option 3
Every child is looking forward to new year holidays... Therefore, kids will be happy to listen to how to draw a Christmas tree with a pencil and decorate with watercolors or other paint.

- Draw a triangle first. At the bottom of the base, a small square is depicted, and under it is a rectangle. This is a tree trunk and a stand. To the sides of the triangle, sketch out lines going downward at an angle. These are the tiers of the Christmas tree.
- Next, you need to carefully draw the branches, connecting the tiers with a triangle. It can be carefully removed with an eraser.
- Now you can draw a star at the top, sketch out the outline of the garland and the main decorations.
- At this stage you need to pay attention small details... Children love to decorate the Christmas tree, so they will be happy to draw a variety of decorations.
- You can decorate the picture with watercolors.
Such drawings can be hung on the wall, or you can give it to your grandmother.
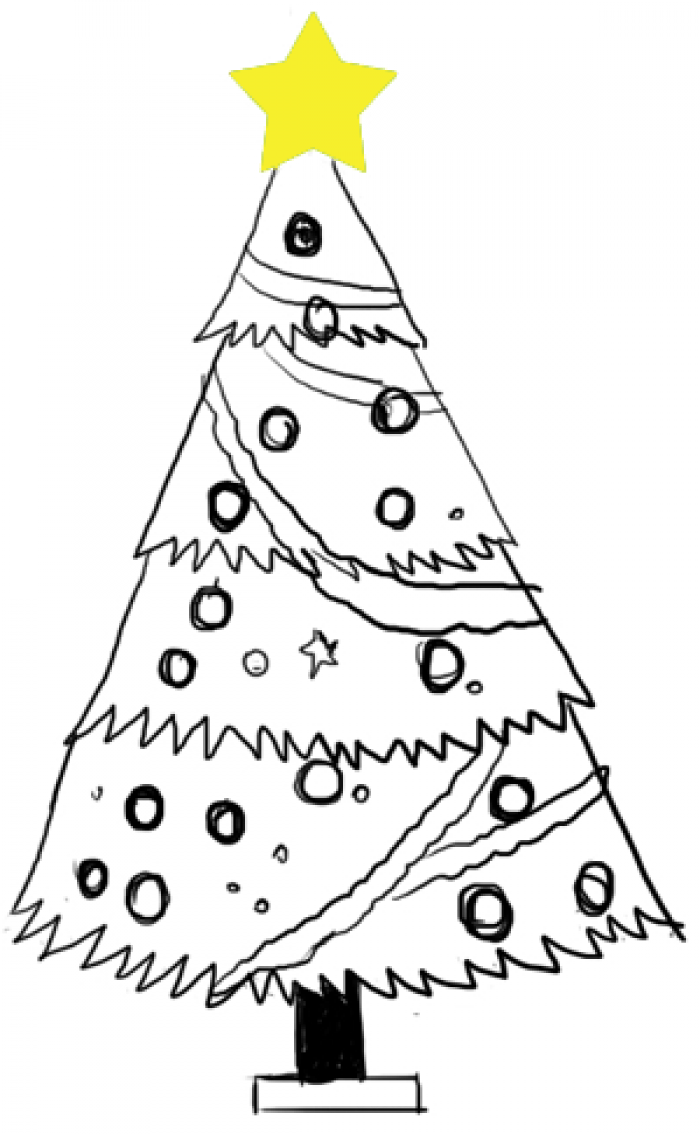
Decorated christmas tree brings in the house festive mood even in the absence of snow and frost. You can also draw it on paper if there is no way to put an evergreen tree in the room. It will have a non-standard shape, but the decorations will be traditional - solid-colored glass balls, a ribbon bow and long golden beads.
Necessary materials:
- album sheet;
- eraser and pencils.

- Christmas tree with pencils
Christmas tree with pencils
Stages of drawing a Christmas tree:
1. Our forest beauty will be very unusual, because the shape of the trunk should be drawn at the initial stage in the form of an arched line. At the bottom, add a small pot used for flowers.

2. In the upper part of the arched line, draw a gorgeous bow, which will be instead of the central star. Draw lines from the decoration to the sides to determine the shape of the Christmas tree.

3. Draw the branches of the Christmas tree, which will consist of five levels.

4. Decorate the tree with round balls and beads, which we cling from one branch to another. We also draw the trunk in the form of vertical lines and around it a little artificial snow in a pot.

5. First of all, we use a light green pencil, with which we paint over the thorny branches of the Christmas tree. Gently stroke the areas around the beads and Christmas tree balls.

6. We paint over with red and burgundy pencils a chic bow on the tip of the Christmas tree, a pot and a small amount of Christmas balls.

7. But the beads themselves will create a golden color using yellow and orange pencils. We will also make this color and several spherical toys on the tree.

8. Paint over the trunk of the tree with a brown pencil, and also work out the shadow on the red areas of the picture.

9. Paint over the Christmas tree with a darker shade of green, and with a soft blue color create a shade on the artificial snow at the base of the tree.

10. Now use a sharpened black pencil so that every detail in the drawing has a neat and clear outline. In addition, we create a shadow for them in all areas. winter illustration... If possible, very small details in the form of beads can be worked out with a black gel pen or a 0.1 mm liner.
 Source: Drawing the contours of the Christmas tree
The finished drawing of the Christmas tree for the New Year will bring good mood and charge of fresh emotions to your original look and bright colors.

If you find clear schemes on how to draw a Christmas tree in stages with a pencil or paints easily and beautifully, then even those who have minimal artistic talent will succeed in a Christmas tree. Among all the crafts and drawings that can be done for the New Year 2018, drawing a Christmas tree is the simplest.

In this material, we have given two of the simplest stepwise way how you can quickly and easily draw a Christmas tree yourself. Even a child can master such a scheme. But, if your baby is still too small, then you can draw a Christmas tree yourself, and give your child your creation for coloring.
Important! If the task is to give your friends, colleagues and relatives something special, made with your own hands, then you can create beautiful postcards in tandem with your child or kids. Have to take beautiful leaf paper, draw a Christmas tree on it with a pencil, and give the children paints, felt-tip pens, crayons or other materials to paint to their liking.
How to draw a Christmas tree in watercolor
A decorated Christmas tree with all kinds of tinsel and Christmas decorations creates on the pre-holiday winter time good New Year spirit... Therefore, it is so important to learn how to draw an evergreen tree with decorative elements for the New Year.
Necessary materials:
- watercolor;
Capacity with water;
Thin brush;
Pencil;
Eraser;
Ruler;
Liners 0.7 and 0.1 mm.

Stages of drawing a Christmas tree:
1. When creating a Christmas tree, draw construction lines. To do this, first draw a vertical line using a ruler and a pencil. From its top we draw to the sides of the line. So we get the frame of the Christmas tree, on which we hang beautiful star.

2. On the left side, we begin to draw the branches of the Christmas tree.

3. Also draw them on the right side. At the bottom, add wide branches and artificial snow that should look three-dimensional.

4. We begin to decorate the forest beauty and for this we take wide ribbons. We "lay" them neatly over the entire surface of the branches. Under the top of the tree, where there is already a star, add a voluminous bow.

5. Supplement empty spaces on the tree with beautiful fluffy bows, Christmas decorations in the form of glass balls and Christmas mistletoe. We distribute everything evenly to beautifully fill the branches of the evergreen tree.

6. With light green watercolor create the first layer on the tree. Paint over all branches with a brush, including the top and lower branches at the base.

7. Mix emerald on the palette green tint paint with a drop of black. We get a dark shade with which we create a shadow on our Christmas tree.

8. Using strokes of blue paint diluted with water, create a light shade of snow under the Christmas tree. Then we will intensify the color in some parts and remove the blue paint from the brush, because now we should take the yellow watercolor. With this sunny color we create round Christmas tree decorations and a star on the top of the tree. Now mix the red, burgundy and dark brown watercolor colors to create a new shade for the ribbons and bows.

9. With liners, create a decorative stroke and work out the details, creating volume and texture in the drawing with strokes.

10. So we get a drawing of a Christmas tree in watercolor for the New Year. But painting with paints is not so difficult! Is not it?!
How to draw a Christmas tree easily and beautifully with a pencil

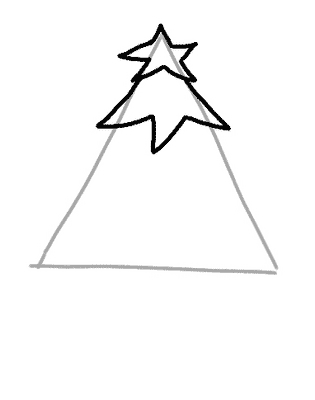
To begin with, you can try to draw this simplest tree. If it is difficult, you can turn to other schemes, detailed photos which are given within the framework of this material.
To implement this method of drawing a Christmas tree, which is described, you will need to draw a triangle. Then make the top and downward in waves to create a semblance of twigs.

It remains to draw the missing parts of the tree, and then simply erase the auxiliary triangle of the Christmas tree, which was originally taken as a basis. Now draw a trunk, bucket or pot where our New Year's beauty will stand.
We constantly write "New Year's beauty", so do not forget to additionally decorate your Christmas tree with garlands and Christmas toys, rain. It remains only to paint a sketch of this beautiful Christmas tree.
In order to use this method to cope with how to draw a Christmas tree in stages
pencil, easy and beautiful, you should start just with a vertical line. It will immediately indicate the height and size of the tree. The height of this line is the height of the tree. It turns out that the longer the line, the longer and larger the tree will be.
Now on the top of the line you need to draw a star - this is the top of the Christmas tree. A standard-sized tree should have three levels. You should start from the top. It is drawn directly under the star in the shape of a mountain. Add jagged ends to this level. Now draw the second part of the tree, also make it jagged. Remains the last, lower and most big mountain, which imitates the needles and branches of a fluffy beauty. It remains to draw a trunk, which will be visible only at the bottom of the tree. Now decorate the New Year's beauty at your own discretion.

This is a nice and simple drawing. Of course, at the time of the bright and magical New Year's holidays, you cannot leave you bored just in this form. Take paints, crayons, crayons and start decorating the Christmas tree so that it finally really becomes festive and elegant.
No. 3 (paints)
In this method, we will consider not how to draw a standard Christmas tree, but how to depict exactly a stranded one. Despite the fact that these trees differ little from each other. In the picture, the spruce will look more natural and natural. As if they took it from the forest and immediately put it on our drawing.
Interesting! There are many myths about the appearance of spruce. For example, someone draws its shape based on an oval, others believe that only rectangles should be selected, and still others insist on a triangle.

First you will need to determine the height of the tree and its general outline... Here you should focus on the pyramid and remember that at the top the tree is narrow, at the bottom it will be as wide as possible. Also, the higher the branches grow on the spruce, the shorter they will be on the trunk. So, you first need to distribute the branches on the trunk. It is better to start with the branches of the upper, first
order.
The lower the branches fall, the more massive they become. Can even be used to color them, green color a more saturated, darker shade. You need to consistently draw branch by branch, draw small branches. But this is the only way to really achieve a real similarity between the tree in the drawing and what can be found in the forest. We offer.
These are the main options for how to draw a Christmas tree in stages with a pencil, easily and beautifully. If it is not clear from the description in words, it should just look at the given photographs. There should be no difficulty in drawing a cute Christmas tree. V good journey let it go New Year will be beautiful and bright, and decorated painted Christmas trees delight with their positive and pleasant appearance.
I have carefully selected several schemes for drawing a Christmas tree different difficulty levels. Choose the one you like best.
Some of the schemes are in this video!
Method 1
Although the method is the most difficult, but this Christmas tree pretty pretty. And given the fact that all kinds of gifts are conveniently settled under it, then it is generally wonderful. This diagram shows how to draw such a tree step by step.
Method 2
And this is real forest beauty, lush, luxurious and so beautiful! I hope the circuit is not too difficult for you.

Method 3
Here is another Christmas tree with big asterisk... You shouldn't forget about her either. Such decoration has already become traditional!


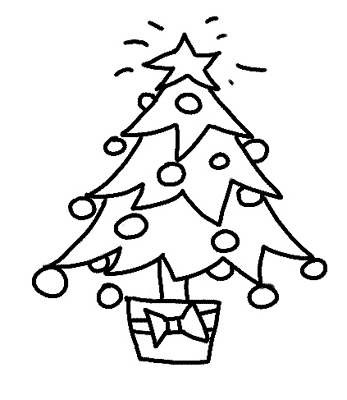
Method 4
This diagram shows in great detail the process of creating a small New Year's masterpiece. First you need to draw a triangle, and at its top there is a beautiful star.


The tree must somehow hold on. I propose to put it in a bucket.

It remains to add some decorations, toys, bows and, of course, color. Paint the tree diligently. That's all!

Method 5
This tree is based on a large triangle... Attached to it stand, branches, decorations.

Method 6
Another good scheme and again with gifts=)

Method 7
And this one is not bad, slender, lush, easy to perform. But it's up to you!)

Method 8
The last diagram will help you learn how to draw a Christmas tree in the most naturalistic way.
With the trees, it seems, we figured it out. If you don't really love paint, can be made of paper, cardboard or fabric. Interesting tips on how to do this you will find in.
Spruce is extraordinary beautiful tree, which is usually depicted on both Christmas and new year cards... Not everyone imagines how to draw a spruce, although there is absolutely nothing difficult in this. In fact, this tree is easier to draw than, for example, a spreading oak or a bright maple. Spruce is especially interesting and useful to draw from nature, for example, in a park or in a forest. But, if this is not possible, then you can consider this tree in a photograph or in a high-quality drawing, and only then start work.
To draw a spruce in stages, of course, you will need a variety of stationery:
1). A piece of paper;
2). Pencil;
3). Liner. It can easily be replaced by the most common ballpoint or the gel pen black tint;
4). Kit colored pencils;
5). Eraser.
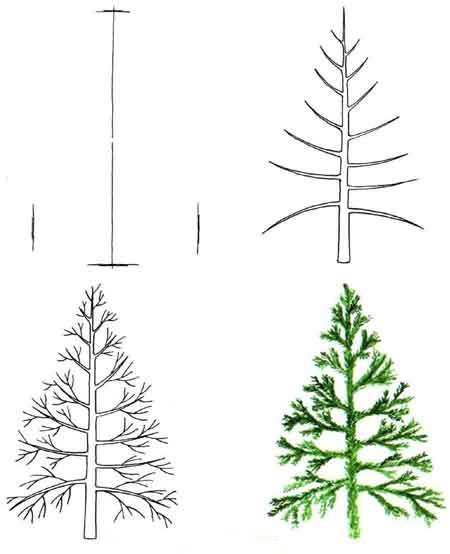
If the items on this list are already at your fingertips, then you can start studying the question of how to draw a spruce with a pencil in stages, and then color it wonderful tree:
1. Start with a simplified sketch. First, draw the outlines of the landscape, and outline the spruce in the form of a triangle;

2. Draw a path near the spruce. Draw the trunk of the tree, making it quite massive;

3. Sketch out the branches of the tree. Try to avoid excessive symmetry, otherwise the tree will end up looking like an artificial one;

4. To draw a fir tree with a pencil, draw its branches in more detail. Draw snow on the branches of the tree;

5. To learn how to draw a fir tree, it is not enough just to make a pencil sketch. After all, only the painted drawing in this case will look complete. Therefore, having made a pencil sketch, carefully outline it with a liner;

6. With an eraser, clean the drawing from pencil lines;

7. Green pencil paint over the branches of the tree;

8. Shade the snowdrifts, the road, and the snow lying on the spruce branches with blue tones;

9. Brown shades paint the tree trunk. And with a lilac pencil, lightly shade the drifts and the path;

10. Gray shades mark the forest in the distance. Lightly shade the sky behind the spruce with a light gray pencil;

11. Slightly deepen the shades of the sky with a gray pencil.

The spruce drawing is completely ready! Now you know how to draw a fir tree. This means that, if you wish, you can create your own unique Greeting Cards for your family and friends. And also you can paint a landscape using, for example, watercolors.

Our video tutorial "How to draw a fir tree"! Enjoy your viewing and see you at the next drawing lesson!
For some people, drawing objects on paper is a problem. If a person does not know how to draw a Christmas tree, this article will be of help. Detailed master classes will help solve this problem.
Herringbone from geometric shapes
For novice artists, there are many options for how to draw a Christmas tree. Most often, geometric shapes are used in symbolic drawings.
Several partially overlapping triangles, arranged in a pyramid shape, with a small brown rectangle at the bottom (trunk) perfectly symbolize the herringbone.
Since you can draw a Christmas tree in a more simplified version, you should consider the option of using one triangle in the image. The corners can also be smoothed or sharpened and stretched.
There is another option, how to draw a Christmas tree symbolically. Geometric shapes are not used for this image. It is enough to draw branches with straight line segments that are directed either downward at an angle or upward.
Symbolic Christmas tree for postcards, making home furnishings and decorating clothes
Here, the designer just needs a way to depict a tree using geometric shapes... You can even smooth the corners of the tree's contour, or, conversely, sharpen and slightly stretch, lift from above. After all, any tree in early period growth twigs stretch to the sun.
The contours of such a Christmas tree can be used as appliqués for decorating clothes and making rugs, for developing patterns for making jacquard patterns on knitted products, for sewing cushions and creative Christmas trees from pillows, making patterns for wallpaper and in many other interesting options.
Master class for kids
Usually, children can easily cope with the task of drawing a Christmas tree. But if the difficulty still exists, you can also teach drawing kids using this master class... He gives a clear idea of how to draw a Christmas tree with a pencil step by step.

- First, draw several triangles in such a way that each one located above is slightly smaller than the previous one. Usually three pieces are enough.
- For very tiny artists, the process of learning how to draw a Christmas tree outline can be completed here and start painting the object. If adults show how to draw a Christmas tree in stages, for older children, for example, kids 3 - 4 years old, then the task can be complicated. Have the child make the sides of the triangles concave inward and the base curved outward.
- The eraser removes auxiliary lines.
- A rectangle is drawn below, which represents the trunk of a tree.
- This is followed by a color overlay on the object. You can only use one shade of green and brown for the trunk. But you can make each upper triangle lighter than the previous one.
- If desired, the tree can be decorated with toys and beads. Then the drawing will be in the New Year's version.
Naturalistic image of spruce
To draw serious pencil paintings - like landscapes - you need to know how to draw a Christmas tree in stages. Interestingly, they begin to depict the object in the same way as in children's master class, with an auxiliary triangle. Then, inside the main contour sketch, "rows" of branches are made - these are pyramidal, partially overlapping smaller triangles.

The bases of the triangles should be made "ragged", uneven. And the sides need to be transformed. Let them become not solid straight lines, but consisting of intermittent segments that have a slightly different angle of inclination. By imposing hatching on the spruce in this way, the artist creates the effect of tree thorns.
Special work should be done on the barrel. First, it is drawn in the form of a rectangle. Then lower part slightly expand, turning it into a trapezoid. The lower base of the trapezoid is made "torn".
Now you need to apply the final shading so that the tree is lighter in the middle than at the edges. Some twigs can "break out" from the main contour - these are young twigs, which have not yet sagged under the weight of their weight, are drawn to the sun. A sharp little twig-top sticks out from above.
Winter landscape
Most often, conifers attract artists in winter. After all, everything around in the forest is bare, and only evergreens stand, as if cold and snow do not exist for them. Such landscapes look beautiful both in black and white and in color.

How to draw a Christmas tree with a pencil in stages was described in detail in the previous master class. Having mastered this algorithm, the artist can depict a winter landscape, where snow caps and collars lie on the branches of fir trees. Making the "garments" of trees is quite simple. You just need to make a contour of a snowdrift on a ready-made spruce, and then remove everything unnecessary with an eraser.

Sometimes a different version is used to depict firs. It is applicable for drawing large perennial trees. Fir trees are not drawn with solid shading, but made more "transparent" by writing out each branch or group of branches separately.