How to make hatching with a simple machine pencil. What types of hatching
Types of hatching.
To create volume and lighting in the picture, artists use hatching. With it, it produces a tonal study of the sheet. Below I will talk about eight types of hatching, which are most often used in the classic drawing:
1. An ordinary single-layer hatching "Zigzag". The pencil moves to the right and left without taking off from the sheet. Forms a barcode similar to zigzag.
2. Overlay two strokes of the Zigzag stroke. The angle of the intersection should not be 90 degrees. With such an intersection, an ugly "grid" is formed. The crossing of the strokes should form "Rhombiki".
3. The hatching at which the pencil touches the paper only when the line is drawn. Pencil smoothly lowers to the sheet, holds a line, and then smoothly breaks away from paper. This type of hatching allows you to connect the strokes very softly and unnoticed. The sheet plane is filled with stroke, without joints and "seams".
4. Barcode around the circle. The movement of the pencil is the same as in the hatch at number 3, only around the circumference.
5. The hatching, similar to the option at number 4. But the number of layers can be arbitrary here. Stroke lengths are short, which allows you to delicately "sculpt" complex forms, for example in the portrait.
6. Intersection of two strokes under an acute angle. Barcode is not a zigzag. After spending a line, the pencil is breaking away from paper every time.
7. The hatching at which the stroke lines intersect at different angle. Both the angle and the number of layers arbitrary. This barcode is well suited for the tonal study of the planes. complex form, crumpled drapery.
8. Combined hatching at different angles. One layer, although additional layers can be administered with further work. Such a hatching is well suited when working out complex, geometrically incorrect forms, for example, stony texture.
When working on a tonal pattern, you need to remember that the barcode must repeat the form of the subject. He, as it were, "fits" the form. At the same time, the saturation of the tone (the level of "black") can be typing in two ways: the power of pressing the pencil and the number of hatching of the hatching. At the same time, the touch should not be "deaf", that is, the paper should still shine through the stroke lines. Otherwise, some "peculiarity" of the stroke may occur, which produces a bad impression.
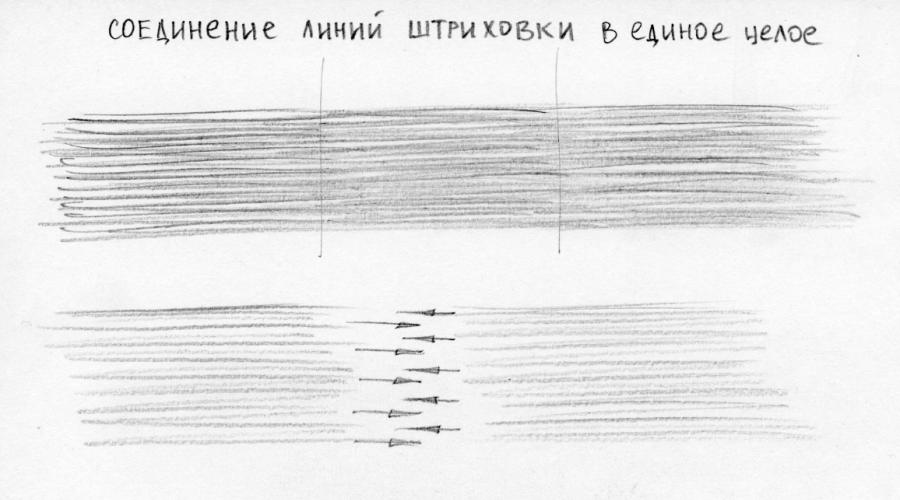
Connection of the lines of the stroke into a single whole.
In the figure, a short barcode is often welcomed, which can be "stacked" on the form of the item depicted. But how to work, for example, the wall plane with short strokes? In this case, the strokes are connected to the block. The table below, I brought an example of how it can be done:

Another one an important point The figure is a combination of work with a plane and pencil edge. The touch can be "fluffy", i.e. wide and blurred. And it can become clear and sharp. In the hatching, each of these approaches is used - both individually and in combination with each other. The table below shows the combinations of a sharp and wide stroke:

The first way. Wide stroke can be made the basis of the picture - the first layer. And on top, in the second layer, use acute barcode and detailed elaboration.
The second way. The neighborhood of wide and sharp strokes creates an interesting texture. If the barcode do short and multidirectional, then they can be produced by a mass of foliage in the tree crown.
Third way. Soft materials of fabrics, fur, foliage ... - are worked with a wide, soft stroke. It conveys the materiality of such a surface well. Accession of metal, glass, gypsum, etc. are acted with sharp stroke. That's where you need clarity and rigidity.
In conclusion, I want to say that there are different techniques conducting a tonal pattern a large number of Shading varieties, different approaches in work. But the key points described in this article are the basis on which the work on the academic pattern is based.
Alexey Epishin.
As in practice, the foregoing is implemented by the example of my work in the section.
Types of hatching.
To create volume and lighting in the picture, artists use hatching. With it, it produces a tonal study of the sheet. Below I will talk about eight types of hatching, which are most often used in the classic drawing:
1. An ordinary single-layer hatching "Zigzag". The pencil moves to the right and left without taking off from the sheet. Forms a barcode similar to zigzag.
2. Overlay two strokes of the Zigzag stroke. The angle of the intersection should not be 90 degrees. With such an intersection, an ugly "grid" is formed. The crossing of the strokes should form "Rhombiki".
3. The hatching at which the pencil touches the paper only when the line is drawn. Pencil smoothly lowers to the sheet, holds a line, and then smoothly breaks away from paper. This type of hatching allows you to connect the strokes very softly and unnoticed. The sheet plane is filled with stroke, without joints and "seams".
4. Barcode around the circle. The movement of the pencil is the same as in the hatch at number 3, only around the circumference.
5. The hatching, similar to the option at number 4. But the number of layers can be arbitrary here. Stroke lengths are short, which allows you to delicately "sculpt" complex forms, for example in the portrait.
6. Intersection of two strokes under an acute angle. Barcode is not a zigzag. After spending a line, the pencil is breaking away from paper every time.
7. The hatching at which the stroke lines intersect at different angle. Both the angle and the number of layers arbitrary. Such a barcode is well suited for the tonal study of the planes of a complex shape, crumpled drapes.
8. Combined hatching at different angles. One layer, although additional layers can be administered with further work. Such a hatching is well suited when working out complex, geometrically incorrect forms, for example, stony texture.
When working on a tonal pattern, you need to remember that the barcode must repeat the form of the subject. He, as it were, "fits" the form. At the same time, the saturation of the tone (the level of "black") can be typing in two ways: the power of pressing the pencil and the number of hatching of the hatching. At the same time, the touch should not be "deaf", that is, the paper should still shine through the stroke lines. Otherwise, some "peculiarity" of the stroke may occur, which produces a bad impression.
Connection of the lines of the stroke into a single whole.
In the figure, a short barcode is often welcomed, which can be "stacked" on the form of the item depicted. But how to work, for example, the wall plane with short strokes? In this case, the strokes are connected to the block. The table below, I brought an example of how it can be done:

Combination of wide and sharp hatching lines.
Another important point in the figure is a combination of work with a plane and pencil edge. The touch can be "fluffy", i.e. wide and blurred. And it can become clear and sharp. In the hatching, each of these approaches is used - both individually and in combination with each other. The table below shows the combinations of a sharp and wide stroke:
The first way. Wide stroke can be made the basis of the picture - the first layer. And on top, in the second layer, use acute barcode and detailed elaboration.
The second way. The neighborhood of wide and sharp strokes creates an interesting texture. If the barcode do short and multidirectional, then they can be produced by a mass of foliage in the tree crown.
Third way. Soft materials of fabrics, fur, foliage ... - are worked with a wide, soft stroke. It conveys the materiality of such a surface well. Accession of metal, glass, gypsum, etc. are acted with sharp stroke. That's where you need clarity and rigidity.
In conclusion, I want to say that there are various tonal pattern techniques, a large number of hatching varieties, different approaches in work. But the key points described in this article are the basis on which the work on the academic pattern is based.
As in practice, the foregoing can be implemented on the example of my work in the "Pictures" section.
5 secrets of a beautiful stroke.
On the course "I am an artist", which I spend now, a question arose "How to learn to stroke beautifully?" I think it is interesting not only by the course participants, so the public answer is here)
The discussion began with this picture:
In this example, we will consider the features of a beautiful hatching.
5 principles of beautiful hatching:
- First, a beautiful barcode is made with confident and fast movements. I have already written about how to spend straight lines, they are not needed by themselves ("That's how I can spend straight without a ruler!"), But as a stroke element. In the figure, these lines are read very well. To carry out straight way, you need to keep a pencil correctly. Lines spent trembling insecure hand are hardly spectacular)
- The tone is cleaned with a cross-stroke, pressure amplification and more frequent strokes. But first of all it is important to rebuild the lines - see, even in the very dark place through the hatching, paper is shifted. This gives overall impression Purity.
- It is not used in the rustic. I do not say that it is impossible to stew at all. You can not mix in one drawing a cross-stroke and tag, if we rub is the whole drawing. Because when graphite is smeared only in several places, it seems that this is a consequence of general inaccurability. It happens that, for example, when, during the stroke, the hand drives on paper and rubs ready-made plots - it's hard to get rid of these stains. Easier to avoid them, putting up blank sheetglasses.
- The touch is superimposed in accordance with the form. For example, it can be seen in the figure that the bananas lie on the horizontal plane, and behind them - the plane is vertical. If the horizontal plane is stroke by vertical lines, it will rise on the wind) that, in general, partly occurred in the lower right corner of the picture.
- Most closely worked out what is on foreground - There are the strongest contrasts of lighting. Iniquited, the tonal transitions were smoother, everything seemed to be twisted with a haze - so the air perspective is shown.
- The rustic of strokes must be carried out along the strokes, but not across. Performing a mouthwent along the strokes, you will achieve more natural toning.
- For the eraser use not only a simple hatching, but also zigzag touches.
- Light This phenomenon allows us to see objects volumetric.
- Blike - on the surface of the subject. Its intensity depends on the texture. Matte surfaces give glare less, glossy - more. There are materials on which glare is not visible. This is a tree, stones, porous textures.
- Halfone (halftone) is a smooth transition between shadow and light.
- Reflex is an unsaturated bright spot in a darkened area. It is formed by rays reflected from close lying subjects.
- Shadow is a weakly lit or completely unlited area of \u200b\u200bthe drawing object. It can be own or falling. The darkest plot is called light-tech.
- The barcode is a line that can be long or short. It all depends on the task of the artist. Hatching can be applied in different areas. When one layer falls on the other, the pattern tonality is gradually gaining. The image gets an interesting grain.
- horizontal;
- at an angle;
- vertical.
- The simplest is a point-haul, which is applied to a slight tapping of the griffel on paper. Than more quantity Points, the time the tonality of the pattern is rich.
- The zigzag hatching resembles hooks, commas, curls that are applied chaotic.
- Spraying technique. It resembles a drawing of a hatching with a cotton wand or a napkin. A sharp knife removes a stylized chip, similar to dust. There is dipping cotton wand or a piece of napkins. The drawing is riveted on paper. The effect of work pastel is achieved.
- The hatching is performed by individual lines. It is impossible to draw a "snake" without taking off the hand.
- Frequent mistake of newcomers - shaking commas. Try the line to be smooth. Many newbies do not immediately understand what a barcode is. The line should be lighter at the beginning and at the end, and in the middle more rich.
- One of the convenient methods for beginners is to stroke from the shade to the light. The surface of any object is illuminated unevenly. Starting work follows from the most darkened place in the figure. It is necessary to move from the shade to the brightest part of the object, gradually increasing the length of the stroke.
- The hatching must be performed with confident hand and fast movements.
- During drawing, you need to turn the pencil in your fingers. Thus, the stalem will wipe evenly. This will make it less often to sharpen it.
- If the drawing is performed on the horizontal surface, then you can not put the palm on the paper. Hand can be accidentally confused with drawing and leave the dirt on the sheet. The artist should learn when creating a drawing to rely on the little finger. Another option is to put a blank paper under the work hand.
- It is necessary to take into account the softness of the pencil. Information is always on the box. The harder pencil, the harder to perform the hatching.
- First, a beautiful barcode is made with confident and fast movements. I have already written about how to spend, they are not needed by themselves ("That's how I am great to spend straight without a line!"), But as a stroke element. In the figure, these lines are read very well. To carry out straight way, you need. Lines spent trembling insecure hand are hardly spectacular)
- The tone is cleaned with a cross-stroke, pressure amplification and more frequent strokes. But first of all it is important to rebuild the lines - see, even in the very dark place through the hatching, paper is shifted. This gives the overall impression of purity.
- It is not used in the rustic. I do not say that it is impossible to stew at all. You can not mix in one drawing a cross-stroke and tag, if we rub is the whole drawing. Because when graphite is smeared only in several places, it seems that this is a consequence of general inaccurability. It happens that, for example, when, during the stroke, the hand drives on paper and rubs ready-made plots - it's hard to get rid of these stains. It is easier to avoid them, putting a clean leaf under the arm.
- The touch is superimposed in accordance with the form. For example, it can be seen in the figure that the bananas lie on the horizontal plane, and behind them - the plane is vertical. If the horizontal plane is stroke by vertical lines, it will rise on the wind) that, in general, partly occurred in the lower right corner of the picture.
- The most carefully worked out what is in the foreground - there are the strongest contrasts. Iniquited, the tonal transitions were smoother, everything seemed to be twisted with a haze - so the air perspective is shown.
And most importantly, you do not need to be afraid to spend the line incorrectly, care for the border, etc. Otherwise you will feel cowardly, and this feeling will certainly transmit the viewer (if you decide to show someone tolerant drawing). To get well, you need to draw with pleasure and less think about the result).
Another important note: The features of the hatching are largely dependent on the nature of the person and temperament. It is as a handwriting. Therefore, do not be discouraged if your manner stroke differs from the manner of other artists, and compare your drawings only with your own!
Learning to draw - hatching with a pencil and handle
In this lesson, we will find out how you can use the handle and pencil when hatching.
The figure below causes the usual sketch of the face performed by the ballpoint handle, and the eye in closeupshown by smear and soft hatching simple pencil.


Before you the most common illustration that displays the main way to use a pencil when hatching.

Such hatching is easy to achieve, for this you only need to drive a pencil back and forth.

This type of hatching is the easiest not only for a pencil, but also for a handle, he will certainly suit anyone.

Let's look at a few more hatching methods. To get a very dark background, take a look at the example that is shown on the left. If you press a little stronger on the pencil each time, you can make a darker tone. The picture you need can be painted in this way.
The stringent hatch is shown on the example of the right. For this, at the end of each line, we slightly tear the pencil from paper. The rest do as described earlier.
We give a couple more examples of pencil hatching. In the picture on the left it is shown that every time, causing all the shortest strokes, we are imperceptibly reduced to no, similar to the cone. It can beneficially influence most hatching areas.
In the picture on the right, the strokes are depicted in a circle. It is also sometimes suitable for use in small areas of thin hatching, or when the fabric is image, or to draw other "special" structures. When using such movements, it is possible to give a picture of some rawless.

Below is a sketch that was drawn simple ballpoint ball, next to him is an enlarged hatching plan, which I used in the cheekbones area. Here you can consider in detail what kind of hatching I used.

In the image you can see how some lines differ from the other deeper shades, for this, I pressed much more on the handle, so that the tones seem darker.
Sea High
Modern Internet Edition about creativity
Basics of drawing: Painted drawing technique

This article will be devoted to painting with a pencil. If you want to learn how to draw, but you can't proceed, now it's time to take up learning. Take a sheet of paper, pencil and try to start with drawing technique.
Painting technique pencil
There are two main drawing techniques - it is a decisive and hatching pencil.
With the help of strokes (short lines), you can very well convey the tone of the subject. Depending on the number of strokes drawn, you can get different levels of tone saturation (the lower strokes - the tone is lighter than the more strokes, the darker). The direction of the strokes you can pass the texture of the surface of the figure. For example, horizontal strokes will be well transmitted by the surface of the water, and the vertical touches are grass.
Basically, the hatching is performed by short straight strokes with about the same distance between them. Strokes are superimposed on paper with a pencil searches. First one fine line is done, then the pencil returns to the line of the beginning, and thus all other strokes are applied.
To enhance the depth of the tone, you can apply a cross hatch. For example, an horizontal tone is applied to the oblique hatching, then it is possible to impose a slanting hatching in the opposite direction - this is still more. The darkest in this case will be the tone, where the hatches of all directions are combined.

Rastuchevka
The eraser is one of the main techniques that can be applied when performing a picture of novice artists. With the help of tone gradation, you can give a fig. In general, the growing is private case hatching. After applying the strokes using the properties of a graphite pencil and a special tool-decisive, they are growing (smeared) before receiving a homogeneous tone.
However, the fulfillment of the essay itself has a number of features.

With the help of such technicians, you can portray everything anything.
10 frequent mistakes that make newcomers
Most people who like to draw make the first steps alone. And even if it is just a hobby, they still make various sketches. We want to write about 10 possible errorsWith which all beginner artists are probably faced.
1. incorrectly selected pencil
If you have a bad shadow, check the labeling of your pencil. Most likely, it is too tough. Shadows are recommended to draw pencils with marking B, 2B and 4B, but not HB.
2. Figure with photos
Each artist begins to sink from photos. But very often photos do not pass enough damn face for good draw. When the person's face is located in Afas, it will be difficult to correctly simulate his face on paper, because the prospect of the head is disappearing. Try to take a photo where the head of a person is tilted a little to the side. Thus, the portrait will be more realistic and with best transmission Shadows.
3. Ensuring basic proportions
Very often, people begin to immediately pay attention to the details, drawing them completely without sketches of the entire drawing. It is wrong, since you do not plan right proportions in advance. First, it is advisable to make the outline of the entire drawing, and only then draw in-depth details.
4. Curved traits
We are accustomed to looking at a person directly and with the drawing to align face features. As a result, the portrait comes out rather distorted. When drawing complex objects, try to outline the guides for which it will be easier to build a drawing.
5. Picture of animals
Usually we look at our animal from top to bottom. From this head, we seem more than the whole body, and normal proportionality is lost. Try to distract the animal so that it turns the muzzle to the side, then the drawing will come out more truthful.

If you draw every hair or blades separately, the drawing will be disgusting. Try to make a sharp sketch, following the dark to light.
Do not try to draw trees, flowers, leaves with the right shapes. Use contours and fellowship for realistic.
8. Incorrect paper
Before buying paper, check it on a sample piece by portraying anything easy. Paper may be too smooth and drawing will be pale. Also, the paper may be too tough, and the drawing will be fairly flat.
9. Volume
Try when passing the volume not to use clear lines for the edges. They can be outlined with light lines of different tone.
Very often does not go out to impose shadows smoothly. Try to use the full color range of the pencil, leaving the light to the darkest. If you are afraid to overdo it with dark, put under the edge of a piece of paper, and all the mobile will be on it.
 At first it may seem that the drawings with a pencil are too ordinary, dim. But with the help of the pencil you can pass great amount emotions.
Small selection of video channels in pencil drawing:
From the author: If you are interested in painting, drawing, composition, and art as a whole, then you are here! Specialty I am a painter monumentalist. He graduated from Mgah them. Surikova. On the ART Shima channel you will find the videos on which I paint and write oil, and rollers with tips. Since I own many techniques, you can safely ask questions, and I will be happy to answer them. By subscribing to my channel, you can see all my new video.
Interesting video lessons on any subject.
Work more comprehensive, but with good description. If you want to wake, and it will come out.
Drawing technique: Decale and hatching pencil

There are two main drawing techniques - it is a decisive and hatching pencil. Most of those who have studied at art school will choose the second drawing technique. It is believed to be proper technique Drawing, and I do not recognize it at all. But there are those who have not passed art Coursesand do not have art Education, Including I, but also draw and very often use the decisive.
We will not understand which technique is better and more correct, but just let's talk about these two drawing techniques.
Rules drawing a pencil
As you already know, there are two ways to transfer tone - rastuchevka and sharchka pencil. The hatching will suit more for drawing illustration, and the decisive makes realistic drawing.
In the textbooks on drawing, you can find many articles on the rules of work with a pencil, about the correct handling, about generating artistic skills.
In no case, you should not question all these rules, but, in my opinion, they are not suitable for everyone. By virtue of different characters, artistic skills, wishes of freedom in drawing - people are looking for those appliances drawing, which they are more comfortable. Do not want to drive yourself into the rules. I think, that's why many people are used by a pencil hatch, but a decisive, which many are not correct.
Rastune pencil
In the lesson, "how to draw a person's nose with a pencil stages, like other things and other lessons, I used two drawing techniques - first decisive, and then hatching. Decisive, as mentioned earlier, helps to make a drawing more realistic.
There are basic rules of decisive, which will help you make it better. The first is to fulfill it only along the strokes, which will give stewing a more natural look. The second - for a decisive can be used not only a simple, but also zigzag hatching. Third - do not rub the drawing with your finger! Use cotton wands or pieces of soft white paper.
Sharchka pencil
With the help of a pencil hatching, you can easily pass the desired tone. Shading is performed short lines (Strokes), which makes it possible to get different degree of tone saturation. In order to strengthen its depth, an intertest hatching is used.
If you carefully look at, you can see that hatches of different directions will be combined in the dark tone: oblique, vertical and horizontal.
The hatching pencil not only has the ability to transmit tone, but also will help transfer the surface of the pattern objects.
Relief hatch
In conclusion, I would like to say a few words about relief hatching. This type of hatching is used when it is necessary to convey the surface relief of the functional object. For example, lips in the lesson "How to draw lips with a simple pencil: phased lesson"I painted arcuate strokes.
As a rule, relief hatching pencil is the use of non-direct strokes.
Aza Azov Figure are lines and strokes. The lines in the figure form the contour of objects, and the strokes form their tonality, creating the illusion of lighting, volume and space. Now we'll figure it out in more detail in the concepts.
Line
The line is a straight, broken or curve, conditionally having no thickness. For example, the elongated rectangle is not a line. However, if its length repeatedly exceeds the width, then it can be considered a line. In the figure, the line is capable of displaying visible object contests, create a feeling of volume, form the illusion of spatiality and emphasize the most contrast areas. This is achieved by the nature of the line: its shapes, thickness and saturation.

Hatch
The barcode is a line forming the visual volume of the object and the space around it in the figure. In the classic (academic) drawing, the strokes are applied in the form of the objects depicted. Many ordered strokes form tone in the figure.

The tone is black and white graduation. It is the tone that makes it possible to display light and the shadow dropping on the objects falling into objects, as well as designate the degree of lightness or the dark objects. The tone in the picture is formed using strokes and other artistic and graphic agents.
Drawing lines

Straight line
It would seem that difficult to draw an ordinary line. However, take in the hands of a pencil with paper and try to draw a long perfect straight line. Happened? Maybe yes. But, if you carefully look at, it turns out that the line has irregularities.

Square
Take a pencil with paper and draw a square. When drawing a square, observe the lines, the exact aspect ratio and the angle of inclination between them are 90 degrees. Draw ...

Triangle
Draw equilateral triangle. Try to draw an equilateral triangle with the same sides and angles between them. Pay attention to the evenness of the lines. Draw ...

A circle
All in school drew circles using a circulation. Now the task of drawing a circle from hand only with a pencil. Remember that by virtue of certain human features when drawing a circle from hand, it often turns out to be elongated. Try to the circle to be less "shaggy", that is, consisted as possible from a smaller number of strokes as close as possible to each other. Draw ...

Academic Strich
In the academic picture, it is customary to stroke objects in their form. Let's try to shake the square. In the square, swipe the horizontal line immediately under its upper face, then with a very small interval with another one, and so draw the line to the bottom of the square. At the end, you will receive a square, fully filled with tightly located to each other. horizontal lines. If you push the drawing from myself and squints, it turns out that the square acquired gray tint. This is how tone is formed using hatching in the classic figure. Draw ...

Free Strike
Valid in the modern figure is used free non-academic hatching. We will master it on the example of a triangle shadowing. Inside the triangle, without tearing a pencil from a sheet of paper, apply diagonal (parallels) lines from the ADD edge of the triangle to another until fill in the entire triangle. In this form, the strokes of the strokes do not lie down in the form of the object, but rzaps under a convenient artist an angle. It is important to create a tonal stain with a ton of strokes, which will denote the shadow or the degree of dark object. Draw ...

Sharching Circle
Strike a circle in two ways academic and free. Let's start with the academic hatching of the circle. In the left lower part of the circle, we apply the circular movements of the stroke. First, with a small distance between strokes, then gradually increasing the interval. Strokes must repeat the shape of the circle to which they are inscribed. If everything is done correctly, then a visual circle will become similar to the ball. Draw ...

Now stitching the circle in free style. Take strokes diagonally at any convenient angle. The main thing is that the strokes between themselves are parallel. Draw ...
Summary
We summarize the above. The line is the basis of any image. Single lines can be depicted contempted objects. If you draw a large number of lines located in parallel close to each other, they will form a tonal stain. In fact, this location of the lines in drawings is considered to be hatching. Having understood with the importance of the line in the figure, you can proceed to more interesting topics: The laws of perspective and lighting.
High-quality drawing of the Griffel is a real work of art. IN art schools Few attention is paid to the work done by the pencil. The hatching is needed in order to give objects the form and volume. In second place is the drawing of light and shadow.
When using the technique, the emphasis should be on cross-stroke. The tone created in this way gives the overall impression of purity. If you look at the drawings of professionals, you can see that even in the dark, the sheet of paper is shifted.
Basic concepts in pencil hatching technique
To understand what a touch is, and learn how to use this technique correctly in the figure is not so difficult, as it seems. To do this, you need to explore the basic concepts:

Shading in the classic pencil drawing
Having understood what a barcode, we turn to its species. The picture uses a straight and cross-hatch. The first happens:
Cross hatching is applied on top to direct. Consider an example. The straight horizontal bar is applied first. Toppers supervised lines at an angle. Then the vertical barcode. This forms a beautiful mesh tone surface. Further apply a barcue with a slope in the opposite direction and again

The details of the drawing, which are in the foreground should be more clearly worked. The contrasts of lighting are stronger here. In the background, the drawing should be as if it will turn the haze and go to aerial perspective. The hatching in the form is used as the image of rounded items, for example, balls, cones, cylinders. Lines emphasize the shape, making it expressive.
Alternative types of hatchovka
Stroke secrets
Principles for which hatch drawings are created:

It is possible to understand what a barcode is, and you can master the drawing technique with a pencil only when not one stack of paper is spoiled. Do not be afraid to make the line or go beyond the borders. Do not try to copy someone's manner to draw. Over time you will work out individual style Picture with a pencil.
On the course I spent now, the question "How to learn to stroke beautifully?" I think it is interesting not only by the course participants, so the public answer is here)
The discussion began with this picture:
Yudaev-Rachi Yuri, "Bananas"
In this example, we will consider the features of a beautiful hatching.
5 principles of beautiful hatching:
And most importantly, you do not need to be afraid to spend the line incorrectly, care for the border, etc. Otherwise you will feel cowardly, and this feeling will certainly transmit the viewer (if you decide to show someone tolerant drawing). To get well, you need to draw with pleasure and less think about the result).
Another important note: the features of the hatching are largely dependent on the nature of the person and temperament. It is as a handwriting. Therefore, do not be discouraged if your manner stroke differs from the manner of other artists, and compare your drawings only with your own!