How to draw an owl with strokes with a simple pencil. Drawing an owl in stages for children
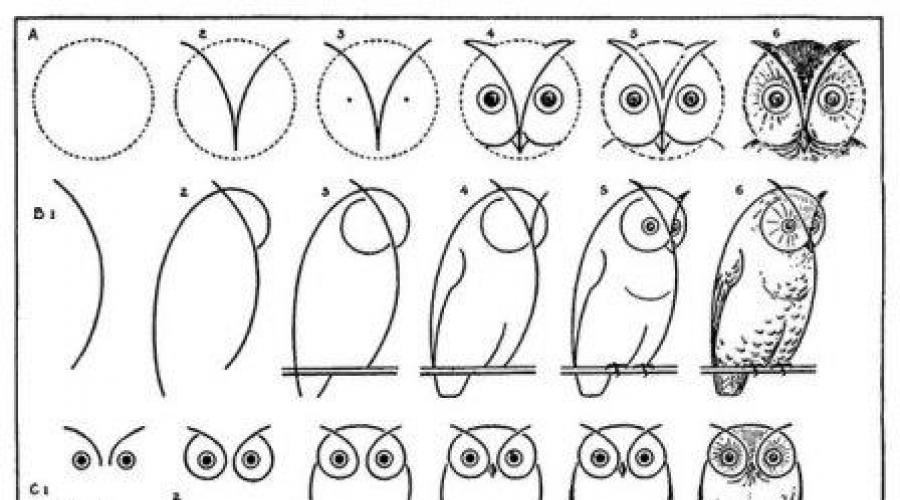


There is also such, drawing an owl, we create the basis of a future owl from geometric shapes

now, follow the steps step by step drawing, as in the picture, we will draw the eyes, beak, feathers


that's it, you can paint it with crayons.


Now we will look at drawing an owl with a pencil step by step. To draw an owl, we need to understand the structure of the feather and wings. Feathers are different small and fluffy, which are located on the head, chest, legs, medium-sized, which are located in the upper part of the feather, and long, which are located in the middle and lower part of the wing.

Step 1. We need to draw an accurate sketch. Draw the outlines of the head, body and wing using thin lines. Click on the image to enlarge it.

Step 2. Draw the beak, legs and feathers.

Step 3. Draw the eyes and pupils, they are incomplete circles. Now we need to erase the outline (lighten) and create the appearance of feathers in place with lines of different lengths. Then we will draw the legs and the trunk.

Step 4. In this picture, the light source is on the left, so the shade on the right is darker. Add slanted hatch lines on the head, representing small, soft feathers. Pay close attention to the direction of the strokes, they are important as they help convey the illusion of depth in the various shapes. Sketch feathers different shapes and the length on the wing. Add some curved strokes on the feet of the paws to show the direction in which the tiny soft feathers grow.

Step 5. Remember that the hatch lines used to draw the feathers differ in different lengths and shades. The outlines are not cut off abruptly, but rather are feather-shaped (or jagged) to convey a more realistic look.
With a 2H pencil, lightly shade the feathers on the left and center of the paws, lower part torso. With pencil 2B, make an intermediate shadow on the right. Then using pencils 2B and 4B add darker shades of feathers on the lower part of the body, on right shoulder, under the beak and under the wing. Draw a circle around the perimeter of the iris for the outer rim.

Step 6. Shade these outer rims with a 2B pencil. Using the 6B pencil, paint over the pupil, leaving a highlight and paint a darker shade on the beak.

Step 7. Using pencil 2H and HB paint over the eye and beak of the owl.

Step 8. Use hard pencils to add more strokes on all areas of the head. Use 2H for light areas and 2B and 4B for darker areas. Add some tiny ovals on the feathers on the forehead and on the sides of the head. The following picture shows the finished appearance of these ovals and at an increased resolution. If you want to make some of them stand out more, just go over them with your eraser to show and highlight the central parts of each.


Step 9. Use a sharpened hard pencil and short strokes to draw soft down feathers on the owl's chest and legs.

Step 10. Shade the feathers on the owl's tail. Each feather has a dark shade on the right, which fades into a lighter shade on the left. Add diagonal lines into separate feathers. Look closely at the drawing and notice that the diagonal lines drawn on each of the feathers complete the shading and accentuate the details.

Step 11. Shade feathers in the upper wing area, while the area on top is darker, as the shadow falls from the head of the owl.

Step 12. Use pencils of different softness and hatching of different lengths to convey the texture of the feathers in the upper part of the wing. Individual feathers have light areas at the tips.

Step 13. Add dark shadows to the claws, while leaving room for highlights. Use hatching with different lines to create the texture of the branch.

Step 14. If necessary, add more lines of your choice to make the drawing look complete. To create light areas use an eraser, for dark areas apply additional shading. Date and sign the drawing.


How to draw an owl
Master Class. We draw an owl.

1. Draw an oval in the center of the sheet.

2. On top we paint on a half of an oval and draw a beak.


Pupils and eyebrows.
4. Draw the wings. Paws and a branch
Finishing the tree, month.

This is followed by color work.
1.When working with paints, a palette and brushes are used, of two sizes: one large for large spots, the other smaller for working out fine ones, small parts Images. We work in yellow.

2. We select ocher colors, the missing colors and tones are obtained by mixing paints.


4. With a thin brush, paint the feathers.

5. Next, we use the technique of drawing with crumpled paper when depicting a tree.

6 Dark blue or purple paints depict the night sky.

At the end, we apply star dots with white gouache (it is better to do this with the opposite tip, with a brush stick).


How to draw an owl with a pencil step by step for beginners
Follow the instructions of the photo lesson by Ivanka Masterova, and you will definitely succeed
To begin with, draw just such a figure (these are the head and wings)

Then we draw the eyes, the beak


We draw slightly visible small ears

Draw feathers on the head

After we draw beautiful, rounded wings

We draw feathers all over the body of the bird


To complete the picture, draw a twig with an owl sitting on it.
Now we take colored pencils and color the drawing.


In principle, nothing complicated, the main thing is to believe in yourself and want to draw

And one more option "how to draw an owl !!!
1. Let's draw an owl with colored pencils. The head is a slightly flattened circle, the body is oval, pointed towards the tail.
2. We connect the head with the body with smooth lines so that there is no jumper on the neck. Let's draw the ears of the owl, a wing (pointed oval), the beginning of the legs - small ovals.


3. It is necessary for our owl to draw a "face" - eyes, beak. Separate feathers appear on the tail, and we draw paws with fingers.
4. With a brown pencil, begin to apply strokes on the ears, on the head. The eyes are, of course, yellow. Few gray feathers on the top of the head.
5. Feathers on the chest and belly are also brown, but in a lighter shade. With a gray pencil, draw stripes of feathers on the wing, on the tail, make gray the shaggy part of the paws.


6. Again we take a dark brown pencil, draw individual feathers on the wing, chest, tail, emphasize the volume on the paws.
7. Use a brown felt-tip pen to emphasize the plumage on the chest and on the wing. Add some brown strokes to the upper furry part of the paws. With a black felt-tip pen we will emphasize the wings, make the claws on the fingers. Well, and finally, to give our owl more expressiveness, let's circle the eyes and beak with black.

How to draw new year owl to kid

Hey! In this tutorial we will learn how to draw with a pencil simple owl on the New Year... Drawing such an owl is easy, because this lesson is intended for children and beginners. The lesson is broken down into seven simple steps, well, I hope you enjoy it, let's go.
In this tutorial, we will look at how to draw an owl with a pencil step by step. The eagle owl belongs to the owl family. This is the most great view family owls and reaches 50-65cm in males and 60-75cm in females. Wingspan - 160-190cm. Eagle owls can hunt crows, pigeons and other birds, and can also eat hares, mice, worms, etc. Unlike owls, it can also hunt during the day. Remember, the owl and are not the same bird, they are different types, which differ in mass, in outward appearance, by hunting and by type of food.
Sketch the shape of the owl, as well as the head and guidelines for the eyes and the middle of the head. The head is slightly turned to the left, so the line of the middle of the head is not in the middle, but deviated.

Draw the ears, the head itself, and the area around the eyes.

The cross determines the tilt of the head and the position of the eyes. Draw all the necessary auxiliary lines, otherwise one eye will be higher than the other. The cross is a simple and reliable way to draw heads (any) correctly. We outline the location of the bird's eyes and beak.

We draw a sketch of an owl, clarify how they will look, where the legs are. We draw the ears. We outline the mask in accordance with the cross. Mark correctly general proportions... This is not as easy as it seems - running ahead, let us reveal a little secret - it seemed to us that the owl's torso turned out to be short, and at much later stages we had to fix it. Look carefully at the proportions.
Important: when drawing on the plane of the table (if the paper is on your table), you see the drawing in foreshortening. Better to take a board and glue the paper with tape, and hold the board in front of your eyes at an angle of 45 degrees. It is in order to avoid distortion that artists paint on easels.

We outline the shadows, so it will be easier for us to decide where the owl has wings and where the legs are.

You can carefully shade the shadows. Dark places will be where there is less light. The muzzle and head of the bird are the brightest and most contrasting.
Important: the feathers on the bird grow in a certain direction, so you also need to draw them correctly. you cannot draw feathers that stick out at an angle to the body of an owl, it will look unnatural. Lest you forget about the feathers, we drew arrows to show that they grow from top to bottom.

Our drawing of an owl is starting to be more detailed - we have drawn the head and eyes of an owl. Of course, we will come back to them later.

We continue to draw with a pencil. Here you can already emphasize more soft pencil eyes and dark outline around the owl mask.

We draw the feathers of the owl. Look carefully: on the abdomen of the owl, the feathers are short, like down, and on the wings - long and hard, they allow the bird to fly. And all the feathers are motley. Drawing colorful feathers is not easy, but it is a calm and peaceful activity. Do not rush, otherwise it will be ugly. And don't get stuck in one place - look at the picture as a whole. Otherwise, the owl will seem to be drawn in parts that are not connected to each other. Draw as a whole, in different places pictures, collecting everything into a single composition.

Most importantly, the feathers are in the shape of the body. And this means that even white feathers where there is a shadow will be dark. Therefore, when drawing feathers, try not to flatten the owl. Use pencils of different softness for different shades.


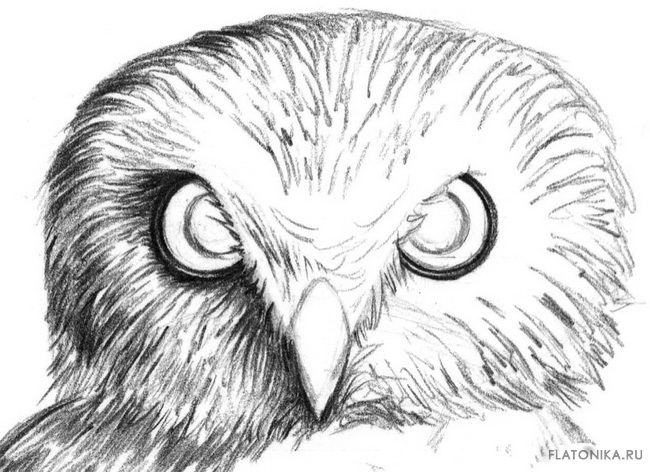
The finished drawing of an owl.
Hello dear friends!
Today our guest is a wise nocturnal bird - an owl. Do not think that a drawing depicting an owl is something not entirely practical, and is only useful to illustrate the tale of Winnie the pooh... Owls are very interesting creatures not only for their way of life, legends and symbols, they all have an unusual plumage color and big eyes, and that should interest you as an artist. Let's take a look at beautiful images birds and learn how to draw an owl.
Drawing materials
In order to get a good sketch, it is enough to have the desire to draw, a sheet of paper and a simple pencil. The work will be more interesting if you apply:
- graphite pencils;
- sketch paper;
- add a few strokes with colored pencils.
If you know how to use ink and pen, you can create a very beautiful graphic work... You can also get a good effect by painting the patterns on the nibs with a black felt-tip pen.
How to draw a human nose
Where to begin
A thick ball of thick and lush feathers well hides the structural features of this bird. The silhouette of an owl can be fitted into fairly simple shapes.
Let's complicate our task a little and try to depict an owl from several angles, consider how to draw its portrait, paws, wings and feathers.
Direction shape and silhouette
We start with a line that will indicate the direction of the bird's body, its pose, and also designate the silhouette with a simple geometric figure.

Do not neglect the line - it will help create symmetrical pattern, and the bird's body will keep balance. Build a shape starting from a line.
After we have placed the bird on the sheet, the image should be a little more detailed, to make the silhouette and body parts clearer. We clarify the shape of the head, wings, tail, add paws. 
How to draw a dog
Head
Main external distinctive feature owls from other species of birds - large round eyes, a small flattened, but sharp beak. To correctly identify the eyes and beak, draw a vertical line dividing the head in half. Further, two horizontal lines denote the frames for the eyes.

- Eyes very expressive, with large pupils, almost round, located at a fairly large distance from each other. Almost all species of these birds have an expressive halo of feathers around their eyes, they are highlighted with a beautiful pattern or color.

- Beak hooked slightly below the center of the eyes. Often it is well hidden among the feathers, and we see only the very tip. In fact, the beak is large enough and opens wide, an owl can swallow even a mouse whole.
- The head of an owl is often painted with ears- this is another feature of these birds. Long sensitive feathers are located above the auricles. These feathery ears help you to hear perfectly and pinpoint the source of the noise. Incredibly keen hearing paired with vision helps this bird to hunt at night.
- Neck very short, it is not visible and it seems as if it is not there at all. Nevertheless, this part of the owl's body is more than mobile, they can turn their head 180 degrees or more.
How to draw a vessel: a vase a decanter a jug
Paws
Feathered predators hunt not only with the help of sight and hearing, but also with strong, dexterous and clawed paws. Since they are covered with thick plumage, most often we can clearly see and distinguish only the claws.

It is quite simple to depict the claws, especially if you are drawing an owl sitting on a branch. Usually we see only three front claws, the middle one is slightly larger than the rest. In fact, there are four claws - one protrudes back, and helps the bird to grab, hold on and not let the prey out of its paws.
Wings and tail
When the bird flies or lands, we can get a good look at the shape of the wings and tail, as well as appreciate the beautiful pattern on the feathers.

The tail is very similar to a fan, all feathers the same shape and size, neatly painted. The wings do not have any features other than beautiful patterns, on the tips - the largest and most powerful feathers are located, on the body there are small feathers.
How to draw a blooming iris
Color
There are many species of owls in nature, and they are distributed throughout the world. The plumage color of these birds directly depends on the habitat. Most often they are painted with brown and grayish paints to match the color of the trees among which they live. White owls - live in the north among the snow, reddish sepukhi - among residential buildings, gray-brown - live in forests, there are also earthen owls.

Regardless of the species and habitat, the feathers of all birds are painted with very interesting and beautiful patterned specks. It will be easier to show these drawings if you can understand and follow the rhythm of the ornament.
Video tutorial
Watch the video how to draw an owl in stages:
Works for inspiration
If you want to portray something beautiful and believable, find a suitable nature to avoid blunders. Since only the most courageous and dexterous will succeed in catching and planting this bird in front of our eyes, let's look at the photos for a sample and inspiration.
How to draw bright lips


These photos clearly show how beautifully nature has decorated the feathers of these birds. There is very interesting legend and a cartoon about where the owl got the patterns on the feathers.
And here are some great graphics:

Step 1. Start your painting by drawing two ellipses as shown in the picture.

Step 2. Now we can draw the outlines of our future owl. Using the ellipses as guides, add details as shown. Keep in mind that the elliptical guide lines will be removed with the eraser at a later stage.

Step 3. Add additional lines and outlines. Just do not forget to make them very light so that you can easily erase them from paper in the future.

Step 4. Now that we have a nice drawn base of the owl, we can start shading. Since you are working on each part of the drawing, I recommend that you lightly erase all the contour lines so that they are barely visible, and then you can start shading the areas. But I want to note that you should not erase all the contours at once, otherwise it will be difficult for you to paint over the owl further. Erase only those lines that directly relate to the area of the drawing on which you are working. The contours will help you visualize the shape of the owl in more detail. Use a piece of cloth or curled paper to blur the superimposed shading.

Step 5. Now we can start adding details to the feathers. Draw oval borders around some of the shaded areas, as I did, to form variegated plumage. As often as possible, consider the image from which you are sketching, this will help you more realistically and correctly depict the owl's feather coat.

Step 6. Now we will add some less detailed feathers to fill in some of the gaps in the wings. Draw and shade small semi-ovals with darker shading at the ends. In my opinion, this type of feather is somewhat reminiscent of scales.

Step 7. Now add darker details to increase the contrast of the picture. Moreover, this trick will help make the feathers more realistic and three-dimensional. Again, if you are drawing from a different perspective, make sure you carefully consider where the shadows are located, without this point your drawing will not look realistic.

The lesson will be about how to draw an owl using simple pencils.
First, we need to sketch with exact proportions and outline it in general outline... Next, we will produce different sections of the poultry.
The lesson can be broken down into two parts:
The first part is placing the owl's proportions on paper.
We will start by examining the structure of the owl's feathers and wings, then we will sketch out, respecting all the proportions of the bird.
The second part is shading the picture.
We will use a variety of hatch lines to draw the feathers and make them look realistic, depending on the location.
Finally, we need to make the tree branch more realistic by recreating the structure of the tree.
For work we need:
white drawing paper good quality, eraser and pencils, I recommend 2H, 2B, HB, 4B, and 6B.
This lesson is recommended for artists from twelve to ninety-nine years old, with basic drawing skills.
Also suitable for home schooling and art teachers.
Placing the proportions of an owl on paper.
To understand the structure of feathers and wings, we need a basic knowledge of anatomy. The next two pictures show the structure of the pen.
Many years ago, the pen was used to write various texts for books. Then there were no ballpoint pens and people wrote with the feathers of birds.
The writer dipped the tip of the pen in ink, and the pen absorbed a small amount of of this ink, since the barrel of the nib has a cavity. Later, scientists created ballpoint pen, according to the same principle.
Feathers vary in size and structure, depending on where they are located on the bird's body.
Here are the types of feathers we have:
Tiny, soft, and fluffy feathers are located on the head, chest, and legs.
Short and soft feathers of medium size, with narrow tips on the upper wing.
In the lower part of the wings, the feathers are elongated and wide, relative to the feathers of the upper part.
In the picture below, we can see the structure of the bird's wing. It shows very well where which feathers are.

Drawing a sketch with precise proportions is the foundation of a drawing. If there are inaccuracies in proportions (the ratio of one component of the drawing to another or others), then no shading can hide these imperfections.
With light movements, without pressure, draw an oval with a slight slope (as in the picture). This is how we designate the body of the owl. By this action we solve the riddle of civilization - which appeared first - a bird or an egg :)

When sketching, make sure to position the sketched oval proportionally on the piece of paper. In order to fit the whole bird in the future.
The second oval will be the head of the owl, we put it on the body of the bird.

Draw a wing from the base of the head to the lower left corner.

On the face, draw a V-shape with curved lines at the tops on both sides. The tip will be the beak of an owl, rounded lines will indicate the location of the eyes.
 Add a small stroke to the owlet's beak as shown in the picture.
Sketching some feathers under the wing.
Add two ovals to the base of the body, thus marking the legs of the owl. Notice that the leg on the left appears to be larger than the leg on the right. But if you look at the owl from the front, the legs will be the same. This is due to.

Outline the eyes of the owl. Note that the eyes are half circles.
Add the part of the tree branch for the owl to sit on.

Recheck the position and proportions of your sketch before starting to hatch.
Shading the drawing.
In this part of the tutorial we will be doing the shading of the picture. Before hatching the drawing, study where which feathers are and see the direction of their growth.
The light source, in this illustration, is located on the top right, so the right side will be lighter.
Use the eraser to erase the highly visible sketch lines.

To show the small, soft feathers on the head, we will apply curved hatch lines.
Draw some slightly curved strokes on chest birds. Draw feathers of various sizes on the wing.
Note that the feathers are shorter at the top of the wing than at the tip of the wing. Add curved strokes to the legs in order to show the presence of fluffy feathers.

We must not forget that for drawing feathers we use different shading lines, both in length and in tone. The edges are not sharp, but rather ragged, which gives realism.
Also do not forget that the light comes from the right - therefore the feathers on the left are darker.

Add shading to the outer rims of the eyes using a 2B pencil.
Work through the eyes and leave a small spot of light on the right eye.

Take a 6B pencil in order to superimpose the dark tones on the hole. Shading the beak.
Finish the hatching on the beak, leaving an elongated light strip (reflected light).

In order to make it convenient to perform shading on the head, sharpen the pencils. With a sharp pencil, you can add more lines.

Use a 4B pencil to work on darker areas. Use it to shade areas such as the upper eye area and the area under the bird's beak.
Add some scanty oval feathers on the head as shown in the image.

In order to draw the soft fluffy feathers on the owl's legs and chest, you must have well-sharpened pencils and short stroking lines must be used.

We hatch the feathers on the owl's tail, as in the lower picture. Closer to the tail, you can work out the structure of the feathers in more detail.

We hatch feathers on the upper part of the wing.
Notice that the shading is lighter on the right and gradually fades into darker on the left.
Also take into account that the shadow from the head falls on the body thus creating a darker background.

Use pencils of varying hardness and line lengths to reproduce the feather structure on the upper section of the wing.
Note that some areas are shaded with a light tone, this is in order to create the illusion of feather lightness.


Putting the finishing touches - work on the feathers and a small piece of a branch in more detail.

Congratulations, your owl drawing ready!
Sign your signature and end date!
