How to draw different types of protein. Draw protein
Drawing seemingly requires special skills that should be developed from the very early age. So, the kids usually begin to show interest in creativity at about three years. Starting from five, you can provide a child with an opportunity to draw a pencil not just figurines, but any representatives of the world of flora and fauna. How to simply transfer the desired image to the paper and tell us in this article on the example of the pattern of proteins.
10 simple steps to create a masterpiece
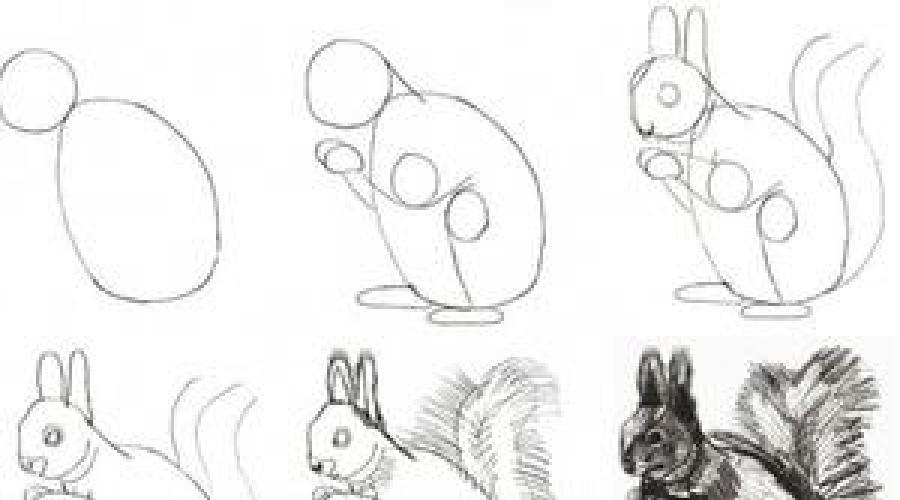
- Base on simple geometric figures. For proteins, such figures are two oval. One large can be placed in the center of the page at a right angle. While the second will be with a slight inclination to the right and placed on the left on the left, in contact with the bottom. The first will be the basis for the body, and the second head.
- Draw the neck., respectively, connecting two ovals, smooth, slightly curved inside, lines.
 We turn to the drawing of the body. On the lower oval of the torso, it is necessary to draw legs. The front paw small oval in the upper part of the body, the wrong shape, curved inside in the center and a little flattened. The lower foot will consist of two parts. This is a thigh and feet. Highly draw as an oval, walking in parallel to the body. It should be inside the oval of the body, closer to the extreme left border. The feet is drawn as a horizontal flat oval, lying right under the body.
- Smooth lines need to connect all the ovals denoting the paws. From the upper foot is a small curved line to the thigh. Hip, in turn, connects to the feet. When the outlines of the paws accurately signed up, the extra lines should be erased, which remained from our billets of oval.
- The next step in the drawing will be giving the right shape legs. On the front paw, we draw a small curved oval, which will mean a brush with fingers. Light horizontal thoughts we denote your fingers, and thumb At the same time, we draw apart from the other. So we can put the mushroom there, which is holding our squirrel. On the lower oval of the feet, we also make the right form. At the base of the paw it should be thinner, and by the end more. The foot itself ends with an angular lifting. Also draw your fingers with two small horizontal lines.
- Now it is time draw tail. To do this, denote the beginning and end of the tail. It should be slightly above the head of the protein, and starting from the right lower corner of the body, right where the back foot ends. The extreme upper point at the same time should be about five centimeters from the head of the protein. Connect the resulting circuit with two smooth curved lines. At the same time, the left line should end at the beginning of the beginning of the thigh proteins. And the right should go until the very end of the body and touch the feet.
- Draw a sympathetic protein ears with tassels. They will be very flat and elongated ovals. They must be located under a slight tilt to the head, on the right side. One earlight lights up the second, so ovals should have a small intersection. Above the ears draw small rounds, which should be combined with the main part of the ears with thin curved inward lines. So the brushes are obtained. We will remove the extra lines that were formed from the intersection of the initial ovals.
- Let us turn to drawing forers squirrels. Draw eyes, spout and mouth. Glazik will be visible only one, as we see the squirrel on the side. In the center we draw a small circle, which is sharpened in the lower left corner, giving it a drop shape. Denote the pupil with a small circle inside the eye, which moves closer to the upper left. So, the look of our squirrel will become perky. In order to draw a spout, simply draw in the top of the oval of small rounds, which is then connected with the head of smooth lines. To draw a mouth from a point where it ends at the bottom of the spout, swipe down, giving swelling and shape with a facet. Then spend perpendicular line To the base of the head for a short distance. Little bending at the end will give squirrels smile. Now it remains to erase all unnecessary crossings of the intersection of the remaining sketches.
- Draw a mushroom squirrel in the legs. To do this, draw two ovals. One more rounded in horizontal position A little tilt up. The lower oval will be oblong, elongated and narrow, in a vertical position, it will turn into a leg. Make it with a slight slope left. From above horizontal oval Dorisite arc, passing parallel to the main line of oval. At the lower vertical oval, draw a curved line from the base. Thus, our fungus gained volume. Will erase unnecessary crossing lines of oval.
- Our protein is almost ready. For completeness, it lacks only small strokes. Denote a fluffy feller protein by drawing lightly inclined tilt strokes along the contour of the tail and breast. Let us give the pattern of stability and colors, coloring the squirrel with colored shallow, pencils or paints. Protein will be red, with dimming on foot and white breast. The fungus will be yellow with a brown hat and a white leg. Masterpiece is ready!
0 235791
Photo gallery: how to draw a pencil squirrel
Of course, the protein can be drawn different ways. Picture an animal on a branch, in a hollow, with nuts or other prey in chain fingers. The drawing can be schematic, primitive or quite complex, plausible, realistic. It depends on the level of skill and the age of the artist. The lessons offered in this article will help the kids to master different variants Drawing proteins and choose for yourself the most suitable way.
How to draw a styardly protein with a pencil?
To draw a simple squirrel with a child, you need to take a sheet of paper, eraser, simple and color pencils or markers. Only at first glance it seems that the creation of a drawing of such an animal is an extremely complex process. If you act in stages, then everything will certainly succeed.

How to draw protein by cells?
The smallest can draw protein by cells. Such lessons allow not only to get original drawingBut also perfectly develop fingers. Similar graphic dictation can be performed with parents. This occupation is perfectly developing logic, attention, perfection, child thinking.

How to draw a squirrel on a tree?
The drawing will be excellent if you depict a protein sitting on a tree branch. To create an image, you need to prepare a sheet of paper, soft and solid pencils. Via solid pencil You can make basic, rough contours. Soft is needed to add details and refinements.


The boundaries of the pre-created lines do not need to be washed, but you should only slightly lubricate.

How to draw a squirrel from a fairy tale about Tsar Saltan?
There is hardly a child who does not know the fairy tale about Tsar Saltan and her the main heroine, protein. No wonder, often many kids dream of drawing a animal. By the way, in schools one of themes visual arts These are the works of Pushkin. That is why many kids seek to portray a magic squirrel with precious nuts.
In today's master class, we will learn to draw pencils to forest beauty-protein. You will make sure that there is nothing hard in the image of this animal.
The torso protein consists of several elements that are combined and give such a complex figure. To make it easier to portray it - best use simple geometric Figure. It can then be possible to detail the entire picture.
Necessary materials:
- black marker;
- simple pencil;
- paper;
- eraser;
- color pencils of yellow, orange, brown and burgundy tone.

Stages of drawing proteins:
Draw the head of the squirrel in the form of a circle. Then draw at the bottom of the arc in order to portray the neck and part of the back. 
On the head we carry out a vertical arc through the entire circle. To the arc, which is the neck and back we draw two small circles of different diameters. Under the head there will be a small circle, and then there will be more circle. 
On a large circle, we draw a part of the lower leg of the squirrel in the form of semi-ham. On the head we draw eyes in the form of two oval. 
Detailing the muzzle and the head of Squirrel: Take the pupils in each eye, the nose in the form of an oval, ears. 
Tyoving the bottom paw. Draw a large and fluffy tail to our animal. 
Draw others small parts Morns: cheeks in the form of semi-brows, circle around the nose, mouth, eyebrows and line on the right ear to create a middle. 
We draw the upper paw on the place of a small circle. It will have several folds. Therefore, it should be very carefully examined by a figure, and then then pass it on paper. Detail the tips of the paws. 
We remove the auxiliary lines and circumference with an eraser. Lines give a wool. You can detail the pattern of the protein and bring it to the perfect state, because then it will not be possible to do this. 
Black marker Will supply a pattern of a squirrel. Fully paint the nose and pupils. 
A yellow pencil partially paint the pattern of a squirrel. 
All white areas are painted with an orange pencil. Let's leave only white teeth and eyes. 
Today we will learn to draw a squirrel. As a result, we will have a beautiful redhead squirrel with a fluffy tail, in whose legs will be a mushroom that she found in the forest.
- white sheet of paper;
- hB pencil;
- color pencils from yellow to dark brown tone;
- eraser.
Figure steps:
1. In the center of the sheet it is necessary to draw a simple pencil general contour Heads and body proteins.

2. Now Dorisuham to the main part of the body is the upper and lower legs, and on the head long ears.

3. On the right side of the body, a large and beautiful tail should be drawn, which distinguishes the protein from many animals. Slightly twisted the tip.

4. Correct the shape of the face, paws and ears. At the tips of the ears there will be small brushes. Take the neck. Also, we separate on the torso white segment of wool from the main orange.

5. Remove all unnecessary lines with a piece of elasty.

6. Correct general form Our proteins. Give the effect of wool on the breast, tummy and fluffy tail. To do this, we will need to draw small jar.

7. Dorisuha in the upper legs of a large mushroom protein.

8. Sketch of a fluffy animal Ending the storage of the face, where you need to draw eyes, nose and mouth. Also add a line in the front ear.

9. We start painting our drawing - protein. At first we take a bright yellow otenok. They create a basic tone of wool practically on all parts of the body and the head of the animal.

10. We ask orange pencils, and then red will create shadow parts in the picture.

11. Brown pencils paint a big mushroom. The hat will have a dark shade, but the leg will be painted only along the contour.

12. B. last stage We work out the stroke of the drawing with a black pencil. Also coloring the eyes and spout on the face of the animal.

Tip: For an even better and accurate circuit of all drawings, you can use a thin black marker or liner for drawing.
That's all ready! Drawing lesson completed! Here we were able to draw such a pretty protein!


Today we will learn to draw a squirrel. As a result, we will have a beautiful redhead squirrel with a fluffy tail, in whose legs will be a mushroom that she found in the forest.
Necessary materials:
- white sheet of paper;
- hB pencil;
- color pencils from yellow to dark brown tone;
- eraser.
Figure steps:
1. In the center of the sheet it is necessary to draw a simple pencil of the overall contour of the head and the body of the protein.
2. Now Dorisuham to the main part of the body is the upper and lower legs, and on the head long ears.
3. On the right side of the body, a large and beautiful tail should be drawn, which distinguishes the protein from many animals. Slightly twisted the tip.
4. Correct the shape of the face, paws and ears. At the tips of the ears there will be small brushes. Take the neck. Also, we separate on the torso white segment of wool from the main orange.
5. Remove all unnecessary lines with a piece of elasty.
6. Correct the general view of our protein. Give the effect of wool on the breast, tummy and fluffy tail. To do this, we will need to draw small jar.
7. Dorisuha in the upper legs of a large mushroom protein.
8. Sketch of a fluffy animal Ending the storage of the face, where you need to draw eyes, nose and mouth. Also add a line in the front ear.
9. We start painting our drawing - protein. At first we take a bright yellow otenok. They create a basic tone of wool practically on all parts of the body and the head of the animal.
10. We ask orange pencils, and then red will create shadow parts in the picture.
11. Brown pencils paint a big mushroom. The hat will have a dark shade, but the leg will be painted only along the contour.
12. At the last stage, we will work the stroke of the pattern with a black pencil. Also coloring the eyes and spout on the face of the animal.
Tip: For an even better and accurate circuit of all drawings, you can use a thin black marker or liner for drawing.
That's all ready! Drawing lesson completed! Here we were able to draw such a pretty protein!