A pencil portrait from a photograph in stages. How to draw a face: basics and proportions
Read also
Irina Khursulova
. Portrait painting is one of the most complex and significant genres of fine art. This is not just a reproduction of the features of a particular human, but an understanding of his inner world, the essence of his character, the uniqueness of his appearance; the artist's expression of his attitude to the depicted. No other genre of painting reveals man so how does it do portrait.
How teach a child to draw a portrait correctly? Each teacher has his own methodology drawing a portrait... I teach children first draw a person's face in stages, with a simple pencil.
Using simple rules, draw human almost everyone can face, even child... Perhaps not the first time, but with a strong desire, you will definitely be able to teach a child to draw a real portrait of a person.
Before you start working on a portrait, it is recommended to prepare everything necessary:
Paper;
A simple pencil.
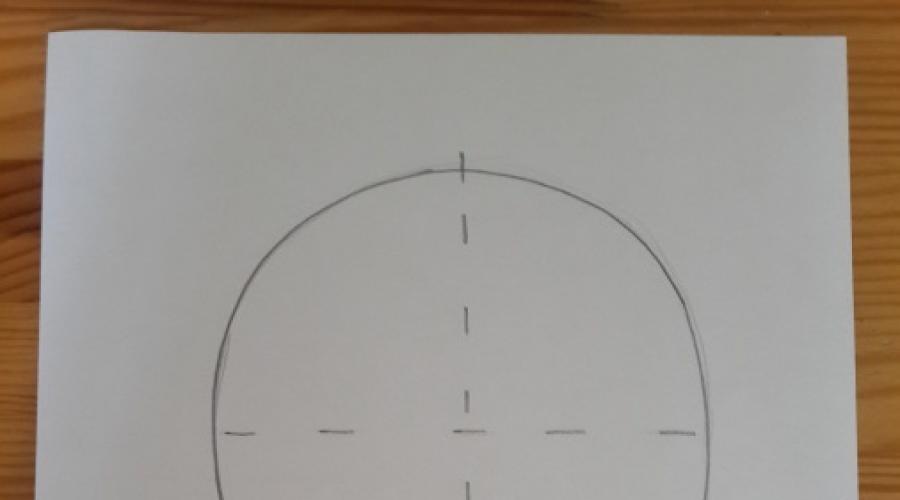
1. First, draw a face with thin lines - an oval.
2. For relief drawing draw a vertical line exactly in the center dividing portrait into two parts and two horizontal lines dividing it by 3 parts: forehead, eyebrows; eyes, nose; mouth, chin.
3. Draw eyebrow arches on the top line.
4. Below are the eyes. The shape of the eyes consists of arched lines. An iris and a pupil are drawn in the middle. Do not forget draw eyelashes, on the upper eyelid they are longer than on the lower.
5. Painting nose - nose in the middle, beginning at the eyebrows. Drawn with a smooth arched line. The crown of the nose is also rounded from the side are drawn wings of the nose and nostrils.
4. The mouth is below the nose. We draw the line of the mouth, on top of the upper lip, two arcuate lines, below the lower lip - a large arcuate line.
Erase the excess lines with an eraser.
5. Draw ears on the sides at the level of the nose, finishing the shoulders.
6. Then the hair: short or long, straight or curly, wavy, with bangs or not, color.
Talent is given to everyone to man by nature, only to develop any abilities you need to start from early childhood. By helping children learn to shape images into images, you educators are doing them a great service. Painting pencil step by step is not only interesting, but also very useful for young children. Good luck to you!


Related publications:
"I started to paint as a gift for my mother, The sun came out and beckons to walk. The sun, the sun, don't be angry, Better sit down next to me. Mother's holiday time."
I bring to your attention the lesson "In the family circle: mother's portrait" The purpose of this lesson: to continue acquaintance with the image of a person c.
Master class for parents "We are able to draw with unusual things ourselves". Purpose: to increase the motivation of parents of preschoolers to use non-traditional drawing techniques in the development of the creative abilities of children.
The venue is a gym. Introduction: Dear educators! We will talk about one sports equipment, which you will find out by guessing.
Good afternoon, dear colleagues, I want to offer you my master class on the topic "How we draw a portrait." Soon the International Women's Day.
Master - class "How to draw a picture if you don't know how to draw" Very often we, music directors and educators, have to ourselves.
How to draw a portrait with a pencil step by step: tips from experienced artists
Do you want to paint a portrait, but something is not working out for you? Exhaust yourself and tons of paper, but not the desired result? Don't be in a hurry to despair!
In this article, especially for you, we have collected tips from experienced artists of the Aquamarine school of drawing, allowing you to quickly master the technique of drawing a portrait with a pencil.
One of the main secrets of step-by-step drawing of a portrait with a pencil
One of the main secrets of experienced artists is that they begin to make images from the whole to the particular, that is, gradually moving from the simple to the complex. While beginners prefer to immediately draw in detail the mouth, nose, eyes and other parts of a person's face.
Thus, our first simple, but very important, advice comes down to the fact that first you need to draw a portrait so that the face you are depicting has an unclear outline, as if the person is in a fog.
At the next stage of the work, the imaginary haze will gradually disappear, and the facial features will become more and more distinct, we will already draw them in detail.
We will also add some more valuable information to the opening section of our article. It is no secret that a person in a portrait can be depicted in three angles - in profile, full-face and half-turn (three quarters of the face are visible).
What is the best angle for a beginner to start with a portrait painting? Experts from the Aquamarine drawing school advise starting pencil tests with a profile, and then moving on to a half-turn of the face. When such a technique is mastered, it will be possible to take on the most difficult part of depicting a person's face in full face.
At the same time, it has been proven that it is easier to draw a person from a photograph than from life. And here, too, you need to think about your strengths. In order to get an excellent result in the end, and to understand well how to draw a portrait with a pencil in stages, it is wiser to move from simple to complex, that is, first learn how to draw a person's face from a photograph or other image, and only then go to nature.
Making the basis for a portrait with a pencil
The basis or frame of the portrait is the oval of the head, as well as points showing the location of the nose, eyes, chin, ears, and so on. And at the very beginning of work, such contours need to be marked.
As an example, we propose to consider the portrait of a pretty girl, which comes as an illustration to this article. Let's analyze what is her head shape? Round or ovoid? Or maybe her head is oval with a square chin?
After we analyze the shape of the object's head, draw it on paper. It will be a circle or an oval. Then, on this basis, it is necessary to place points indicating the location of the eyes, mouth, ears, and so on.
If you are drawing a portrait from a photograph, then simply arm yourself with a ruler, and first outline the approximate height and width of the head, and then measure the rest of the parameters of the face and indicate them with dots on the sketch.
If you are drawing a specific face from nature, then stretch your hand towards the model and on a pencil visually, roughly measure the distances from one point to another, and then transfer the segments proportionally and with the necessary scaling to paper.
So, first it will be necessary to mark the approximate distance between the crown of the head and the chin, then the width of the face, and then the rest of the points, which already show more detail of the elements.
From the anatomical features, we will inform you that usually the width of the head is equal to three-quarters of its height. This is a standard from which deviations of 1-2 centimeters are always possible. But the formula is given so that you carefully check the ratio of the sizes you specified on paper.
For work, it is better to use an HB pencil. It is necessary to strive for the outlines of the face at the initial stage to be barely noticeable, light and delicate.
Do not hurry. We are created in such a way that each person is different, and you need to capture and correctly reflect the unique facial features on paper. If you unreasonably left a lot of space for the image of the nose, then in the end it will be swollen, like a pig's, and if you have little space left on your face under the eyes, then they will also be small pig-like. But we don't want to offend anyone.
Check the base of the portrait against the original at each step. Notice the features of your face. Maybe it will be a large nose or wide cheekbones, or maybe a small mouth and big eyes. If you want to figure out how to draw a portrait with a pencil in stages, these points are very important.
Stages of drawing a portrait with a pencil.
Standard face
The face standard is the golden rule for portrait painters. It is in it that the generally accepted proportions are indicated, which subsequently make it possible to accurately depict a particular person.
The portrait reference includes the following points:
The eye line runs exactly in the middle of the line running from the crown of the head to the chin.
The nose line runs strictly in the middle of the segment located between the eyebrow line and the end of the chin.
The position of the lips should correspond to this proportion. If the line between the nose and the chin is divided into three equal parts, then the end of the upper third will serve as the upper border of the lips, and the upper border of the lower third of the segment will be the lower border of the lips. This is the standard, and the rest depends on the individual proportions of the person.
The eyebrow line is defined as follows. Divide the distance from the crown of the head to the end of the chin into 3.5 parts. The upper lobe in half of the part is left on the hairline. Behind it we measure out one part and draw a line, which will be the eyebrow line. We measure one more part from it, and the new line will point us to the lower point of the nose image.
The width of the lower jaw is calculated as three quarters of the widest part of the head.

If you are making an image of a face in a half-turn, then look at the illustration presented on how to draw such proportions correctly.

First, an imaginary line divides the head vertically in half. Then it is worth considering that your face is visible only in two quarters. Therefore, the half of the face closest to the artist will account for two-thirds of the image, and one-third will remain on the rest of the face, which is visible only in a half-turn.
Stages of creating a portrait: Stubbing head
The chopping head is a simplified representation of a human head. It is the "stump" that novice portrait painters study in professional art institutions.
We suggest that you also try to draw the stubby head of the model: only the head, without the rest of the figure elements.

At the second stage of the image of a person's head, it should be noted the features of the size of a particular face. In particular, in the figure you need to indicate:
- the relief of the cheekbones, their thickness, the falling and protruding parts;
- bridge of the nose, base of the nose, its width and length;
- eyes with distances in width and height;
- lips with dimensions in width and height;
- bending of eyebrows, their thickness and direction;
- the chin is triangular, square or otherwise.
Now let's take a closer look at how to draw the main elements of the face. All this also naturally enters into the process of how to draw a portrait with a pencil step by step.
Phased face painting. Eyes
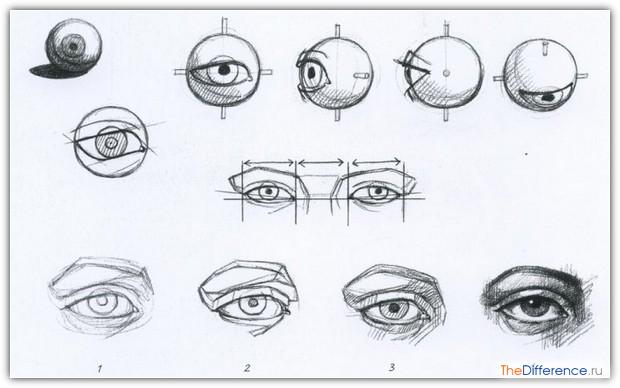
The shape of the eyes is a round sphere, so it is important to emphasize this roundness on a sheet of paper. In order for the eye to be spherical, volume is given to the white of the eye in shades of different intensity.

You can determine the proportions of the eyes for the full face as follows: you need to divide the width of the head into five parts, of which the second part will represent one eye, and the fourth - the other.
If you are drawing a person in a half-turn, then first you need to mark the eye socket, located next to the temporal part of the head. Then you need to measure the distance from it to the farthest eye, which will be half the size of the one closest to you. Then on paper you need to indicate the distance between the eyes and outline the contours of the second eye on the sheet.

In the next step, use the line segments to show the position of the eyelids. Every eye has an upper and lower eyelid. At the same time, experts do not advise making the lower eyelid too dark, but it will still be a tone darker than the white of the eye. Also look at the illustration below for how to show its thickness.
Phased face painting. Nose
The nose takes up a fairly large part of the face. To portray it correctly, pay attention to the following points:
The location of the wings of the nose can be outlined by drawing down two parallel lines from the inner corners of the eye.
By creating a half-turn face, the line from the far eye will be hidden behind the bridge of the nose.

In general, the nose is in the shape of a trapezoid, draw it and this will be the base of the nose. Select the sides of the nose with lines. Place the pencil vertically, parallel to the nose, remember the angle between the side of the nose and a strictly vertical line, reflect it on paper.
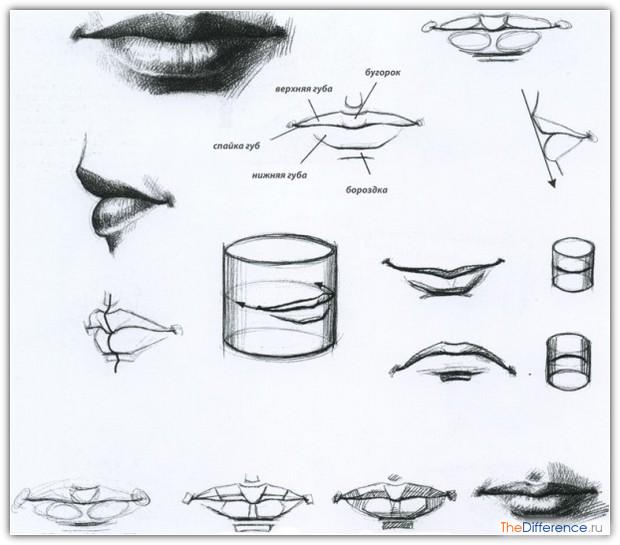
Phased face painting. Lips
We also start the image of the lips by determining the size and drawing the contours. First, divide the head height into eight parts. The fifth line, if you go from top to bottom, will be the lip line.
On this line we draw a cylinder, which, when drawn in detail, should later turn into a mouth with us.

The division into two lips is done as follows. We divide the height of the lips into three parts, of which one upper part falls on the upper lip, and the second two - on the lower one.
Another interesting detail from the experts: the width of the lips will be equal to the segment, which is the distance between the centers of the pupils of the eyes. But when depicting a person in half a turn, the width of the lips will need to be measured from the photograph and adjusted to the scale of the picture.
There is another way to determine the width of the lips on paper: measure the eye, multiply the resulting value by 1.5 and you get the size of the lips in width.
Phased face painting. Ears
You can determine the location of the ear in the figure as follows: its top will be equal to the lower line of the eyebrow, and the bottom will be equal to the lower line of the nose. The illustration presented to you clearly shows how you can draw the "correct" ear.

When depicting a face in profile and in a half-turn, draw only one ear, the second is not visible from this angle. Just do not forget to depict the ear in the figure a little with an inclination to the head, so it will be anatomically more correct.

The angle of inclination is determined by eye or with a pencil, which we apply to the photograph.
Detailing
At the last stage of the process, how to draw a portrait with a pencil in stages, you need to learn how to do a detailed drawing. It consists in drawing all the elements of the face, depicting all its roundness and smooth lines.
To achieve a likeness to the original photo or model, you naturally need to be painstaking and attentive. After (or in the process) of drawing, the extra contour lines should be removed.

At the final stage, the shading of the portrait is done.

First, the darkest parts are shaded, and then the turn comes to the lightest. Then you need to put lighter spots on some details, for example, to make highlights on the pupils, on the tip of the nose and in other areas.

The drawing is ready!
But some portraits can be done without shading. This will already be a linear portrait, in which only lines are used as image means.
We invite you to see how you can draw a girl's face in this way.


A portrait of a child can be performed according to the scheme suggested below:


With advice from experienced artists on proportions, detailed drawing and shading, you too can successfully draw different people in profile, full face and half-turn. Draw, practice, come to classes at the Aquamarine drawing school and every time you will get better and better!
Have you ever had this: you depict eyes, lips, nose, correct, try again, erase again - and so on endlessly, but the result is not satisfied? This is how many people try to draw a portrait with a pencil. And it would seem that you have studied the structure of all parts of the face, proportions, anatomical features, but the creation looks ugly. What is the reason for such failures?
The point is that it is best to move from the general to the particular, from the simple to the complex. Imagine a man emerging from the fog. Vague outlines appear ... The haze dissipates - and more and more details show through. So it is on paper. Let's study together: create a pencil portrait in stages.

Pencil portrait of a man: sketching
The beginning is very simple. We outline the oval of the face, and then the location of the eye sockets, nose, lips. To make it easier, we use a special way drawn lines. One of them is vertical and runs in the middle of the oval. The other two are horizontal, closer to the center of the face. The upper one indicates the future position of the eyebrows, the lower one - to the tip of the nose. As a result, we get a kind of cross. We will draw a full face pencil portrait for beginners. Professionals often draw people half-turned or in profile, but it is the symmetrical front view that allows you to learn how to mark distances at the beginning of your creative path.


Drawing details in a portrait with a pencil
Think about who you would like to portray? It is good if the model helps in the embodiment of the idea, but you can create a drawing from a photograph. At the first stage, it is easier not to build on the model at all, but to capture a fictional character. When you're ready to work with a real person, focus on achieving similarities.
And it's not just about physical parameters! Yes, it is very important what shape the eyes are, the lips are thin or plump, the ears are pressed or protruding ... But it is no less important to achieve psychological similarity. All individual traits - from emotions to character and habits, which you place in the center of attention, will give the work liveliness and realism.


These eyes are opposite ...
Eyes- the most expressive element of the face. It is not difficult to "find" them. We divide the width of the head into five parts: the second and the fourth, and there will be eye sockets. Use notches to mark their width and height. Watch the distance between your eyes! Define the iris and pupils. We do not leave the proteins unpainted, but add volume with the shadows. We mark the eyelids. If you are drawing a portrait of a girl with a pencil, depict thicker and longer eyelashes than the man's. Fill the eyes of older people with wrinkles.


Difficult stage: depict the nose
This is a rather difficult process for a beginner, because nose- the most prominent part of the face. But just understand the principle, and you will be subject to noses and noses of any shape and size! Let's designate a pair of parallel lines from the inner corners of the eyes. Let's outline the location of the wings of the nose. Have you forgotten about chiaroscuro? Most of all, the area near the nostrils is darkened. Highlight the back and tip of the nose.


Lips: we continue to draw a portrait with a pencil
As usual, we start with the correct location. The standard for the mouth is line # 5 if the head height is divided into 8 parts. Imagine that the lips are on the cylinder: this will be easier. Note that the upper lip is usually thinner than the lower lip and protrudes more. But what about the width of the mouth? Just measure the distance between the center of the pupils or estimate how much space takes up one and a half eyes. Don't forget to add a groove between the nose and mouth and a crease above the chin.


Such an important chiaroscuro
Now you think that it is very difficult to impose shadows in the right places and add suitable highlights, right? But we will teach you a few tricks. Imagine the head as a collection of surfaces - more protruding and even. This makes it easier to distinguish which areas to darken. Trace them to get a three-dimensional image. Note that the shadows form a complex pattern and are not uniform in depth.
By creating chiaroscuro, change the pressure on the pencil and the saturation of the strokes. Is the color too intense? Do not wash, just blend, the result will be even better! It is convenient to do this with your fingertips or a piece of paper. Add highlights to the pupils, nose tip, lips. It is chiaroscuro that helps the work come to life!


It turned out to be simple enough, right? Take a piece of paper in your hands, create a beautiful drawing using this lesson! Perhaps your creation will be drawn with a simple pencil, or maybe you want to add brightness and draw a portrait with colored pencils? Go for it! You will definitely succeed!


As you know, the image of people is one of the most difficult areas in art. In order to beautifully draw the figure of a man, woman or child, a novice artist needs to have not only certain professional skills, but also knowledge of anatomy, as well as be able to maintain proportions. A pencil portrait is one of the most romantic gifts you can make with your own hands. Surely each of us, at least in dreams, thought about how to draw a portrait from a photograph. Do not be ashamed of your inexperience, try to draw with a pencil, because even those portraitists who are taking their first steps in creativity can do it.
Beginning of work
Before you start drawing a portrait, you should study the photograph, what position the head of the depicted person takes, how it is rotated relative to the vertical and horizontal. Be sure to pay due attention to the proportional ratios (size, as well as the relative position) of the eyes, nose, ears and mouth. Precise observance of proportions when applying the first strokes is an important guarantee of the similarity of the final image with the face in the photograph. Check the average human face proportions shown in the figure, and then compare them with the original image in the photograph. If they diverge a little, there is nothing to worry about, since it is in the deviations from the standard that the individuality of a living person, captured with a camera, lies.
For more detailed information about the structural features of the human skull, which may be needed when depicting a portrait, you can always refer to the anatomical atlas. Apply with light lines the general contour of the oval of the face, hair, lip line, nose, eyes and eyebrows.

After that, you can start parsing the planes of the face. At this stage, you should indicate the height of the nose with a plane. In order to better see the volume, you can shade it. This should be done with all areas of the future portrait that are in the shade. Next, we designate the plane of the lips, the cheekbone, located closer to us, as well as the plane of the eyes, which connects to the eyebrows. At this stage of creating a portrait, it is quite easy to outline the geometric features inherent in the face of the person being depicted, without drawing it out even with smooth lines.

We carry out detailing of the face
Use a nag eraser to remove the top layer of the pencil so that the previously drawn lines are almost invisible. After that, we proceed to drawing all the facial features. We round them to give the portrait the maximum likeness to photography.

It's no secret that the eyes are often called the mirror of a person's soul - they are very expressive. Therefore, there is no need to prove the importance of accurately conveying their location and shape. In order for the eyes drawn on paper to look more alive, the sclera (the so-called white part of the eye) does not need to be depicted as snow-white, since in fact its color changes under the influence of its own shadow and the shadow that the eyelid throws on it. Apply highlights to the lower eyelid and the inner corner of the eye.

The picture below shows the sphericity of the eye, as well as how the eyelids rest on the eyes. Here, a novice artist can familiarize himself with the sequence of images of eyes in a portrait, starting with highlighting the illuminated and shaded areas (2 and 3) and ending with the application of highlights and shadows. It should be noted that in women and men of different age categories, the eyes are different. For example, women tend to have longer and thicker eyelashes and thinner and more defined eyebrows than men.
The mouth in its expressiveness is not too inferior to the eyes. It is the lips that are the place of transition of the mucous membrane to the skin. This is the reason for their characteristic pink color. When depicting lips in a portrait, it should be remembered that they are the most mobile element on the face, capable of taking one form or another. The upper lip is usually thinner than the lower lip.
Many, drawing a portrait from a photograph, are faced with the problematicness of the image of the nose, which looks completely different from different points of view. The main task is to be able to convey the main contrast of shadow and light on the nose, so that the drawing does not turn out to be overloaded with unnecessary elements. Usually, but not in all cases, the maximum light falls on the tip of the nose and the bridge of the nose, and the thickest shadow falls on the base of the nostrils (figure).

As for the ears, their shape varies greatly in different people, but does not have pronounced features in the stronger and fair sex. Despite the fact that in photographs the ears are often hidden by the hairstyle, professional artists recommend not to neglect them, in particular, their most expressive and accurate position on the sides of the head. The length of the ear in adults is approximately equal to the length of the nose (see illustration). In children, the ears are proportionally slightly larger.

Hatching, working out halftones as important stages of drawing a portrait
After finishing work on detailing the face, we proceed to the beginning of hatching. First, you should erase all the extra lines in the portrait, since after the start of laying the tone, there will be no way to do this with sufficient accuracy. There are no specific rules for shading - everyone does it as it suits him best. Professional artists advise to start shading from the darkest parts of the portrait. In the future, it will be possible to build on them, so as not to darken too much clothes, eyes, skin.

When adding tone to the skin of the face, clothes and hair, you should not use a nag (unless, of course, you accidentally put a stain on the future portrait). If you are right-handed, then you should start intensive shading of halftones from the upper left corner of the sheet, in order to avoid smudging what you have already depicted. Accordingly, a left-handed person needs to do everything in a mirror image. At this stage, a slight study of the background is allowed.
Highlight and darken - the final stages of working on a portrait from a photograph
At the end of the shading, if you did everything correctly, you will get an almost finished portrait, which, however, will not look three-dimensional. To correct this flaw, it is necessary to highlight certain areas on the face, such as the tip of the nose, the eyebrows, the upper part of the cheekbones, the sclera of the eyes, the lower lip and sometimes the chin. Using nags, the artist can draw small lines on the lips and wrinkles, as a result of which the portrait will become more vivid. Hair lightening should be performed in the areas of the largest form fractures. In this case, they will appear shiny and more realistic.

After highlighting, we proceed to the final stage - darkening those areas where you need to demonstrate the space. These places can be the ears, the edge of the hair, the background, folds on the hair. After that, the portrait will be almost ready. However, in any case, you will have unnecessary strokes, stains from fingers stained with a pencil. Therefore, you should take the nag in your hands for the last time and eliminate everything that visually seems superfluous to you.

After reading this article, you should not take it as a ready-made guide to how to draw a portrait of a person from a photograph. Indeed, even with the maximum similarity of the resulting portrait with a photograph, we always have a place for creativity. When redrawing, you do not have to exactly copy everything that you do not want to see in the portrait. Before you is a blank sheet, ready to embody all your ideas. As you know, photography is not always successful by all criteria. Well, an artist, working on a portrait, can think out, correct and get as a result what was beyond the powers of the photographer, due to the specifics of the creative process.
In order to fully learn how to draw portraits with a pencil, you need to study the basics of drawing and the proportions of a person, as well as devote enough time to practice.
If you are a beginner in drawing, then you should not immediately "rush into the pool with your head" and try to master the whole portrait as a whole. First you need to fill your hand in the performance of individual parts: eyes, nose, mouth, as well as ears and neck. You can learn how to draw all these elements in separate lessons on our website.
A step-by-step description of a portrait of a girl in pencil.
Stage one.
Starting to draw a portrait with a pencil, take a good look at the subject, determine the shape of the face and cheekbones, trace the slope of the lips and determine which one is wider, how the outer and inner corners of the eyes are located relative to each other. Then we draw an oval that is suitable in shape for a specific person.
Stage two.
We divide our oval into four parts. To do this, draw vertical and horizontal lines strictly in the middle. Next, divide the resulting horizontal parts of the lines in half again, marking them with small serifs. Divide the lower part of the vertical line into five equal parts. Remember that these lines are auxiliary, and when our portrait of a girl with a pencil is almost ready, they will need to be erased, so do not press too much on the pencil while drawing them.

Stage three.
Place the center of each eyeball just above the dividing points of the horizontal line. Draw the line of the base of the nose at the second notch on top of the lower part of the vertical axis, and the line of the mouth - in the region of the second notch from the bottom.

Stage four.
Draw the line of the upper eyelid and draw the lips. It should be remembered that the distance between the eyes is equal to the length of one eye. The earlobes should be flush with the drift. Draw the outline of the hair with sketch lines.

Stage five.
We proceed to a more detailed drawing of a portrait of a person with a pencil in stages. We depict the upper border of the upper eyelid and the visible part of the lower eyelid. We add several eyelashes on each upper eyelid. Draw the lines of the eyebrows and the bridge of the nose.

Stage six.
To add volume to our portrait, we shade the lips and hair with a simple pencil, highlighting the dark and light places, add shadows.

Thus, by drawing several faces, you will see that they are different from each other. Continue drawing the portrait with a pencil step by step until you achieve the maximum similarity.