How to learn to draw a person. How to beautifully draw the figure of a woman's man in full growth in stages with a pencil for beginners and children? How to draw the body, arms, legs of a woman's man in clothes? How to draw a man woman sideways, pencil movement

Each of us is surrounded by thousands of people. It would seem that we have learned the proportions and features down to the millimeter. human body... But here's the paradox - draw a man much more difficult than that which you have only ever seen.
Sometimes, when you draw someone, you wonder - not a person, but some kind of alien. If you also fail to draw people, as they say, do not pass by - here you will find a lot of useful and interesting things for yourself.
And the very first thing is this video, which will show you how to draw a boy and a girl.
Even ancient artists, drawing a person, tried to divide his body into equal parts, so much so that it was easy to correctly recreate the proportions of the figure. After all, knowing the ratio of individual parts of the body to the figure as a whole, you can easily draw a person. At the same time, of course, we must not forget that all people have their own characteristics.
So, drawing a person, for the unit of measurement we take the size of the head.
The height of an adult man or woman is equal to 8 head sizes, the height of a teenager is 7, a student is 6, and a baby is only 4 head sizes.
Proportions of people of different age groups

Before drawing a person, remember a few important nuances.:
- the arms should end at the middle of the thigh,
- elbows are at waist level,
- knees - strictly in the middle of the leg.
Did you know that the height of a person is equal to the length of the arms spread apart, and four heights of the head fit in the length of the legs?
But what delighted me even more was the size of a human foot. It turns out that its height is equal to the height of the nose, and its length is equal to the length of the forearm.
See how a man and a woman should be drawn correctly in different positions.


And now I will show you how to draw people in stages.... I assure you that with a master class from Pustunchik it will be easy and simple.
How to draw a boy
If you need to draw a boy, use the following diagram. And I will tell you how and what parts of the body you need to draw step by step.
1. Draw an oval for the boy's head, then a small neck and a rectangle for the torso.

2. Draw another rectangle from the bottom, divide it in half. These are the legs. Draw rectangular arms. On the upper large rectangle, make the curves from the neck to the arms - these are the shoulders.

3. Erase the extra lines on the shoulders. Draw the neckline of the jacket, the seam lines (but not to the end), where the sleeves are connected to the main part of the jacket. Draw the fly and folds on the slingshot pants. Now sketch out the shoes and hands. For a detailed diagram showing how to draw the hands, see the right.

4. We start drawing the head. First draw a cross - it will point to the middle of the head and determine the location of the eyes. Two arches, two dots and one small bow at the bottom of the head are the top of the eyes, the future nose and lips. Ears will be located at the level of the nose and eyes.

5. Draw the eyes, draw small circles in place of the dots - nostrils. Now move on to the eyebrows and hair.

6. Erase the extra lines and with light pencil movements mark the folds on the clothes. Add details. Congratulations! The boy's drawing is ready.
How to draw a kid
This drawing is perfect for any comic book, and you can also draw it in kindergarten or for a student. elementary grades... The funny little toddler will be a godsend for the school exhibition of young artists.
1. Draw an oval, mark the eyes with dots, show the baby's nose and mouth with two bent arcs.

2. Mark the corners of the lips, draw the ears and hair.

3. Draw a trapezoid at the bottom of the head - the boy's body. Do not forget to separate the blouse from the pants with a straight horizontal line, and show the pants with a vertical line.

4. Draw the sleeves.

5. Now draw the arms and legs for the child.

6. Fingers on hands are separated by lines. That's all! The little mischievous guy is ready for pranks :)

Draw girls
Three beauties at once on one sheet. Do you want to have such fashionistas in your album? Then rather draw these charms!
1. Draw sketches of girlfriends.

2. Create hairstyles and clothes for them.

3. Add details: belt, lace sleeves, leg warmers, handbags and so on.

4. Draw faces for girls, make folds on clothes, highlight accessories. Add uniqueness to the shoes of each of your friends.

Great job!
You will learn more about how to draw lips, nose, eyes of a girl from the following video. I warn you, the master class is not for beginners, so be careful not to miss important details.
Draw the girl's face. Part 1
Draw the girl's face. Part 2
How to draw a guy
Every girl at least once in her life tried to draw the guy of her dreams. It is, of course, different for everyone. But for now, let's just draw a guy with glasses and a cool T-shirt. Go?
1. Make a template for a person.

2.Use the guide lines to draw the head and arms.

3. Draw the hair, nose, lips. Put the guy on the glasses.

4. Trace the contours of the guy's body. Draw the hands. Add shadows with dashed lines. Draw a line for the neckline of the shirt.

5. Remove unnecessary lines. Sharpen the contours of the man's body.

Well! A macho with a serious look and cool glasses is ready to win hearts!

In the lesson, I will try to tell you how to draw a person in stages with a pencil in full height... Draw people pretty difficult task, but it will be easier for you if you understand and remember the principle of constructing a human figure.
How to draw a person in stages
So, grab a simple pencil, an eraser and a little patience - let's start the lesson. how to draw a person in stages with a pencil.
I will not tell you about the proportions of a person, because all this can be read in drawing books. Reading about proportions is very boring, but believe me, it's very important! Mandatory in free time read about human proportions.
First, let's build something like a skeleton. The circles in the figure represent the joints.

When you have built the skeleton, let's move on to the stage of stroking this very skeleton. Take a close look at the picture below, and try to circle as in the picture.
Draw circles where the joints are. They will help you later to correctly trace the figure in places where the arms and legs are bent and the joints protrude. Just do not press hard on the pencil, because we will delete all these lines!

We got a semblance of a human figure, only in the form of a doll. And now we need to give the figure a human look. To do this, cover all parts of the body with "flesh". This means that the muscles need to be given a more believable shape.
Note that all muscles taper where they attach to the tendons and expand in the middle.

In the lesson how to draw a person in stages with a pencil, we went through three stages. Next, you need to delete all the lines inside the shape with an eraser. You should get a human figure - see the picture below.

All that remains is to dress her, draw her face and hair!

And again, with an eraser, remove all the extra lines after you have drawn the clothes.
In order to consolidate knowledge, try to draw a person in different poses or, for example, with a raised leg or hand.
We have already talked about the portrait, now we will talk about a full-fledged, so to speak, person ( to his full mighty height). I think each of us had a problem when everything seemed to be cool and the body was drawn well at first, but it - bam!- and did not fit on the sheet. The trouble is straightforward.
So, I’ll tell you a secret, and only to you, that the system, according to which, eliminates such a thing. That is, thanks to her, we will be able to put everything that we want to put on a piece of paper - even the smallest one.
The essence of the system we have mentioned comes from the schematic drawings of a person. Each of us started out exactly from this - and when I say “ started", I mean, I started to draw in general in the literal sense. Little children draw little people in a very primitive way, but mostly correctly.
Let's remember something like: “ Stick, stick, cucumber - it turned out to be a man". Remember what happens if you follow this? That's right, a schematic drawing. Such a man in the first place will teach us to see proportions and portray them correctly.
Agree, if in the picture a person has one hand lower than the other, or the nose is too oversized, then, frankly, it looks not aesthetically pleasing ( it's another matter if such proportions in life ...). In general, I think you appreciated and realized the importance of little people, now we will consider each of them separately. Yes, yes, each of them is somewhat different from the previous one.
Schematic drawing of the body
Man number one. No, I don't like to call our faithful assistant that way ... Let's call him, well, let's say Stu... Start over.
1. So Stu is number one... It has four limbs plus head and torso (no details)... He does not give us very much - except perhaps the opportunity to fill our hand (no, not about his face) in keeping the proportions of the body.
 2. Now Stu the Second... Here there is already more nobility, in other words, there are more details. This Stu can show us not only the proportions of the main outlines, but also the proportions shoulders, forearms, legs and ... thighs.
 3. And finally, Stu number three (it looks like this is already the grandson of the first Stu)... After going through a uniform evolution, it turned into a perfectly folded ( well, according to the proportions) of a schematic man. Bravo to him! He can proudly demonstrate to us and shoulders, and the presence of a pelvis.
Not everyone reaches this level of depicting the simplest schematic Stu, ugh, little people. And not because it is extremely difficult, just this goal is not particularly set.  So, sir, with the "proportional" little men, for now, they have finished explaining themselves - go to practice... Think back to your childhood and play around with people. BUT! Don't forget to keep basic proportions. This will be the task: analyze how well and accurately you succeed convey proportions.
After completing the task, we turn to the little men in motion. It is with their help that we will be able to distribute a full-fledged person in the future so that he fits entirely on the sheet. Here are some examples.
Body drawings in motion

This Stu is throwing a spear (or trying to knock down an annoying crop-stealing crow)

This one dances at the disco (well, or, as an option, he was shocked)

Here's Stu Runaway (probably shouldn't have teased the neighbor's pit bull). Have you noticed that he already has a coat hanger here? This is all due to the fact that we depict our Stu not in the forehead, but from the side.

Here you and Stu the Combatant - probably a gladiator. Again, the peculiarity: the hand that holds the sword looks shorter, plus the rotation of the whole body - this is what a person looking around looks like (for example, the one who found himself in the situation of Stu the Runaway).

Here's a desperately sad Stu. Well, or Stu looking for yesterday ... Something like that.

But you can appreciate Stu, posing as a noble lord. The shoulders and hips are slightly unfolded.

But this Stu suddenly decided to help the site administrator with yoga classes and therefore invented a new position. Poor fellow, he is probably very uncomfortable.
Upon completion of the work of the movement with the little men, we go to next level, called the man of balance. One of the most important details while driving is the center of gravity. And since our legs weigh half of the whole body, the center of gravity (following the laws of mathematics) will be located somewhere in the center - in the lower abdomen.
So, let's start considering the movement of at least crazy friend Stu by name, well, let it be Dean.
Red circles- the center of gravity itself
Red arrow- direction of gravity (gravity)
Green arrow- fulcrum.
All clear? We started.
Drawing a body with balance in mind
There you are Dean the first (stomping in the bar to frame the girls)... He is in balance not from the fact that he has not yet reached the bar, but, my dears, from the fact that the center of gravity is reliably held between two points of support (legs)

And here for you Dean coming back from the bar (obviously today is not his day, and he hasn’t gotten any decent girls). You can see the center of gravity, which has moved away from the supports - as a result, the unfortunate Dean runs the risk of finding himself on the cold ground.
 Tek-s, in the next drawing, our schematic Dean took up yoga (or else his leg just itches - as an option). In any case, whatever he does, but right now he is balancing - and this is possible only with a more or less relative symmetry of the body.
 Here Dean tries to stay on one leg too, but his center of gravity, as well as his body, leaned to the right.

Well, here Dean trying to keep up with a suspicious guy (or vice versa - running away from the police)... According to the picture, the center of gravity hangs in front and because of this our Dean is constantly pulling down, but he does not fall, because he runs - puts his legs (fulcrum) alternately forward.
 Dean brooding, waiting for someone, or simply Dean leaning against the wall... We can see that, again, his center of gravity is between two points of support - below the leg, above the shoulder.

it Dean portraying Bruce Lee (pretty good, by the way)... The center of gravity moves to the right of the support and, accordingly, the body will move to the right side.
 In any case, neither our Dean nor Stu, nor any hero you invented is not required to be in balance - on the contrary, when a person is in motion is good. This shows the dynamism of the character.
Now let's talk about body flexibility.... Take a look at the schematic image of our friends' girlfriend (there must be at least one girl in our schematic world, right?) by the name ... Here she just goes (a bit like Dean's gait, no?)
Take a closer look at how the hip joints and shoulders move - notice that the shoulders are moving in the opposite direction from the pelvis? In the lower drawing, Charlie is lying on her side, resting on her elbow, and her ribcage, as it were, hangs down from the corresponding shoulder. By the way, our spine is flexible, which means that it is able to be in different positions.
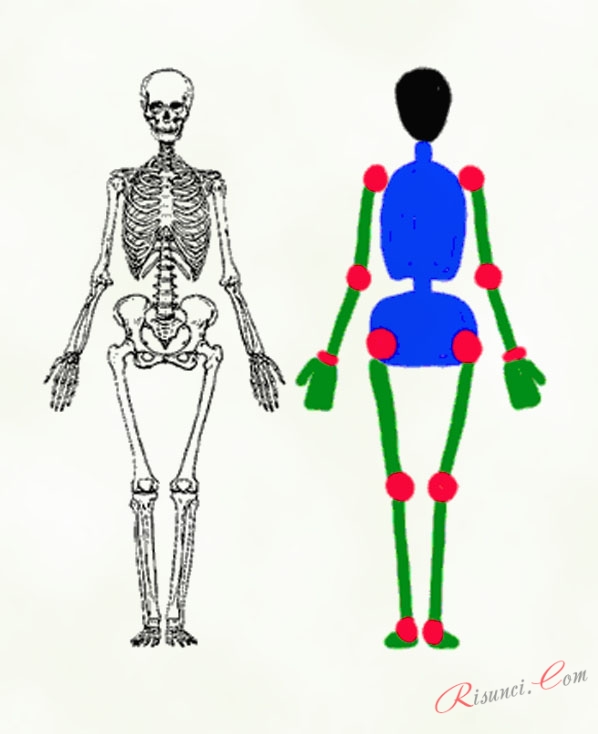
 Now let's recall the lessons of anatomy, recall the structure of the skeleton - the basis, so to speak, of our body.
Front view:
- head ( black color )
- rib cage ( blue )
- spine ( blue )
- pelvis ( blue )
- joints ( RedColour )
- hands ( green )
- brushes ( green )
- legs ( green )
- feet ( green )
 Take a closer look at how the spine is arched in the following, profile images, and evaluate side view:
 What? Does it look scary? Come on - I have a fallback: it is on it that it is easier to understand the structure of our body ( well, as for the draftsmen):
 Let's get down to muscles, muscles, "sausages" and cellulite (so whoever has that ...)... To do this, remember mentally how all sorts of ellipses, cylinders, squares and cubes, we will use them to begin with, when we will select the most suitable shape for a certain part of the body we need.
So, here are examples for you - from schematic sketches to volumetric sketches, of course, based on schematic ones. We highlight all the connections we need with the red lines.
 Remember that every person is different, and this is expressed in everything, including the proportions of the body. It so happens that it is much easier to draw a man as a whole, and sometimes you have to start with chest... However, this is all at your discretion and ability.
Hello dear friends!
Today we will continue the topic of drawing a human figure, and in this lesson we will study proportions. In this tutorial we will learn how to learn how to draw a person in stages with a pencil in full growth... In order for the following information to really be useful for you, I suggest you prepare a sheet of paper and a pencil and immediately draw with me.
First of all, it is necessary to clarify: we will consider, and also learn how to build and draw a figure tall man with perfect academic proportions. The figures of most people have their own characteristics, sometimes very far from the standard ones, nevertheless, they are all interesting and beautiful in their own way. In order to learn how to correctly display the characteristic features of the figure of each person individually in the figure, you first need to remember the ratios and proportions in their ideal form.
If you've never drawn full-length people, start simple:
- First, try to build some proportional skeletons so that the arms, legs, palms, pelvis, knees, and other parts are in place.
- Then, put on the human body on these frames, in a very simplified version, without muscle relief. You can dress your character in simple clothes.
- From such a skeleton, you can make a man or a woman, a fat or thin person, he will have everything in place. Train!
- If everything works out well, try to show the muscles of the arms, legs, torso.
The height from the crown of the head to the line of the nose is equal to the size of the palm. This is a very important measurement, mark it for yourself, it will come in handy more than once today.
Torso and pelvis
In order to find important key points of the chest and pelvis, we need to mark the size of the palm height somewhere in the corner of the picture, now we especially need it.

Hands
In order to correctly draw a human figure, it is important to understand the proportions of the arms, elbows, forearm, collarbone and hand.

These are landmarks that are almost always the same for everyone.
Scheme
If it is too difficult to cope with these measurements and proportions, try printing this image with ready-made markup, and practice drawing a person according to this scheme.

Hope this makes things easier and helps you.
Video
In this lesson, we figured out the basic proportions of the human body, and after some training you will be able to draw a full-length human figure without preliminary marking, noting only the main landmarks.
Each of us made our first sketches in childhood. In drawing lessons, not everyone tried to do the job efficiently, did not think about acquiring skills. As adults, many feel the need to create something beautiful, but how do you learn to draw with a pencil? After all, any drawing techniques are based on the ability to hold the lead correctly, make elementary sketches, and create images. In this article you will find useful tips for teaching drawing, as in art school, and independently.
Pencil drawing basics
Experts say that anyone, regardless of age, can learn how to draw correctly with a pencil. Painting training always begins with getting acquainted with the materials that are necessary for a novice artist:
- a sheet of white paper, of any format;
- an eraser, aka a rubber float;
- simple pencils.
The first steps in drawing begin with a pencil sketch. With the help of scanty lines, the general outlines of the object being drawn, various poses, and moments of movement are conveyed. The sketch is the most quick way to fix on paper your first thoughts and impressions of what you are drawing. During the execution of the sketch, you do not need to pay attention to unnecessary details; it is recommended to draw it for no more than 10 minutes.
How to learn to paint from scratch
Scientists psychologists have proven that during the process of creating a picture, both hemispheres of the brain are actively working in a person, imagination is turned on. No wonder there is a technique for calming the nerves called art therapy - this is drawing for adults and children. Many people want to be able, but do not know how to learn how to draw with a pencil. Learning to draw from scratch is not at all difficult, because the technique of drawing with a pencil is available for children and adults.
Art school
How can a child learn to draw with a pencil? The most the best solution- to send him to an art school. It is designed to educate children school age from 6 to 17 years old. Upon admission to this institution, the level of knowledge and skills in fine arts... Depending on the skills, the child is assigned to the appropriate group of students.

The art school is free of charge and is funded by the state. This institution is visited after the main lessons at school three times a week. The course of study is from two to seven years. After leaving school, the graduate receives a diploma that opens the door to an artistic future: admission to a school or higher institution by specialty.
Courses
How to teach adults to draw with a pencil? It is possible to learn the skill of drawing with the help of art courses... They are paid. The course of study ranges from several weeks to four years. During this time, the art studio will teach you the following skills:

- How to draw correctly in step-by-step technique.
- Learn to use a pencil and brush. Teachers in the art studio teach not only the ability to hold the tools correctly, but also to choose, to distinguish between high-quality and low-quality.
- Learn how to draw children with a pencil.
- Learn many drawing techniques.
- Learn how to learn to draw various subjects.
- Learn to paint from life, landscapes, still lifes, people, animals, etc.
- Learn to color - choose and match colors correctly.
- Learn how to draw a cat with a pencil and other animals.
- They will tell you how to learn how to paint portraits.
Online lessons
If you do not have free time, and you do not know how to learn how to draw with a pencil, then use online courses. They are suitable for those who do not have the opportunity to attend a stationary studio. An approximate plan for passing classes of this format for beginner artists:

- The teacher gives basic knowledge in drawing in the form of examples of work, pictures.
- The selected topic of the drawing lesson is analyzed in detail.
- The teacher at the end of the lesson gives homework which you complete and mail to the teacher for review.
- In the next lesson, the student, together with the teacher, examines the homework in detail, together they correct mistakes in the drawing, if any.
Online lessons, as an option, in order to learn how to draw professionally, are not the only way out. If you do not have financial and territorial opportunities, but there is a great and irresistible desire to learn how to draw cool, then this can be done on your own using:
- textbooks and drawing guides;
- self-study guides;
- drawing instructions;
- training videos.
Step-by-step drawing technique
A beginner needs to practice drawing from the creation of sketches. In order for the drawing to be meaningful, the sketch must be created according to the rules that form the plan:
- First, choose an object to paint, such as a kettle or vase.
- Consider it from all sides, determine the shape, its texture, how shadows fall on this object.
- Determine the composition of the drawing, i.e. how it will be located on paper, in what format.
- After the outlines are drawn, draw in the details, add shadows.
Human
In order to draw a person, you need to decide on the composition. This means that you need to analyze the boundaries of the location from head to toe. Once you've visualized the figure, start composing the body parts. You need to draw a person from the outline of the head, dropping below. In the image of a person, it is very important to immediately find the image; you should determine the amount of details required for the finished drawing.
Face
In drawing a person, a lot of attention is paid to the face. To draw it correctly, you need to proceed in stages:

- Determine how the face will be located on the paper. To do this, mentally draw an axis of symmetry, it should pass in the center of the sheet.
- Draw the outlines of the face in the form of an oval (shape chicken eggs).
- Build the shape of the face, starting from the chin line, moving to the most convex part - the zygomatic region, then to the narrowest - the temporal zone.
- Align the drawn lines with the eraser, this will noticeably "lighten" the outline of the oval.
- Divide the resulting oval into three equal parts with light, barely noticeable lines. The very first line closer to the chin marks the tip of the nose.
- We draw the nose, starting from the tip. It always protrudes forward, therefore it has a round, square, or pointed shape. Then we draw the wings of the nose and the bridge of the nose.
- We draw the mouth, starting with the upper bend of the lip, which is located in the middle of the nostrils of the nose.
Eyes
In a portrait of a person, the eyes occupy the most important place, they attract attention to themselves, so they need to be given special attention. To draw them in a phased technique, you must adhere to the following plan:

- Before drawing the eyes, it is necessary to outline the eyebrows, which are located at the level of the bridge of the nose. Their shape depends on the character that the artist wants to convey in the portrait.
- Having outlined the approximate location of the eyes, draw their shape in the form of an oval.
- We draw a pupil in the form of a circle.
- We aim the eyelids and shape the eyelashes.
Anime & Manga
Many young artists begin their training in drawing with anime and manga, because portray people in style bright characters Japanese cartoons are much simpler than classic ones. The greatest emphasis in such cartoon characters is on the head, eyes and hair. Let's analyze phased scheme drawing, with which the aspiring artist will learn how to learn how to draw anime:

- We start drawing anime with an oval that will be the head.
- Divide the circle in half lengthwise with straight line.
- Divide the head across into three parts with light lines.
- Next, it is necessary to note the location of the eyes, nose and mouth.
- We draw big eyes starting from the arch of the upper eyelid. The distance between them should be equal to one eye. Great attention in drawing the pupils, the focus is on applying glare. The eyebrows of these characters are drawn classic style: two straight arcs.
- The nose of anime and manga is drawn small, expressed using a checkmark.
- The lips are drawn with two small lines.
- Anime and manga hair should be drawn with flowing triangles that slightly cover the eyes.
- Anime girls are drawn in colorful clothes, mostly in dresses.
3d drawings

Volumetric drawings fascinate with their realism, thanks to correct construction shapes, applying shadows and highlights in the right places... Learning to portray such pictures should be done with simple geometric shapes: cylinder, rhombus, square. To recreate the 3D illusion of an object, you need to draw in isometric, when the angles between the coordinate axes are 45 degrees. The volume of the picture is added by auxiliary lines, which are drawn inside the figure with a light click, and the outline is drawn with a bold, darker color.
Portraits

Portraits can be drawn both from nature and from photography. Before drawing up an image, carefully consider what message will carry future drawing... Learn to draw a portrait of a person correctly, not only in terms of proportionality and symmetry, but also display lively emotions. Another task of drawing an image of a person is the maximum transfer of the similarity of what is being drawn; for its implementation, before starting drawing, consider all the details, highlight those features, "highlights" that you will focus on.
Graffiti on paper

Nowadays, graffiti painting is a fashionable movement that is gaining momentum. Many buildings are full of incomprehensible volumetric inscriptions, but often beautiful, professional drawings on the walls. In order for your paintings not to disfigure city buildings, and so that expensive paints are not wasted, you need to train for a long time on paper. To get started, try drawing the letters of the alphabet using a simple pencil. Use construction lines to give them volume.
House

The ability to draw buildings is useful not only for children, but also for people of any age groups to easily compose pictures, for example, a house with a landscape. Buildings are very easy to draw using lines. You should start with a rectangle, adding a triangle, you will get the image of a house, as children draw it. With the help of simple techniques and additional lines, the house becomes voluminous.
Cars

To draw a car with a pencil, you must adhere to step by step plan:
- Draw the outer outline of the car by dividing it in half with a line.
- Draw the body with bolder lines.
- Then we draw the wheels.
- We display the details of the front of the car: headlights, windshield, bumper.
- We draw windows, doors, mirrors.
Animals

It is much more difficult to sketch animals than objects, especially from nature, because they constantly change their position, are in motion. To draw an animal, for example, a horse, you need to decide on its characteristic features: thick mane, elongated muzzle, slender, muscular legs. Look detailed instructions,. You may not be able to correctly portray your beloved cat or dog on the first try, but after a few workouts, you will definitely succeed.
Video tutorials on drawing with a simple pencil for beginners
Video lessons - great way learning to draw on your own. Below is a selection of tutorials for experienced artists to show you how to create easy pencil drawings for beginners. After watching the video, you will learn how to draw Japanese cartoon characters - anime girls, learn how to draw flowers. If you like landscapes, then watch the third video to the end, in which the artist paints nature, focusing on the trees.
Draw girls
How to draw flowers
Beautiful landscapes
How to draw a human body