My future draw a drawing. How to draw a future pencil phased
Read also
Of course, you want to master the initial skills of the urban landscape, since they were on this page. Well, you just at the address. It is here that the most detailed instructions, how to draw the city. Moreover, the first part of the master class is dedicated to a two-dimensional figure, and the second gives the basis of the surround image, as is customary to speak, in 3D format.
Secret ... in geometry
Have you ever wondered why even the most inexperienced viewer hypnotizes the kind of drawn city? Mystics there is no mystics. The secret is that the human brain loves order, system, repeatability of lines. It seems to him fascinatingly beautiful. This rule is fully consistent with symmetry and asymmetry, lines of lines, the smooth circles and the accuracy of the angles. Geometry, in one word. You do absolutely correctly, except for a pencil, eraser and a dense sheet of paper (for the drawings), styled by a ruler.
Lesson 1: "Highlights"
To understand how to draw the city, just follow the illustrations. Repeat the details of each step. Gray lines "will prompt" new figures, which should be drawing at the moment.
Only two different in the height of the rectangle (future skyscrapers) - and the beginning of the picture is:
Straighten a couple of high spirits:

Add rectangular background buildings facades:

Picture pictures of the house most remote from the foreground:

Pay attention to the most imperceptible components of the architectonics of the picture:

Draw some small fragments, make focus on Deteals:

Despite the fact that the windows in the figure are the most tiny details, they are far from minor to significance. Gently, under Lineshka, draw each of them, and you will not regret the time spent:

Remove all excess lines. That's what you should get in the end:

Like? It's only the beginning! Ahead - 3D graphics!
Lesson 2: how to draw a city with a perspective
To achieve a surround effect, you need to follow the simple rules of the prospects. In order for the drawing to become dynamic, first of all, it is necessary to determine the horizon line - the place where the sky is found with the Earth, and the point of convergence is an area in which objects, decreasing, disappear.
Here, take a look at in which the prospect "runs away" in the distance:

But the drawing and the final version, where the prospect seeks to swell:

And the master class will show you how to draw a city with two points of convergence:

Divide the sheet vertical line in half. Note on the horizon of the point of convergence, equidistant from the vertical on both parties. Stretch from them with the work lines to the central part, as shown in the picture:

Light movements designate barely noticeable auxiliary lines. Add three parallel features, and in front of you the outline of the first, key building:

Please note how builds dispose of the viewer to the horizon are located. Indicate each:

Now is the time to try the doors, windows, signs and other significant details. Remember, the more elements (pillars, sidewalks, pedestrian walkways, even traffic lights), the natural picture. At the end of the work, erase all unnecessary lines, the contours are well hover. Add shadows, and your drawing will come to life. Do not forget when hatching take into account the direction of sunlight. The most illuminated places should be less painted.
That's how you learned how to draw a city volume. In fact, the points of convergence may be not only two, but also more. Five, for example. Then your drawing will be like this, as if the city was filmed by the photographic lens "Fisheye". In this case, the image takes a convex look, as if the house had an intention to jump out of the drawing.
prompt
The unexpected angle and artist when looking at the urban landscape, the more exciting and more likely the picture. No less interesting are the motives on the subject of the coming. How to draw a city of the future? On this account can not be a definite answer. For the landscape being created is the fruit of the artist's imagination. Who can know what pictures do you get up before His mental look? And the basis is one, and we just told you about it, and have shown. Try, create! And who knows, maybe it will be and not fiction even, but prediction ...
Rivers, lakes and forests are a pleasure. However, now we will learn how to draw the city. Let's look in detail the step-by-step drawing process. So let's get up!
Necessary materials:
- colored pencils of yellow, brown, green tone;
- simple pencils;
- line;
- eraser;
- white paper sheet.
Stages of drawing:
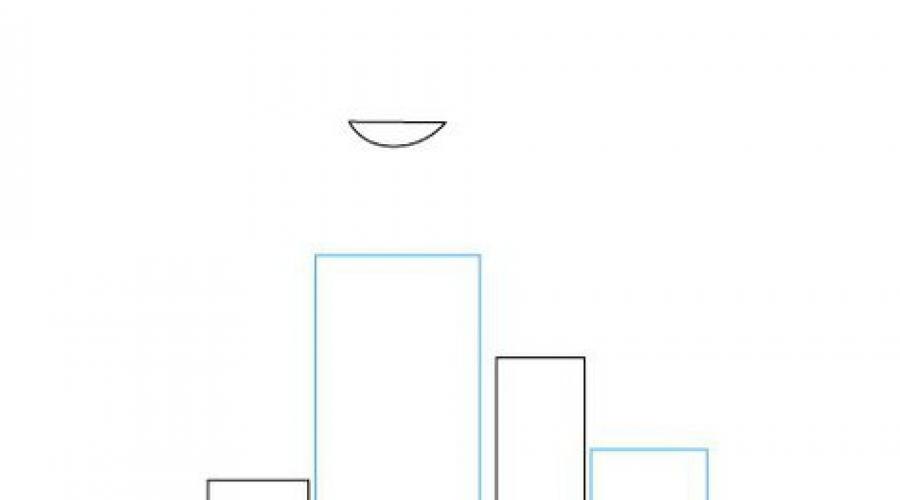
1. We begin to equip the city, for this, first of all, we need high-rise buildings. Initially, place two such buildings. Height and width may differ from each other. For the ease of further drawing, first of all spend the horizontal line on which all buildings in the city will be located.

2. With the left and on the right sides, Dorisuham on another building. In this picture there is one building, which is above all, it is above its top with a semicircle. But on a small building placed on the left side, draw a scope roof.

3. Dorisuha in the background of the altitude. The building on the right side has an interesting appearance of the top. Next, you should connect your fantasy and come up with your own building design. We will draw exactly such the tops of the building. Let our city become a megapolis of the future!

4. Add a few more buildings and draw the top of one of them, which will host a television antenna or office of one of the TV channels.

5. We now turn to the detailed drawing of the entire drawing. Each building with windows. In each building there will be windows of different shapes. Detailing a television tower. Add trees to drawing and other vegetation. If you wish, you can, shops, people who will walk or hurry to work, etc.

6. For brightness and saturation of our drawing, we use a simple pencil having a B8 or B9 labeling. Such pencils are soft, so they can create dark lines. Write the whole drawing.

7. Coloring tree trunks with brown pencil. But light green start gardening trees.

8. Dimmer trees and bushes by dark green pencil.

9. windows show blue or blue pencil.


Hello dear friends! It's time to figure out how to draw the city of phased by a pencil.
If you live in the city, the very best that you can do to draw it is to go out on the street (of course, before this you need to read this article), choose a colorful place and try to srister it. Working with kind will give you more emotions and experience than sriska. If you are too lazy to get out to the street or there is bad weather, then you can always transfer your view from the window :)
In general, we will talk about drawing from nature somehow another time, but for now we will proceed to the phased painting of the city and we will analyze all the important points in this matter.
Learning to draw the city
Stage 1
Our drawing will consist of houses and paths between them, so in the first step we must make outline buildings.
We draw six lines, it turns out too abstract description. So that you understand what kind of lines are and for what they need, we recommend that you invigorate this lesson just above or at the bottom. Seeing the finished drawing you will immediately understand what these lines mean. 
2 stage
We continue to refine our sketches with a pencil made at the previous step. Draw corners of buildings and door passage at the left home. 
3 stages
Now we work on the roofs of our city.
By the way, when drawing the city, you are actively developing the feeling of perspective, because the city is a combination of rectangles, that is, the buildings whose location is very easy to understand. 
4 stages
It's time to take care of the urban road. Two lines conducted from the corner of the house to the end of the drawing with a pencil, we depict the sidewalk.
Since the sidewalk is a bulk object, then we must transmit its volume. Pay attention to the left side of the road. In some places, the sidewalk is narrowed in one line, this is exactly what allows us to convey its volume.
Also, on this step, we detail the roof, for beauty, add stripes at home and we depict the doorway with a large canopy. 
5 stage
What kind of city without trees? On the left side of the road we depict a small village. If you do not know how to draw trees, you can read our article about it. In the right house insert the door :) 
6 stage
We continue to work on our city scenery. On the right side you need to draw tables and chairs of the street restaurant. It is best to draw them first with a pencil, so that in case of an error it can be corrected.
Also, in this step you need to draw the door and roof of the restaurant and the door in the left house. 
7 stage
Detailing our metropolis. On the roofs draw pipes, flowers in a pot on the road and hanging on the wall, draw a pillar.
Small details are a very important thing in drawing, especially in the drawing of the city with a pencil. Therefore, you can draw some kind of different details. For example, a cat, people, cars and more. 
8 stages
Draw windows in homes. Please note that windows in the left and right-hand house are subject to the laws of perspective. Namely, drawn at an angle, unlike windows in the house, which is located in the center of the picture.
If you wish, you can draw in the windows of curtains or people. 
Outcome
We left the most difficult task on you :) you need to take paints or markers and paint our metropolis. Of course, you can also work on white, but it is already for more experienced artists. So, if you feel the strength, dare!
Every year the construction industry is improving, offering people more and more comfortable and beautiful homes and apartments for housing. If you just think about how the houses have changed in one century, you can closing the eye to visually imagine how much time it can change. You can argue on this topic to infinity. However, not every person can express their thoughts on paper. Therefore, in today's article, we decided to push our readers to work, demonstrating how future the future drawing pencil may be original and unique. The photo below suggested the ideas that you can use in the creation of dream dwellings, well, or as a sample for drawing.
How to draw a house of the future drawing with a pencil?
To draw a pencil to the house of the future, you need to prepare all the image tools in advance. In addition to a simple pencil with a solid giffing, it is necessary to have a few white sheets of A4 format, eraser, color pencils, paints or markers for painting finished work at hand. Also, artists recommend in advance to think over the house of the future in their understanding. For example, whether it will be similar to the Royal Castle, a spacecraft, a geometric shape or flower.
Do not forget about the facade of the house. It may have a panoramic view, unusual windows in the form of geometric polygonal shapes, and even the lack of doors.


House of the Future - Picture Pencil Picture
Below are more than 20 options for houses that differ in appearance and internal filling in the cut. Each model is unique and unique, has its own characteristics and unusual details.
If you compare each dwelling among yourself, it is impossible not to note the discrepancy in shape, material, parameters, and even the items necessary for comfortable life. We are talking about windows, entrance doors, foundation at home and even the external facade. After all, the decision on the landscape near the standing area is to solve only the owner.


Think out all the details of the house of the future, visually presenting each detail. This will help depict the dwelling in a short time without resorting to help.
Take care that all drawing attributes are at hand.
Use your idea of \u200b\u200ba dream home, not sinking from a ready-made layout.
Any paint, pencils and markers will be suitable.
Without artistic skills, it is better not to be taken for complex work. It is better to make a choice in favor of one-story, uncomplicated residential premises painted in one color.
Drawn houses of future children, pencil drawings in the photo:


