How to draw beautiful eyes in stages. How to learn to draw eyes
Read also
What You "LL BE CREATING
Eyes - this is a wonderful topic for the image, they combine many different materialsand they look like gemshidden in our body. They are also quite difficult to draw, but this does not mean that you will not be able to do this! In this lesson, I will show you how to draw beautiful, realistic eye No source image.
What you need
- Paper
- Pencil HB.
- Pencil 2b.
- Pencil 4b.
- Pencil 5b.
- Pencil 7B or 8B
- Stupid
- Eraser (preferably soft)
- Pencil sharpener
1. Begin to draw eyes
Step 1
Take a pencil HB., roughly draw a very light oval. The line must be barely catchy.
Step 2.
Draw two curves crossing oval, which will create eyelids.
Step 3.
The age should have a certain thickness, so add edge to them.
Step 4.
Draw a round rinker, pupil in the middle, the figure of reflection glare, as well as an eye corner.
Step 5.
Brow is an eye frame, so do not forget about it! Draw an eyebrow using straight lines to recreate natural shape.
Step 6.
Before, we will proceed to shading your eyes, we must understand its 3D shape. You can solve it by drawing guide lines. I described this technique in my lesson
2. Draw a realistic rainbow shell
Step 1
Take yourself soft pencil
(It is best to suit a pencil 7B or 8B), and then fidgeting the pupil, leaving the area for reflective flare. Darkness pupil will determine the contrast for the rest of the pattern.
Step 2.
Take a pencil 2b.And then draw support bundles running from the center of the iris. Go to the flare area. Lightly tilt the pencil so that the lines are soft.
Step 3.
Distow the edge of the iris, and also draw a "ring" around the pupil.
Step 4.
Take a pencil 2b.And then still stronger darke the edges. Stress the iris by adding more supporting bundles or fibers, individual fibers should be darker than others.
Step 5.
Use the same pencil to sharpen the entire iris. Draw a half of the rings, as well as small shadows between the fibers.
Step 6.
Take a pencil 4b.Make sure it is well sharpened. Use this pencil to emphasize the shadows that you drew earlier.
Step 7.
Via rastushka, neatly align the circuit of the iris. This is part of the eyeball, so the iris should not have a fully hard edge.
Step 8.
Take a pencil 4b.To draw shadow from the upper eyelid over the iris. Do not forget that the eye is not flat, and therefore the shadows should be curved.
Step 9.
Using the same pencil, draw shadow from the eyelashes. Shadows will be most noticeable on top of the reflection region.
Step 10.
Take a pencil 5b.To adjust the contrast of the eye. Distow the shadows so that light areas have become more expressive.
3. Shadow eye
Step 1
Take a pencil HB.And then create a gentle shading around the eyeball. During the shading process, remember that the eyeball is approximately the sphere, so do not make shades flat.
Step 2.
Use the ardent to soften the shadows. Do not be afraid to combine them even further into the center.
Step 3.
Take the eraser to clean the illuminated areas. The eye is not quite smooth, so it will look even better if you break the soft shadows with rigid edges of rubber rods.
Step 4.
Take a pencil HB.and then draw details temacious meat. This area is wet and brilliant, so add the outlines of small glare.
Step 5.
Gently staring the area of \u200b\u200bthe tear canal.
Step 6.
With a pencil 2b., even stronger the above area. Using the same pencil, add a gentle shade under the lower eyelid. This will separate the eyes from the century.
Step 7.
Take a pencil HB.To sharpen the edge of the eyelids. Do not forget about the location of the light source!
Step 8.
Specify the shaded area with a stupid.
Step 9.
Using the same technique, staring the rest of the skin around the eye. Draw a tilted pencil to immediately capture the large area, as well as avoid hard lines
Step 10.
Take a pencil 2b.To add shadows where necessary.
Step 11.
Take a pencil 4b.So that even more stronger shadows.
Step 12.
In conclusion, take a pencil 5b.To further darken the fold of the upper eyelid.
4. Draw eyebrows and eyelashes
Step 1
Take a pencil HB.To draw the direction of hairs eyebrows.
Step 2.
Take a pencil 2b.To draw the hairs one by one. The hairs should not be sharp - their width will depend on the scale of your image. Tilt the pencil, if necessary, to achieve more dense strokes.
Step 3.
Take a pencil 4b. to thicken the front low part eyebrows.
Step 4.
With a pencil 2b., Apply the outline of the directions and shape of eyelashes. However, before you start, look in the mirror and try to understand what you see. Eyelashes have a curved nature, and their form depends on the perspective. They slightly fall down, right from the edge of the upper eyelid, and then bend up.
Step 5.
In the same way, add eyelashes to the lower eyelid.
Step 6.
Eyelashes tend to stick together to each other, creating a dense beam.
Step 7.
With a pencil 4b., thhushes eyelashes, adding more hairs between them. Eyelashes do not grow in one fine row! Also, adjust the width of the eyelashes according to the image scale.
Step 8.
Take the most soft pencil, make sure that it is sharpened, and then emphasize some sections of the eyelashes.
Step 9.
The drawing is almost completed. Look at it from the distance, and also try to see how the shading can be improved. Use all pencils for this task.
Step 10.
In conclusion, add small partsTo make a drawing more realistic: Thin veins in the area of \u200b\u200bthe eye, including small wrinkles around the eye. You can make the skin more uneven, just apply rows of thin transverse lines.
If you decide to digitize your drawing to publish it on the Internet, do not forget to pre-prepare it:
What about another eye?
I will open you a secret: "another eye" should not be. When you draw a portrait, then draw both eyes at the same time, step by step. Thus, you just draw both eyes without copying them one by one. And the good news is that they should not be absolutely identical - our faces are not entirely symmetric!
Each artist depicting someone's portrait should be able to draw a person's eyes. At first glance, it seems that there is nothing complicated in this. However, that the drawing is realistic, it is necessary to take into account all the nuances and small details. How to draw a person's eyes beautiful with a pencil?
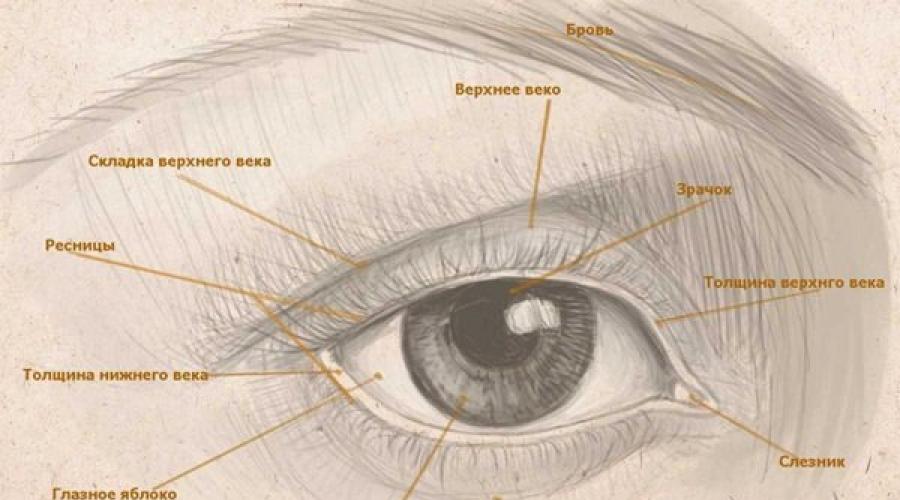
Structure of human eye
The human eye consists of several external structural elementsEach of which performs a specific function:
- upper eyelid;
- lower eyelid;
- top eyelashes;
- lower eyelashes;
- rainbow shell and iris;
- eyeball (sclera);
- pupil;
- tear.

To draw a person's eye with a pencil, it is necessary to take into account all the folds of smooth lines, shadows and much more, and also correctly choose the place of eyebrows. Otherwise, the drawing will seem implausible.
Step-by-step instruction for drawing a person's eye
Paint the eyes of a person with a pencil is needed in several stages. Step by step, line behind the line, from structural elements a whole image is obtained. The phased process of drawing a person's eye can be seen in the picture.

Step 1
First you need to draw the shape of the eye. To do this, it should be concluded in the framework of the shapes with angles. Immediately need to draw folds that are visible above the upper and lower eyelids. Also, the shape of the eye can be drawing from two perpendicular linescrossed together. Horizontal line Must be longer vertical. Then four points are smoothly connected. Denotes in the inner corner the tear, without which the eye will be unnatural. External and inner angles can be drawing both on one and at different levels. Additional lines need to erase.

Step 2.
It is necessary to draw a rainbow shell, which should be round form. It is important to take into account the fact that its third part is hidden by the top century. Inside the rainbow shell, strictly in the center, you need to draw pupil, paint it into a dark color.

Step 3.
Then you can proceed to drawing up the upper eyelids, followed by the part of the iris with the pupil. For this, the method of applying lines in the form of strokes is used. The main thing is not to rearrange, so that the eyelid is optimal thickness, it was darkened in the fold zone. After that, the lower eyelid should be drawn, which is highlighted from the inner corner of the eye.

Step 4.
At the next stage, you need to draw a glare near the iris on the pupil. It is depicted in the form of a small circle. On the contrary, the flare is formed a stain of scattered light, which is also near the pupil, only on the other side. This is a reflex that needs to draw smooth lines.

Step 5.
The next step is an image of eyebrows and abnormal arcs that protect the eye from external stimuli. The eyebrow is always placed above the organ of vision and put forward slightly forward. First, it is recommended to draw a trial line, and then draw the hairs from it. The base of eyebrows thicker than the temple. The hairs can be placed both in one direction and intersect.
The top eyelid is above the bottom. In the photo below, you can see all directions. They should be observed, otherwise to draw a realistic eye will not work.

Step 6.
Eyes must be framed by eyelashes. They can be drawn in advance, but on recent steps We still have to correct. Like everything else, the eyelashes should look realistic, and not as in children's drawings, where they resemble daisy petals. In the photo below, you can get acquainted with the right decoration. The top eyelashes are always longer than the lower, thick at the base and sophisticated by the end. For this, as each eyelashes drawn, the pressure of the pencil should be reduced.

Step 7.
The last step is necessary in order to remove the auxiliary lines, remove extra touches, make darker or lighter or darker than certain places. That is, bring your drawing to perfection.

Video: How to statenly draw a person's eyes with a pencil
The video presents a lesson for beginners who will help to draw a pencil's eye with a pencil taking into account each line. Visually familiar with S. general RecommendationsEven an inexperienced artist will be able to draw a person's face.
How to draw eyes a pencil? Each of us approximately looks like human eye and can draw at least such a primitive image:

But, since you were puzzled by the question, how to paint the eye, apparently you want to get more.
First, I advise you to approach the mirror and carefully consider your eyes. A simple learning object always opens a lot of new things. I remember school lesson Drawing on which we were given a task. I drawn, as I could and brought a teacher to check. And Natalia Maksimovna advised me to carefully look at her eyes. "Pay attention," she said, "we have eyelids and folds under the eyes." They also need to draw. " At that moment, this was a real discovery for me - it turns out if you look at something with all your attention, and not just to pump up the memory, the object will open up its new faces to us. It is worth adding a few parts and the eye begins to look quite differently. It becomes more alive, real.

In the next few years, until the end of the school, I drew a lot of self-portraits sitting in front of the mirror. And the more the hand worked with a pencil, the better the result was obtained. Gradually, the drawing and reflection in the mirror began to like each other, which was originally observed and in risen. The longer I draw, the less doubt in choosing a profession. I absolutely wanted to be.
In this lesson, I want to show you how realistic eyes are drawn, the volume of eyeballs, pupil. If you understand the structure of the eye, then everything will become more easily and understandable.
The basis of the eye is the ball, which is subject to a special fossa on the skull (Eyeball). The ball cannot be lit uniformly. Some part of it will be in the shade, some kind of light, and between light and shadow there is a territory of lighting. Accordingly, the protein in the eyes (the white field around the color circle) will not be evenly white. Below I visually demonstrate it.

The rainbow shell of the eye, the one that happens green, blue, brown and in the rarest cases of purple, is the rounded bulge, which goes beyond the eye of the eyeball. Accordingly, it will be unevenly illuminated. In fact, the iris does not drink so much from the ball, but I exaggerated for clarity.

Top eye is the skin that covers most Eyeball and forms folding - top and lower eyelids.

Want to know how to draw a child's eyes? What do they differ from an adult eye? Look in the photo below. The iris in the kids seem much more in size than an adult. In fact, children have less eye cut - a hole between the centuries, through which the eyeball is visible. Over time, when the child is growing, the incision will increase and the eyes "mature". And, as a rule, the eyes of children are wide open. They look in surprise on the world and do not judge anyone. Kids are simply saturated with information about the place in which they live.


Gradually, under the influence of society, a person is formed in nature. "Soul Mirror" acquires its special features. Some people have laughing eyes, others have strict. In someone else's eyes are drowning like in the sea. They are bottomless and attracting. But there are eyes from which you want to turn away and never look into them anymore, because there is nothing but emptiness or malice.


We will draw big beautiful eyes. How to draw eyes in stages?
Inscribe 2 parallel lines and divide them to 3 equal segments. Why 3? The distance between the eyes is equal to the length of one eye. It can be a little more or a little less.

Most people have an inner corner of the eye is slightly lower than the top. In other words, people have a slightly diagonal eyes. This "delay rate" is most strongly expressed in the peoples of Asia - the Chinese, the Japanese, Koreans, Mongols ... However, it is also present from Europeans.

The inner corner of the eye is somewhat too. Here is the so-called tears meat - a small area pink colour. Eye shape is very different. I draw a rather large eyes of a girl.

We celebrate the area that the nasty meat will take on the inner corners of the eyes. Then draw a rainbow shell in the form of a circle. As a rule, the iris is not completely visible. Partially it is hidden under the upper century. If you want to draw frightened eyes that are filled with horror, do on the contrary - hide part of the iris under the lower eyelid, and leave free space between the upper century and iris.

Now draw the pupil exactly in the center of the iris. The size of the pupil depends on the illumination. Than brighter light, the smaller the pupil. In the dark, when a person is peering somewhere, the pupil becomes 2 times more. We draw the top and lower eyelid. The shape and width of the century in all people are different. The elderly, the top eyelid can become quite imperceptible due to the hanging outbrow arcs. The folding of the lower eyelid is noticeable not so much, at least in young people. With age, all wrinkles become more pronounced.

In order for the eyes to look expressive, they need a beautiful frame, or rather eyebrows. The distance between the eyebrows is greater than the length of the eye. The outer ends of the eyebrows go beyond the external corner of the eye. Of course, the eyebrows are all different, but, as a rule, they caress them under modern canons of beauty with cosmetics. Here in the Middle Ages, women swung eyebrows. Such a strange fashion requirement ... perhaps, after 100 years will laugh at our ideas about beauty. Who knows…

In our drawing, the light will fall on the right. We celebrate glare on the iris. These are the brightest specks in front of the eyes. If you look into the mirror on your eyes, you will see how they shine. Why is the glare on the iris? Because the iris is the most convex area in front of her eyes and it falls on the most light.

Now proceed to the hatching of the eyes. We take an acutely dotted pencil NV (firm-soft) and neat strokes fill in the whole drawing except for glare in your eyes.

Gradually, we recruit the tone by changing the direction of the stroke.

Dark eyebrows, eye irises, upper and lower eyelids from the left (shadow) side.


Slightly darken areas on the sides of the nose. We continue the layer of the layer to dim eyes and eyebrows.

Now draw cilia, some of which are shorter, others are longer. Eyelashes are drawing short strokes from their roots to the eyebrows.

Making a line of eyelashes in the upper eyelid. It will give the eyes of expressiveness.

Now proceed to the most pleasant part. Take a soft pencil (I used 5V) and dimly several sites, namely the pupil in the middle of the eye, the iris, paying special attention to the outer edges. Also that dim the growth line of eyelashes and eyelashes themselves in the upper eyelids. Slightly lay out the lower eyelashes. The eyebrow will also make a little darker. As you can see, the eye came to life. The difference between the right and left parts of the drawing is obvious.

In this lesson, I will tell you how to draw eyes in stages. To begin with, let's understand from what the eye consists, knowing all its components you can easily achieve its realistic image.
Eyes structure
We disassembled the structure of the eye, moving to the picture of the eye
Draw eyes
Let's start with the pupil, you can use the circle or draw it from hand. Draw a circle to more - it will be our irresoline, and in it the circle is less - pupil.

The next stage. We draw the top and lower eyelid. In order to do this correctly imagine that the form of the age resembles a fish. If a little strain our fantasy should get something similar.

Dorisite on our pupil somewhat glare - it will give the eye of realism. Do not forget about the 3th century, about the thickness of the upper and lower eyelid. After the form of our eye began to completely arrange you forget about fish and fins.

No less important item in drawing eyes - eyelashes. It is necessary for yourself to understand what a form of eyelashes, in which direction they grow and how not to draw them. Eyelashes are usually the form of a comma on the contrary. At the base, they are thicker, at the end they narrow. Eyelashes are not straight and one thickness, otherwise you will have rays sunshine as children paint. Please note how not to draw eyelashes and how to depict them correctly.

Practice separately until you get it.We now move on to the direction of eyelashes. In century, as a rule, eyelashes grow in different direction Depending on the location. In the figure below, I will show the arrows, in which place and in what direction they grow. Do not forget that closer to the corner of the eye (3th century) eyelashes reduce their size. In no case do not make them one size otherwise it will be not plausible.

In order for our eyelashes, you watched a little a little stroke into the floor of the force at the base of the eyelashes. Thus, eyelashes will acquire volume and luxury.

Let's start part of the tone, volume and realism of our eye. In this lesson, our eyes will be black and white in order to emphasize the basics and buildings. We split our eyes on the tone. The brightest part will be a glare on pupil. We will not touch it, but later and in general will move its contours. Please note that the most dark in our eye is the pupil, then the eyelashes go on the tone, then the 3rd eyelids, the iris and the brightest will be the bladge of the eye (do not leave it white, he also has a tone).

For proper application Tone I will note the red lines in the same place it is worth it to apply that you would not be mistaken. Remember that the glare should remain pure white. The arrows indicate the direction in which your tone should weak and merge with what you have applied before.

You have to go out similar image eyes

At the end, give contrast to your eye. If it is necessary to strengthen the tone where you have applied it. Optionally, you can draw in the amount of the upper eyelid that closes the eye. This will give our eye even more volume and realism. Pay attention to the building of the iris. Draw it, it will be only a plus for your eye.

Many novice artists are most striving to draw human faces. This is quite explained: the face is the most important aesthetic component of the body, and the portraits of orders come much more often than, say, on the image of the feet.
If you have already been more or less studied general structure human head, primary construction and the basis of lighting can also begin to develop parts. The most expressive part of the face is, without a doubt, the eyes - it is them today and will take care of drawing.
So let's get up!
First sketch your eye contours. Designate general shape, make a tear and eyelid.

Then draw the circuits of the iris and pupil, after which we mark the contour glare and gently shake the iris, bypassing the marked glare.

In the next step, shadow pupil (immediately make it darker to separate from the iris). Start drawing a streak on the iris, as well as draw a falling shadow from the upper eyelid. Do not put on a pencil too, to be able to gradually gain tone in the right places.

Draw a streak on the iris carefully, take the shadows above the upper century, and also draw the shadow under the bottom. Walk through a thin face of a cropped elastic band around the eye: on this light line we will draw eyelashes.

Draw eyelashes - and the drawing will immediately acquire a completely different look. The upper eyelashes are crossed, forming "triangles". The lower eyelashes are usually much thinner, shorter and less often the upper. Also it will be useful to work in more detail: apply to it dark Points And strokes, and also carefully wipe the tiny bright areas with a rubber band.

It remains to work on the details. Still all dark places: pupil, iris contour (the upper border is in the shade, so darker), the lower boundaries of the upper eyelashes. Shadows above the upper and under the lower eyelids also need to do a little darker. Pay attention to the glare: they must be as light as possible. Add the volume with the eyeball, is a little amplified shadow and bright places.