From photo to drawing online sketch. How to make a realistic painting effect in Photoshop
Read also
Often users want to learn how to make a drawing from a photo in order to later print a photo and store it as a drawing. Consider the most effective ways.
First, let's look at several popular services with which you can quickly create a picture effect on a photo without installing an additional software on computer.
Photo Phunia Service
On this site, users can take advantage of an automatic effect with which an ordinary picture is converted into a drawing. You can also choose the background texture of the source file: color, white or "custom".
To get started, select the file on your PC. To do this, click the Browse button on the website.
Then define color range images (black and white or color).
Click on the shape of the texture you want to output and click on the "Create" button to start the process of converting the file.
In a few seconds, a direct link will be generated to download the picture from the site.
Croper service
The next popular site for creating a drawing from a regular picture is Croper. This online photo editor allows you to apply additional effects to your photo.
With it, you can create a unique image without losing quality.
One of the most popular features of this site is the pencil drawing feature.
The transformation of the file occurs by creating darker tones of the image, then strokes are gradually superimposed on the layers of the picture, which, in turn, make a sketch from the picture.
The editor interface is very simple. Upload the file to the site by clicking on the appropriate button.
The picture will open in a new window on the site. After that, find the main menu tabs - they are located at the top of the site. Click in turn on "Operations" - "Effects" - "Pencil".
At the top of the page, select a stroke length setting and a slope level.
Then press the Apply button to start the process of converting the picture.
It will take less than one minute. If necessary, you can adjust the contrast of the final image.
The result of Croper's work is shown in the figure below.
Create a picture in Adobe Photoshop
With the help of Photoshop, you can also create a pencil drawing from a regular picture.
Using the built-in functions of the program, you can achieve a better display of all strokes and the resulting picture will look natural.
The effect of the picture will be very clearly visible if you print it on a printer. For more effect, you can use white or craft paper.
All of the steps below were performed in Photoshop CS6. The functions used are available in earlier and in all new versions of the application.
We will use a regular scanned photograph; We recommend that you do not use small pictures while working in Photoshop, because after applying the "picture" effect, some of the pixels may be blurred, which will worsen the quality of the final image small size.
First, we need to copy the original image.
To do this, open the picture in the program, wait for the toolbar to load and press the F7 button. Then click on the combination of buttons Ctrl - J. This way you will create a duplicate of the layer.
To do this, click on the Image item (main menu of the program). Click on "Correction" - "Inversion". Also, to desaturate a layer, just press the Ctrl and I keys at the same time.
As a result of desaturation, we get the negative of the image, and not its black and white version. All light areas of the photo will become dark, and all dark areas will become light.
In the layers panel, the resulting negative will be displayed as a second copy of the original layer. Next, let's change the display mode of the layer. Click on layer 2 and in the "Mode" line open the drop-down list. Click on Color Dodge.
After changing the mode, the project canvas will turn completely or partially white. On the main menu bar, click "Filter" - "Blur".
Select "Gaussian Blur" from the list provided. In the window that opens, adjust the slider to create the level of blur.
The higher the value of this indicator, the brighter the picture becomes, acquiring the outline of the drawn one.
Important! Do not overdo it with the blur filter, otherwise the photo may become too light and the pencil effect will be lost. The optimum value for blur is 12.5 - 13 pixels.
This method of discoloration allows you to achieve maximum clarity of the strokes of the picture, pixels are not lost, the resolution of the picture is preserved. As you can see, the picture has acquired the outlines of a pencil, but did not become too light.
Go to the window for working with layers and select the very first layer, as shown in the image below. Then, move the pointer to the layer name and wait for the context menu to appear. In it, click on the item "Merge visible layers". Hold down the Alt button and select all three layers that need to be merged with the pointer.
Choose the most upper layer(layer 1). You need to change its display mode to "Multiply". This darkens each sketch line, giving the sketch more naturalness.
The lines shouldn't be too dark. If this happens, adjust the Opacity to 50%. It is necessary that the color of the "plain" pencil is preserved.
This is where you can finish your work. As a result, we get black and white sketch original photograph. If you want to add some color to the sketch, create a copy of the background layer by pressing Ctrl - J.
Now we only need to change the display color parameters of the duplicated layer. Select the "Color" mode and in the line Transparency set the value to 65%, as shown in the picture above.
The final result of converting a picture to a sketch will look like this:
Creating a drawing from a regular photo in Photoshop will take you no more than 10 minutes, even if you are not an advanced user.
You can easily achieve this in a short period. In this lesson, you will learn how to create drawings from photography using brushes. If you use in your work Graphics tablet then an even better effect can be achieved. In a similar lesson, another option for creating from photography was considered pencil drawing... So, let's begin!
Here's the result you should get:
In the lesson, an image from a paid resource was used, but you can easily find free photos of a similar topic on the Internet.
1. Image adjustment
Step 1
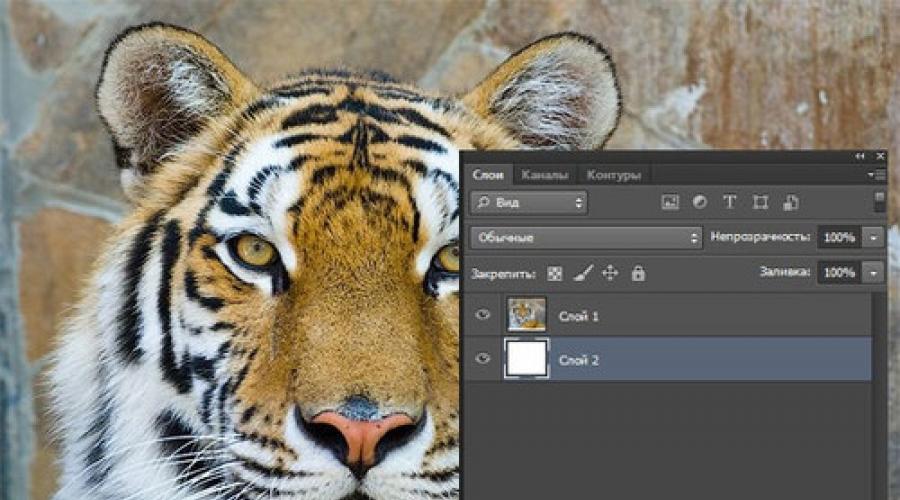
Open our source in Photoshop. Double click on the Background layer to unlock it and name it Layer 1. Create New layer and call it Layer 2. Set the color foreground white and then with the tool Fill(G), fill it with white. Place Layer 2 under the original layer.

Convert the color image to black and white. Make active the layer with the photo and go to the menu Image - Correction - Hue / Saturation and in the settings window that appears, reduce the Saturation to -100.

2. Create a picture effect
Step 1
Let's move on to creating the picture effect itself. Add a layer mask to the tiger layer. To do this, click on the layer mask icon and immediately fill it with black using the tool Fill(G).

Next, switch the foreground color to white. The background color should be black. We activate the tool Brush(B) .Select from a set of brushes Flat blunt with short stiff bristles, set the size to 60 pixels. and start applying strokes on the black layer mask (you can experiment with brushes and sizes and choose another one you like).

Step 2
Continuing to apply white brush strokes on the layer mask, we restore the image, giving it the texture of the picture. Try to keep your brush strokes like a crosshatch or crosshatch that mimics a pencil drawing technique.

Step3
Tool Moving(V) Center the tiger on the document and add strokes until you are satisfied. When finished, duplicate this layer with the keys Ctrl + J.

Step 4
Now we need to enhance the effect of the picture. Go to the menu Image - Correction - Levels and set the settings for the RGB channel as in the screenshot, thereby increasing the contrast and highlighting of strokes. After that we merge all the layers together. Ctrl + Alt + Shift + E.

Step 5
You can stop at the result, but it's better to spend another couple of minutes and make the drawing as close as possible to the real one, made on paper. We will do this using a gradient, we will try to achieve the effect of a photograph of the picture. Right-click on the layer with the picture and in the drop-down menu go to the option Blending options(you can just double-click on the layer with the left mouse). Choosing a layer style Gradient overlay, set the values as in the screenshot.

It is very easy to make a drawing from a photo.
There are several ways to give a photo the look of a pencil drawing or stylize any image to look like a picture painted with watercolors, gouache, oil, or using other materials.
If the quality and realism of the image are not particularly important to you, but you just need to do it quickly, you can easily get by with online image editors, which are enough on the Internet, for example, these: PhotoFania , Photo Pencil Sketch or on this site Free online services from Pho.to... There are many more similar ones, but they all have one significant drawback - low quality of image processing, and the choice of stylization effects is very small and transformation tools cannot be customized. I do not use online services for this reason, monotonous, poor quality and not interesting. Elements of your own creativity missing completely.
The second method is also very simple, but it gives a chance to add some individual, author's shades to each new image. This is a way using small special programs and applications. There are also a lot of such programs, from very simple ones, in which the quality is not much superior to online editors, to quite professional ones. Of very simple programs i can advise FotoSketcher and Dynamic Auto-Painter.
In a programme FotoSketcher it is very simple to work, there are few settings and by changing them you can achieve a completely realistic result.
In a programme Dynamic Auto-Painter it is even easier to work, but more interesting, the whole process of changing the picture can be observed in real time and stopped when you are satisfied with the result, there are quite a lot of profiles in it, under different styles painting. If you install additional programs for screen recording and conversion, you can also make animated GIFs, for example, this one:
Another very good and powerful program, professional level - AKVIS Sketch... This program is not difficult to use, but its capabilities in stylizing images for a drawing are comparable to those of Photoshop a. This program can work as a plugin for many graphics editors. Understand the tools and settings of the program AKVIS Sketch very easy, but if you still have difficulties - look at the office. developer's site, there are many understandable reference materials and lessons.
From the same series and a program that is designed to simulate different art styles... Using programs AKVIS Sketch and AKVIS ArtWork you can make very realistic photo stylizations in various art styles in a few minutes.

And of course the same thing best quality in processing bitmaps can be obtained in a graphic editor of all times and peoples - in Photoshop e ( Adobe photoshop). I am using version Adobe Photoshop CS6 13.0 Extended but even earlier versions will achieve very High Quality and the realism of the images.
It is very difficult to master all of Photoshop on your own, but you can quickly learn how to use some of the functions and filters. Watch these video tutorials exactly on your question and you will not have any problems to make a drawing from a photograph.
- use graphic editors, special programs that need to be installed on your computer, these programs are used to edit images, including turning a photo into a drawing with watercolors, paints, pencil
- use graphic editors online
- use programs that are used to transfer photos from the camera to HDD computer, they can also be used to edit images and turn a photograph into a drawing.
You can do without Photoshop, there is a lot on the Internet free photos editors and photomasks, into which you just upload a photo, and on exit it is displayed with the effect you want.
One of them is http://funny.pho.to/ru/ (but there are a lot of them)
The portrait effect will look something like this (but this is not the only portrait template, there are better)


There are also a bunch of templates for postcards, but naturally your exclusive one needs to be done in Photoshop.
Today this is no longer a difficult task, because there are many programs in order to turn an ordinary photograph into a painted portrait. you can use Photoshop, FotoSketcher, Paint, Dynamic Auto-Painter... These programs can be downloaded for free from the Internet.
Everything is very simple:
there are special filters in Photoshop that will make your photo not only drawn, but also embroidered and wrinkled and whatever 🙂
The main thing is that you have photoshop installed, and it's easy to figure it out
Hello everyone! Nowadays, in order to find the answer to our questions, you just need to go to the Internet. And to the question that bothers you there are a lot of different and most importantly free photo editors, with the help of them you can easily learn how to turn photos into painted portraits! I myself often use this site and I do not have any problems. With the help of this site, you can turn your own and another photo into a painted portrait!
Today one of the classic themes is next in line - creating the effect of a pencil drawing from a photograph. This is one of those quick and easy techniques that brings real satisfaction to the professional, but also makes the lesson useful for beginners. Sure, Photoshop is awesome and has tons of built-in filters and artistic effects, but they don't quite compare to what we want to show you.
What we want to get:

Step 1
Let's start by choosing a photo to work on. It is desirable that the background is clean and the photo is of high quality. As a last resort, download this stock photo.
Only with these conditions will we achieve the desired result.

Step 3
Drag the background layer over the new layer icon in the Layers panel, or use a combination CMD + J to create a duplicate layer. We pass Image> Adjustments> Invert / Image> Correction> Invert(or CMD + I) and right click select Convert to Smart Object.

Step 4
We choose Gaussian Blur and change the radius to 40 pix... Usage Smart object will apply this filter as a Smart Filter (that is, smart!) so that we can simply tweak the parameters as needed, instead of constantly applying this effect.

Change the Blend Mode of the duplicate layer to Color Dodge Foundation which will dramatically increase the contrast and give the surface the grain we need.

Step 5
Click on the icon Adjustment Layer and choose Levels... Move the shadow sliders and Midtones slightly to the right to darken the image slightly.

Step 6
Add new Adjustment Layer and now select the option Black and White... The default settings will be enough to remove the color and give the image more "pencil".

Step 7
Use CMD + A, to Select All then use Edit> Copy Merged(or keyboard shortcut CMD + Shift + C). This will clip all visible layers. Click on CMD + V to paste this layer on top of the others.

Now we do this: Filter> Filter Gallery> Filter Gallery, then we go to Glowing Edges from the menu Stylize... Change the parameters as shown below:

Now Image> Adjustments> Invert / Image> Correction> Invert(or the CMD + I) to take a negative image (instead of black on white, it will turn out to be white on a black background).

Step 8
Change the blending mode of this layer to Multiply, then lower the layer's Opacity to 50-60%.

Step 9
Click on the icon New Layer at the bottom of the palette Layers then press CMD + Backspace to fill the layer with white (this is the default background color). Come back to Filter Gallery, but now we choose Texturizer... Change the settings to Sandstone.

Change the blending mode of this layer to Multiply so you can see the main lines, then lower the Opacity to 50% to achieve a texture effect thin paper... To enhance the color pencil effect, turn off the black and white adjustment layer.


Outcome
As a result, we got quite realistic effect pencil sketch with natural lines and shading.

Translation - Duty
Often users want to learn how to make a drawing from a photo in order to later print a photo and store it as a drawing.
Let's consider the most effective ways.
First, let's take a look at several popular services with which you can quickly create a picture effect on a photo without installing additional software on your computer.
Photo Phunia Service
On this site, users can take advantage of an automatic effect with which an ordinary picture is converted into a drawing.
You can also choose the background texture of the source file: color, white or "custom".
To get started, select the file on your PC. To do this, click the Browse button on the website.
Then define the color scheme of the image (black and white or color).
Click on the shape of the texture you want to output and click on the "Create" button to start the process of converting the file.
In a few seconds, a direct link will be generated to download the picture from the site.

Croper service
The next popular site for creating a drawing from a regular picture is Croper. This online photo editor allows you to apply additional effects to your photo.
With it, you can create a unique image without losing quality.
One of the most popular features of this site is the pencil drawing feature.
The transformation of the file occurs by creating darker tones of the image, then strokes are gradually superimposed on the layers of the picture, which, in turn, make a sketch from the picture.
The editor interface is very simple. Upload the file to the site by clicking on the appropriate button.
The picture will open in a new window on the site. After that, find the main menu tabs - they are located at the top of the site.
Click in turn on "Operations" - "Effects" - "Pencil".

At the top of the page, select a stroke length setting and a slope level.
Then press the Apply button to start the process of converting the picture.
It will take less than one minute. If necessary, you can adjust the contrast of the final image.
The result of Croper's work is shown in the figure below.

Create a picture in Adobe Photoshop
With help, you can also create a pencil drawing from a regular picture.
Using the built-in functions of the program, you can achieve a better display of all strokes and the resulting picture will look natural.
The effect of the picture will be very clearly visible if you print it on a printer. For more effect, you can use white or craft paper.
All of the steps below were performed in Photoshop CS6. The functions used are available in earlier and in all new versions of the application.
We will use a regular scanned photograph.
We recommend that you do not use small pictures while working in Photoshop, because after applying the "picture" effect, some of the pixels may be blurred, which will worsen the quality of the resulting small image.

First, we need to copy the original image.
To do this, open the picture in the program, wait for the toolbar to load and press the F7 button. Then click on the combination of buttons Ctrl - J.
This will create a duplicate layer.

Read also:
To do this, click on the Image item (main menu of the program). Click on "Correction" - "Inversion".
Also, to apply discoloration to a layer, just press the Ctrl and I keys at the same time.
As a result of desaturation, we get the negative of the image, and not its black and white version. All light areas of the photo will become dark, and all dark areas will become light.

In the layers panel, the resulting negative will be displayed as a second copy of the original layer. Next, let's change the display mode of the layer.
Click on layer 2 and in the "Mode" line open the drop-down list. Click on Color Dodge.

After changing the mode, the project canvas will turn completely or partially white. On the main menu bar, click "Filter" - "Blur".
Select "Gaussian Blur" from the list provided. In the window that opens, adjust the slider to create the level of blur.
The higher the value of this indicator, the brighter the picture becomes, acquiring the outline of the drawn one.

Important! Do not overdo it with the blur filter, otherwise the photo may become too light and the pencil effect will be lost. The optimum value for blur is 12.5 - 13 pixels.
This method of discoloration allows you to achieve maximum clarity of the strokes of the picture, pixels are not lost, the resolution of the picture is preserved.
As you can see, the picture has acquired the outlines of a pencil, but did not become too light.
Go to the window for working with layers and select the very first layer, as shown in the image below. Then, move the pointer to the layer name and wait for the context menu to appear.
In it, click on the item "Merge visible layers". Hold down the Alt button and select all three layers that need to be merged with the pointer.

Select the topmost layer (layer 1). You need to change its display mode to "Multiply". This darkens each sketch line, giving the sketch more naturalness.
The lines shouldn't be too dark. If this happens, adjust the Opacity to 50%.
It is necessary that the color of the "plain" pencil is preserved.

This is where you can finish your work. As a result, we get a black and white sketch of the original photo.
If you want to add some color to the sketch, create a copy of the background layer by pressing Ctrl - J.

Now we only need to change the display color parameters of the duplicated layer.
Select the "Color" mode and in the line Transparency set the value to 65%, as shown in the picture above.
The final result of converting a picture to a sketch will look like this:

Creating a drawing from a regular photo in Photoshop will take you no more than 10 minutes, even if you are not an advanced user.
This method allows you to achieve the highest quality effect of a picture drawn with a pencil.
Use photoshop too. There are corresponding filters that make the photo look like a painted one, and there are still several options for a portrait, even a watercolor. And it's easy to do, although there are video tutorials for this.
there are special editors for example olympus the master there are functions for painting with watercolors, oil paints, with a pencil you only need to adjust more real option by hand
If the question concerns the creation of a drawn picture from a photo in the Photoshop editor, then I offer the following video selection (excluding the videos that have already been answered):
Ate this question involves the creation of a drawn portrait using third-party programs (this method is especially good for those who do not know how to use Photoshop), then here is another plot (and there is even online programs, where you can make a drawn portrait or still life from a photo - the video is just about such a program):
And there is also such an option (using CorelDRAW)
Well, I like to do a similar effect automatically on the site - http://www.imgonline.com.ua/cartoon-picture.php (there it is called cartoon)
Even with the default settings, it works out very well!
In order to change real photo to drawn, you just need a photo editor for this.
I myself personally always use This Site.
Here you can change All your photos to pictures, that is, on this site you can turn a Photo into a painted portrait.
There are many ways how to give a photo the effect of a painting... The most common and probably the most in an easy way which I know is the use of the program Dynamic Auto-Painter... This program will automatically do whatever it takes to give your photos a pencil drawing imitation.
You can do everything manually by yourself, having mastered Photoshop. But this is a little long and requires some effort.
Turn a photo into a painted portrait or turn a digital image into a painted one different styles painting or drawing, in several ways: