How to draw a boy standing with a pencil. How to draw a boy with a finger using a pencil step by step
Each of us is surrounded by thousands of people. It would seem that we have learned the proportions and features down to the millimeter human body... But here's the paradox - draw a man much more difficult than that which you have only ever seen.
Sometimes, when you draw someone, you wonder - not a person, but some kind of alien. If you also fail to draw people, as they say, do not pass by - here you will find a lot of useful and interesting things for yourself.
And the very first thing is this video, which will show you how to draw a boy and a girl.
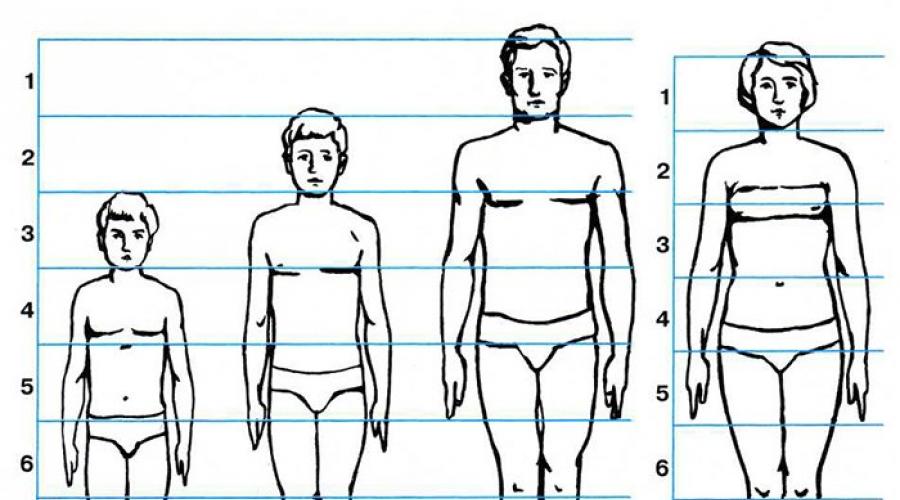
Even ancient artists, drawing a person, tried to divide his body into equal parts, so much so that it was easy to correctly recreate the proportions of the figure. After all, knowing the ratio of individual parts of the body to the figure as a whole, you can easily draw a person. At the same time, of course, we must not forget that all people have their own characteristics.
So, drawing a person, for the unit of measurement we take the size of the head.
The height of an adult man or woman is 8 head sizes, the height of a teenager is 7, a student is 6, and a baby is only 4 head sizes.
Proportions of people of different age groups

Before drawing a person, remember a few important nuances.:
- the arms should end at the middle of the thigh,
- elbows are at waist level,
- knees - strictly in the middle of the leg.
Did you know that the height of a person is equal to the length of the arms spread apart, and four head heights fit in the length of the legs?
But what delighted me even more was the size of a human foot. It turns out that its height is equal to the height of the nose, and its length is equal to the length of the forearm.
See how a man and a woman should be drawn correctly in different positions.


And now I will show you how to draw people in stages.... I assure you that with a master class from Pustunchik it will be easy and simple.
How to draw a boy
If you need to draw a boy, use following scheme... And I will tell you how and what parts of the body you need to draw step by step.
1. Draw an oval for the boy's head, then a small neck and a rectangle for the torso.

2. Draw another rectangle from the bottom, divide it in half. These are the legs. Draw the rectangular arms. On the upper large rectangle, make the curves from the neck to the arms - these are the shoulders.

3. Erase the extra lines on the shoulders. Draw the neckline of the jacket, the seam lines (but not to the end), where the sleeves are connected to the main part of the jacket. Draw the fly and folds on the slingshot pants. Now sketch out the shoes and hands. For a detailed diagram showing how to draw the hands, see the right.

4. We start drawing the head. First draw a cross - it will point to the middle of the head and determine the location of the eyes. Two arches, two dots and one small bow at the bottom of the head are the top of the eyes, the future nose and lips. Ears will be located at the level of the nose and eyes.

5. Draw the eyes, draw small circles in place of the dots - nostrils. Now move on to the eyebrows and hair.

6. Erase the extra lines and light movements pencil, mark the folds on the clothes. Add details. Congratulations! The boy's drawing is ready.
How to draw a kid
This drawing is perfect for any comic book, and you can also draw it in Kindergarten or for a student elementary grades... The funny little toddler will be a godsend for the school exhibition of young artists.
1. Draw an oval, mark the eyes with dots, show the baby's nose and mouth with two bent arcs.

2. Mark the corners of the lips, draw the ears and hair.

3. Draw a trapezoid at the bottom of the head - the boy's body. Don't forget straight horizontal line separate the blouse from the trousers, and show the trousers vertically.

4. Draw the sleeves.

5. Now draw the arms and legs for the child.

6. Fingers on hands are separated by lines. That's all! The little mischievous guy is ready for pranks :)

Draw girls
Three beauties at once on one sheet. Do you want to have such fashionistas in your album? Then rather draw these charms!
1. Draw sketches of girlfriends.

2. Create hairstyles and clothes for them.

3. Add details: belt, lace sleeves, leg warmers, handbags and so on.

4. Draw faces for girls, make folds on clothes, highlight accessories. Add uniqueness to the shoes of each of your friends.

Great job!
You will learn more about how to draw lips, nose, eyes of a girl from the following video. I warn you, the master class is not for beginners, so be careful not to miss important details.
Draw the girl's face. Part 1
Draw the girl's face. Part 2
How to draw a guy
Every girl at least once in her life tried to draw the guy of her dreams. It is, of course, different for everyone. But for now, let's just draw a guy with glasses and a cool T-shirt. Go?
1. Make a template for a person.

2.Use the guide lines to draw the head and arms.

3. Draw the hair, nose, lips. Put the guy on the glasses.

4. Trace the contours of the guy's body. Draw the hands. Add shadows with dashed lines. Draw a line for the neckline of the shirt.

5. Remove unnecessary lines. Sharpen the contours of the man's body.

Here you go! A macho with a serious look and cool glasses is ready to win hearts!

Not all novice artists know how to draw a boy. However, there is nothing overly complicated in this task. Even a child can draw a boy with a pencil. The main thing is that proportions should be observed in the process of work. Having figured out how to draw a boy, you can easily portray other people.
To draw a boy with a pencil and then color in a sketch will of course require some stationery, which is best prepared in advance:
one). Paper;
2). Liner;
3). An ordinary pencil;
four). Eraser;
5). Multicolored pencils.
If all those items that are on the list have already been prepared, you can proceed to learning how to draw a boy in stages:
1. Draw a vertical line. On it, mark a segment that marks the head, and also mark the line of the shoulders;

2. Draw the boy's head. On it, depict hair, nose, eyes, mouth and ears;

3. Draw the neck. Using rectangles, outline the upper and lower parts of the boy's body. Mark the boy's legs with thin lines;

4. Draw a T-shirt. Draw the boy's arms. Draw the top of the shorts;

5. Draw the child's legs. Draw the grass on which he stands;

6. Using the liner, carefully trace the preliminary sketch;

7. Using the eraser, carefully remove absolutely all pencil lines;

8. Use brown pencils to color the child's hair. Shade the body, arms, legs and face of the child with a nude pencil. Paint a little on the cheeks pink... Those areas of the body where the shadow falls, lightly shade with a brown pencil;

9. Paint over the shirt with yellow and red tones. Color the shorts using yellow and green shades;

10. Use the blue pencil to color in the socks. Shade the shoes with a deep blue pencil. Paint over the grass with a light green shade.

Now the drawing is completely ready! Now you already know how to draw a boy in stages with a pencil, which means that you can teach this to your child. To better and quickly learn how to portray people, it is most useful to make quick sketches, the so-called sketches, from nature. It is most convenient to draw people from nature in a cafe, in transport, in a park. Most importantly, you should always carry a small notebook and a well-sharpened pencil or pen for this.

In this tutorial, we will look at how to draw a boy in full height with a dog with a pencil in stages, and then also paint with colored pencils.
You will need: a state of calm confidence, readiness for new creative successes.
Materials: pencils, eraser, black pen, if desired - gouache, brush.
1. We begin with the fact that we "outline" our little character on a piece of paper. Let's designate his height - approximately three heads, the middle vertical line of the body and face, the line of the eyes. Let's outline the cheek and hair. The midline of the torso is sometimes drawn as an axis in the center of the body, and sometimes as a strip glued to the back, this may depend both on the author's preferences and on the character's posture and / or its dynamism. (Note: and then I slightly reduced his head).

2. Dress the child). Remember that there is a body under the clothes and that the clothes themselves also have a certain weight. Therefore, the top of the sweater contour (on outstretched arm boy) will approximately follow the contour of the hand. Whereas Bottom part contour - sags unobtrusively). It is also useful to remember that clothes are thick, and also tend to slightly change during wear - knees may sag slightly, etc. Thicker fabrics tend to form larger folds. The right leg in the knee area sags less than the left, since the fabric at the bottom is gathered in a denser fold, which partially holds the weight of the leg. The left leg sags more and the leg line is straighter. This difference is less than they are not too noticeable, but still the lines are curved a little differently.

3. We outline the strands of the hairstyle and facial features. Let's mark the shape of the eyes, eyebrows, nose line. We draw a mouth, in its corner I usually put a small dot, draw a line for the bottom of the lower lip. We clarify the rest of the lines (for example, I reduced the head).

4. Erase the extra lines so that they do not interfere, continue to refine the contour, work out the folds. We add animals, for example a rabbit). Although in fact it would be better to remember him earlier.

5. We start painting the drawing. With a blue pencil, lightly paint over the shaded parts of the boy (except for the face). We do it really lightly (for clarity, the toning in the photo is shown with more contrast than it actually was).

6. Again, lightly begin to apply the color. First we tint the carrots orange middle, then from the middle to the edges - tint with yellow. In dark brown, draw the hair at the crown and the ends of the hair. A stroke with strong pressure at the beginning, and almost no pressure at the end - similar to how we put commas, only very, very slightly curved strokes. Press more on the pencil at the top of the head, reducing the pressure to the glare. By the same principle, we tint the ends of the hair, reducing the pressure towards the top.

7. Then add to the hair a lighter Brown color(you can have it with a slightly reddish tint). Then, using the same principle, we work out the hair with a yellow pencil, reducing the pressure on the glare.

8. We continue to color the clothes using different shades green, salad, blue, blue, yellow. For the jumpsuit, a light purple pencil was also used (from the shadow side.)

9. Condensate the shading, except for the more illuminated, prominent areas (shoulder, belly, shoe noses). We begin to tone the skin of the face with a flesh-colored pencil. Then on top of the flesh one, lightly add a blush with a red pencil. Then we tint it again tightly - then the red is shaded a little and will look more natural.


10. Begin to trace the outline with a black pen. It is desirable that it does not flow). Just in case, keep a piece of paper nearby to wipe it off. Lightly work on the hair with the pen, changing the pressure in the same way as before changing the pressure of the pencil.

11. Again we work on the hair, leaving a very small area of the flare, not painted over, or you can use the eraser as you like). Draw the pupils with a pen, not forgetting about the highlights. For some reason, the glare on the slippers left me in the wrong direction, but because anyway, at the final stage, I will arrange the highlights with gouache - it does not really matter.

12. We work on the jumpsuit with a blue pencil, shading it around the edges. You can also add shadows on clothes, shoes and carrots using diagonal shading with a simple pencil (I use a mechanical one, because sharpening pencils is always lazy). We paint and outline the rabbit. We use a blue and light purple pencil, well, and a simple one for shaded areas, the tips of the ears and tail, and drawing the toes. The teeth can be distinguished more, otherwise I have some kind of dog-like rabbit)


13. At the thirteenth stage, the boy looks somehow strange, probably he is superstitious). We draw greens on the carrots, lightly paint the child's lower lip with a pale pink pencil. We circle the eyes with a pen, do not forget about the fold of the upper eyelid, cilia can be marked with dots. With a simple pencil we bring a shadow in the ear. Red and simple - paint the sole of the shoe. Salad - paint the patch. We remember that the boy casts a shadow). As well as a belly in principle.

14. Draw an iris with a sharpened pencil. Draw a breast pocket with a simple pencil, draw a stool with it, add a blue color to the left, outline the furniture with a handle.

15. If desired, add white gouache to the drawing, placing highlights and reflexes.
Here's another additional photo - so that you can better see where I drew the lines with a brush with gouache.


That's all). Enjoy your creativity!
These "titles" with larger fragments may be useful to you.

Click on the image to enlarge
P.S. I am not a pro, and I think (even rather know) that I am not describing everything here correctly and competently, I just madly love to draw and I want to convey at least a little of this love to you. With the help of the lesson) And may creativity always bring you happiness!)
Dear boys and girls! In this tutorial we will tell you how to draw a boy with a pencil step by step... Not every child will be able to learn to draw a person the first time, and therefore we divided the whole process into 8 stages. In any case, you should like our lesson, because with it you can learn how to draw a boy using a pencil.
STEP # 1
We start with a circle for the head, and then draw out the outlines of the torso, arms and legs, until a human figure appears, similar to the one you see here.
STEP # 2
Now you should draw the whole face shape. It is necessary to sketch out the ear, eyebrows, hair and the outlines of the eyes.

STEP # 3
In this step, we finish drawing the eyes of our boy, and then draw simple nose and mouth.

STEP # 4
At this stage, we finish with the hairstyle, as shown in the picture.

STEP # 5
The next step is to draw the boy's neck, as well as the torso, which will be hidden in a T-shirt with sleeves and a collar.

STEP # 6
Now we draw the hands as shown in the picture.

STEP # 7
Our boy is almost ready, and there is very little left. To do this, we finish drawing his legs, which will be hidden under the trousers. This is the simplest part of the body that you needed to draw, so you shouldn't have any difficulties.

STEP # 8
On the the last stage you need to draw shoes or feet. Don't forget to add a sole for your shoes. Now you can erase the lines and shapes that you drew in the first step.

STEP # 9
This is what your boy will look like when you're done. Now you can have even more fun when you start coloring it, and you will end up with a finished one. beautiful picture... We hope you enjoyed our step-by-step lesson pencil drawing boy.

I confess to you a secret: before, I did not know at all how to draw people. But more recently, I was incredibly lucky - I learned a few secrets of drawing a human body. I share them with you!
Each of us is surrounded by thousands of people. It would seem that we have learned the proportions and features of the human body down to the millimeter. But here's the paradox -draw a manmuch more difficult thanthe most exotic flowerthat you've only ever seen.
Sometimes, when you draw someone, you wonder - not a person, but some kind of alien. If you also cannot draw people, as they say, do not pass by - here you will find a lot of useful and interesting things for yourself.
And the very first thing is this video, which will show you how to draw a boy and a girl.

Even ancient artists, drawing a person, tried to divide his body into equal parts, so much so that it was easy to correctly recreate the proportions of the figure. After all, knowing the ratio of individual parts of the body to the figure as a whole, you can easily draw a person. At the same time, of course, we must not forget that all people have their own characteristics.
So, drawing a person, for the unit of measurement we take the size of the head.
The height of an adult man or woman is equal to 8 head sizes, the height of a teenager is 7, a student is 6, and a baby is only 4 head sizes.
Proportions of people of different age groups

Before drawing a person, remember a few important nuances.:
- the arms should end at the middle of the thigh,
- elbows are at waist level,
- knees - strictly in the middle of the leg.
Did you know that the height of a person is equal to the length of the arms spread apart, and four head heights fit in the length of the legs?
But what made me even more delighted was the size of a human foot. It turns out that its height is equal to the height of the nose, and its length is equal to the length of the forearm.
See how a man and a woman should be drawn correctly in different positions.

Now I will show you how to draw people in stages.... I assure you that with a master class from Pustunchik it will be easy and simple.
How to draw a boy
If you need to draw a boy, use the following diagram. And I will tell you how and what parts of the body you need to draw step by step.
1. Draw an oval for the boy's head, then a small neck and a rectangle for the torso.
2. Draw another rectangle from the bottom, divide it in half. These are the legs. Draw rectangular arms. On the upper large rectangle, make the curves from the neck to the arms - these are the shoulders.
3. Erase the extra lines on the shoulders. Draw the neckline of the jacket, the seam lines (but not to the end), where the sleeves are connected to the main part of the jacket. Draw the fly and folds on the slingshot pants. Now sketch out the shoes and hands. For a detailed diagram showing how to draw the hands, see the right.

4. We start drawing the head. First draw a cross - it will point to the middle of the head and determine the location of the eyes. Two arches, two dots and one small bow at the bottom of the head are the top of the eyes, the future nose and lips. Ears will be located at the level of the nose and eyes.

5. Draw the eyes, draw small circles in place of the dots - nostrils. Now move on to the eyebrows and hair.

6. Erase the extra lines and with light pencil movements mark the folds on the clothes. Add details. Congratulations! The drawing of the boy is ready.
How to draw a kid
This drawing is perfect for any comic book, and you can also draw it in kindergarten or for a primary school student. The funny little toddler will be a godsend for the school exhibition of young artists.
1. Draw an oval, mark the eyes with dots, show the baby's nose and mouth with two bent arcs.

2. Mark the corners of the lips, draw the ears and hair.

3. Draw a trapezoid at the bottom of the head - the boy's body. Do not forget to separate the blouse from the pants with a straight horizontal line, and show the pants with a vertical line.

4. Draw the sleeves.

5. Now draw the arms and legs for the child.
6. Fingers on hands are separated by lines. That's all! Little mischievous guy is ready for pranks :)
Draw girls
Three beauties at once on one sheet. Do you want to have such fashionistas in your album? Then rather draw these charms!
1. Draw sketches of girlfriends.

2. Think of their hairstyles and clothes.
3. Add details: belt, lace sleeves, leg warmers, handbags and so on.

4. Draw faces for girls, make folds on clothes, highlight accessories. Add uniqueness to the shoes of each of your friends.

Great job!
You will learn more about how to draw lips, nose, eyes of a girl from the following video. I warn you, the master class is not for beginners, so be careful not to miss important details.
How to draw a guy
Every girl at least once in her life tried to draw the guy of her dreams. It is, of course, different for everyone. But for now, let's just draw a guy with glasses and a cool T-shirt. Go?
1. Make a template for a person.
2.Use the guide lines to draw the head and arms.

3. Draw the hair, nose, lips. Put the guy on the glasses.

4. Trace the contours of the guy's body. Draw the hands. Add shadows with dashed lines. Draw a line for the neckline of the shirt.
5. Remove unnecessary lines. Sharpen the contours of the man's body.
Here you go! A macho with a serious look and cool glasses is ready to win hearts!