How to draw a nose with a simple pencil? We draw a nose, how to draw a nose in stages.
Read also
We have already told our readers about human anatomy, or more precisely, about how to draw lips, neck and eyes. However, it never came about how to draw a person's nose with a pencil in stages for beginners. That is why in today's article we decided to demonstrate step by step master class, which will help to repeat exactly the proportional part of the face - the nose.
Of course, many can say that you rarely meet a person with symmetrical proportions of the face ... but it is better to learn to draw from a smooth, small and easy-to-draw nose. Whether it is male or female, it makes no difference, the most important thing is that the final result exceeds expectations.
Master class: how to draw a person's nose with a pencil step by step for beginners photos
To repeat step by step work with a pencil, it is enough to adhere to 6 step-by-step points, repeating one action after another, to get a very good final result.


- Step 1 - sketching
Of course in this master class, we will not consider the different structures of the nose and their shapes. We will simply show how an academic or, as it is also called, abstract drawing can be reproduced from a geometric sketch. Its feature is complete symmetry and the absence of anatomical features acquired at the time of birth or received as a result of trauma.
To sketch, just use simple pencil, a ruler, a white sheet of paper and an eraser. The base visually resembles an inverted T, with a stick extended through the top.
- Step 2 - outline outline
To keep the bridge of the nose, nostrils and their wings symmetrical, measure the same distances with a ruler, starting from the vertical line. To do this, make two strokes on top, and complete the lower lines by drawing dashes to them - you should get equal segments.
- Step 3 - contours
To get a finished sketch, you need to connect all the segments together.
- Step 4 - eraser
Using the eraser, erase unnecessary details, leaving only the outline.
- Step 5 - shading
Through shading, you can add volume to the picture. A light press on the pencil will give the facial features a neatness and a kind of reality.
- 6 step - coloring
With skill, the nose can be painted with paints. True, beginners are not recommended to do this.
Finished work of a person's nose with a pencil, photos of stage-by-stage work of beginners:


This is a medium-sized lesson. It can be difficult for adults to repeat this lesson, so I do not recommend drawing a nose for this lesson for young children, but if there is a great desire, then you can try. I also want to note the lesson "" - be sure to try to repeat it if you have the time and desire to draw today.
What is needed
In order to draw a nose, we may need:
- Paper. It is better to take medium-grained special paper: it will be much more pleasant for novice artists to draw on this one.
- Sharpened pencils. I advise you to take several degrees of hardness, each must be used for different purposes.
- Eraser.
- Shading wand. You can use plain paper rolled into a cone. Lego will rub off the shading, turning it into a monotone color.
- A little patience.
- Good mood.
Step by step lesson
Different parts of the body and organs of a person should be drawn with a certain degree of realism. It requires academic drawing... Also, he strongly recommends drawing a nose from life or, in extreme cases, from a photograph. This is the only way to achieve high realism and elaboration.
By the way, in addition to this lesson, I advise you to pay attention to the lesson "". It will help you improve your skill or just give you a little pleasure.
Please note that every object, every living creature, every phenomenon on paper can be depicted using simple geometric objects: circles, squares and trigolniks. It is they who create the form, it is them that the artist needs to see in the surrounding objects. There is no house, there are several large rectangles and a triangle. This makes it much easier to build complex objects.
Tip: Sketch in as thin strokes as possible. The thicker the strokes of the sketch, the more difficult it will be to erase them later.
The first step, more precisely zero, you always need to mark out a sheet of paper. This will give you an idea of where the drawing will be located. If you place the drawing on half of the sheet, you can use the other half for another drawing. Here is an example of centering a sheet:
As an example, we will use the so-called Nubian nose - long and wide at the base. The lucky owner of such a nose is the President of the AGR, Barack Obama.

Let's start with the proportions of the nose. They are shown in the first picture. The ratio between the height and breadth of the nose should be approximately 1.5: 1. Let's draw the approximate boundaries in which it will be located. You don't have to make the lines so bold so that it does not turn out as if in a frame. Just a couple of light strokes are enough to make it clear, or just imagine in your mind.

Let's draw a curve at the bottom in the middle - the base of the nose. And two small convolutions along the edges for the nostrils. Of course, each person has different noses (thicker, wider, narrower, longer), so you should not limit yourself in choosing these parameters. Even a smurf nose exists !!

Now draw out the contours of the nose, the so-called "wings" on the sides. Make them curved at the bottom, and fairly flat towards the top. Their size should fill a little less than a third of the entire length of the nose.


Lightly draw in the center of the main lines, as well as the lines where the nose merges into. It is difficult to sketch from a photo, because in reality there are no clear contours, so you need to learn the basic techniques for drawing a nose with a pencil.

To solve this problem, applying darkening in those places where clear lines are not visible will help. Start adding
To become a good artist, you need to train your hand all the time. Sketches of any objects or certain fragments of human figures should become a kind of exercise. For example, you have a question how to draw a person's nose beautifully? Feel free to take a pencil and try, the main thing is not to be afraid to make mistakes. After all, athletes also train almost every day in order to achieve success. Everywhere you need to make an effort, and often considerable.
If you are just mastering the basics of drawing and try yourself in portrait genre maybe this lesson will help you figure out how to draw a human nose. We will not delve into complex anatomical details, but try to schematically simplify this task for ourselves.
There are many different techniques and options. Each teacher and each art studio will teach you how to draw using their own best practices and tips. Today we will use a not very complicated scheme and try to draw a person's nose in full face. If this tutorial is easy for you, try sketching from different angles. Change the angle of rotation, achieve that in your drawings it was possible to "read" whose nose it is: male or female.
So, how to draw a nose with a pencil step by step?
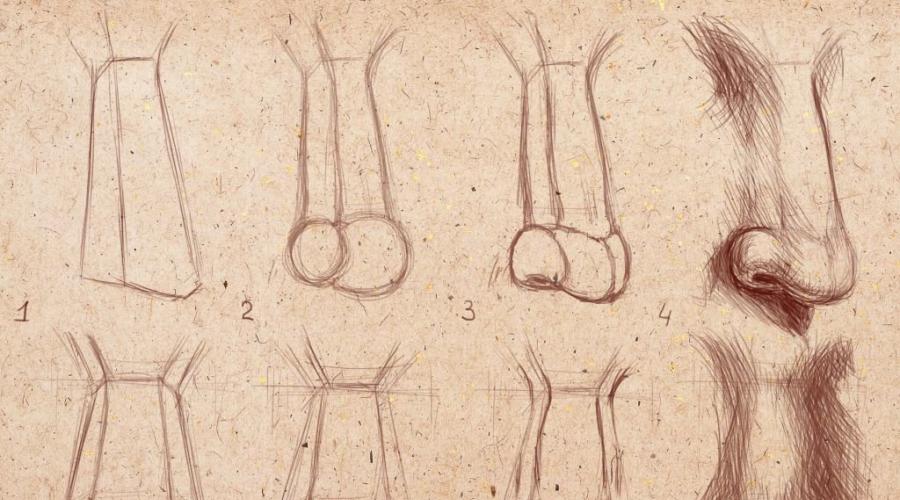
1. We will not remind you of pencils and paper here. Let's start drawing. The first step, as always, starts with a sketch. Draw a small circle - this will outline the tip of the future nose.
2. The next step will be the bridge of the nose. We draw two vertical lines up. Yes, not much like a nose. But bear with it, it will soon begin to take shape.

3. After the bridge of the nose, go to the wings of the nose. We outline future nostrils. You see, it's already better! Even in this form, the nose is easy to guess.

4. At this stage, you need to focus a little. Take a closer look at the drawing, you will see that you need to draw lines from the wings of the nose to the bridge of the nose. We outline horizontal line nostrils - this will be the place of the future highlight at the very tip of the nose. We lower the lines of the bridge of the nose to the line of the nostrils and bend slightly in the middle to the base of our original circle. It sounds a little confusing, but these lines will help you in the next step. Try to draw everything lightly, barely touching the sheet. Then you will need to erase the extra lines.

5. Now you can move on to creativity. We begin to indicate the shadows, without which your drawing will remain flat. Try to work out an academic 45 degree stroke and put the strokes tightly together. Here, the lines that we outlined in the previous step will serve as a kind of boundaries.

6. Now you need to erase all the lines that interfere with you, correct the shadows, soften them with your finger or a piece of soft cloth, rubbing lightly along the main lines. Do not get carried away too much, if you are not sure that you will rub the pencil correctly, skip this step. However, you can fix everything with an elastic band.

7. Make the shadows a little more contrasting, move the nostrils. Correct the bridge of the nose. This is the last step in how to draw the nose.

Your nose is ready! Now you can show others how to draw a nose.
In conclusion, I would like to remind you that even when drawing individual parts of a face or a portrait as a whole, try to maintain proportions, pay attention to the angle of rotation of the head and, accordingly, nose, do not forget about chiaroscuro. Practice, paint yourself, looking in the mirror. Success in your training!
When creating a portrait, it is important to accurately portray all facial features. The nose takes a central position on the face, so it immediately attracts all the attention to itself. With all the variety of shapes and sizes, there are several rules that will help you portray it correctly.
Before you start drawing, you should carefully read the anatomy of the nose and its components. The narrowest place at the nose is in the region of the nasal bone, that is, in the bridge of the nose. The nasal bone of an adult is distinguished by the presence of a bulge, sometimes quite noticeable (hump). Children do not have such a bulge. The widest part is at the location of the wings. If you look closely at the shape, you will notice that any nose is a bit like a pear. Pay attention to the differences in the structure of the nose in men and women, in adults and children. Often male noses are more massive, and women are softer. The facial features of women, and hence their noses, are smoother, often with pronounced roundness due to the presence of a greater amount of subcutaneous fat compared to men. The shape of the wings of a child's nose is practically the same as that of an adult. But the child is only in the process of forming the nasal bone, so the noses of children are not only smaller, but also noticeably shorter and slightly bent upward, that is, snub.


The portrait is one of the most difficult tasks in drawing. But the nose is the simplest part of the face, since it is the only static and practically immobile organ. Therefore, it is better to start training with him.
A special part of drawing is the nose, which is often overlooked by portrait painters. This shouldn't be happening, though! If your nose does not work at all, then the whole portrait will suffer. Therefore, we will learn to portray the nose!
Three images of the nose


The image in front of you is a simple nose sketch.
The nose is completely simple forms: both lines running along the entire length of the nose, a rounded ball that indicates the type of nostrils and nose.

This drawing indicates the initial sketch of the nose, with shadows applied to it.

Here is a completely finished illustration of the nose.
In this figure, the sketch is no longer visible. Here you can see that the features of the nose are filled not with sharp lines, but with a shadow.

The illustration above indicates the structure of the nose using red lines. To adjust the shape of the nose, we raise and lower our red lines.
Below in blue shows how you can draw a shadow that will be located directly below the end of the nose.
From time to time the shadow will be heavier, and sometimes a little lighter and softer, but in most cases it will be exactly as shown in the lighting.

Of course, it is clear that there cannot be much shadow on the side of the nose or on the side of the bridge of the nose, which is more illuminated.
In order not to make the mistake that beginners most often make, you should not select the entire contour of the nose on both sides. This is not beneficial because the outline makes the portrait look completely unrealistic. So it is better to draw the contour of the nose with the help of shadows.

When you draw or shade around the nose, try to press on the pen or hand weaker, because they require light pressure. These three areas are shown in the figure.
In the event that you are drawing a theme that does not contain many sharp shadow transitions on the face, then you should not draw these features too much. In the usual case, you can just shade slightly. For example, as shown above.
1) The area marked in blue has an almost imperceptible shadow and shows the nose from the side.
Here the area near the edge of the eye and the area where there is not an imperceptible sign of a "ball" at the nose is shaded.
Usually, where the highlighted side of the nose is, few portraits allow for a little more shading, but not much anyway. When shading, special attention should be paid to the bridge of the nose. In order to guarantee the proper illusion of the size and depth of the nose, it is usually necessary to shade and highlight the details of the nose in the area dark side as shown on the left side of this figure.
2) Further area, working with which you need to press lightly when drawing - the "smile line", highlighted in the image in green... This line is usually called the nasolabial fold.
In this image, you can see a slight smile effect. Imperceptibly from top to bottom, at first, the strokes weaken, and then completely disappear. There are types of faces in which the "smile line" is much darker and longer.
3) On the surface of the skin, on the upper lip, from the area of the line located in the middle, a labial groove extends, which joins the protrusion of the upper lip. In the figure, the groove is defined in red and is also applied with light strokes.

Also, you cannot ignore the white areas near the nose, which are shown in the picture above.
As aptly noted in the backlit image, the areas near where the nostrils begin are often not delineated. The drawing will look much rougher if you select the entire base of the nose (under the nostrils).
Let's pay attention to the area on the side of the nose, located between the beginning of the "smile line" and the nostrils. You do not have to place the smile lines directly next to the nostril. Some people have a gap between the nostrils and the "smile line".
Pay attention to this nuance when you start drawing the area near the nose. In this figure, the space is slightly multiplied. By paying attention to the various typical characteristics of faces, you will notice this space.

This figure shows the nose in projection? At an angle.
If our portrait is depicted in projection instead of the front view ?, then the nose is also in the same projection, which means that it will look at a slight angle.
In the picture, you can see the purple line, which takes place in the very center of the face.
On the left of the purple line is the section of the nose, sketched with red lines.
On the other side of this line, there is a blue shading that indicates areas of the nostril. In this case, the nose is drawn rotated, and absolutely does not look symmetrical on either side.
Green color indicates that the edge of the nostril lives on approximately the same line on which the corner of the inside of the eye is located. Likewise, when viewed from the front, they will be on the same line.
With an orange line, I marked how to draw the edge of the nostril in relation to the center of the mouth.
Although the different people different shapes of the nose or mouth, they are mostly depicted in this way. The girl depicted in the picture does not have a very large or very wide nose, nevertheless, we will apply the "method of lines" to her.
Those who are just starting to master the technique of drawing depict noses too narrow. To achieve a good nose width, pay special attention to this.

Take a look at the purple nose. It indicates how far from the face it is. Don't be afraid to paint it. Feel free to experiment with your nose, but don't change the length too much.
Keep in mind that if the noses that you will draw are the same length, they will look absolutely not believable. Since people different faces, then their noses should be different. Make them look as close to the original as possible.
The proportions of your nose must be respected.
As you can see from the two red and two purple lines above, the length is not that much greater than the width.
Not all persons have the same size. However, some of the artists paint the nose either too long or too short. Mostly, your portrait should be realistic.
We draw a nose with a pencil, in stages:
1) First, draw a sketch of the nose. Lines on the sides of the nose should not be darkened. One side is usually more shaded than the other.
2) Now you need to shade the base of the nose and its side that lives in the shade. Mark the nostrils in the picture. Next, you need to shade the nostril that is in the shadow.
3) We finish shading the nose. Select with soft shading areas of roundness of the nostrils and the area of the "ball" of the nose.