Airbrushing by car. Airbrushing on a car Airbrushing on a car fire
Always attracts the attention of passers-by. You can also make your car individual if you master the technique of airbrushing. This is not as difficult as it might seem at first glance. The main thing is to have a good tool, paint and a desire to make your car unique.
Airbrushing on cars
Airbrushing principle
Airbrushing is the process of applying a pattern to the surface of a car. Recently, this method of registration has been used not only in transport. In this way, you can decorate everything that is suitable for painting.
Drawing is carried out using a special device -. Outwardly, he looks like. The paint is supplied using compressed air and a special needle.
The drawing made with the airbrush looks as realistic as possible. Please note that it is better to apply the image through the initial stage. But with the help of an airbrush, you can also draw by hand. Here it all depends on the level of skill.
Pattern type
You can paint almost anything on the hood of your car. It all depends on your preferences and imagination. But, before you start applying the image to the hood, side or trunk, you should properly prepare the surface and simulate the design.
It is optimal to use special programs for modeling. Thus, you can choose the most correct arrangement of the picture, choose matching colors and see the final result.
Before painting, the surface of the car must be processed. The surface is thoroughly degreased, polished, and only then can the process of drawing the pattern begin. Below we will consider the technique of applying the most popular images:
- natural themes: fire, water, animals;
- camouflage;
- portraits of celebrities, statesmen;
- portraits of women;
- fictional characters.
 Drawing on the car
 Drawing portraits
Oddly enough, but in this category, Putin's airbrushing is in the first place. His portrait quite often adorns the hoods, doors, trunks of various cars:
 Portrait of Putin on the hood
 Sometimes you can even find very unexpected ones:
 Airbrushing on the trunk
 In general, it all depends on your imagination.
Applying a portrait is much more difficult than a regular drawing for those who do not have the talent. It is also problematic to do this through a stencil, since small details still have to be drawn by hand.
Initially, you should select the image itself for transferring the portrait to the car. After the surface of the machine is ready, you can begin the process of drawing the pattern. Take into account that you need to start with light details, gradually moving to darker ones, and so on until the end. The airbrush should be held perpendicular to the work surface. The further the needle is from the surface, the wider the line will be. Movement during the drawing of the portrait should be smooth. Otherwise, the formation of smudges and bubbles may occur.
If you can't do it all by hand, you can use digital airbrushing. The principle of operation is the same. The only difference is that drawing a portrait on a car is done using an airbrush robot. His movements are controlled by the person himself through a program on a PC.
 Variety of drawings on cars
 Natural theme
The image of a wolf on a car is perhaps one of the most popular. Such drawings belong to the second category, when there is only one artistic object, but several colors are used.
Before starting to apply an image of such a plan, carefully work out the color palette. The wolf can be both colored and of the same type. In any case, the application of shades and shadows is implied.
It is better to use preliminary computer simulation here. For drawing such a plan, it is better to use the "hands free" technique. This will make the image of the wolf as realistic as possible. As in the previous cases, the surface of the machine must be carefully prepared. After applying the pattern, it must be allowed to dry well, then varnished and polished.
 Drawing of a wolf on the hood
 Portraits of women
As in the case of wolves, the image of the beautiful half of humanity is quite often found on vehicles. Consider the technology of applying an image of a woman to a surface.
Initially, you should select the image itself, determine its position on the surface of the machine. The finished drawing is transferred to the stencil, after which it is attached to the prepared surface. All other parts of the car that are not involved in the work must be sealed with film or waterproof paper.
Initially, the contour of the drawing is blown. This should be done with a thin line so that the outline is barely noticeable. After that, small details are worked out. The final stage is drying, varnishing and polishing the surface.
 Drawing of a woman car body
 Fictional characters
Often, motorists decorate their cars with their favorite cartoon characters or movie characters. The Joker is in the lead here. This type of drawing belongs to the second or even the third category - it will also require preliminary modeling.
If the drawing involves several art objects and a background, you should start with large and light details, gradually moving to darker ones. The Joker will look best on the hood of the car, but it's up to you.
You can apply the image either by hand or using a stencil. If neither one is suitable, you can use digital airbrushing.
 Joker drawing on the car
 Natural disasters
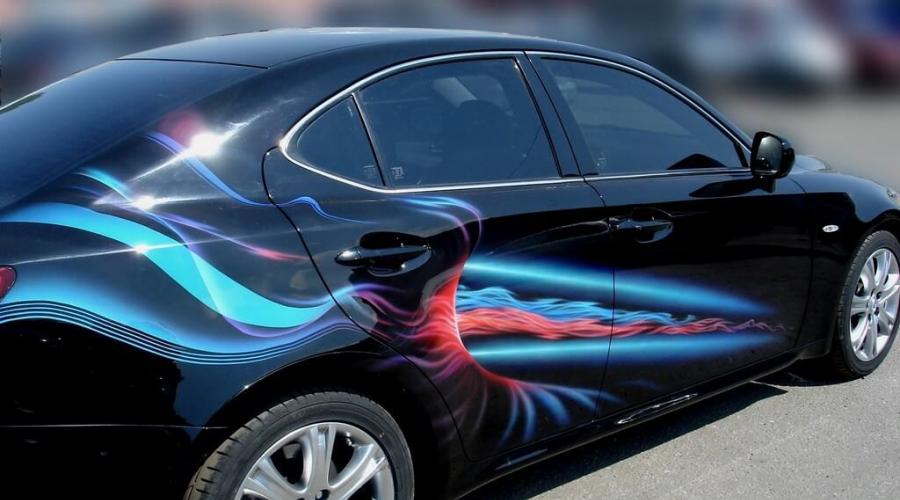
Most often, car owners decorate their iron horse with clouds and an image of fire. The flame can be located around the entire perimeter of the car, but clouds are best placed on the sides or on the hood. Although it all depends on your imagination.
Clouds can be applied with a stencil or by hand. In this case, there is no particular difficulty, since small parts are present in a minimum amount.
 Drawing of nature on a car
 As for fire, this type of painting can be attributed to the second category, like camouflage. This is due to the fact that there is only one artistic object, and several colors are used. You can cover the whole car with a similar image.
Images such as camouflage or flames should only be applied by hand. Using a stencil, you can only draw an assumed outline of the flame on the machine (for proportionality).
Warning: Use of undefined constant videoembedder_options - assumed "videoembedder_options" (this will throw an Error in a future version of PHP) in / home / d / dana21j3 / site / public_html / wp-content / plugins / video-embedder / video-embedder .php on line 608
In our country, the art of airbrushing has recently gained popularity. The niche is practically empty. Airbrushing studios and professional craftsmen are found mainly only in megacities. On the periphery, anyone who is not alien to creativity, a person can open their own business or simply make airbrushing their hobby. You just need to know where to start airbrushing for beginners?
Where does airbrushing for beginners begin?
First of all, you should get the tools that every airbrush needs. The most important tool is the airbrush. You can buy it at an art salon. The principle of operation of an airbrush of any model is similar. The only difference is in the set of components and the price, which largely depends on the manufacturer. I must say that an airbrush made in Taiwan works, as a rule, no worse than a branded version.

A tool you shouldn't skimp on is the compressor. The main characteristic when selecting a compressor is to obtain a pressure in the range from 200 to 500 grams per square meter. see Also, several containers for paints will come in handy.
By the way, you can paint both with ready-made paints, specially produced for airbrushing, and with ordinary nitro paints, after selecting the required concentration. It is not recommended to use acrylic paints for airbrushing. They contain a hardener that is incredibly difficult to remove with a solvent. You will just quickly screw up your instrument. Airbrushing for beginners who are not used to dealing with spray guns will be easier if you apply your first drawings using ordinary stencils.

Here's a step-by-step description of how to make a flame image using templates. Cut stencils depicting a flame from thick cardboard. Paint over the galvanized iron sheet with black paint. Fill the airbrush with yellow paint and apply the first layer, without pressing the template to the sheet, but holding it at a distance of about 5-10 mm from the sheet. Use different parts of the template and your imagination.
Wait for the first coat to dry and remove excess paint that has not adhered to, the so-called "overburden". It is very convenient to do this with special sticky napkins. Or use a wide brush.
Rinse the airbrush and fill it with red paint. Draw the central part of the flame. Do not forget to remove the "overflow". If a hair or debris gets on the paint layer, do not remove it from a damp surface. Wait until the layer is dry, and only then remove with a sharp needle. Otherwise, you cannot avoid streaks in the picture.

Flame finished image
Rinse the airbrush thoroughly again and replace the paint with white. Draw the bases of the flames with it. After the drawing is completely dry, apply varnish to the surface. It will not only create protection, but also make the image brighter, more contrasting.
Of course, such a simple picture is just the basics of airbrushing. To depict the flame more realistically, you need to add purple shades and dark reds, work with transparent paints. To master the skill, you will have to fill your hand for a long time, gain experience, and also, comprehend the small secrets of professional craftsmen.
The quality of the drawing is strongly dependent on three components: the direction of the paint stream, the distance from the nozzle to the working surface, and the time the paint is sprayed over a certain area of the working surface. Each of these components should be considered in more detail.
Remember, air is always ahead of the paint flow. It is necessary to direct the jet strictly perpendicular to the surface on which you are working. The area that the paint will cover depends on the distance. The closer to the surface you hold the airbrush, the thinner the line will be.
When creating halftones, spray paint at a distance of 30 to 50 times wet for a short time. If a completely colored, bright area is required, shorten the distance and lengthen the spray time.
Beginners shouldn't drown - get some experience!

Beginners shouldn't drown - get some experience!
Having mastered the basics of airbrushing, beginners can't wait to start creating masterpiece paintings. However, you will have to first learn how to create simple lines and paths. Spend more time with the airbrush, gain experience. Airbrushing for beginners recommends making the first steps in the profession, using paper sheets for "training".
Or make a special tablet for yourself from a metal sheet with a thickness of 3 to 5 mm. Cover it with a background and apply the varnish yourself or have it done in any workshop. This "tablet" is very convenient for learning. You can safely spoil it with failed creations, erase the drawing and do it again.
And try to relax. Stiffness in movement will not be beneficial to learning. The basics of airbrushing are clear vertical and horizontal lines, applied almost perfectly, of any thickness. In addition, you should learn to draw lines in different directions, both from left to right and from top to bottom, and vice versa, as well as diagonally or crosswise. After that, you can move on to teaching the "dagger strike" of the line, starting wide and tapering to the end and vice versa.
Prepare the surface first! The paint adheres much better to the surface prepared in advance. It should be cleaned, degreased, primed. Each surface has its own primer. You need to stock up on solvent. They are "light" and "heavy".
The lungs, which contain ether, evaporate almost instantly. "Heavy" ones, containing oil components, benzene, xyluene and toluene, dry out for a rather long time.
Any art requires constant practice, airbrushing for beginners is no exception. Practical experience can only be gained by long-term studies, achieving memory in movements at a reflex level.
Airbrush Basics: Airbrush Care!

The airbrush is the heart of your passion and should never be postponed until later. First of all, carefully study the instructions and learn how to properly disassemble and, accordingly, assemble. Rinse in a clean place, on a table not littered with rags and paint residues.
During flushing, do not spare the solvent. Wipe all parts only with soft swabs. If you are switching from white to black paint, you just need to "dust" the solvent a little. When changing from black to white paint, be sure to rinse the airbrush. Never use metal objects for cleaning. Soak a tiny, dried drop of paint in solvent and wipe off patiently with a soft swab.
Where is it easier to master the basics of airbrushing?
If you live in Moscow or St. Petersburg, you can contact one of the studios, where you will be taught with pleasure, for a certain financial reward, all imaginable and inconceivable ways of airbrushing. A resident of the province will inevitably have to go through the basics of airbrushing on their own. And maybe it's for the best. It is much more interesting and much cheaper to comprehend everything on your own experience.
This tutorial was created in Photoshop with an exceptionally soft airbrush in Pen pressure mode, adjusting the brush size as needed. Don't be afraid to use a lot of layers, they will save you headaches if you make any mistake.
STEP 1 - Color Picker
For this tutorial I have chosen a standard set of colors, but these can be absolutely any colors. But make sure the colors - both dark and light - are high-contrast (but avoid white).
STEP 2 - Shaping
With the lightest color and a very thin airbrush, draw some wavy lines. Everything should be very simple, only 3-4 lines.

STEP 3 - Start drawing fire
Take a medium shade and use a soft airbrush to paint the fire, repeating the outlines just outlined.

STEP 4-5 - Light and Shadow
Select / add light spots with light colors, again using a soft brush. Apply light tones very slowly, gradually creating smooth transitions.

Also, start highlighting the dark areas of the flame by matching colors from both dark backgrounds and dark colors in your palette.

STEP 6 - Adding / processing parts
Now you can add some additional flames and work out the details. For such small things, use a thin brush. Remember, some flames need to be sharp and some soft / rounded - to understand what I'm talking about, take a closer look at the images of a real flame.


You can also take advantage of Photoshop's Liquify filter if you want to slightly reshape the fire that is too round (like mine> _>). The flame has a more unpredictable shape.
Now all that remains is to refine the small details until the result is satisfactory. For this tutorial, I stopped at this stage, but the fire can have a huge number of other details and layers of flame. How much you want to detail the image of the flame is up to you.
Final touches
At the very end, I created a new layer in the Overlay mode (Overlay) and slightly emphasized the orange / yellow shades in the picture using a large soft brush.