We draw pictures ourselves. How to draw pictures
Are your walls empty? Do you want to change the interior, add a color accent, make your home more comfortable?
Have you ever thought that you can completely create a picture on canvas, whether it be a landscape or a still life, yourself, with your own hands? How to draw a landscape, quite simple?
It is not so difficult to draw pictures for the interior with your own hands, it would be time, desire. To understand how to draw it is good to first take a closer look at how other professionals do it.
So, let's draw pictures! It is not necessary to depict complex realistic portraits or landscapes, you can get by with a very simple or even abstract drawing for a start. Not enough imagination to come up with - find a drawing for your landscape.
For work, you will need a canvas with a stretcher, paints (acrylic or oil), brushes, spatulas, rags, a can of water for acrylic. The store also sells small canvases stretched over cardboard, they are flatter, it is sometimes more convenient to pick up a ready-made frame for them. The canvas with a stretcher is thick, you will probably have to make a custom frame for it. Although now it is fashionable to hang pictures without a frame at all. In some interiors, they look great too.
How to paint a landscape
First, the canvas needs to be primed, I cover it with a layer of white acrylic paint, wait until it dries completely. Then you can do as Bob Ross advises in his programs - Start painting a picture from the general background of the landscape.
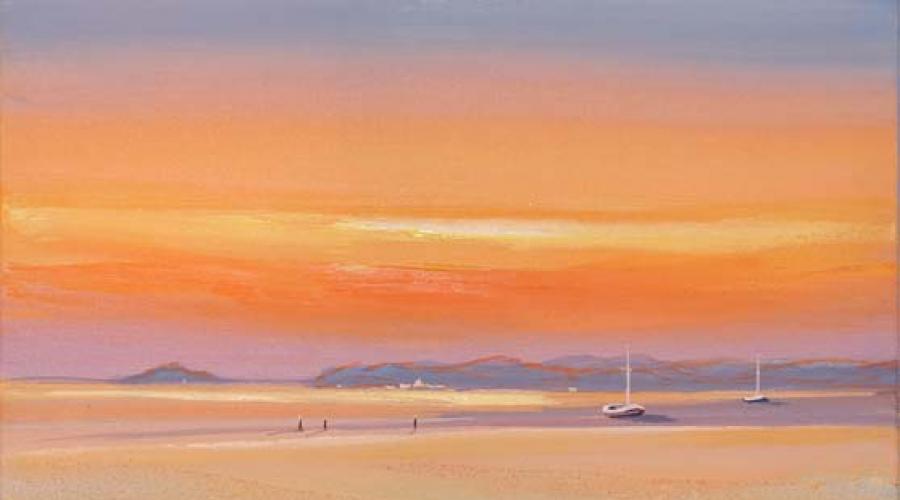
This simple landscape has a minimal amount of detail, beautiful color transitions. From this you can start - paint over the background of the future landscape with a gradient with a transition from blue (sky) to orange (foreground sand) with horizontal brush strokes.

Take a closer look at the details - the figures of people, boats, see how the mountains are drawn, with only strokes. Do you visit exhibitions, museums of fine arts? Looking into shop windows? My unprofessional advice, which helped me a lot to draw some pictures with my own hands - take a picture of the canvas you like, first in its entirety (then you will make the outlines in Photoshop and transfer it to the canvas), and then all the details separately in macro mode (so that all the little things are clearly visible) , at home consider. And draw! Try it!
Let it be seen that your landscape was painted by a novice artist, even if it has little in common with the original landscape. I assure you - it's interesting! Preparation, the process itself, as well as the result on the wall.

There is another interesting technique at the very bottom - the sand on the beach is drawn with the addition of real sand!
That we should build a house - we will draw we will live!
Everyone who has a desire and a creative streak can create a decoration for their interior to their liking - draw, for example, a simple landscape with the sea, boats on the horizon, mountains in the distance with their own hands, you just need to want, try, the main thing is to start, everything is not as difficult as it seems.
There is a great variety of technicians - with a brush, large strokes with a spatula, a sponge, even just with your fingers! You need to try to draw as it is more convenient. It's so great to create!
It is worth noting that acrylic dries instantly, and it is difficult to make such color transitions as oil. The oil can dry for a long time, a couple of months, the room must be clean, without dust, otherwise it will settle on the surface of your painting, stick tightly - ruin the whole work.
I photographed this landscape in such detail because I thought I would draw something similar too. It didn’t come to that, I already have all the walls occupied by my "works", there are landscapes and still lifes, they are not all masterpieces, but I like them, because I put my soul into them, then I somehow boast.
You may be interested in:

There is everything here, starting with a separate photograph of the contours of the landscape, which, before drawing, must be transferred to a prepared primed canvas, and ending with a description of the work from start to finish. In many ways, the result depends on the imagination of the artist himself, his creative vision, you can change the landscape, add details.
Do you know what lavender smells like? This scent cannot be confused with anything. The landscape of the south of France with its lavender fields in bloom is something special. You can try to convey silence, bloom, sultry day and the smell of Provence flowers with paints and a brush. It's not as difficult as it sounds. You will find a detailed description with an outline diagram inside the article.
How do you like this landscape? In my opinion, it is amazingly beautiful. A bit abstract picture, but understand how you want it. Drawn or balloons, or an autumn landscape with trees. Do you know where such a wonderful shine comes from? It's very simple - a thread made of natural silk glitters. Yes, the work is very painstaking. The entire surface is laid out with a thin thread! We draw three-dimensional pictures with flowers from paper and paint with paints
Pictures can not only be drawn. It will be a mixed technique - both paints and other materials will be used. An interesting idea is to create "volumetric" due to crumpled paper, even newsprint. The question arises - how to make it hold, does not change shape, is not exposed to moisture, in short, does not deteriorate over time. Interesting - come in!
Painting is a great way to become a creative person. If you want to develop your inner Rembrandt or Pollock, you can learn how to start developing skills and acquire all the necessary materials for this, which will allow you to paint the pictures you want. Learn how to choose paints and brushes, choose the appropriate theme for what you want to paint on the canvas. See Step 1 for more information.
Steps
Part 1
Selection of paints and brushes- Most watercolors are thick and heavy and to use them, you must first wet the brush in water and thin out the paint with water or mix paint with water on a palette. It is a thin and light paint, so it is very suitable for beginners, although it can be somewhat difficult to control.
- Start with good quality paint to avoid frustration at the beginning. Sennelier watercolors are available in both trays and tubes. These are much higher quality paints than your school watercolors. Try trays to avoid having to buy a lot of paints individually. Also, it is convenient from the point of view of keeping all the paints in one place. Schminke, Windsor & Newton are also considered quality brands that are widely available in professional stores.
-
Acrylic paint is quick-drying yet as versatile as oil paint. It is most common for both amateurs and professional artists. Water-based acrylic paints are easy to use and widely available in professional and specialist art stores, ideal for intricate details and abstract masterpieces. They are less expensive than oil paints, but no less professional.
- Acrylic paint is most commonly found in tubes, just like oil paint, and can be mixed with plain water on a palette to dilute and create new colors. Therefore, this paint dries very quickly and is ideal for base tones to emphasize depth and detail in landscapes, portraits and other types of paintings.
-
Oil paint. It is the most versatile, professional and brightest paint available. It is also the most expensive and takes the longest to dry, but offers all kinds of advanced mixing techniques and provides ample opportunity for professional artists. It may not be the best paint for beginners, but it's worth considering in the future or experimenting if you're looking to challenge it.
- Oil paint is often sold in water-soluble blocks that can be used in the same way as watercolor and can dry slightly faster than traditional tube oil paints. To get a variety of primary colors, you need to learn how to mix paints to reduce your paint costs.
- If you do not want the paint directly from the tube to be squeezed out in large drops onto the canvas, as in De Kooning's paintings (amazing to look at, but super expensive), then in addition to paint, you will need a solvent.
- If you are painting with oil paints, you must first cover the surface with an acrylic primer, otherwise the paint will damage the canvas or paper. Any painting surface, palette or mixing board should also be primed to prolong its life.
-
Make your paint from natural ingredients. Who Says You Should Buy Paints? Use berries, tea emulsions, or even ash. These are great techniques, depending on the story you are creating.
- Food-based paints can change color over time (or rot, depending on how you look at it). This can give your painting a time-based element that changes over the days and weeks after you finish the painting. Fix your egg-based paint before it starts to stink and finish on time or rub over with acrylic paint to fix.
-
Choose the right brushes for the job. Depending on the type of paint, you will ultimately have to choose the brushes you need to work with it.
- Use the rounded tip of your watercolor brush. Flat tipped synthetic brushes are best for acrylics, while walnut tipped brushes are best for oil paints. You can experiment with different brush fibers, choosing what you can afford.
-
Prepare other materials you need to start painting. In order to keep your clothes clean and the paints collected in one place, you need a few more things besides great paints and brushes.
Part 2
Start-
Prepare the painting area. Put on your old clothes and have all your supplies ready to get started. Any painting project is likely to result in a little mess, so it's important to prepare for this and avoid paint stains on carpet or other surfaces that cannot be removed later. To get started, find an open area with lots of light.
- It is generally accepted to use an easel for painting, but this is not necessary. Find a hard surface, such as an old clipboard, to secure your watercolor paper, or set your canvas on a table covered with old paper or newspaper.
- Place newspapers or old paper on the floor and on any surface that might come in contact with paint. You don’t have to worry about dripping paint as long as you’re well-secured around you, so you can fully concentrate on creating the painting.
-
Sketch the painting with a pencil, although this is not a required step. You can always just start sketching, but a sketch can be useful for sketching out the basic shape of an object to be used as a guide. If you want to draw a pot of flowers, you don't have to sketch out tiny details, but having a sketch of the petals on paper before adding color can be a good idea.
- Use contour lines to sketch the basic shape and gesture lines to get a sense of space between objects in objects. The painting will consist of many small shapes, as if from many small paintings. Try to focus on the relationship between things.
- Locate the beginning of the line illuminating your subject and start looking at how the shadow falls, which you will need to highlight with color and line.
-
Mix colors. Spend some time mixing paints on your palette and trying to get the colors you want to paint with. Some artists will be really concerned about getting the image as accurate as possible, like in "real life", while others may want to change things a little. There is no definite correct way to do this.
- Mix a few colors to draw test lines to see what the color looks like against a white background. Don't mix a whole tube of white and blue paint to get cyan. Make as much paint as you need.
- Paint your bright colors with a little white to soften them, or add black to create different shades of color. Adding the opposite color of a color wheel to one paint will give you an endless range of possibilities.
- Using different contrasting colors in your painting will help create a more dynamic sense of color. Use a lot of tones and shades if you're serious about color.
-
Practice using brushes. Learn to use, clean and take care of your brushes before you start painting. Before you dive into your masterpiece, gain some experience by learning how to brush the right amount of paint and practicing smooth, straight lines. Don't worry about what you're painting, just paint something by mixing colors and thinning the paint.
- Use short and long strokes. Use as little paint on your brush as possible to get the result you want. Do not saturate the paper with ink. Use different brushes for different kinds of effects such as blotting, sketching, and dotting.
-
First, draw the background. As a rule, the background is painted first, working from back to face of the painting. This allows you to go from general details to specific ones, add layers to create small details, and not vice versa. If you start with petals, the picture may end up looking unbalanced. Experiment to see what works best for you.
- Everyone's favorite TV painter, Bob Ross was excellent when he started in the background and used his imagination to move on. He usually found complementary colors and with a dry brush did the background in the pleasant tones of the sunset, and then he began to paint trees and other nature scenes without planning. This is a great way to get started painting on canvas.
Part 3
Painting a picture-
Start drawing and let accidents happen. Just start painting gently using a small amount of paint on your brush to start shaping the shape. If you are only guided by your imagination, let the paint create the forms, and you follow them. If you've already started sketching, once you've drawn a nice background on paper or canvas, you can start overlaying shapes with colors to create a sense of space.
Add colors from light to dark. Identify a source of light and shadow to start adding meaning. Start adding the lightest colors and gradually creating darker tones. It's much easier when a darker color layer becomes lighter rather than the other way around. Don't put yourself in a hopeless position. Mix a small amount of paint, adding color judiciously and slowly.
-
Use a brush to create texture. Change the amount of paint on your brushes and the types of strokes you use to create different textures. Short, small strokes can look like fur, while smoother strokes will even out the paint. Using less paint can help "age" the subject, while another brushstroke can thicken and add density.
- If you've ruined a part of the painting by adding too much paint, don't panic. Embrace your happy accidents and integrate them into your painting. Don't waste too much extra time putting another layer on top, just let your blemish be there and look back at it at the end to see how it affected the overall composition. Keep moving forward.
-
Watercolor. The most readily available, cheap and easy-to-use watercolor paint comes either in tubes or small plastic trays with multiple color palettes. Depending on the quality of the paint, watercolor can be light or quite lively and vibrant. This is a beautiful and effective way to start, especially for landscapes and whimsical still lifes.
Coloring pictures by numbers is very interesting. This is the best way to be alone with your thoughts. What else is great about coloring by number pictures? The fact that you get quick results. You can decorate your home with the painted picture and proudly tell and show to guests. Every time you look at your masterpiece, you will experience joy and delight. You don't need to give up my kingdom for such a hobby, coloring pictures by numbers are affordable. Check out our selection of paintings that we have planned to paint.
1. Blooming sakura.
You can look at this picture endlessly. Decorate a bedroom or living room.
2. Lush bouquet.
Flowers and fruits look like real ones, it is best to decorate the dining area.
3. Lioness with a baby.
Animal lovers will gladly take on this work.
4. Marine theme.
Can be drawn and presented to a friend of an avid traveler.
5. Golden autumn.
While working on this picture, it seems to us that you can forget about all the problems. It works better than medicine.
6. Brooding fish.
This fish only looks simple and unsophisticated. He will work on it as much as necessary.
7. Yellow sunflowers.
Picking up this set, you can compete with Van Gogh himself. In any case, make it no worse.
8. Somewhere by the sea.
This picture will make it possible to mentally locate a thousand kilometers.
Each interior should have its own flavor, and often the simplest and most elegant option to bring uniqueness to a room is a painting.
But how do you find what will decorate your bedroom, living room or other room? Most likely, for an author's work, you will have to pay a large amount of money.

But if you do not count on additional expenses, but you still want to have something original, then it is quite possible to make an interesting picture with your own hands.

At the same time, it is not at all necessary to be able to draw well. After all, paintings in the usual sense have long been replaced by volumetric images on the walls, abstract ideas embodied in a wide variety of techniques.

DIY fabric paintings
All high quality canvases are made on a fabric basis. However, the modern interpretation of such paintings changes our view of art.
Modular fabric paintings have become very popular. But it's not so difficult to make them yourself. In stores now you can find a lot of fabrics with a very beautiful, interesting and bright print.

If you liked any of them, then you can safely buy it and make an author's decor item.

Modular picture
To create a room decoration such as a modular fabric painting, you will need a base in addition to the selected material. It can even be a door from an old cabinet or a piece of chipboard, which could well have been lying around somewhere in the garage after repairs.

Cut a few pieces from the base to fit your fabric and fit the wood over it. Make sure the fabric is tight and does not wrinkle. Your painting is almost complete. It remains only to attach the hooks for which it will be attached to the wall.
Most often, such paintings consist of three or more modules, which can be of the same size or differ. Their shape can also be different.

The most common and easy to manufacture are square and rectangular elements. But there are round, oval and other forms of modules for paintings. Frames for picture modules are not needed in this case.

Pictures from clothes
Even a T-shirt can become a decoration of your interior. It often happens that on clothes that you have not worn for so long, and their colors are still bright, spots or holes appear. It is possible not to throw away the seemingly spoiled thing, but to make an original picture out of it.

Cut out a rectangle with an image from your clothes, glue it to paper and place in a frame. The photo shows that such pictures with the image of cartoon characters will perfectly fit into the interior of the children's room.

Embroidery
In some way, embroidery can also be attributed to fabric paintings. This method of decorating an interior is not new. Our great-grandmothers also had at least one self-embroidered image in their house.

However, to embroider a picture, you still need some skill and patience. This method is not suitable for everyone, but if you are doing needlework, then the pictures embroidered with your own hand can say a lot about you as a hostess.
Volumetric paintings
Embossed images on the wall are also very popular as decorative elements in the interior. Volumetric paintings can be made with plaster on the wall even before it is finished.

But such decoration can take place only when it is not planned to stick wallpaper on the wall.
Note!


The method of making such paintings requires training and a considerable amount of time. Therefore, it will not suit everyone.

Paper paintings
There is an easier way to make a 3D image. To do this, you will need colored paper or cardboard. Cut out several figures of the same or different sizes from it. These can be, for example, butterflies.

Use pins or double-sided tape to attach them to the wall in a chaotic manner or forming some kind of pattern. Your paper painting will look more impressive if you choose a color that contrasts with the tone of the wall itself.
The butterflies themselves can also be of different colors. Such a picture will sparkle with new colors when artificial lighting is on, so it will look most advantageous in rooms where the light is turned on most often, for example, in the corridor.

If your house has a staircase to the second floor, then the kittens will look original in different poses, placed on the wall, to which the steps adjoin.

Pictures from bushings
Toilet paper rolls or paper towels will help you to make a voluminous decor with the image of flowers and leaves. It is enough to flatten the cylinder a little and cut it into equal parts about 2-3 cm wide.
Note!


In order for the flowers to be brighter, and the leaves to stand out in color even before the start of work, the sleeves can be painted in different colors. The individual parts of the sleeve should be placed so that a flower is formed, thus it is possible to compose whole compositions.

Artificial flower paintings
The easiest to make are paintings from artificial flowers or other decorative elements. The main thing here is to beautifully glue the finished parts onto the base.

For this technique, you will need a frame, a solid color material and the actual image itself. Cover the sheet of paper with a cloth, curling the edges over and gluing on the back.

Then, after taking the glass out of the frame, insert the base of your picture into it and glue artificial flowers or other details (shells, dry twigs, etc.) to it. Finally, you can decorate the frame with beads.

If you already have a ready-made canvas, then there are many master classes on how to decorate a painting that is already boring to you and thereby update the interior.
Note!


A flat image of nature or still life can look completely different if you attach several volumetric details to it.

It can be either a paper cut image, or natural materials in the form of dry leaves or even butterflies.

Do-it-yourself pictures of paintings


