How to make a portrait with a pencil. How to learn to draw with a pencil for beginners
The first thing to do is draw the oval of the HEAD, not the oval of the face and not the opened cranium, but the head COMPLETELY. More specifically, the head looks like an inverted egg.
Draw a vertical, straight line exactly in the middle (axis of symmetry). She will help us draw all parts of the face symmetrically.
It will be strange to look at a portrait in which one eye is larger than the other and is at different heights. Brrrr ... Therefore, we will align everything relative to the middle of the face.
We divide the length of the entire head into two equal parts. We draw a horizontal line. On this line we will draw the eyes, but a little later. First, we will find the location of all the other parts.
At the top of the head, we make a notch defining the hairline, i.e. here the forehead will begin. We do this approximately, "by eye". The rest will be the face.
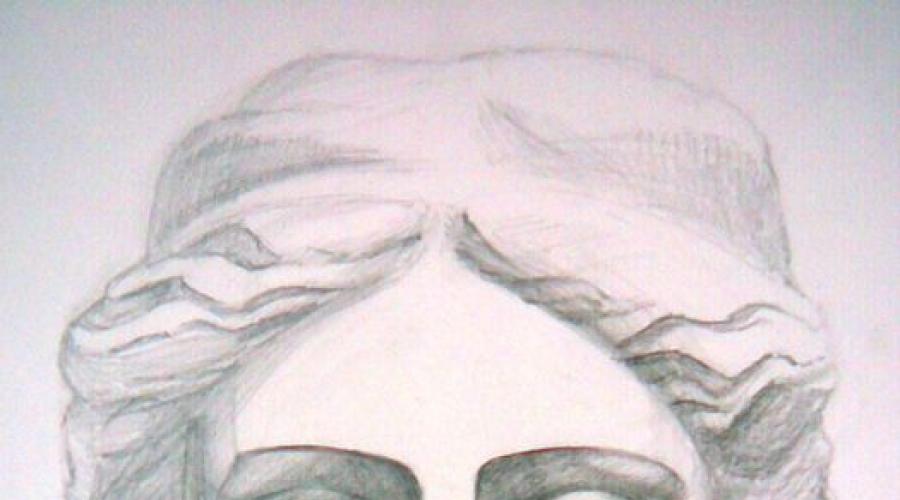
Divide the length of the face into three equal parts... The first line, as I said, is the beginning of the hair, the second is the eyebrows, the third is the edge of the nose.
On the line of the eyes, the one that is exactly in the middle of the HEAD, draw eyes... Note that the distance between the eyes is equal to the length of one eye.
Our pupils are not located exactly in the middle of the eye, but are slightly hidden under the upper eyelid.
We draw a nose. We have already decided on the length, it remains to decide on the width. Usually, the width of the wings of the nose is equal to the distance between the eyes. Do not forget to check the symmetry of the face i.e. measure the distance from the right and left sides to the line in the middle.
div> ", delay: 300)">
We study the structure and proportions of the face and head, pay attention to the muscles of the face. We also draw and learn all the features of the parts of the face and head - eyes, nose, lips, ears, etc.
Knowing the structure of the skull is essential in order to paint good portraits. We study the structure of the bones and muscles of the head. Create an expressive portrait using a variety of shading techniques.
Let's pay great attention to the study of chiaroscuro. Using a combination of light and shadow, we can create the impression of depth of space, volume and density.
Study of the proportions of the head.

We draw the head of Venus with a pencil. Full face.
What makes a good portrait? Lighting and contrasts are of paramount importance when drawing a portrait. You will learn to see an object as a form. What the different parts of the face look like, what are their sizes, what forms are there inside the large form, how they interact. Everything that you will draw from now on should be pieces of a puzzle that, when connected, create a complete picture. You just need to decide for yourself what shape they are and how dark or light. In this lesson, you will see how this applies to drawing a human face.
Consider the basics of the structure of the details of the face and the principles of their image (eyes, eyelids, eyebrows, ears, nose, chin, neck).

How to paint a portrait with dry pastel(soft material) according to the pictures.
You will learn how to paint with pastels. We work on tinted paper.
Let's talk about the different styles of portraits.
You will also learn how to draw people of different ages and convey human emotions on paper.

Sketching a portrait with markers.
Sketching is a fast drawing technique. It allows you to make quick drawings, reflecting the composition and main ideas, to convey emotions and atmosphere.
You will learn how to draw with markers and create stylish designs.
For the lesson we will draw 1-2 works. A4 format.
Portrait is one of the most attractive and challenging genres for a sketch artist. After all, sketches are a rapid process, without hours of refinement and elaboration. This means that you need to capture and convey the character literally in a couple of lines. But it is precisely this airiness that captivates the viewer. Many sketchers, feeling confident in their abilities, sooner or later turn to the portrait genre, and some completely go into it.

Sketching a portrait in watercolor.
We use watercolors, watercolor pencils and a liner.
Sketching is a wonderful skill that helps to transfer your idea from head to paper as quickly, efficiently, beautifully and coolly as possible. In other words, sketching is a unique tool for realizing your ideas.
Let's draw 1-2 works in A4 format.
Oftentimes, sketching portraits are more vivid and realistic. The reason is that we work on sketching with our heart, not our head. We capture the very essence and character of the face, draw with minimal means, but more succinctly, without long deliberation and a passionate desire to get exactly in proportion.

9th and 10th lessons
You are drawing portrait based on your photos... Draw the one you want to draw (relative, acquaintance, self-portrait).
You choose the material yourself - pencil, pastel, watercolor, charcoal. and you can draw one work in 2 lessons, or 1 work in each lesson. A4 or A3 format (your choice)
In order to master the portrait, we need paper, a pencil and, in extreme cases - at a very extreme - an eraser. We use it only when we understand that we cannot help a drawing with a pencil. Then we isolate ourselves from society - we ask those around you not to interfere with you - and solemnly let's start learning to draw a portrait with a pencil.
To make it more convenient to correctly understand and execute the drawing, it is better to adhere to a kind of " instructions for use».
First you need to do a detailed inspection of our drawing subject - that is. You need to consider everything very carefully, and think over the shape ... Or better, make a couple of sketches to make it easier to see the constructive shape.
 It would be very good to draw the nature itself in different positions, with different turns and angles. You can also lightly move on the subject of drawing with a pencil to get a feel for how the form works.
Now, an equally important part in a portrait is your place of work... It must be selected taking into account a convenient and acceptable view of nature. For a start, it is better that nature itself is in a calm state - that is, no strong and unusual angles.
Composition composition
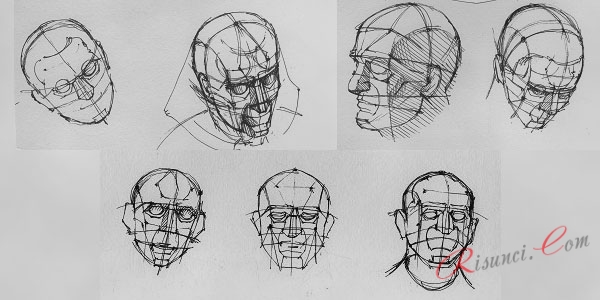
Now you need to compose the whole composition on paper. At this point, ours is working in an enhanced mode, because we will need to find places for individual parts of the composition - for head and torso.
We recheck the main volumes, detect rotations and the main, basic construction axes. Now we need to build the form: first everything together, then everything in turn, and then everything again together.
With each change or addition to the drawing, one must also remember about the perspective ratio, proportionality of the forms and the correspondence of these forms to each other. That is, you need to ensure that everything is harmonious.
Now we need to highlight the eternal opposition - in other words, we need to separate light and shadow. For this, a neat, unhurried one is used.
Modeling the shape of a portrait
The next step is to model the shape based on what we already have: overlying chiaroscuro and spatial vision... In the process of modeling various little things, it is important to remember that this little thing is part of everything, and, therefore, must harmoniously fit into this "everything".
As a result, you should get something like this
As with any student, you will find mistakes - do not hesitate, but do not be discouraged. Now let's start analyzing them, and, accordingly, correcting them.
So, one of the most common mistakes, or rather even effects, is that the work is very dark, redrawn. The second effect is airy forms, they seem to be wadded, not like real ones. Such a drawing is also called cast iron. It's all about the violation of proportions. Well, also, construction lines can be overstressed.
The reasons for such defects can be artist problems with chiaroscuro... Or rather, even with chiaroscuro on the volumes. After all, he is trying to convey the volume of the head correctly, but he in no way manages to separate the particular from the general, that is, to impose a shadow not only throughout the drawing, but also in separate parts so that it looks acceptable.
Perhaps it is also a mistake that the person who is trying to draw a portrait cannot in any way connect individual details into a general picture and the drawing looks ... as if torn. The draftsman tries to “wipe out” this oversight with the help of shading.
In other words, the draftsman should do the drawing of the details again.
If the above effects take place in your drawing, then let's start with methods to avoid this. In case, during the transfer of the form by shading, you feel that something is wrong, immediately put aside the work on the tonality and once again take a closer look at the volume of the head. You can lightly go over the shape with a pencil, mark with precision any detail, slopes, turns, indents, and more. Thereby, you will be able to feel the interconnection of all areas with each other.
 Moreover, we turn on our logical thinking - not again, but again - and consider these very details of the head, that is, where it begins and ends, why so and not otherwise. In addition, with the help of this analysis, you can also distribute light and shadow, as well as position in perspective. (which object is active - closer and which one is not).
We've dealt with this problem. Further, in a countdown: if you, having begun to deal with the constructive form and volume, suddenly and suddenly felt discomfort (a sudden urge to sneeze, go to the toilet, or drink water does not count), then choose one of the following options.
We try to mentally divide the subject of drawing (the head in our case) by the bends of the shape on the plane. This makes it easier to model the volume.
Detail drawing
We are trying to understand the essence of the form: how exactly it is arranged. Then we build the volume using any conditional planes or construction lines (if you mix everything - not scary).
Again, it should come out no less good than in the picture:
Still below is another drawing, which is slightly redrawn, but it is much more convenient to consider it as an example, work on the volume of the head, tone and details.
It is very difficult to put in the holes intended for them - they usually come out either flat or bulging, like a frog.
So, when drawing eyes, you need to remember about their design - that they have a voluminous eyeball, lower and upper eyelids, eyebrows, which tend to cast a shadow over the eyes.
It is also not easy to distribute chiaroscuro on the hair: for example, the upper part of the hair is lightened, while the temporal part is hidden by partial shade. Hair on the temporal line is worked out especially clearly, because it is there that the head passes into the back of the head - this is how we show the volume of the hair.
It is very important to successfully search for the proportions of volumes - both general and separately, details, the mutual proportionality of these details. The fact that proportionality is not found or is distorted, you will understand if in the drawn portrait you cannot recognize your nature
 I repeat again: therefore do not hesitate to work on them first. The most important thing is the basic proportions, volume, all sorts of planes and design points.
You can catch the volume of the head of the passerby you are interested in ( or a passerby 😉), your favorite actor or just a person from advertising ( no, but what? a good way to turn long minutes of a commercial break into an interesting and rewarding activity).
Portrait is a complex type of fine art. It is necessary not only to convey the picture, but also to emphasize the depth of the gaze, to express emotions, to depict them vivid and natural, to endow the character with individual features, facial expressions, inherent in every person "zest".
We have selected the best free step-by-step video tutorials and instructions for novice artists that will help you learn how to draw portraits with a pencil, paints or from a photograph from scratch, as well as master the initial skills of portrait painters, pay attention to shortcomings, and get your hand in mastering basic techniques at home.
The author of the video, based on long-term practice, shares the secrets and skills of depicting a person who is as similar to himself as possible. It teaches you to pay attention to the proportions, shapes of parts of the face and the gaps between them, to small deviations from the standard appearance of the average person. Recommends asking yourself questions (what is the geometry of the chin, its size) and mentally answer. You should not rely on one photo as a source, it is better that there are several of them and from different angles. The error is absolute symmetry. You should not quit your job if, after drawing half, there is no clear similarity. The material is presented in a simple accessible form, easy to perceive.
Working with a reference
As a basis, the author takes several pictures of the character from different angles in order to have the most complete picture of him. He starts by drawing a circle - all parts of the face are distributed on its basis. It is always recommended to go from general to details (from proportions, basic positions of parts of the face). It is important to look for the distinctive features of a person, to avoid excessive approximation of the work, when the proportions are not fully conveyed. It is undesirable to finish portraits in one go, you can even stretch them out for several days, look from afar, which will allow you to notice shortcomings. The presenter explains and demonstrates each step, making the video suitable for beginners.
Possible mistakes
Lesya Poplavskaya analyzes typical mistakes - divides the sheet into two halves and draws an oval: on one half - correct features, on the other - incorrect ones. From the lesson, viewers will learn the rules for marking the face, the location of the lips, bridge of the nose, eyebrows of the back and the tip of the nose. Les draws attention to the need to work out small details - it is imperative to build the bridge of the nose, which is often absent, a fossa above the upper lip, the back of the nose should be equal to the length of the chin and half of the forehead, it is not recommended to draw eyebrows to the very edge of the face. The lesson lasts half an hour, during which time beginners are given all the basic information in an accessible form.
Young woman
Maria Ponomareva talks in detail about the pencil technique and nuances in the process, which is based on classical principles. Maria disassembles each detail in detail on a separate sheet of paper, then connects everything on the sheet with a circle, modifies the hair, neck, ears. According to Maria, drawing a portrait is not difficult if you practice and recreate each element separately, connecting the picture at the end. Below the video are links to master classes on the image of individual elements - hairstyles, eyes, nose.
Princess
The author of the RybaKit video channel teaches girls the principles of creating a princess with felt-tip pens and crayons. First, he draws a chin, long hair with bangs, a neck, shoulders and a dress - to the end of the sheet. Then - symmetrical eyes, eyelashes, mouth and eyebrows. The contours are drawn with a black felt-tip pen, after which the details are painted with crayons in accordance with the required color. The result is obtained not at the level of a professional artist, but accessible for a child to draw.
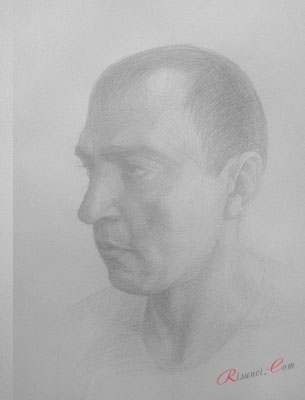
Profile
Alexander Peleshko, using the example of a man's head, shows step by step how to draw a hero in profile. The head fits into a square. To be convincing, you will have to take measurements vertically and horizontally. The square is vertically divided into zones: three are identical, the fourth is slightly smaller. It is not necessary to do this, but such lines are auxiliary for building the head. The same can be done horizontally. It turns out a kind of markup. Last but not least, Alexander adds hair. At the bottom, you can draw the neck, collar of clothes and shoulders.
Watercolor
Elena Goryunova, the owner of a studio in St. Petersburg, gives step-by-step recommendations on the watercolor technique. The character is formed from the general image - the contour, the shape of the hairstyle is applied. In the sketch (for contrast), Elena suggests using two line thicknesses, gives a list of required materials, which makes it easier for beginners. It is advisable to take a limited palette, which contributes to the harmonious construction of the picture. Before you start applying watercolors, you should practice with a pencil. The video is accompanied by light pleasant music.
By photo
Tatyana Izotova gives general information about the structure of the head, the breakdown of the base oval into parts vertically and horizontally. The future artist must learn to be well versed in all lines, proportions, as they will help to capture the asymmetry existing in life, the individual characteristics of the model. The next step is a drawing from a photograph with a practical explanation from the presenter. From time to time, in the course of creativity, you have to double-check all the distances. The main thing is not to be afraid of mistakes in order to ultimately achieve positive results.
Mother and father
A lesson for children, from which they will learn about the main techniques and features on the example of drawing dad and mom. All you need is paper and a pencil. Olga, the host of the video, will explain and show universal techniques for female (mom) and male (dad) images, focus on the differences, show how to repeat this or that trait, focusing on the gender of the character - a man has a chin, a wider nose, straight eyebrows and wide, eyelashes are not so long. A dad can have a beard and mustache. The video is designed for children, but the lesson can also be used by adults who are mastering the first steps in this direction.
Butter
Yuri offers a master class in oil portrait painting. Explains colors, palette and materials. Tip: the less experience, the fewer colors you need to use. The main paints are titanium white, burnt umber, ultramarine blue, cadmium yellow, cadmium red. Additionally, you will need a palette knife (thin spatula) for mixing paints, a rag for wiping the palette knife and brushes, nylon hard brushes, and special paper for the oil composition. Yuri forms a sketch and only then takes paints. In parallel, he tells what to focus on, how to achieve naturalness and resemblance to the original.
Pencil portrait
This type of activity trains perseverance, observation, eyes, visual perception, fine motor skills, memory, objective and imaginative thinking, hard work, intuition. It is not necessary to become a great artist - the main value is the procedure itself, which allows you to release your creative inclinations and find yourself. In addition to the classical approach, there are many options - pen, crayons, felt-tip pens, charcoal, ink, nib. But masters recommend starting with mastering a pencil before moving on to something more complex.
Have you ever had this: you depict eyes, lips, nose, correct, try again, erase again - and so endlessly, but the result is not satisfied? This is how many people try to draw a portrait with a pencil. And it would seem that you have studied the structure of all parts of the face, proportions, anatomical features, but the creation looks ugly. What is the reason for such failures?
The point is that it is best to move from the general to the particular, from the simple to the complex. Imagine a man emerging from the fog. Vague outlines appear ... The haze dissipates - and more and more details show through. So it is on paper. Let's study together: create a pencil portrait in stages.

Pencil portrait of a man: sketching
The beginning is very simple. We outline the oval of the face, and then the location of the eye sockets, nose, lips. To make it easier, we use specially drawn lines. One of them is vertical and runs in the middle of the oval. The other two are horizontal, closer to the center of the face. The top indicates the future location of the eyebrows, the bottom indicates the tip of the nose. As a result, we get a kind of cross. We will draw a full face pencil portrait for beginners. Professionals often draw people half-turned or in profile, but it is the symmetrical front view that allows you to learn how to mark distances at the beginning of your creative path.


Drawing details in a portrait with a pencil
Think about who you would like to portray? It is good if the model helps in the embodiment of the idea, but you can create a drawing from a photograph. At the first stage, it is easier not to build on the model at all, but to capture a fictional character. When you're ready to work with a real person, focus on achieving similarities.
And it's not just about physical parameters! Yes, it is very important what shape the eyes are, the lips are thin or plump, the ears are pressed or protruding ... But it is no less important to achieve psychological similarity. All individual traits - from emotions to character and habits, which you place in the center of attention, will give the work liveliness and realism.


These eyes are opposite ...
Eyes- the most expressive element of the face. It is not difficult to "find" them. We divide the width of the head into five parts: the second and the fourth, and there will be eye sockets. Use notches to mark their width and height. Watch the distance between your eyes! Define the iris and pupils. We do not leave the proteins unpainted, but add volume with the shadows. We mark the eyelids. If you are drawing a portrait of a girl with a pencil, depict thicker and longer eyelashes than the man's. Fill the eyes of older people with wrinkles.


Difficult stage: depict the nose
This is a rather difficult process for a beginner, because nose- the most prominent part of the face. But just understand the principle, and noses and noses of any shape and size will be subject to you! Let's designate a pair of parallel lines from the inner corners of the eyes. Let's outline the location of the wings of the nose. Have you forgotten about chiaroscuro? Most of all, the area near the nostrils is darkened. Highlight the back and tip of the nose.


Lips: we continue to draw a portrait with a pencil
As usual, we start with the correct location. The standard for the mouth is line # 5 if the head height is divided into 8 parts. Imagine that the lips are on the cylinder: this will be easier. Note that the upper lip is usually thinner than the lower lip and protrudes more. But what about the width of the mouth? Just measure the distance between the center of the pupils or estimate how much space takes up one and a half eyes. Don't forget to add a groove between the nose and mouth and a crease above the chin.


Such an important chiaroscuro
Now you think that it is very difficult to impose shadows in the right places and add suitable highlights, right? But we will teach you a few tricks. Imagine the head as a collection of surfaces - more protruding and even. This makes it easier to distinguish which areas to darken. Circle them to get a three-dimensional image. Note that the shadows form a complex pattern and are not uniform in depth.
By creating chiaroscuro, change the pressure on the pencil and the saturation of the strokes. Is the color too intense? Do not wash, just blend, the result will be even better! It is convenient to do this with your fingertips or a piece of paper. Add highlights to the pupils, nose tip, lips. It is chiaroscuro that helps the work come to life!


It turned out to be simple enough, right? Take a sheet of paper in your hands, create a beautiful drawing using this lesson! Perhaps your creation will be drawn with a simple pencil, or maybe you want to add brightness and draw a portrait with colored pencils? Go for it! You will definitely succeed!

