Picture in the form of a drawing with a pencil. How to make a realistic painting effect in Photoshop
Turn your photo in artistic masterpiece! Softorbits Sketch Drawer will help convert images into pencil drawings with multiple mouse clicks. Our program will create color or black and white pencil drawings from ordinary photos, generating neat pencil strokes. You do not need to be able to keep a pencil in the hands to be an artist. Sketch Drawer makes the creation of a photo from the picture is simple and cheerful things!
Surprisingly, but remade the photo in the drawing is quite simple, even if you are not an artist. To do this, you will need a computer with installed program To create a picture from the photo. Sketch Drawer is fast and easy to learn and use. Open the picture, select the type of drawing from ready set And get a magnificent pencil drawing!
The program has many ready-to-use pencil pattern effects to obtain different types Images. With the help of them you can create as pictures simple pencilAnd with colored pencils, as well as drawings with handle, felt-tip pen, watercolor, coal. You can edit each templates by changing its settings to get those effects you want.


Creating a drawing with colored pencils has never been so easy. You do not need not only to be able to keep a pencil in your hands, but even have it. All you need to convert photos to a color pencil drawing is Sketch Drawer.


Sketch Drawer equally simply allows you to create both color and black and white pictures. To perform drawing with colored pencils, simply turn on the "Color Sketch" setting. You can also make a drawing from a photo, made not a simple pencil, but a pencil of a given color.
Want to convert big number images in drawings with the same settings? CJ Sketch Drawer does not matter how many source photos do you have. Available batch mode allows you to easily convert all your photos in drawings. You can add photos one or entire folders. Just check the settings on one of the photos and get excellent drawings from all photos in a matter of minutes.


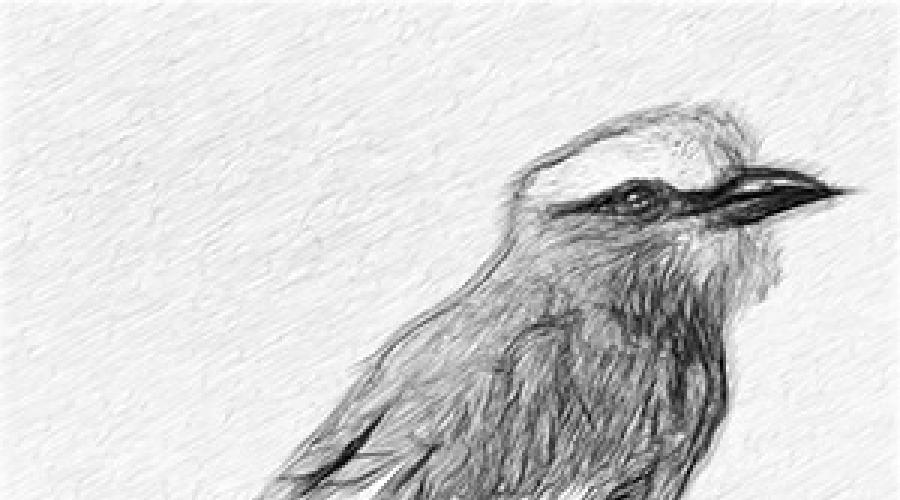
In this simple lesson, I will show the technique, as from the usual photo using Photoshop, you can make a drawing, as if drawn with colored paints. The rate is made on the edges circled. The effect is obtained that first the drawing is painted with a pencil, and then it was painted, leaving the stressed circuit strokes.
Source image:
Final result:


Step 10.
Activate the lower black and white layer and set the overlay mode or, depending on what your photo looks like.
With regime Overlapping:

With regime Soft light:

To reduce the color intensity, you can on the second black and white layer or on the background layer to lower the value.
Outcome
The finished result should look something like this:
When choosing a photo for processing, pay attention to the fact that the best way This lesson allows you to stylize images with nature or with flowers. Also for the lesson, images made using macro photography are suitable. The processing of portrait photos or pictures with the image of animals is likely to look not so impressive.
Noticed the error in the text - select it and press Ctrl + Enter. Thank you!
Fotosketcher is a free graphic editor, with which you can turn a photo into a drawing using a large number of effects. The program turns images into pictures made by pencil or paints, in different style. Instead of the usual photo you will get a picture written by the artist's hand.
With the help of the Fotosketcher program, you can open the artist, turning the photo of the image into the paintings. Photos taken in Fotosketcher will noticeably differ from the pictures taken with the camera, if you try, then in this wonderful program you can create a real work of art.
The name of the Fotosketcher program in Russian can be translated as a photo of a sketch (sketch or sketch). The photo (image) as a result of a modification becomes a pattern, or a picture.
In Fotosketcher, you can create images not only in the form of drawings made in miscellaneous technologyIn the photo editor, you can improve the original photos: add or reduce brightness, increase contrast, color saturation, resize, crop image, sign drawing, add watermarks, send to print, etc.
You can download Fotosketcher from the official developer site. The program works in the operating room windows systemThe application has Russian interface language.
fotosketcher download
After startup, the Main Fotosketcher window opens. In the top of the program window, there are two panels: the menu bar and the panel with the buttons. From the menu bar, the program is managed.
Using the buttons, access to the most popular program functions is available. Such functions have a practical any graphic editor: open the image, save the image, copy to the clipboard, paste, cancel the action, trim, resize, add text, send to print, etc.
By default, in the main window of the program to demonstrate the capabilities, the initial image is open in the right side of the window, and in the left side of the window, the processed pattern, made in the form of a painted hand drawn. You can practice with this image, or add a picture to the editor from your computer.
The program can be controlled not only with the mouse, but also with the help of hotkeys. Click on the Edit menu item. In the context menu that opens, you will see what commands match the keyboard keys.

Creating a picture in FotoSketcher
Select the initial image, open it in the program, and then press the "Picture Parameters ..." button. You will then see the new "drawing parameters" window. Here you can upload the parameters (if the parameters were saved earlier), save the parameters, or reset the default settings.
First you need to choose the drawing style. In the Fotosketcher program available a large number of Diverse effects:
- 6 Effects Sketches Pencil
- 2 Effect Sketch Feather Ink
- 10 painting effects (watercolor, oil)
- 7 stylized effects (cartoon, mosaic)
- 3 other effects
- 1 Option without effects (frame, texture, text)
In the "Drawing Style" setting, you must select one of the represented styles: drawing made by pencil, ink, painting, cartoon, mosaic, etc.
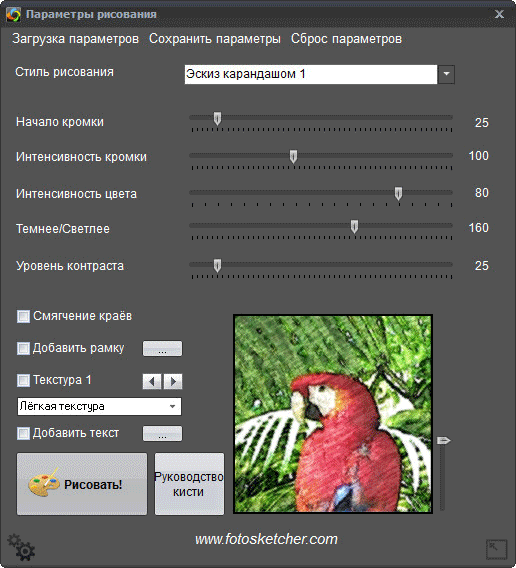
Summing up the mouse over a specific style, you will see that the image fragment is displayed next to this style. This facilitates the choice of a suitable option.
After selecting the style, the pattern fragment will be displayed in the Drawing Settings window. This fragment can be increased by showing full size Images, in the size reduced window form. This reduced picture can be moved with the mouse to see different areas future drawing.
Now you can modify the image in accordance with the selected style: adjust the intensity of the color, the level of contrast, etc. For each style, your own settings are applied. Using the "Brush Guide" button, you can change the size of the brush with which the picture will be performed.
Apply various filters to impart the image of the desired type. Experiment in order to create a picture made in a certain style based on its representations. First, try creating a simple drawing, and then, after you get the necessary skills, you can go to the creation of more complex images.
After selecting the settings, click on the "Draw!" Button. For some time, project processing is happening, so wait for it to complete.

After completing the processing, the image on the computer. If the result is noticeably different from the planned, you can try to create several options before stopping on a more suitable figure.
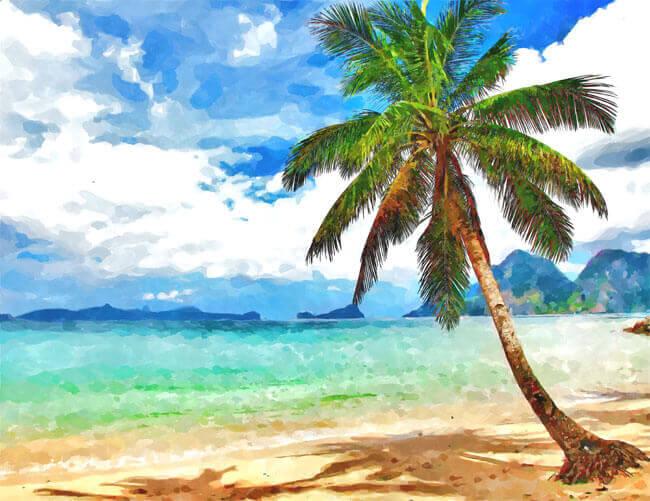
In this image, it can be seen that this is no longer a photo, but a picture written in watercolor. The author of these lines in childhood studied in art school, so I tried to make the drawing appeared watercolor paints (I most liked watercolor more).
Similarly, you can engage in creativity, reworking photos in the paintings written in different styles.
In the final version of the image, you can enter into the frame, add a signature to the picture. Try, create, create portraits, landscapes, etc. In order for you to get good paintingsIt is necessary to independent experience in the program.
Conclusions Articles
Free FotoSketcher program - graphic editor for image processing. With Fotosketcher, ordinary images turn into pictures written by the artist's hand. The program has a rich selection of effects in order to turn into a drawing, made in different styles of painting and graphics.
To create that would look as true as possible, and it could be used when creating various graphic work, Little to use standard filters or programs. It is necessary to master the principles of Adobe Photoshop.
We decided to simplify your work and collected several lessons in which it describes in detail how to make picture pencil in photoshopSo that it can be realistically as possible.
Effect of pencil pattern
This is perhaps the most the best way Of those that they have come to the Internet. Using this video Lesson, achieve effect drawing pencil You can literally within 5 - 10 minutes.
Draw colored pencils
In this lesson you will learn how to turn any photo in crayon Using Adobe Photoshop. For beginners, it will take to make a little effort to execute this lesson in this program.

Picture pencil from color photo

We make a drawing pencil
Our masters also decided to keep up with fashion trends In the world of Adobe Photoshop. therefore we make a drawing with a pencil in Photoshop Together with you on the pages of our site.


There are several ways to make picture pencil in photoshop. This program even has special filters to create a similar effect. However, in this lesson you will learn how to create a sketch of a pencil without resorting to them.

Not necessarily be able to keep a pencil in hand or be professional artist. In this lesson you will be shown like make a drawing with a pencil in Photoshop With the maximum realistic imitation of living materials.

Excellent example, as quickly and easily turning photo in drawing with a pencil (sketch) in photoshop. In this video, the lesson you will find all the necessary information, so even a beginner can cope with the execution.

To convert any photos in Figureperformed simple pencilThere are many plugins and programs. However, the opinion of the author of this lesson is definitely: "They did not create another button to make a pencil drawing in Photoshop."

Pencil drawing in photoshop
Many professional designers and wedding photographers use effect of drawing with a simple pencil from the photo in PhotoshopTo give a picture grace and artistic. Methods Transform photo in sketch with a simple pencil a lot.
Consider how you can make a drawing from the photo using image editors or mobile converters.
Follow the instructions:
1 Open the desired photo in Photoshop and add a new layer of color tone and saturation. To do this, find the styles display panel in the program window and click on the tab. "ADJUSTMENTS" (Correction);
2 Click on the "Hue" icon specified in Figure (tone-saturation);

3 A new layer will appear in the layer tab "Color Tone Saturation". This layer is corrective and allows you to change the palette of shades and the structure of the photo;

4 Click on a new layer. The settings window appears. In the Saturation field "-100" value. So you reduce the saturation of the image;

5 Now the picture will become black and white. Next you need to select the background layer. Click on it in the window Layers.;

6 The next step is to duplicate the existing background layer. In the program header, click on the Layer tab. In the drop-down list, click on "New Layer" - "Layer Via Copy";

7 As a result, On the layer display panel A copy of the background will appear;


As a result, the picture should be displayed as a negative.
9 Change the type of layer overlay. Select a copy of the background layer and activate the COLOR DODGE mode. This is necessary for clarifying the foundation. The picture will become white with a mapping of several dark plots;

10 Now we need to make a smart object from the resulting layer. Click on duplicate background and then click on the button. "Layer Menu";

11 In the drop-down list, convert the item to "Smart Object". After that, the icon appears near the preview of the layer, which talks about the assignment of the smart label object.

12 To apply the filter, click on the "Filter" menu. Next go to the tab Blur and select "GAUSSIAN BLUR." In the window that opens for RADIUS, set the value of 12.0 pixels. Save the settings;

In the photo, the outlines of the silhouette will appear and the image will become exactly the same as the drawing familiar to us.

If you want to add a picture of colors in the layer settings window, set the "Color" mode. As a result, the layer will automatically accept color gamut original image.

EditorGimp.
Gimp. - This is one of the most popular alternatives. According to its functionality and the possibilities of processing GIMP is not inferior to professional paid applications.
Photo processing can be performed in any version of the program.
The process of converting the picture is simple and will take no more than 5 minutes.
To begin with, open the original image in the program and compraise. Click on the "Color" menu tab and select "Defense".
Now copy the background layer and now work exclusively with a copy.
When incorrect setting Or to return action, you can always return to the original variant of the layer.
Open the "Filter" menu tab and click on "Edge allocation"- "Edge".
In the window that opens, configure such parameters:
- The basis of shades of gray - "Svetlota";
- Algorithm - Laplace;
- The value is "2.0";
- Action - "Blur".
Save the settings. As a result, the edges of the picture will acquire the outline of the drawing.

It remains only to invert a picture for a realistic art design.
Click on the Color tab in the program header and select "Invert". The result of the performance:

StandardPaint.. Net.
Paint.Net is a standard graphics editor for Windows.
The convenience of working with this desktop program is that you do not need to install and adjust it.
Everything is ready for work, and thanks to the simple functionality to process the photo and turn it into a drawing will be able to even a non-dirty user.
Hand drawn image from any photo.
Photo "To" and "After" processing:

Follow the instructions:
1 Open the original image in the editor;
2 Copy the basic layer of photos and select the built-in effect for it. "Oil painting". Such an option is available in all versions of the program;
3 In the parameter adjustment window that appears, set the appropriate battery values. Also. We recommend experimenting with the size of the brush and smears. You can always remove the copied layer and re-use the main one;

5 Bas-relief allows you to create clarity and boundaries of the pattern. To remove grey colour from duplicate layer in the settings window "Layers" Click on "Mix Mode" and select "Overlapping".