Beautiful drawings with a marker on paper. Stages of drawing with markers
I decided to collect general principles drawing, the post will be useful if you are going to try to draw with markers and does not know where to start. All pictures in the post are from the Internet.
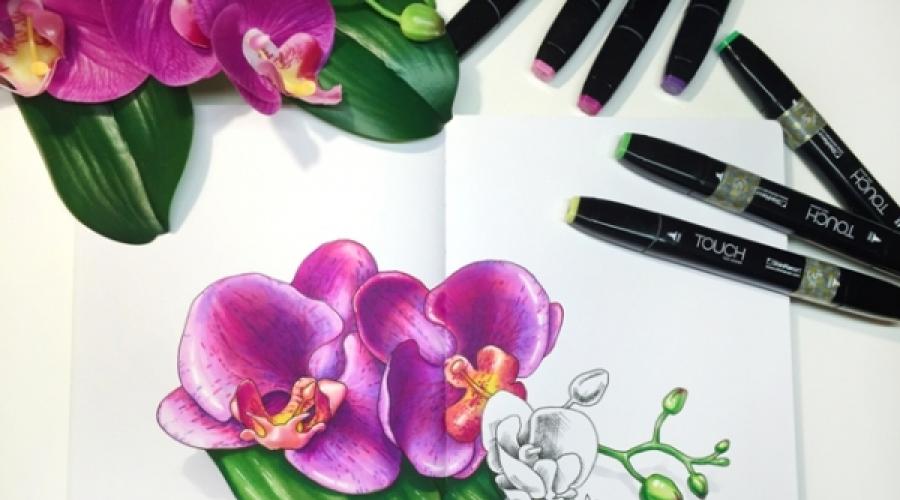
This is mainly about drawing with alcohol markers. Let me remind you: the main difference between alcohol markers is that they are filled with alcohol-containing ink and when you paint with them, the paint dries very quickly and does not warp the paper.
There are several basic techniques:
Draw with outline liners- became popular thanks to the master classes of Anna Rastorgueva. First, a water-resistant liner (this is important!) Draws the main outline of the future drawing, the degree of detail depends on your intention, but it is better to stick to large details. Then the colors and tone of the picture are added with markers and at the end the final accents are put with a white pen. The white pen can be replaced with white acrylic, gouache, but many people use the pen simply because it is convenient and you can draw thin neat lines. The technique of overlaying the path at the end, after drawing with markers, also works. If you don't have a liner, you can try waterproof mascara, but this can be more time consuming. On this moment, in my opinion this is the most common technique.

Drawing with a contour, but not a liner, but with colored pencils, colored pens so that the outline does not stand out from the general tone of the picture. It looks interesting, but for some reason very few people draw like that.
Drawing without a path, only using markers. It is less common, because markers cannot always draw neat small parts... However, large-scale drawings look very cool in this technique. The well-known Pomme Chan draws in this technique.

Another example 
Also, I drew Ryan Spahr and here the process is shown step by step. 
Combining markers with other materials. Here the markers act as secondary material, but nevertheless play important role... You can draw an underlay for drawing with markers colored pencils, you can, on the contrary, use pencils over the markers (I mostly draw this way). This technique allows you to make shades smoother and richer colors. In this case, it's okay if you are missing some marker colors - pencils compensate for them perfectly. Plus I like the rough pencil texture on top of the relatively smooth marker texture.

In general, markers can be combined with watercolors, pastels (substrates), gouache, ink. This is a great material for those who are not afraid of experiments and know how to come up with different techniques drawing.
For those who are just starting to draw, a few tricks and secrets: 
Finally, I collected useful videos with drawing techniques to help you get started.
Basic color mixing tutorial.
And one more basic lesson about markers.
Lesson from Liza Krasnova, one of the leading sketchers. Lisa is always very bright and beautiful drawings, I recommend looking at everything you find.
An interesting technique for drawing a white cat.
Another amazing artist Volha Sakovich shows how to draw with copies, check it out channel, there are many interesting things. I like the artistry of the technique and the minimum of the contour.
A delightful lesson in drawing beautiful skin.
And finally, one more excellent example of pictorial technique with markers.
Feel free to experiment and come up with something of your own, there are no strict rules for drawing with markers. On the contrary, it is relative new material and it's in your hands to try and make it a great tool for your style.
How to draw a mandala with markers
First of all, I drew a mandala with markers :) I attach a photo of the process. Also in the screenshots you can see the patterns that I used in this mandala.
 |
 |
 |

How I chose the markers
1. Molotow
The price of one 300 rubles
yes, money wasted ....
In my opinion, markers flow strongly. But the main disadvantage of the coverage is uneven - individual strokes are visible
Since these markers appeared with me first, I immediately thought that I just can't draw))))
2. FINECOLOUR
Chinese markers. The price of one is 70 rubles / piece
These are super markers! Just great. I bought it for trial, but it turned out to be just wonderful. The most ideal coverage is obtained from them! The Chinese are great. The only drawback is not a rich palette, or rather, it is large, but it happens even more. For example, the most tender blue I never found it. And one more drawback - each marker behaves differently, for example, the ink for red flows strongly and the paper under it gets very wet, while for other colors it does not.
If you don't have markers at all - start with them! Definitely!
English markers. Very popular with illustrators. And the name is well-known. I cannot say that I am delighted with them. Expensive enough. The tip is hard. The coverage is even, but sometimes strokes are visible, especially when applying a second coat if necessary. In general, not perfect
I bought for 215 rubles / piece
4. Copic
The price of one in Russia is! 450 rubles per piece (depending on the amount of ink)
But they have the perfect brush tip. Love them
The coverage is uniform. But sometimes it seems to me that the Chinese have better coverage, so I use them in combination.
Here it is - my sun!
In turn, I bought a set of FineColor - 24 colors on Aliexpress. And then I bought Vista-Artista in Leonardo. As a result, I have a set of 36 colors, and for now, that's enough for me. It seems to me that everything I want to paint at the current level can be created using this palette.
My resume and impressions.

How to choose marker paper
It is best, of course, to use special marker paper. To be honest, I have not tried it yet, but the whole point of this paper is that, as manufacturers say, it allows you to save markers. Its second plus is that it is thick, more precisely denser than ordinary sketchbook paper. Its density is usually 150-160 mg / m3, but markers will still show through it.
That's very useful overview from Zhenya Lipatnikova
Do you know what amazes me among other things with alcohol markers? The fact that you draw one sketch with them, and in the end you get two :)) On most papers, markers soak through a sheet or page in a sketchbook and ... on the other hand, I always have a second sketch that looks like watercolor drawing:)) My mom is really fond of them! Says give me the back of your sketches
How bright and clear this mirror illustration will turn out depends of course on the paper. I tried gluing Letraset with 70 g, Leuchtturm 1917, Savannasketch and Tsusketch sketches with a full approx. 160-170 g, but the brightest and sharpest result of the "back" sketch came out unexpectedly unexpectedly on marker paper from @ black13bunny with a density of 80 g. and with a glossy finish on reverse side(to prevent markers from being printed on the next page).
In reality, you can use both sketches now Like, I not only draw with markers, but also with watercolors I can right there
Zhenya's illustration

I draw in a graphic pad, density 200 mg / m3, A5 format. She does not shine through on the reverse side as picturesquely as Zhenya's. Here are my beginner sketches :)
 |
 |
 |
How many times, looking through the next curious instructions, were you going to repeat them? But something always stops me from joining the legion of practicing handmade lovers. Either a lack of time, or resources. Well, the question of time will have to be solved independently. And we will help with resources: we will show you 21 cool idea which can be realized thanks to a simple marker.

An ordinary permanent marker in skilled hands becomes a real magic wand. Fulfills any creative desires. And this 21 creative project- an excellent proof of this. Using a marker, you can:
1. Decorate ceramic mugs with any pattern or inscription

It is very easy to make such a gift for friends and family. It is enough to paint the mug with a marker and send it to “bake” in the oven for half an hour at a temperature of 180 C. After this maneuver, the drawing will not escape after the first washing of the dishes.
2. To turn simple plain furniture into "predatory"

What could be easier than painting spots? If it's a pity to spoil the furniture with home-made creativity, you can always sew a simple cover or experiment with pillows.
3. By the way, about pillows

Multi-colored markers + rubbing alcohol + boldness = adorable watercolor-style pillowcases. Draw a blank for the future pattern and sprinkle the pillowcase liberally with alcohol, pouring it into a bottle with a spray bottle. The marker will "float" creating an interesting effect. To consolidate the result, let the clothes dry naturally, then send them to the automatic dryer for 30 minutes, and then walk from the inside out with a hot iron.
4. Paint pebbles or shells to create unique home and garden decor

5. Decorate the table lamp with an author's pattern by completing it with a white marker

A designer thing for a penny, also made with your own hands - isn't it tempting?
6. Or paint the lampshade with motivating inscriptions to always re-read them before going to bed


7.Use a marker and stencil to decorate anything from napkins to T-shirts

The main thing is not to forget to warm up the newly-made design with an iron.
8. Simple glasses turn into elegant candlesticks with a slight movement of the marker

By the way, openwork napkins can be used as a stencil for the pattern.
9. Paint plastic bags, turning them into original packaging for gifts or small items storage

10. Or make wrapping paper out of plain paper

11. A black marker and a little alcohol will help to give silver jewelry a noble vintage look.

But it's better not to do this trick with real silver.
12. Give new life to old jeans by making them shorts with a cool print

13. Paint the Easter eggs
14. Or your own nails

It is noteworthy that all the flaws of the "marker manicure" can be corrected using cotton swab dipped in alcohol. And at the same time do not damage the varnish layer.
15. Make unique Christmas tree decorations from solid balls, which are sold everywhere on the eve of the holidays.

16. And transform simple white plates into a unique author's set

The main thing is not to forget about the baking rule from point # 1.
17. Why are there Christmas decorations and plates, you can even draw on light bulbs!

I think that a dispute can be carried on for a long time - what is easier after all, drawing with a felt-tip pen or paints? However, the answer to this question is unlikely to be found, because everyone will defend their own kind of art. And it's not so important, the main thing is that with the help of both you can draw interesting pictures.


Although both minuses and pluses can be found in both methods of painting, for example, with the help of paints you can perfectly convey exactly color range, because they can be mixed. You can't do that with felt-tip pens, so all the work will be a little one-sided in the combination of colors. Even if you buy a set of two hundred markers, thanks to paint you can create a thousand times more shades of the same color. But drawing with a felt-tip pen is really easier in terms of technique - you don't have to use water, there is nothing to mix, which means the process itself is simplified.


And the artist Antoinette Fleur prefers felt-tip pens in her work, and we can say that she is great at it. Thanks to them, she creates rather pretty and lovely works, maybe not filled with deep artistic meaning, but sensual and sincere. The lines are not clear, the details are not so noticeable, but she succeeds in images with a bang. However, it has already been said about the combination of colors - it seems that they are too bright.


But is it a minus? I think not, because someone will surely be delighted with this brightness, novelty. Unfortunately, much is not known about the artist herself, except that she is French. But we hope that she will please us with her works more than once, because this is, if not new, but for sure unusual way self-expression.
I promised to tell you about my creative materials. I'll start with markers, and the next post will be about sketchbooks and paper. Is it worth talking about the features of markers as an artistic tool? They allow you to create realistic images with smooth transitions, or make quick sketches. You can read a little about the features of drawing with them.
During this year I have tried many different brands and I am ready to tell you about each one.
Let's start with the most popular and famous - TRIA, similar you could see at Katya Hot. These markers have three tips that allow you to draw lines of varying thickness. Honestly, I used a thin rod three times, most often I use a so-called brush. This brand is cheaper than the legendary copics, but I will not say that it is much inferior to them. So if you want to collect yourself a palette and not go broke, then you can stop at them. True, as far as I know, they were taken out of production, so you have to be content with leftovers in stores. In our city they are no longer there, in St. Petersburg, by the way, too. 
The approximate price is 250 rubles. Numbering: a letter (which denotes a palette - orange (O), yellow (Y), gray (G), etc.) and a shade number.
An extensive palette of 300 colors. The markers are refueling.


Alternative and replacement TRIA from the same company - Letraset. The main difference is only two tips: thin and wide. The first is used to work out the details, the second is for painting. I have both individual colors and sets: grays and skin tones.
The approximate cost is 230 rubles. Colors are indicated by words (soft peach, mandarin, etc.). The main disadvantage- do not refuel.


Markers ZIG I first saw Katya Hot at MK, I suspect that this is her partner or sponsor, so we painted with them. I don’t know why, but I don’t like them as much as the letraset markers. I bought one for testing in St. Petersburg. Not happy.
The cost is 300 rubles. Shades are indicated by both numbers and words. A palette of 136 colors. refuel.
Many people ask why artists need such palettes (as in the photo above) - of course, for convenience. You can clearly see all the colors and how they will look on paper.
I give you almost insider information, these are Katya Hot's palettes, in order to paint portraits you need to buy: skin color (main), shadow and blush color. The shades for each category are shown above. To get started, just a few from each category. 

Never! Hear not, ever! Don't buy firm markers Molotov, I beg you. They are in the photo on the right, I will never forgive them for the fact that the flesh tint turned out to be dark brown. If you, like me, do not like betrayal, then you will understand my displeasure. I bought a fool, as many as four colors, having seen them in Leonardo.
And also their appearance resembles a copy, which is also a kind of deception.
The cost is 200 rubles.
In the photo on the left, markers LePlume, bought by me in the artist's shop. They have only one tip in the form of a brush, and it is quite flexible. Some colors seem somehow bright to me. I actively use only brown tint for shadows.
The cost is 150 rubles. Do not refuel.
As you can imagine, these two brands are not my favorites, they are "white crows" in my collection.
Now let's move on to them! Great and popular markers Copic.
My heart is given copic scetch and copic ciao. Probably the last one even more, I was bribed by their brush and light transparent colors. Seriously, you can only understand this when you yourself paint with them - a weightless and light color. But their palette is smaller than that of other copic representatives.
I don’t think there is anything else to tell about them, because they speak for themselves and they are chosen by famous artists.
The cost of Сopic ciao is 300 rubles. Copic scetch - 500 rubles. Copic (square) - 500 rubles
Everyone is refueling.
By the way, I never use a blender in my drawings. Maybe in vain this will improve the quality, but so far the hands have not reached it.
Colored pencils will help make your drawing even more realistic, this technique is used by many artists.
Once again I will post here shades for painting portraits. 
To summarize: for me, the main thing when choosing markers is the nibs, because I like to paint with a brush, moreover, with its entire plane.
Therefore, my favorites today are TRIA and Copic Сiao.
Ready to answer your questions and listen to your feedback
And I will also share good news for me! On next week my first meeting-lesson on drawing with markers is about to take place.
This will be an individual lesson, and I am so worried because I want everyone to like it. There are also requests from other cities regarding training, but I do not yet know how to organize it correctly. In my opinion, teaching other people is a very responsible activity that needs to be carefully prepared.
Thank you all for reading. And I move on to preparing the next promised post about paper.