How to draw a straight line in a Word. How to make a line in Word? How to make a horizontal line in Word - Horizontal line styles in Word
When you work with Microsoft Word, very often you may need different separators in the form of lines. In this article we will tell you how to make a line in Word in various ways.
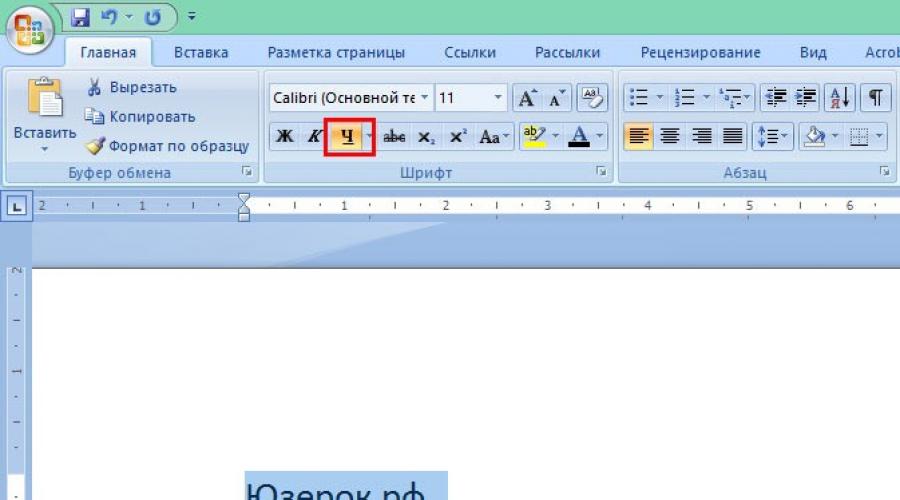
1. The easiest way is to make an underline. To do this, go to the "Home" tab and click on the icon with the letter H. This will activate the underlining of the text. After that, all the selected text will be underlined below.

You can also "underline" an empty area. To do this, activate the text underline icon (the letter "H") and press the Tab key on your keyboard several times.
You can set the appearance of the underline line and select its color.

2. Also a very simple and effective way. To do this, you just need to hold down the Shift key and press the space bar.

3. To draw a line across the entire width of the sheet above or below the line, you can use the Border Tool, which is more commonly used to adjust page borders. The line can be both horizontal and vertical.

4. If you need to underline in different forms or complex texts, you should use tables. You can set them up so that one part is invisible and the other is set as underline.

Click on the table and select Borders and Fill. Adjust the table so that some lines are visible and others are invisible
5. You can just draw a line in Word. To do this, go to the "Insert" tab and in the "Shapes" column, select the "Line" item. To make the line horizontal, hold down the Shift key.

In this article, we will cover, in three ways:
- how to make a horizontal line autocorrect;
- how to insert a horizontal line by adding a border;
- and how to draw a horizontal line.
Let's start with the fastest and easiest way, how to make a horizontal line in Word .
The fastest way to make a horizontal line in a Word
In order to quickly make a horizontal line, type three or more special characters on a new line and then press Enter. Word automatically converts these characters to a horizontal line. The horizontal line style depends on the entered characters:
How to make a horizontal line in Word - Horizontal line styles in Word
- Three or more "*" - dashed horizontal line
- Three or more "=" - double horizontal line
- Three or more "~" - wavy horizontal line
- Three or more "#" - thick decorative horizontal line
- Three or more "-" or "_" - a thick or thin single horizontal line
These horizontal lines are often used in Word documents.
How to make a horizontal line using a border
You can also use paragraph borders.
1. To do this, place the cursor in the place where you want .

How to make a horizontal line in Word - Place to insert a horizontal line
- On the Home tab, in the Paragraph group, click the arrow for the Borders command.

How to Make a Horizontal Line in Word - Insert Horizontal Line
- Horizontal line ».

How to Make a Horizontal Line in Word - Horizontal Line
- At the cursor position, horizontal line.

How to make a horizontal line in Word - Horizontal line in Word
- To customize made horizontal line double-click on it with the left mouse button. The dialog box " Horizontal line format».

How to make a horizontal line in Word - Adjusting a horizontal line in Word
In this window, you can adjust the width, height, color and alignment horizontal line in Word .
More information about borders is available in the article.
How to make a horizontal line using a shape
The last way, how to make a horizontal line in Word- this is draw a horizontal line.
- Click the Insert tab, and in the Illustrations group, click the Shapes command.

How to make a horizontal line in Word - Shapes
- In the list that opens, select " Line ».

How to Make a Horizontal Line in Word - Line
- The mouse pointer is converted to a plus. Click in the right place in the document where you want insert a horizontal line, while holding down the Shift key and the mouse button, move the pointer to a different location, and then release.

How to make a horizontal line in Word - Drawn horizontal line in Word
In these ways you can make a horizontal line in Word.
If you often work in Word, sooner or later you will need to create a horizontal line above or below the text. This is very convenient when you need to create a template for a specific document.
There are many ways to do it in Word, but we will consider the simplest ways to solve this problem.
Horizontal lines in Word 2003
First, we place the cursor in the required place. Go to the "Format" menu and select the "Borders and Fill" item there. Select the required line in the "Type" menu and click "OK". Now the line we selected will belong to the entire paragraph. If you only need a specific part of the string, then it is best to use cell insertion. Visible and invisible lines will also need to be marked there.
Horizontal lines in Word 2007 and above
In this version of the Word, a horizontal line can be made in several ways... If you just need underlined text, you can use the "H" button in the "Home" section. Simply and easily.
To create a line from top, left, right(vertical), you need to go to the "Paragraph" section and open the "Borders" menu. Here you can choose the line you need, after which you can safely type the text. It will be dialed already with a line.
With this approach, it is important not to forget that the "Enter" key will remove the line. Therefore, you need to move around the document only on the "arrows".
If you need a subscript, but without text, you can do it simply by holding down the "Shift" key while pressing the "-" key as many times as necessary. The result is a line like "______" without text.
Now you can draw horizontal lines in Word.
If you at least occasionally use the MS Word text editor, you probably know that in this program you can not only type text, but also perform a number of other tasks. We have already written about many of the features of this office product, if necessary, you can familiarize yourself with this material. In the same article, we will tell you how to draw a line or a strip in Word.
1. Open the document in which you want to draw a line, or create a new file and open it.

2. Go to the tab "Insert" where in the group "Illustrations" press the button "Figures" and select a suitable line from the list.

Note: In our example, Word 2016 is used, in previous versions of the program in the tab "Insert" there is a separate group "Figures".
3. Draw a line by pressing the left mouse button at the beginning and releasing it at the end.
4. A line of the length and direction you specified will be drawn. After that, a mode for working with shapes will appear in the MS Word document, read about its capabilities below.

After you draw a line, a tab will appear in Word "Format" where you can change and edit the added shape.

To change the appearance of the line, expand the menu item Shape Styles and choose the one you like.

To make a dotted line in Word, expand the button menu Shape Styles, having previously clicked on the shape, and select the required line type ( "Hatch") In chapter "Blanks".
To draw a curved line instead of a straight line, select the appropriate line type under "Figures"... Click once with the left mouse button and drag it to set one bend, click a second time for the next one, repeat this action for each of the bends, and then double-click the left mouse button to exit the line drawing mode.

To draw a free-form line, under "Figures" choose "Polyline: Drawn Curve".

To change the size of the field of the drawn line, select it and click the button "The size"... Set the required field width and height options.

- Advice: You can also change the size of the area occupied by the line with the mouse. Click on one of the circles that frame it and drag to the desired side. If necessary, repeat the action on the other side of the figure.
For shapes with nodes (for example, a curved line), a tool is available to modify them.

To change the color of the shape, click the button "Shape outline" located in the group "Styles", and choose a suitable color.

To move a line, simply click on it to display the area of the shape and move it to the desired location in the document.

That's all, from this article you learned how to draw (draw) a line in Word. Now you know a little more about the capabilities of this program. We wish you success in its further development.
When using Microsoft Word, you need to know how to draw a line in a Word. For these purposes, you can use the Boundaries word function.
Word borders
You are typing and the moment comes when you need to draw a line separating it in the document. How to make an underline in a Word without text?
One of the ways: position the cursor in the desired place, press, without releasing, the shift key and at the same time, press the dash. Here you yourself can choose the length of the line you need. This can be done automatically using Word borders.
They can be used in tables. To do this, place the cursor in the required place. Next, you need to click on Borders (in the formatting panel). Here we choose - the lower border.
If you click on the top border, then the line will be below the text. Alternatively, you can click on Add Horizontal Line, which will create a gray line horizontally.

By choosing the "Outside Border" command, we will create a frame in which we can type text.

If you do not need a frame already, place the cursor inside it and click on "Delete Borders".

Lines can also be drawn in many other ways. Let's consider 2 more of them.
Option 1. How to draw a line directly under the text in a Word? You have typed the text and now you need to draw a line under it. In this case, select all this text and click on the H icon on the panel, all the text will become underlined.
Option 2 - here we will learn how to make a line in a Word without text. If you need a line anywhere in the text, and it can be not only horizontal, but also vertical, oblique, etc., then you need to go to the Insert tab and select "Shapes" there, select the icon with the image of a straight line and set it in the required place, setting its start and end points.
How to write over line in word?

The Microsoft Word office program is good in that one task, in it, can be solved in different ways.
Method one: you need to go to the Page Layout, then click on the function - "Horizontal line" and select the desired one, there are many options: wavy, flat, bold or dotted.
The second way is to draw using the Draw tab. Choose - Shapes - Lines. We choose the option we need and install the line in the place we need.
Also, the third method has already been described above - we use an underscore.
Here are some simple methods to make it easier for you to work with Microsoft Word.