How to draw an astronaut with a pencil step by step. How to draw space: finalists of the competition and a step-by-step master class Drawing for Cosmonautics Day at the senior school
Many thanks to them for that! Well, I just have to repost their notes))
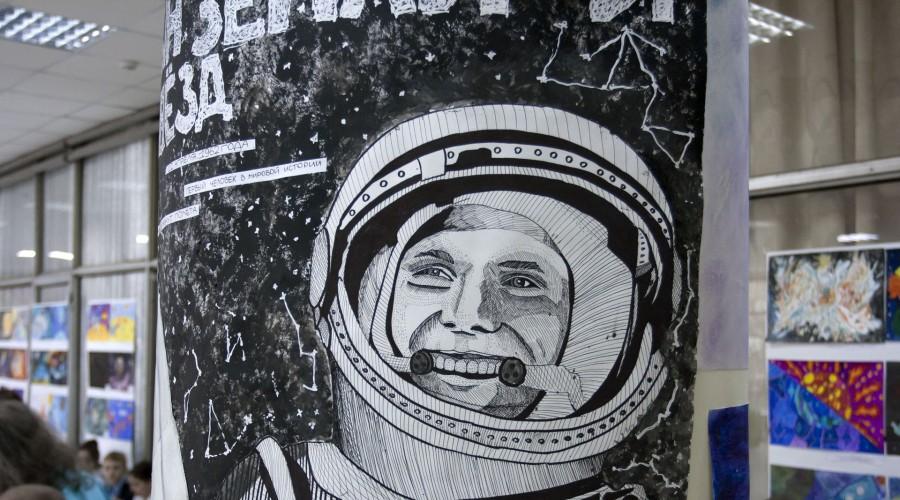
Original taken from shatlburan in How children see space

Today the whole world is celebrating the anniversary of the beginning of human exploration of a fundamentally new essence - the Cosmos! On April 12, 1961, Yuri Gagarin made a space flight for the first time in history and thus opened a new era of mankind.
An exhibition of children's drawings on a space theme has opened in Rostov today: We are descendants of Gagarin. Space relay-Rostov.
It was interesting to see how children imagine space, how they see the space future, what they expect from it and whether they dream of becoming astronauts.
There are many photos from the exhibition under the cut.
Figures can be conditionally divided into several categories. Some differed in the detailing of the technical part of the spacecraft:


(this one is generally done in pastel)

Others reflected the story:


Still others imagined everyday scenes of the cosmic future:

Space trains, railway station, spacecraft parking. The curtains on the windows of the train are great!

And here we can see orbital stores: plants and flowers, household appliances, honey. laboratory. I would venture to suggest that small buildings are fast food outlets: shawarma, tasty food, "coffee to go", etc.
Of course, it was not without aliens:

The title of the picture is "Hello friend!" It's nice that the children are in a peaceful mood. The culture of aggression has not yet ruined them. The theme of friendship and peaceful coexistence with aliens runs through all the drawings. There are no battle scenes anywhere.

Subtle humor and good imagination. Everything is perfect here!

Catching the stars

Attractions attached to the rings of Saturn.

Flying saucer with wheels!

Only NEVZ launched its space electric locomotive :)
Nebulae and landscapes:


And some just liked:


The ship and one spacesuit are made of foil.
A total of 152 drawings from 15 educational institutions in Rostov and the region are at the exhibition. There are many interesting works. The exhibition will be held from 12 to 20 April at the Rostov House of Creativity for Children and Youth (former Palace of Pioneers, Sadovaya, 53-55). Free admission.
The exhibition is important in that it actualizes the theme of space as such. Children fantasize and draw interesting stories. But it's sad that they stopped dreaming about space - to the question "who do you want to become?" none of the authors of the drawings answered "cosmonaut". A football player, a lawyer, a businessman ... Meanwhile, man and Humanity have a much higher purpose than business and football. It is necessary by all means to kindle the thirst for the expansion of space, to convey the value of this path. And the more active the space theme will sound on the agenda, the more chances we, earthlings, will have to return to the path of development and achieve outstanding results on a universal scale!
Happy Cosmonautics Day everyone!
Original taken from kopninantonbuf in Space dreams of Don schoolchildren

An exhibition of children's drawings dedicated to the 55th anniversary of the first manned flight into space has opened today in Rostov-on-Don at the Palace of Children and Youth Creativity.
Children drew pictures, wrote stories within the framework of the All-Russian competition "We are the descendants of Gagarin - the space relay race", which is conducted by the public organization for the protection of the family "Parent All-Russian Resistance" in conjunction with the public movement "The Essence of Time".
The exhibition presents more than 150 works made by students from 20 educational institutions of Rostov-on-Don, Shakht, Kamensk-Shakhtinsky, Novocherkassk, as well as eleven stories (they can be read in the VK group dedicated to the exhibition.
“Every atom of our body
was once a star. "
Vincent Freeman
A week ago, on our creative instagram @miftvorchestvo, we launched a competition for the best performance of the task from the notebook "642 ideas of what to draw". The task sounded simple - space. Many creative and creative works were published for the competition. You can see them all by tag. We publish the best works and give a step-by-step master class on how to learn how to draw space.
The best works for competition # 642ideikosmos

"If you can't fly into space, make it come to you." Photo by @ al.ex_kv.


"And when darkness sleeps beside you, And the morning is far away, I wanna hold your hand and guide you ..." Parov Stelar ft. Lilja Bloom - Shine. Photo by @julia_owlie.

Aren't they cool? 🙂

Step-by-step master class
If you did not participate in the competition, but also want to learn how to draw space, save yourself somewhere these step-by-step instructions on what to do and how to make it look bright and beautiful.
1. In order to draw the Universe, only 3-4 colors are enough. At least with that amount you can start. Important: the sheet for watercolor should be very dense so that it does not wrinkle from water and so that the paint spreads beautifully and evenly.

2. The outline can be drawn with a hard, simple pencil to indicate the area that you will wet with water. Wet some of the allotted space.

3. Apply paint to the wetted area. Try to keep the contours nice.

4. Wet the rest of the space with water and apply a different color of paint. Selectively paint bright spots throughout the design. The drawing must be wet for the paint to flow beautifully.


5. After the drawing is completely dry, apply the stars. This can be done with white or yellow paint using an old toothbrush.


6. Some stars can be drawn more carefully.

Photo for the master class from kitty-ink.tumblr.com.
If you sprinkle salt on a wet drawing, then the structure of the cosmos will turn out to be even more interesting. The salt will absorb some of the paint, and shaking it off after it dries completely, there will be beautiful white dots and clouds in place of the salt.
On our creative instagram @miftvorchestvo, we will regularly hold notebook contests “642 ideas, what to draw”, “642 ideas, what to write about” and “642 ideas, what else to write about” (new!). Subscribe to keep abreast of everything creatively interesting and creatively fun.
P.S .: Did you like it? Subscribe to our new mailing list. Once every two weeks, we will send 10 of the most interesting and useful materials from the MYTH blog.
Master class in drawing for preschoolers of the senior preparatory group on the topic: "SPACE" in stages with a photo

Sredina Olga Stanislavovna, educator, head of the art studio, MDOU CRR, Ph.D. No. 1 "Bear", Yuryuzan, Chelyabinsk region
Purpose:
Creation of educational, gift or competition work
Materials:
A3 paper, white or colored double-sided, wax crayons, salt, gouache or watercolor black, soft brush No. 3-5
Goals:
Creation of works on the space theme
Tasks:
Teaching different ways to represent space
Improving practical skills in wax crayons and watercolors
Education of patriotism.
Development of curiosity
Preliminary work:
1 Consider photographs of cosmic depths.


2 We get acquainted with the history of cosmonautics, with the names and achievements of our outstanding cosmonauts. Remember the names: Yuri Gagarin, Valentina Tereshkova, Alexey Leonov. The world's first astronaut, the first woman in space, the first person to walk into outer space. We look at photographs, talk about the difficulties and delights of the profession of space conquerors. How did test pilots become astronauts? What training did they go through? We dwell in more detail on the first manned spacewalk.


2 - Thinking about space, UFOs, aliens. We discuss films and cartoons. We think what they can be - aliens: good or evil?
3 - Literary living room:
Arkady Hait
In order, all the planets will be called by any of us:
One is Mercury, two is Venus, three is Earth, four is Mars.
Five is Jupiter, six is Saturn, seven is Uranus, followed by Neptune.
He is eighth in a row. And after him already, then,
And the ninth planet is called Pluto.
V. Orlov
Flies into space
Steel ship around the Earth.
And even though its windows are small,
Everything is visible in them at a glance:
Steppe expanse, sea surf,
Or maybe you and me!
Practical work No. 1: "Distant space"

To draw a space landscape, we need stencils of circles of various diameters. You can use special rulers or various "improvised means".

We draw several planets with wax crayons, placing them at random on the plane of the sheet. You can apply the technique of superimposing nearby planets on the side planets, or depict one of the planets only partially.

After creating a space composition, we crush a sheet of paper, twisting it several times, and gently straighten it

Coloring the planets. To prevent the planets from becoming like grandmother's balls with threads, we draw very carefully with crayons, do not go over the edges.
Before starting to work in color, we remember how forests, mountains, deserts and oceans look from space, we think about whether all planets can look the same? Fiery and foggy, sandy, gaseous and icy - they can look absolutely fantastic. Coming up with complex color combinations.

Cover the entire sheet with black watercolor. The paint, accumulating in the cracks, creates the mysterious depth of outer space.

Practical work No. 2: "Spacewalk"


For this work, we need a figure of an astronaut in a spacesuit, circles of various diameters and a silhouette of a rocket.


We place all the shapes on the sheet in random order. We start with a rocket and an astronaut. Then we add the planets.


We delimit the planes inside the silhouettes. We add portholes on the rocket, we divide the spacesuit into separate parts. We begin to paint the rocket, the astronaut and the planets in stages. In order to create a festive atmosphere, we take bright, juicy colors.


Add stars. We take yellow and white crayons. We place them in small groups, in the form of constellations, or line them up (like the milky way). Each star is a distant - distant sun, around which the planets can revolve and there can be life on them.

We take a brush and black paint (watercolor or gouache) and start painting over the whole work. First, draw lines along the edge of the sheet, then work across the entire sheet.


Until the paint has dried, "salt" the drawing. In the place where a grain of salt fell, the paint seems to collect, and the cosmos with the help of this technique again becomes deep and mysterious.


Children's work (5-6 years old)


Drawing options
Flying saucers (UFOs) can be very diverse. Turning on the imagination, we depict alien aircraft.
It is very important to nurture respect and culture in our children. I consider it very correct to widely celebrate the All-Russian Cosmonautics Day, which takes place on April 12. It is inextricably linked with the name of the first earthling who flew out of the Earth's orbit, Yuri Gagarin.
And it is even more important that this is our compatriot. For our children, this is authority, courage and courage. Therefore, in all kindergartens and schools on this day, a handicraft competition is held on this topic.
The first thing that comes to mind is a rocket and an astronaut. However, I found for you a lot of original ideas on the topic of Space, let's get down to their implementation.
You need to start with the simplest options, so let's look at what you can make with our preschoolers. With them we will use the simplest materials: paper, cardboard and plasticine.
For this rocket, you need to make blanks, because the kids of four are not yet very good at using scissors, so they need help to cut out the parts.

My daughter just loves to glue rockets. We have already dedicated an entire album to them. Self-adhesive paper was specially bought for this purpose. It is very bright and easy to stick.

I caught the eye of the idea of a Martian from a ball. It certainly couldn't be easier!

Also, the alien can be made of cardboard, and decorate the plate with sequins, which adhere well to PVA glue.

To help, I suggest taking a ready-made rocket template and stretching plasticine over it with your fingers. To be able to use this picture many times, laminate it or glue it on both sides with wide tape.

Also use the ready-made forms of the planets for application, at the same time and broaden the horizons of the child, explaining to him that there are several planets, and we live on the one that is blue and is called the Earth.

Here are two step-by-step master classes on how to evenly cut in blanks from colored paper.

And another template for cutting. All figures have a long tongue with the former base. This base needs to be glued. Then you will have a volumetric applique with a 3D effect.

Another idea made on a piece of cardboard wrapped in a trash bag. How to do such I gave a detailed master class.

More templates for cutting.

This flying machine can be assembled from cardboard.


Toilet rolls can be used to glue cool, simple rockets.

Or use shiny paper for decoration.

Now I will show you how to make such a rocket step by step.

You can combine a craft and a postcard. And make the tail of the rocket from threads of red, orange and yellow colors that resemble a flame.

Look at these templates, it immediately comes to mind that there are still lunar rovers, satellites and the planet Moon itself, there are so many options for creativity at once. Or you can simply cut out these figures and stick them on blue or black cardboard.

Also, just give your child a coloring book on Space and keep it as a souvenir.


Any of these coloring pages can be used as a template to make crafts from plasticine, stained glass paints or cereals! you just need to fill the space between the lines with the selected material.
For example, my child and I love to stretch plasticine with our fingers. And for this, a coloring book with large pictures was specially bought.
By the way, buy soft plasticine for these purposes!
Crafts for April 12 for schoolchildren
For schoolchildren, the requirements are more complicated. But on the other hand, it is much easier for them than for babies, because the amount of materials that they can use is increasing.
For example, make gingerbread on the theme of Space in the form of a comet, planets, flying saucer. You can replace the gingerbread with salted dough. And also after baking, paint it with colored glaze. How to cook it is well described by my colleague https://azbyka-vkysa.ru/vozdushnyj-pasxalnyj-kulich.html

Or use cotton pads. They can be colored and passed off as the planets of the solar system.

Also a very painstaking work for those who like to embroider with beads. It can be replaced with bugles, sequins, or even use the cross-stitching technique.

Here's an example of how to replace beads with buttons.

First graders can be asked to make a rocket from a cardboard roll.

Or this option with a passenger)))

How to correctly make a rocket that has a base is shown in the instructions. Everything is very detailed and the child himself will be able to repeat all the stages.

You can cut the stand according to this pattern.

How do you like the idea of a voluminous craft? When the whole Cosmodrome is looking at you, maybe Baikonur itself?

You can make a craft on a stick. We need skewers for a kebab. Use crepe paper or napkins for the tail.

A cocktail tube works great too.

Use two pieces to hide where the tube is attached.

You can create a whole composition of crafts using this technique. By the way, you can put them in a glass with semolina, sugar or salt. Grains and spices will prevent the sticks from moving and bending over.

Glue the planet out of papier-mâché.

Older children also work with plasticine. But they are already using complex techniques for working with flagella and shapes.
Another cool plasticine work. Look, the whole sky is made of these same flagella.

And here is our favorite technique of stretching plasticine with our daughter. It is suitable for children of all ages.

Teachers will also like cardboard hangers with passengers inside and string tails.

If you like to use unusual materials, then I advise you to take pasta. What is not done with them! Even the balls are pasted over, as we did with threads and PVA glue. Or they create a beautiful design for work.

Felt is also suitable for creativity. It is easily glued with transparent super glue. Products are made from it according to the same patterns as paper appliques, so this fabric holds its shape perfectly and has a convenient thickness for work.
In fabric stores, you will be offered many shades and different sheet thicknesses of this material. There is a lot to choose from.

But according to these patterns, you can assemble an astronaut, a plate and a rocket.

They need to be transferred to paper and then to felt.


Make a fabric applique from it.

This template will do.

Or such a not so simple, but super-duper photo frame with the image of children.

By the way, about the photo! There are still very original ideas with them. For example, to portray a child as an astronaut.

Or use this angle. You can also stick photos of friends or classmates on each planet.

A paper helmet will help you feel like an astronaut.

It can be made thicker and more realistic by using the papier-mâché technique.
To do this, you inflate a balloon, a newspaper is applied to it, abundantly moistened with paste. Many layers are done this way. Then, after drying, the ball bursts and carefully peels off from the structure. The final layer always comes from white paper so that you can beautifully decorate the craft.

From sponges and polyurethane foam, you can cut out such balls and assemble them into a reduced copy of the solar system.

I consider this wreath with stars, planets and an astronaut to be an original idea. Shapes can be cut from the above coloring pages.

For home use, together with your son, make a jet engine out of plastic crafts.

An even more serious version of the space composition, which can be made from salt dough, plasticine and even clay.

Plastic ball and disc Saturn will conquer any teacher!


These balls are sold in florist shops. We made a similar one from polyurethane foam. We poured it into the model, dried it and cut out the shape we needed with a clerical knife.

The joint will be fixed with a toothpick.

The volumetric applique will also appeal to everyone.

All its zest is in the paper spiral that holds the plane or rocket.

Quite a complicated idea from pieces of paper. Here it is important to observe the color scheme and shape of all objects. It can take quite a long time, but it looks very grown-up.

More options for simple rockets in different colors.

And now I'll show you how to conquer all classmates and teachers! You need to do something big, like a growth rocket!

In the assembly hall, it can be used as decoration and decor, as well as as a photo zone.

Or you can leave at home, let your son rejoice.

Here is a variant of the exhibition samples.

It's not a shame to nominate such a rocket for the competition, but we'll talk about this later.
A step-by-step origami rocket masterclass?
Origami allows you to create independent paper objects without the use of scissors and glue. Often one A4 sheet is enough for them. And there are a lot of missile options, there are those that stand on their tails, and there are those that are used for volumetric applications.

The simplest version of the rocket is made in three minutes.

After you find the middle of the sheet along the length, you need to roll both upper corners to it.

Then we shape the body.

And side elements. Turning the edge outward.

We repeat the same for the second side.

I will also give a step-by-step diagram, which is supported by the upper master class.

The origami base can be supplemented with paper tubes.

There is a modular origami technique, when a picture or figure is assembled from many small parts of the same size. Here's an example of this technique.

Of course, you won't be able to do it quickly, but hand skills will develop.
And, of course, you need to see how a complex craft is done.
Please be patient and repeat all the steps shown with your child. Perhaps he is your future engineer, or designer!
Making a rocket out of plastic bottles and waste material
They are gaining more and more popularity. They are used by summer residents to decorate their plot and from them do homework for school.
For example, using different volumes, you can make such an instance.

Or you have disposable tableware left at home, then it can be used almost as intended. Replace the plastic saucer with a flying one for an alien.

Or convert a bottle from a rinse aid into a flying machine, and even with a photo of an astronaut.

Ice cream sticks, a plastic container, and a cream cheese box can also make a cool plate.

And make radars out of wire.

Another idea from disposable tableware.

And when you have a whole bottle of Fanta and some cardboard, put together a very realistic model.

Aliens can be made from wire and kinder eggs.

Old discs come in handy too.

This option deserves all the praise in general. People did their best and captured the name of the Mir rocket and lifted our country.

I think you were inspired by these simple crafts, so let's take a look at how to make them step by step.

You need to cut off the bottom of the bottle, and cut out the porthole.

A cone can be made using this technique, when one cut is made in the circle to the middle and the edge is superimposed on the adjacent side.

We paint all the cardboard parts and the bottle body itself.

It is better to use hot glue for gluing, so all the parts will be better fixed.
Ideas for the competition by April 12
Of course, all kinds of contests are held in every educational institution and children are obliged to participate in them. But not all works are then taken to the exhibition. Let's take a look at the options that deserve close attention.

For lower grades, choose a cardboard rocket.

For older adults, suggest making a whole composition with elements of the Cosmos.

It is made on the basis of a cardboard box, which is painted blue or black from the inside. And all the prepared elements are attracted to its top on the fishing line.

I have specially selected a lot of photographs, made in one idea, to make it clearer for you.

You can hang any content in the style of Space: planets, stars, comets, rockets, astronauts, etc.

I also liked the voluminous idea of the parade of the planets.

It is glued together in layers, in which a smaller circle is cut.

This is what the blank looks like.

The sheet with the cut out circle of the largest diameter is placed first, the rest are in order of decreasing diameter.

I would also take a plasticine idea to the exhibition, which is very neatly executed and rather laborious.

An option for how you can make craters on the surface of the moon.

Well, remember about the growth rocket, which can also be submitted to the competition. after all, at such events, they are very fond of large crafts.
I'm finishing up for today. If you have any more ideas, please describe them in the comments below the article.
How to draw a beautiful and vivid drawing for Cosmonautics Day in kindergarten and school, our interesting and informative step-by-step master classes will tell. We will teach kids 3-6 years old to create thematic artistic images with a pencil and decorate them with felt-tip pens, and for children in grades 3, 4, 5, 6 and 7 we will reveal the secret of how to use a brush and watercolors to make original works on space, interstellar flights and various celestial bodies inhabiting the solar system.
Simple pencil drawing for Cosmonautics Day in stages for children in kindergarten
In honor of the Cosmonautics Day with kids in kindergarten, you can draw a very simple, but at the same time bright and beautiful thematic drawing - a rocket for space flights. If the work is done in younger and middle groups, it is better to refuse to use a compass. Guys 3-4 years old will not yet cope with such a drawing device and there is a great risk that someone will inject themselves in the process of creating a drawing. If you still want the porthole window to turn out to be even and symmetrical, you should take the round templates prepared in advance or invite the kids to circle the bottle cork or some kind of cap.

Necessary materials for a simple children's drawing for Cosmonautics Day
- A4 sheet of paper
- plain HB pencil
- ruler
- compass
- eraser
- set of colored markers
Step-by-step instructions for children's drawing in honor of Cosmonautics Day

Beautiful drawing for Cosmonautics Day with a brush and paints to school

Primary school students will undoubtedly be very interested in making a beautiful genre drawing with paints and a brush for Cosmonautics Day. The beauty of this work is also that children can show their imagination by depicting the astronaut and the objects around him as they imagine. It is completely unnecessary to stick to the details of the image. It is enough to keep the idea, adding some interesting details of your own.
Necessary materials for creating a drawing for Cosmonautics Day with paints and a brush for school
- paper
- simple pencil
- set of colored paints
- brushes (wide and thin)
- eraser
Step-by-step instructions on how to make a drawing at school in honor of Cosmonautics Day using paints and a brush
- On a piece of paper in the lower right corner, with a simple pencil, sketch a semicircle symbolizing the Earth.
- In the upper right corner, depict a round sun with several triangular rays, and in the upper left of the composition, draw a celestial body resembling Saturn in appearance.
- In the center above the semicircle of the planet Earth, draw the figure of an astronaut in a spacesuit, and on the left side of it, draw a flying space rocket.
- Take a wide brush and tint a fragment of the globe with blue paint. When the gouache dries up, draw continents of any shape on top with a green shade. To add volume, make several strokes of a lighter shade on them.
- Paint the sky surface with black silt with a very dark blue paint, carefully avoiding the figures of the planets, sun, rocket, astronaut and leave to dry completely.
- He will paint the luminary and the planet from above with bright yellow and orange paints. Paint the rocket with contrasting shades, leave the cosmonaut's spacesuit white, but use a thin brush to work out details such as straps, locks, cuffs, emblems, etc.
- Sketch a face, and write the word "Russia" on the helmet of the spacesuit.
- Add realism to the sky by highlighting the glow of the stars and intergalactic dust with white paint.
Thematic drawing for the Day of Cosmonautics for children 3, 4, 5, 6, 7 grade - a watercolor master class

For a school matinee or class hour dedicated to Cosmonautics Day, children in grades 3, 4, 5, 6 and 7 can make elements of festive decoration with their own hands, for example, draw thematic drawings or posters. Then, with these works, it is appropriate to decorate the premises of the school, in order to create a festive atmosphere and raise the mood of everyone present.
Necessary materials for creating a children's thematic drawing in honor of Cosmonautics Day
- Whatman sheet
- simple pencil
- ruler
- eraser
- watercolor paints
- brushes
Step-by-step instructions on how to draw a watercolor drawing for the Day of Cosmonautics in grades 3, 4, 5, 6 and 7
- Spread the drawing paper on the table, use a ruler to measure ¼ on the left side and on the bottom of the sheet, mark with a simple pencil and do not occupy this space with a drawing. Here, in the future, numbers and letters will be located.
- Dip a brush in light yellow watercolor paint and paint in the upper right corner of the sun and semicircles of rays emanating from it. Make wide strokes with the brush, leaving a little empty space between the yellow color.
- In the upper left corner, without going into the left wide strip on the side, draw the Moon, and paint the blue sky around with a thin brush with light strokes.
- In the sun's rays, paint two space probes with lilac and blue paint and leave the work to dry very well.
- Then, with a simple pencil, very carefully draw on top of the watercolor background a sketch of a space rocket (in the center) and an orbital ship (from the right edge a little closer to the bottom).
- To paint the aircraft with paints so that they match the general color of the picture.
- On the left side, where there is a white blank canvas, write a large vertical number "12" in red paint and add the word "April" under it.
- In the lower empty part of the picture, write in large blue letters "Cosmonautics Day" or any other thematic greeting, congratulation or short wish.
- At the end add a few strokes of red between the sun's rays, and behind the rocket make a few thin blue stripes symbolizing flight. Decorate the classroom or the assembly hall of the school with the finished work, where the matinee in honor of the Day of Cosmonautics will take place.
It is much easier for children of all classes to get acquainted with Cosmonautics Day with interesting stories and entertaining creativity. Therefore, students in grades 3, 4, 5, 6, 7 should be invited to draw a rocket, an alien saucer or a real astronaut. Cool and beautiful images will help children to invent their own space stories. You can create a drawing for Cosmonautics Day with pencils, paints, brushes. It is important that the child is comfortable working with the materials, and the subject itself is really interesting to him. In these photo and video master classes, you can find detailed descriptions that children will understand.
A simple pencil drawing for Cosmonautics Day in stages - for children of grades 3, 4, 5

Children who are in elementary school or just starting high school find it easier to draw unusual characters with smoothed lines. Such a simple drawing for Cosmonautics Day for children will be within their power and will not cause difficulties when transferring from an example. In addition, they can color it at their own discretion, which does not limit the flight of thoughts and fantasies of schoolchildren. An easy and very interesting drawing for Cosmonautics Day can be drawn in pencil even by those children who find it difficult to depict people.
Materials for creating a simple drawing for Cosmonautics Day for students in grades 3, 4, 5
- regular pencil of medium soft;
- eraser;
- A4 sheet of paper.
Step-by-step master class on creating a simple drawing for Cosmonautics Day for children

Cool drawing with a brush and paints for Cosmonautics Day - for children of grades 5, 6, 7

A cheerful astronaut is more suitable for the image of a toddler, high school children will more like drawing for Astronautics Day with paints in the form of a rocket. They will be able to color the aircraft itself, the fire, and the surrounding space in different ways. If you wish, you can supplement the picture with distant silhouettes of planets. It is not difficult to paint such a drawing for Cosmonautics Day with a brush, but it is better to use watercolor: it lays down softer and with its help it is easier to achieve smooth color transitions for space.
Materials for creating a cool drawing with paints for Cosmonautics Day for children of grades 5, 6, 7
- A4 sheet of paper;
- regular pencil, eraser;
- set of watercolor paints.
Step-by-step master class on creating a drawing with paints for the Day of Cosmonautics for schoolchildren

Universal drawing for the Day of Cosmonautics for children of grades 3, 4, 5, 6, 7

The cool rocket will appeal to all students, but there is another drawing that will surely delight the children. A beautiful UFO saucer will be portrayed by children with no less interest and admiration. Such a drawing for Cosmonautics Day in grade 4 will amuse students, but students in grades 6-7 will force them to show their maximum imagination to get a non-standard picture. For example, they can add eye-catching new elements to the Cosmonautics Day drawing step by step. A UFO can carry a cow away or an alien can look out of it. There are many options for finalizing the image, you just need to come up with your own story.
Materials for creating a universal drawing by schoolchildren
- a sheet of A4 watercolor paper;
- regular pencil;
- eraser;
- a set of paints or crayons for drawing.
Step-by-step instructions for creating a universal drawing for children of grades 3, 4, 5, 6, 7
