Contour drawing of black and white squirrel for children. Drawing squirrels in stages in the preparatory group
Read also
Now you will learn how to draw a squirrel simple pencil... We will need at least one soft pencil, I use three: 4H, 2B and 6B. When I was looking for a photo on the Internet to draw a squirrel, I came across an albino squirrel. I was shocked, a copy of my white rat, only with a fluffy tail, and red eyes, and paws are the same. Do not be lazy, for fun, look in search of a white squirrel, here is a rat and that's it. Strange, although the gray one does not at all look like a rat. I have a lesson on drawing a rat who wants to -. Now we are going to draw a gray fluffy squirrel.
Step 1. We draw by barely pressing on the pencil (I initially draw with a hard pencil), draw the squirrel's head. Click on the picture to enlarge.
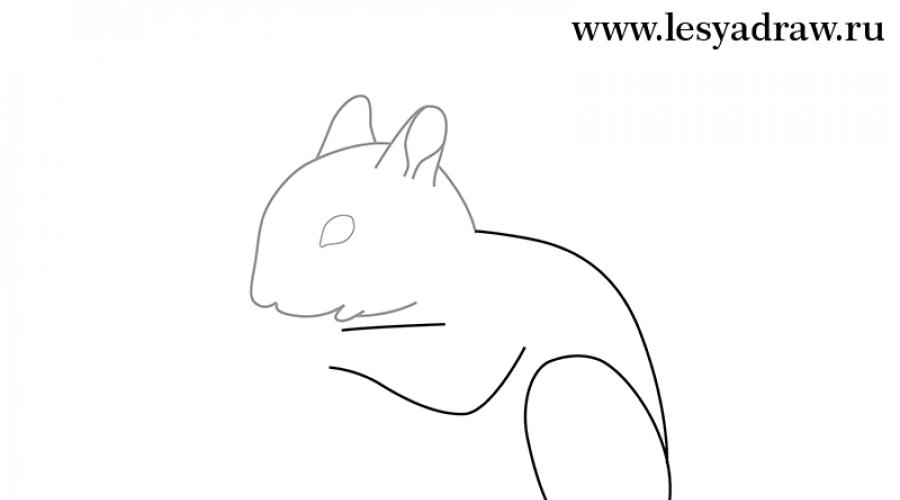
Step 2. Draw the line of the squirrel's back, paw and thigh.

Step 3. Draw the squirrel's legs.

Step 4. Draw a huge tail and the protruding part of the front paw.

Step 5. Here is the base for our protein.

Step 6. Paint over the eye, leaving a big highlight with white. We paint over the fruit in its paws. We erase the contour of the back and where it was, draw the protruding wool close to each other with lines. We also do with the hip and tail. Draw very small line segments on the squirrel's forehead. We draw lines on the body, as in the picture.

Step 7. Now take a soft pencil and draw new lines on top of the drawn ones. Look at the picture, you can see everything there.

Step 8. Take either the index or middle finger and smear the lines that we drew. We leave untouched places near the eyes and nose. Now soft pencil we pass along the edges, making it more saturated. On the forehead, you can add a little small lines, slightly barely noticeably paint over the area below the nose, where the mustache and mouth are. Near the ear to darken, maybe somewhere else, it's difficult to write everything in words. Then we take the eraser and finish the strokes with the edge, as now we drew wool. We erase between the ears quite a bit, we did not touch the nose and eyes, then, where the cheek is a white area, on the elbow at the squirrel, a white area on top of the thigh, a little on the belly and tail. We do all strokes with an eraser in the direction of the wool. We lubricate the borders of these lines with a finger so that it is more or less uniform.

Drawing, it would seem, requires special skills that should be developed from the very early age... So, babies usually begin to show interest in creativity at about the age of three. Starting from five, you can give your child the opportunity to draw with a pencil not just figures, but any representatives of the world of flora and fauna. How easy it is to transfer the desired image to paper, we will tell in this article using the example of a drawing of a squirrel.
10 Easy Steps to Create a Masterpiece
- Build on simple geometric shapes Oh... For a squirrel, such figures are two ovals. One large one can be placed in the center of the page at right angles. Whereas the second will be slightly tilted to the right and placed on the top left, in contact with the bottom. The first will be the base for the torso, and the second for the head.
- Draw the neck, respectively, connecting two ovals, smooth, slightly curved inward, lines.
 Let's move on to drawing the body... On the lower oval of the body, it is necessary to draw the legs. Fore tarsus is a small oval in the upper part of the body, irregular in shape, curved inward in the center and slightly flattened. The lower foot will be in two parts. This is the thigh and the foot. Draw the thigh as an oval tilted parallel to the body. It should be located inside the oval of the body, closer to the extreme left border. The foot is drawn as a horizontal flat oval lying directly under the body.
- It is necessary to connect all the ovals denoting the legs with smooth lines. A small curved line extends from the upper leg to the thigh. The oval of the thigh, in turn, connects to the foot. When the outlines of the legs are accurately outlined, you should erase the extra lines that remain from our blank ovals.
- The next step in drawing will be shaping the legs... On the front leg, draw a small curved oval, which will mean a brush with fingers. Light horizontal lines denote fingers, and thumb while drawing separately aside from others. Thus, we can place the mushroom there that our squirrel is holding. We also make the correct shape on the lower oval of the foot. It should be thinner at the base of the foot, and larger at the end. The foot itself ends in an angular rise. And also draw the fingers with two small horizontal lines.
- Now is the time draw the tail... To do this, mark the beginning and end of the tail. It should be slightly higher than the squirrel's head, and start from the lower right corner of the body, right where the hind leg ends. In this case, the extreme upper point should be about five centimeters from the squirrel's head. Connect the resulting outline with two smooth, curved lines. In this case, the left line should end even at the level of the beginning of the squirrel's thigh. And the right one should go to the very end of the body and be in contact with the foot.
- Let's draw cute squirrels ears with tassels... They will be very flat and elongated ovals. They should be located at a slight slope to the head, to the right. One eyelet obstructs the other, so the ovals should have a slight intersection. We draw small rounds above the ears, which should be connected to the main part of the ears with thin lines curved inward. This is how brushes are made. Let's remove the extra lines that were formed from the intersection of the original ovals.
- Let's move on to drawing squirrel muzzles... Let's draw the eyes, nose and mouth. Only one eye will be visible, since we see the squirrel from the side. Draw a small circle in the center, which we sharpen in the lower left corner, giving it the shape of a drop. Let's designate the pupil with a small circle inside the eye, which is shifted closer to the upper left part. So, the look of our squirrel will become perky. In order to draw a nose, just draw a small round in the upper part of the oval, which then connect to the head with smooth lines. To draw a mouth from the point where the nose ends at the bottom, draw a line downward, giving swelling and shape to the muzzle. Then swipe perpendicular line to the base of the head a short distance. A small bend at the end will give the squirrel a smile. Now it remains to erase all unnecessary intersection lines left over from our sketches.
- Let's draw a fungus in the squirrel's paws. To do this, let's draw two ovals. One more rounded in horizontal position slightly tilted up. The lower oval will be oblong, elongated and narrow, in an upright position, it will turn into a leg. Make it slightly to the left. On top of the horizontal oval, draw an arc parallel to the main line of the oval. At the bottom vertical oval, draw a curved line downward at the base. Thus, our fungus has gained volume. Erase the unnecessary intersection lines of the ovals.
- Our squirrel is almost ready. For completeness, only small strokes are missing. Let's designate the fluffy fur of the squirrel by drawing light oblique strokes along the contour of the tail and along the breast. Let's add liveliness and color to the drawing by painting the squirrel with crayons, pencils or paints. The squirrel will be red, with darkening on the legs and a white breast. The fungus will be yellow with a brown cap and white stem. The masterpiece is ready!
For a drawing with a squirrel, we need: a sheet of thick A4 drawing paper, a set of gouache, hard bristle brushes (large flat No. 10 for the background, round No. 2 or No. 3 for drawing a squirrel) and a thin round soft brush (for example, synthetics No. 1 or # 2) for details. Don't forget a jar of water, a palette, and a cloth for wiping your brushes.
Making a sketch
On an A4 sheet, using a small brush and any paint (I use brown), we apply the basic outlines of the squirrel, the branch on which it sits and the trunk of the tree. At this stage, it is important to simply convey the basic shapes and positions of objects on the sheet of paper. If you find it difficult to start drawing this way, you can sketch it out with a simple pencil instead. 
Draw the background
Let's start working on the background. The main background color is green, because the forest and foliage of some distant trees are visible on it, but we do not paint the background evenly with one color, since there may be gaps in the foliage, some areas are illuminated, somewhere a shadow falls. Therefore, we mix whitewash, ocher, brown, somewhere blue or other colors that you will see there to the main green color. We pick up the paint thickly, almost without diluting it with water, onto a hard large brush and spread it quickly, rubbing the borders of different colors, while the paint has not yet had time to dry.
In order to push the main objects of the drawing onto foreground and not to allow them to merge with the background, we try to play on the contrasts of light and dark. So, light falls on the branch from above, and its lower part is in the shadow. Accordingly, we try to make the background above the branch darker, and under it - lighter. Also with a squirrel, where the squirrel's coat is lighter, the background is dark, and vice versa. 
Tree trunk and branch
The trunk of the tree is covered with bark plates and scales of different colors. We draw them in large vertical strokes, without rubbing the boundaries between different colors... We use ocher, brown, a mixture of red and brown to paint the bark, as well grey colour obtained by mixing black and white.
The branch on which the squirrel sits is drawn brown paint, which in the upper illuminated part is diluted with whitewash with a small addition of ocher. We make a smooth transition from a dark color at the bottom to a light one at the top, rubbing the paint that has not yet dried, just as we did with the background. Closer to the trunk, behind the squirrel and under it there is a thick shadow, which is painted with dark colors, here you can add a little black to brown. At this stage, you can also correct and align the shape of the trunk or branch if you made a slight mistake with them or partially covered them with the background. 
Basic protein tones
We look at the photo with the squirrel, you can squint a little, and look for the main tonal spots, dark and light areas of her fur coat, and then apply them to our drawing. The main paints used are ocher, brown and white. The muzzle, legs and tail of the squirrel are red. Ocher is quite close in color to red wool, you can mix a little red with it for certain areas, so you get a brighter red color. I do not recommend using a mixture of red and yellow, which, although it gives orange, is too bright and harsh to paint animal fur with it. For the ears, we use ocher and brown. The back is gray-brown, for this it is enough to mix brown with whitewash in different proportions to get a different lightness of the shade. The breast is white, but it is better not to use pure whitewash, add a drop of brown to them. It is important to keep track of where the lighter and darker areas are in order for the drawing to gain volume. I got it like this: 
Detailing
After all the basic tones and objects of the drawing are applied, you can start drawing small details. We start by marking the bark flakes. With a thin brush with a mixture of brown and black paint, draw cracks in the bark, show the shadows from the lagging scales, slightly blurring the dark paint and emphasizing the edge with black. At the edge of the tree, where it is wrapped, the scales will appear narrower, since we see them from the side. Where the trunk is facing us, the scales are wide. Try not to draw them the same in shape and size, the monotony makes the drawing boring. 
How to draw wool
The effect of wool in gouache can be obtained with a dry bristle brush. She is typed a small amount of paint, no water added. You can wipe off excess paint on an unnecessary piece of paper. The brush should leave a light, dry mark of paint, not smears. You can practice first on a separate sheet. If you need to dial in a different color, rinse the brush and dry it well with a cloth so that no water remains on it. The bottom layer should show through under the dry brush strokes, we do not overlap the previous colors new paint... With a brush, work in the direction of the growth of the coat, with quick movements. We use the same colors for the wool as for the basic tones of the squirrel, but more clearly specifying them and adding contrasting wool. The squirrel's tail is fluffy, here we make sweeping strokes, going beyond the previously drawn contour, so that the feeling of long soft wool appears. The same is on the ears. On the rest of the body, the hair is shorter, therefore, we will make the strokes shorter. 
We are finalizing small parts, we finish drawing
On the last stage draw the paws, dividing the toes, draw a shadow under the paws on a branch and a shadow on the squirrel's fur coat under the front paw. You can add some bright “tasty” spots on the fur coat. We draw in the white of the eyes. Pay close attention to the position of the eye so that it is in its place, do not raise it too high to the ears or the back of the head. First, we draw the basic shape of the eye with black paint, then we add highlights, muffling them. purple, draw light hair around the eye. Use a thin brush to mark the mustache and eyelashes. You can also add a few cracks on the branch. 
Lesson author: Kira Neyman
In today's master class, we will learn how to draw a forest beauty squirrel with pencils. You will see that there is nothing difficult in the image of this animal.
The body of a squirrel consists of several elements, which together give such a complex figure. To make it easier to depict it, it is best to use simple geometric shapes. Then it will be possible to detail the whole drawing.
Necessary materials:
- black marker;
- simple pencil;
- paper;
- eraser;
- colored pencils in yellow, orange, brown and burgundy tones.

Stages of drawing a squirrel:
We draw the squirrel's head in the form of a circle. Then we draw an arc in the lower part in order to depict the neck and part of the back. 
On the head, draw a vertical arc through the entire circle. Draw two small circles of different diameters to the arc, which is the neck and back. There will be a small circle under the head, and then there will be a larger circle. 
On a large circle, draw a part of the squirrel's lower leg in the form of a semi-oval. Draw eyes in the form of two ovals on the head. 
We detail the muzzle and head of the squirrel: we finish drawing the pupils in each eye, the nose in the form of an oval, the ears. 
We finish drawing the lower leg. We draw a large and fluffy tail for our animal. 
We draw other small details of the face: cheeks in the form of semi-ovals, a circle around the nose, mouth, eyebrows and a line on the right ear to create the middle. 
Draw the upper foot in place of the small circle. She will have several folds. Therefore, you should very carefully study the figure, and only then transfer it on paper. We detail the tips of the legs. 
Remove auxiliary lines and circles with an eraser. We add wool to the lines. You can detail the drawing of a squirrel and bring it to an ideal state, because then it will no longer be possible to do this. 
With a black marker, draw a circle around the drawing of a squirrel. Paint over the nose and pupils completely. 
Partly paint over the drawing of the squirrel with a yellow pencil. 
Paint over all white areas with an orange pencil. Let's leave only the teeth and eyes white. 
After walking around autumn forest your kid wants to draw a squirrel, and you have no idea where to start? Then this small master class is for you!
To get started, grab the following tools:
- plain pencil (non-greasy);
- eraser;
- felt-tip pens or colored pencils (you can use watercolor or gouache);
- sheet of white paper.
To start drawing, decide on the plot of the drawing. A squirrel on a tree? Is the squirrel gathering supplies for the winter or is it just running through the autumn forest? If the plot is clear, then it's time to get to work.
How to draw a squirrel with a mushroom
Imagine that a squirrel decided to go to visit his friend the hedgehog and grab some presents. Autumn is the season of mushrooms, so let's draw a squirrel with a mushroom in hand. By following this simple diagram, your child will quickly learn how to draw this wonderful animal. Connect your imagination, draw clouds, the sun, birds and the hedgehog itself.
How to draw a squirrel sitting on a tree
Let's imagine we saw a squirrel on a branch. It is not difficult to draw this animal, the main thing is to follow following scheme... Pay attention not only to the squirrel, but also to its habitat. Let the child draw a forest or park, a lot of trees, because the squirrel loves to travel.

How to draw a squirrel about to jump off a branch
The squirrel does not sit still. This agile and agile animal moves very quickly. Imagine that a squirrel from a tree saw a nut on the ground and she urgently needs to run after him. Let the child try to draw a squirrel jumping from a branch using this simple scheme.


How to draw a squirrel from the cartoon "Ice Age"
Many children fell in love with this funny squirrel from “ Ice age”. To draw it, the child will need your help, because this is an unusual animal.
Start with the head, then move on to drawing the body. At the very end, draw a tail and an acorn.


How to draw any squirrel
To draw a squirrel, you need to represent it in the form of geometric shapes. The head and legs are circles, and the body and tail are triangles. Below you will see a universal scheme by which you can draw any squirrel.


Experiment with your child. Through drawing squirrels, you can easily learn letters B-E-L-K and A. Connect your imagination, come up with funny stories to involve the kid in the process.