Learning to draw a house. Draw a beautiful house with a pencil Paradom with children
Phased drawing At home, colored pencils should have each element smooth and beautiful, so we will certainly use a ruler in the image. From hand you can draw bushes around the house and a small window in the attic.
Necessary materials:
- set of colored pencils;
- ordinary pencil;
- black marker;
- eraser;
- line;
- paper.
Stages of drawing:
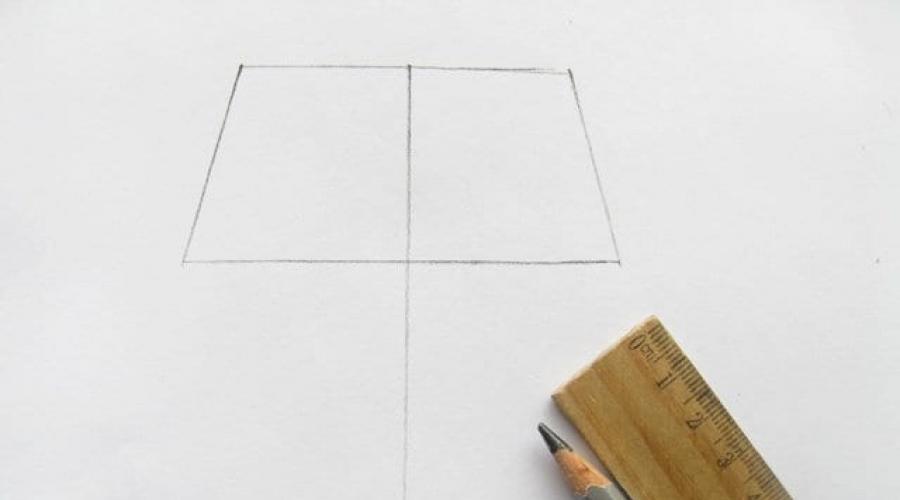
1. To begin with, you will need to draw a vertical line on a piece of paper. It will be the middle in the picture. Then draw the roof of the house. Externally, it will resemble a trapezium. From above, the horizontal line will be shorter than the bottom. For convenience and simplicity you can use a ruler.

2. In the middle of the drawing, add the vertex of the triangle. In the future it will be an attic room with a small window.

3. Dorisuha on the sides of the roof on one line. Then connect with the main roof circuit, drawing at the bottom of another short line.

4. Then, you can draw an attic room with a window. To do this, I will first draw a part of the square and then supplement our small roof by an additional layer.

5. In the middle of the square, draw a small and pretty window. It can be any form. We have chosen a round window. It is unusual in shape and probably interested in sitting and looking out of the attic room.

6. Add the roof at the bottom of the roof another horizontal line and connect with the main contour. Dorisis the main part Houses - walls. They will hold the roof on them. Show this part of the house in the form of a square.

7. The desired element in each house - entrance door. Before her image, we draw a small rise in the form of a step to make it easier to enter the house.

8. Take a big window on the right side. We must definitely draw a frame. Add window partitions.

9. Under the doorway, draw another one. Dorisu around the house is green bushes.

10. We remove all unnecessary lines and begin to circle our drawing. It is better to do it for a ruler.

11. First affect the roof of the house. Take a yellow pencil for this purpose.

12. For realistic in the windows, you can draw glare pencils of blue and blue.

13. Decorating the walls of the house at the bottom and in the attic brown pencil. The same color will be steps under the door.

14. Red pencil give the color of the window frame and the front door.

15. Green pencils of two shades show off her greens near the house.

That's ready! See you soon!


If you have found a mistake, please select the text fragment and click Ctrl + Enter..
Many love B. free time engage in creativity. it great way Relax and even you can portray any character of a book or movie. And you can figure out how to draw beautiful house. After all, every day passes by huge number Buildings, therefore, it will be interesting to portray any structure on a sheet of paper.
How to draw a wooden house?
A city resident most often sees only stone buildings. You can look at the house from the logs only in the villages, and there are far from all the townspeople. It is worth trying to independently depict such a house surrounded by nature.

Sort out how to draw wooden house Pencil gradually, can even a teenager. Such a landscape can be given to someone from relatives or hang on the wall. In a similar way You can depict rustic houses, as well as a fabulous hut Baba Yaga.
How to draw a two-storey house?
It will be interesting to try to portray the structure with two floors. There are several options that are suitable even inexperienced artists:

It will be interesting to learn how to draw a pencil with a courtyard and some buildings:

So you can learn to portray a variety of buildings from the village to urban. Parents can explain to children themselves how to draw a house in stages. After all, for this you only need a desire and patience.
How to draw a house kids?
The smallest can be suggested to try this option:

- First you need to draw a square. Optionally, the baby can use the ruler.
- Now you need to portray the triangular roof.
- Let the child draw a window on the wall. And then you will need to add the outlines of other sides of the roof and walls.
- It remains to add details, such as the door, pipe. You can depict logs from which a house is made.
- If the crumb wants, it can decorate the drawing.
Also, preschoolers will suit another way with which you can portray a fabulous hut:

- First you need to sketch the contours of the house.
- Next, the straight line you need to separate the wall from the roof, and also depict the windows on them.
- The baby can be added to the line to add straight lines on the side of the roof and between it and the wall. Let it independently paint the windows and legs for the hut.
- Now you can paint the picture at your discretion.
The kid can hang his drawing on the wall or stored in the album.
Articles on this topic:
|
Children simply adore to invent with their parents from handicrafts, from materials that are familiar to them in a familiar life. How much can you invent different ideas from cotton disks and sticks! Ordinary things are easy to turn into wonderful little animals, sun, tuchs, wood and much more. |
Now we draw a simple house, it is not necessary to detail it, only the main lines can be drawn. We must need a ruler, so that the house turned out to be smooth.
Step 1. Do we draw two rectangles, upper slightly below the bottom.

Step 2. Draw a squeeze sides of the roof and additional decorative lines.

Step 3. We wash the horizontal side straight from the rectangle, then draw the door and windows.

Step 4. Put the grille on the windows, we will have an attic from above.

Step 5. Play the window in the attic and this can be finished, but who wants to draw the whole house, continue. Draw parallel lines on the roofs.

Step 6. Draw a tile. Let's start from the bottom row. We plan the middle of the house and spend the horizontal straight line in the very first bottom row. Then we draw to the left, while every time we make a line straight right to the right, then you draw right, making the farther, the greater the slope of the left line. Now go to the second row of the bottom. Each straight line draws is drawn in the middle between each tiling of the first row, do not forget the closer to the side, the one should be inclined to the other side. We continue to do so on the top row inclusive. Then we draw patterns and on the sides and on the roof of the attic. I drew wavy lines with circles, you can come up with your pattern, it is not fundamentally.
How to draw a house in a phased pencil with a perspective. In this lesson, I would like to tell how to draw a smooth house. You probably heard the word - perspective. Do not be afraid of this word, because it is the prospect that will always help you draw flat buildings.
How to draw a house phased
I'll try to tell how to draw a house stages, at the most simple and understandable language. That is why I will not tire you with a multitude of lines.
Practice and only practice will help you find out what perspective is and how to draw a house with her help. For drawing you need a ruler and a soft pencil.
Let's start with the fact that you draw the horizon line, approximately in the middle of the sheet. Note on the horizon line two points - "A" and "B". From each point we carry out the line intersecting between themselves.

From the intersection point, take up one vertical line. Then on the right and on the left, too, spend on one vertical line. See the drawing below.


Walls at home are ready!

I wipe the extra line, and get ready to draw the roof. This is the next stage of the lesson how to draw a house in a phased pencil.
From the point "B" we spend two horizontal lines. Then you need to draw a vertical line, up to the intersection from the top horizontal line. See the drawing below.


After that, it is necessary to carefully wipe all the extra lines, and put the roof and walls of the house. You should leave the horizon line so that you can draw the doors and windows. Thus, everything will be smoothly and symmetrically. I deleted my horizon line so that you fasten your knowledge and tried to draw on your own.

The next step will be drawing the door, windows and smoke pipe at home. You can locate windows and doors, as you want!

Pencil "3B" I draw a roof, the sunny side of the house (wall on the left) pencil "H", and where there are the doors with a pencil "NV". Do not press on pencils so that the barcode is impaired.
Before you start drawing a house, you need to carefully look at it: High it or low, where the door is located, how many windows in the house, how many floors. Pay attention to the roof of the house. Work on drawing common form At home, from his facade (that is, the view of the house when you look at him directly and see only one wall and roof). Note the height and length of the house, the size of the window and its place. Do the same with the door. Watch the windows of the windows, the lower edge of the roof and the base of the house were horizontal. The windows can draw in the form of cells with straight lines from top to bottom and left to right.
Toy house
And you can still draw such a house. It looks like a toy.

Multi-storey building
If we draw a multi-storey house, you will note that the windows are on the same vertical line (top row over the lower). In addition, all windows of one floor are usually at one height, on one horizontal line.
How is it better to place a house on a sheet of paper so that it is not very small: in the length of the sheet or width?

When we draw people, think about what size they should be compared to the house. Look at the drawings and tell me where the artist painted correctly, and where not.
