How to draw a poemaid pencil a beautiful house. Put the house with a pencil phased
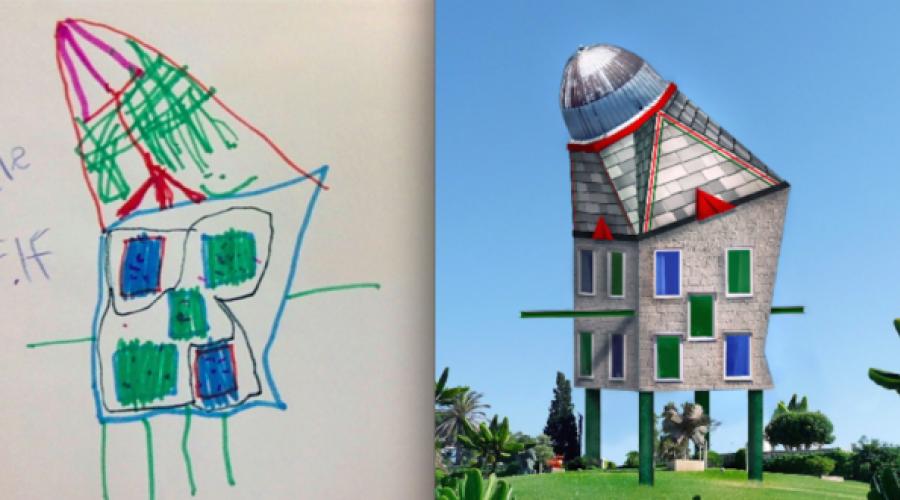
Every year the construction industry is improving, offering people more and more comfortable and beautiful homes and apartments for housing. If you just think about how the houses have changed in one century, you can closing the eye to visually imagine how much time it can change. You can argue on this topic to infinity. However, not every person can express their thoughts on paper. Therefore, in today's article, we decided to push our readers to work, demonstrating how future the future drawing pencil may be original and unique. The photo below suggested the ideas that you can use in the creation of dream dwellings, well, or as a sample for drawing.
How to draw a house of the future drawing with a pencil?
To draw a pencil to the house of the future, you need to prepare all the image tools in advance. In addition to a simple pencil with a solid giffing, it is necessary to have a few white sheets of A4 format, eraser, color pencils, paints or markers for painting finished work at hand. Also, artists recommend in advance to think over the house of the future in their understanding. For example, whether it will be similar to the Royal Castle, a spacecraft, a geometric shape or flower.
Do not forget about the facade of the house. It may have a panoramic view, unusual windows in the form of geometric polygonal shapes, and even the lack of doors.


House of the Future - Picture Pencil Picture
Below are more than 20 options for houses that differ in appearance and internal filling in the cut. Each model is unique and unique, has its own characteristics and unusual details.
If you compare each dwelling among yourself, it is impossible not to note the discrepancy in shape, material, parameters, and even the items necessary for comfortable life. We are talking about windows, entrance doors, foundation at home and even an external facade. After all, the decision on the landscape near the standing area is to solve only the owner.


Think out all the details of the house of the future, visually presenting each detail. This will help depict the dwelling in a short time without resorting to help.
Take care that all drawing attributes are at hand.
Use your idea of \u200b\u200ba dream home, not sinking from a ready-made layout.
Any paint, pencils and markers will be suitable.
Without artistic skills, it is better not to be taken for complex work. It is better to make a choice in favor of one-story, uncomplicated residential premises painted in one color.
Drawn houses of future children, pencil drawings in the photo:


Complexity: (2 out of 5).
Age: From three years old.
Materials: Tight-paper sheet, wax chalk, simple pencil (just in case), eraser, watercolor, palette with water deepents, big brush.
Objective: We pass and fix the knowledge of the form of the square (home, window), triangle (roof), definition (horizon line).
Progress: The child draws a large square (future house), then a small square (window), then a triangle (roof), deactivate.

We have a sheet vertically, it means a short side to yourself. Always pay attention to this your baby, because it should know such concepts as vertically and horizontally. The more often you will mention it in class, the faster the child will remember.
Now for the walls of the house, I choose any color of the wax chalk, which he wants and tries to draw a square. If the baby is not confident in herself, let him draw a square with a simple pencil, until he succeeds. All sketches with a simple pencil are made by light movements without pressing it, so that the eraser would easily remove misses.

Draw a roof house in the form of a triangle. And paint the resulting parts. Our house is ready! We begin to paint wax crayons.
Draw a horizon line. Another definition that your child should know. Repeat it more often and the baby will remember him. The horizon line is the line of connecting the sky and the earth.Draw it with a simple pencil.


We proceed to one of the most interesting stages. We take a thick brush and divorce 2 colors of paint in the palette (blue and green), plenty of water. Macham brush into diluted paint and apply a blue color from above (heaven), from left to right and moving down to the horizon line. But then we will have to wait, when the paint dry, otherwise when we will draw green (land) can be ugly. We check the sky in the drawings if it dried, then proceed to the final part - we draw the Earth. We draw it as well as the sky - to the left of the right and from top to bottom.

How to draw a house with a pencil in stages? In this article we will learn to do it. It may seem to draw a house very difficult, but it's not at all.
We draw a house, not a house :) Therefore, we will draw with the side view without drawing volume figures. This will greatly simplify the drawing process, of course, if you feel the strength, you can try the volumetric elements of the house, that is, the second wall and draw the roof.
On paper, we will portray the most ordinary village house, which can be found in almost every city of the world. So let's get up!
Phased sample drawing
We will draw pencils, so we bask the usual pencil, color, eraser and sharpener. And, of course, paper.
Stage 1
The house will consist of two parts (you can watch the finished drawing), draw a rectangle and divide it into two parts. Please note that the rectangle should be divided not in the middle, but a little with a displacement to the left side. 
2 stage
In the second step, we plan a roof and a doorway. We plan to do the door pass so wide not just like that. The door pass is so wide, because it will not be one door, but two. 
3 stages
Now a pencil detail the roof and insert the windows into our house. The windows do not have to be square, very often rectangular windows are installed in buildings.
Nevertheless, the windows must be located at one height, otherwise your building will be very unrealistic. For accurate markup, you can even use the ruler. And if you have an eye-diamond, then it is not necessary to use the ruler :)
Also, around the bottom of the building need to draw a decorative strip. 
4 stages
We supply the windows and the door to another line, it will give a little the effect of volume, despite the fact that our goal is not to draw a bulk house.
On the roof it is necessary to portray the smoke pipe, otherwise where will Santa bring gifts to Christmas? 
5 stage
The fifth is a very important step, because it's time to detail the entire building. Insert the doors, undermine them as a staircase. Insert glass windows, also detail the roof and lower, decorative buildings of the building. 
Every person has a wonderful place where he was born and grown. This place is home. The house is not only an architectural structure intended for living, but also the corner where you constantly want to return, where you love and wait, always listen and help if necessary. No wonder the house is a symbol of life and communication. And it does not matter, the old one is home or quite recently built, the main thing is that the life of a person will not be complete. The house for a child, like his parents, is an integral part of life. Therefore, children love to draw different types of home. But how to draw a house in stages? In the process of preparing for drawing at home, remember with the child, which are at home: one-story, multi-storey, built from blocks or bricks. If the child grew up in the city, tell me how the houses look like in the village than they differ from urban homes. Consider on the drawing of the house of different types. It is very important to determine which parts is this or that kind of house, separately exercise in the design of the geometric shapes - elements of the house. Find out whether the child is planning to portray something around the house. And then help choose everything you need for drawing - and let your baby build a house on paper!
What do you need:
- white sheet of white (can be an album for drawing or sketch-beech);
- simple pencil;
- colour pencils;
- eraser.
- To paint the house with a pencil take a sheet of paper and a simple pencil. Draw the figure shown in Figure 1.
- Draw a rectangle on the right to the resulting figure.

- Now you see that we started building a house and we need to try the roof. Follow the example in Figure 3.
- On top of the roof we draw a smoke pipe. She has a square, strong.

- Below on the house Draw a line. It will be an ornament for our facilities. Put in the places where you want to draw the windows. This is done so that the windows are accurately placed.
- Now we draw the windows. They can be square or so rounded as I.

- It will be not difficult for a child to draw such a house, you need to remind you that the house must have a door and you can also decorate. We also teach the details of the windows, follow the example in the figure "7".
- It is time to decorate our house. On the roof you can select several slate pieces, and below, under the line - pebbles as the decoration of our building. In the windows - curtains. You can decorate not only the house, but also the territory around it. Here you can connect your fantasy as possible. Personally, I drew a fence as an integral part of the territory, wood and lawn.

- Draw a house in stages for children will be especially interesting during coloring.

It is also worth considering the example of drawing no longer a cottage house, but a multi-storey. For example, I decided to bring a typical view of a residential building. For drawing, we use a sheet of paper, a simple pencil and a ruler.


The house is an architectural structure, so drawing it in stages, first you need to build a general drawing of the house, and then start "building" and add other parts of the house to the picture. Drawing a house can not do without a ruler, and, of course, a pencil. The house should look symmetrically, so you need to accurately place the size of the height, width, etc. Using a ruler.
The house can be depicted in different ways, for example, to make a roof of the tiles, draw dual doors or add a fireplace pipe laid out of a brick. These "little things" draw your desire, but any house must have a foundation, walls, roof and doors with windows. If you follow these rules, then the lesson, how to draw a house It will be very easy for you.
1. Common drawing of the house

To create a drawing of a home draw a rectangle first. Measure more than half of the space inside it and spend the vertical line at this point. It will divide the house into two parts, hallway and living room. The purpose of this lesson learn to see the proportions of the house, my drawing is not necessary to copy, you can choose another planning of the house for your drawing.
2. Roof contours and doors

Inside the left half of the house, draw in the middle of the roof line, the point of its vertex. From the end of the right line, swipe a horizontal line, up to the end of the house itself, it separates the roof from the walls. On the right side of the picture, draw a rectangle for the future door.
3. How to draw windows

You see that drawing a house in stages, with the help of a ruler, everything turns out quickly and smoothly. And only it is worth painting the windows and the foundation, the picture at home will be almost ready. At the bottom of the picture, run a line for the foundation, it must be at any home. Circuit roof contours with additional parallel lines. In the living room, drew two rectangles for windows.
4. Add more details in the drawing of the house

Now you need to slightly "trim" the roof on both sides, making a small slope for it. Rarely roof houses are straight, builders are always trying to give her an interesting, unusual form. "COMM" roof lines of debris in two places. Circuit windows and door with additional contour lines. At the bottom of the house, add another plane for its bottom. Near the separation vertical line, draw a rectangle with a small other rectangle at the top, this figure will serve as chimney. Draw in the left side under the roof line of connecting the roof with a wall.
5. How to draw a house. The final stage

Pencil parallel lines of the front part of the roof to create the effect of the plated boards. Draw jumpers in the windows. Draw a doorway from two halves. At the bottom of the entrance draw the threshold. Foundation "Make" from the brick, dividing the overall contour to the cells. The roof must also be decorated. It is best to draw the details of the tile. Will have to work a little, but drawing at home It will be more beautiful. The fireplace pipe will also be made of bricks.
Video drawing of a country house in a three-dimensional perspective.
6. Color picture at home
Drawing a house can not do without the surrounding landscape, consisting of trees, herbs, blue sky, bright yellow sun, dialing animals, people, etc. Be sure to color the picture of the house at your discretion with colored pencils or paints.
Drawing at home, castle - a good lesson for learning drawing. An ordinary simple pencil is gradually you will learn to draw the proportions of the building, create a perspective for the area around the house, learn from the help of shadows and lines to give volume walls.
The tree is quite often becoming an object of children's drawings. After all, what picture of the house without trees. But the tree is not so easy to draw, as it seems, so novice artists better draw the tree in stages and first a simple pencil.
Beautifully when trees grow next to the house, flower beds are broken. Drawing a house, be sure to draw a number of flowers.
First of all, several tips on drawing techniques. Some people have a habit of drawing intermittent lines, and sometimes to circle them. Try learning how to draw the lines in one movement, do not be afraid to make mistakes.
Favorite cat at home on the sofa, a cat in boots from a beloved fairy tale or a favorite cat often become characteristics of children's drawings. In addition, such pictures can become a good decoration of the children's room. But in order to correct the cat, let's go a little.
Senbernar is a bad guard at home, but just a reliable friend. He will not be diligently barking on someone else who came to the house, but he will save the covered snow avalanche of man. In this lesson, we will learn to gradually draw a pencil dog Senbernar.