Draw a picture on the theme of theater. Drawing project on the theme: “Wonderful world of theater
Instructions
Draw a rectangle. Divide it conditionally into four parts. The curtain pieces will be placed on the sides and top. And below - the immediate place of performance - the floor.
Draw straight vertical lines on the left side. There should be at least 5. Then draw 2-3 more, but shorter ones. And after that, they are very short, about half shorter than the first lines.
Do the same on the right side. Only everything is in a mirror image.
Place a dot in the middle of the top line of the rectangle. Draw curved lines from it. As if depicting a wide-spread letter "l". Draw a few more above them. These will be the folds of the fabric. The strokes don't have to be the same. Make them different in both length and thickness. The ends should reach the beginning of the shortest vertical lines. In the place where they meet, draw lines that smoothly diverge to the sides. These will be the curtain holders.
Draw several parallel straight lines at the bottom of the rectangle. They will represent a plank floor.
Shade with deep shading where you want to indicate folds. The same goes for the folds at the top of the curtain. Here the shadow should repeat the arched lines. For a spotlight effect, draw a circle, and within that circle, paint everything half a tone lighter. Pay special attention to the color of the plank floor. It cannot be completely monochromatic. Mix several types brown paint or add a little black. Draw the lines of the slits in the floor with a bold line.
Going to paint a portrait, landscape or still life, an aspiring artist is invariably faced with what needs to be portrayed folds... It can be folds of clothing or draperies. Draw them in different ways, depending on the nature and purpose of the work. Sometimes a fashion designer also needs to draw folds. The pleats on the skirt are the most affordable option, so it's best to start with it.
You will need
- - paper;
- - a simple pencil;
- - colored pencils or paints.
Instructions
Draw the skirt of the model you want. If this is a model with a counter fold, then divide the bottom line of the belt in half. Draw 2 diverging lines from this currents down. Lead the lines down to the bottom of the skirt. The piece of fabric located between the folds appears to be slightly shorter than the length of the product. Therefore, step back a little from the bottom and draw a straight or slightly curved line between the folds of the fold. When painting such folds, no tricks are required, fill the skirt with one color, and circle the contours of the product and folds of the folds with darker or paint.
For a skirt or skirt with longitudinal pleats, divide the bottom line of the belt into an arbitrary number of parts and put dots. From these points, draw slightly diverging lines downward. Draw them longer than the skirt itself. Connect the end point of the fold to the intersection of the bottom of the skirt and the adjacent fold. Connect all other points in the same way. You should end up with something like "". Color the skirt in the same way as in the previous version.
Soft folds are transmitted mainly by light and shade. Draw a product with such folds - for example, or the back of a musketeer's cloak. Please note that if the bottom of the product is presented in a projection on a plane, it will not appear straight, but wavy. Change this line.
In this tutorial, we will create red curtains using filters, vector objects, and layer styles. You will learn how to create realistic textures, draw beautiful ropes, create shadows and work on the shape of vector elements.
Final result:
Step 1
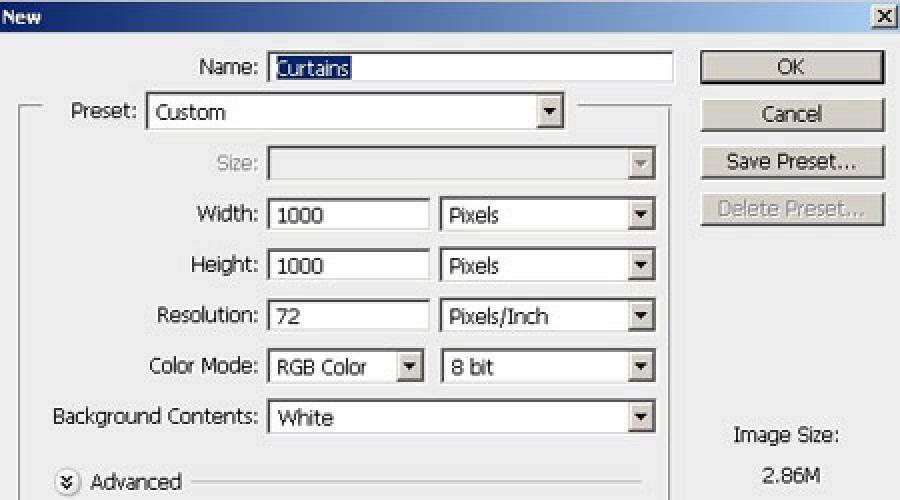
Create a new document in Photoshop (Ctrl + N) 1000x1000 pixels.

Step 2
Set the default colors (D), create a new layer (Ctrl + Shift + Alt + N) and apply Fiber filter(Filter> Render> Fiber) (Filter> Render> Fiber).

Step 3
Apply Filter Application(Filter> Simulation> Applique) (Filter> Artistic> Cutout).

Step 4
Apply Motion Blur filter(Filter> Blur> Motion Blur).

Step 5
Double click on the layer with the resulting texture to open the style window. Apply style Color overlay(Color Overlay): Mode - Multiply.

Step 6
Duplicate the texture layer (Ctrl + J) and hide the original by clicking on the layer's eye thumbnail. Tool Rectangular area(Rectangular Marquee Tool) (M) select the left half of the texture, cut it from the layer (Ctrl + X) and paste it on a separate layer (Ctrl + V). You will notice that after pasting, the red color disappears. To add color again, copy the color blending style from the previous layer via the context menu and paste it on a new layer.

On the half texture layer, activate Warp mode(Edit> Transform> Warp) (Edit> Transform> Warp) and reshape the texture as shown in the screenshot.

Place the resulting curtain on the left edge, and then create the same one on the right.

Step 7
Choose a tool Feather(Pen Tool) (P) and draw lower part curtains as below. Reduce the opacity of the layer to change the curvature of the bottom edge. The color of the shape is not important.

Select the drawn shape (hold down Ctrl and click on the layer thumbnail). Go to the menu Editing> Clear(Edit> Clear).

Change the bottom edge of the other curtain.

Step 8
Go back to the original texture layer and make a rectangular selection. Copy it to a separate layer (Ctrl + J). Place the texture in horizontal position using the mode Free transformation(Ctrl + T), activate warp mode, select warp type Arc from below(Arc Lower) and set the Bend (Bend) to 70%.

Resize the new part of the curtain and center it on top. Create two copies and place them on the sides.

Step 9
Now we are going to create the curtain brushes. Choose # ecc242 as your main color. To draw the ropes, we need to prepare the brush. Create a new document in Photoshop 200x150px with transparent background... Tool Feather(Pen Tool) (P) draw a shape like this:

Apply the following styles to this shape:
Outline(Stroke): Position - Outside, Mode - Normal, Stroke Type - Color.

Inner shadow

Result:

Go to the menu Editing> Define Brush(Edit> Define Brush Preset) and save the brush as "Rope". Return to the main document, open the brushes panel (F5), select the created brush and adjust it like this:

Choose a tool Feather(Pen Tool) (P) in Paths mode and draw a line as shown in the screenshot. Click on it with the right mouse button and select the item Stroke the path(Stroke Path).

In the window that appears, select Brush(Brush) and the path will be stroked with the previously configured brush.

Step 10
Select all the rope layers and merge them (Ctrl + E). Apply the following styles to the resulting layer:
Inner shadow(Inner Shadow): Mode - Multiply.

External glow(Outer Glow): Mode - Lighten, Method - Soft.

Casting a shadow


Step 11
Choose for tool Feather(Pen Tool) (P) Shape mode. Draw two elements as shown below.

Apply the following styles to the bottom element:
Inner glow(Inner Glow): Mode - Overlap.

Gloss(Satin): Mode - Overlap.

Casting a shadow(Drop Shadow): Mode - Multiply.

Result:

Apply the same styles to the top element, except for the style Gloss(Satin). Create a copy of the two elements, rotate them the other way (Edit> Transform> Flip Horizontal) (Edit> Transform> Flip Horizontal) and place them on the right curtain.

Step 12
Create a new layer under the top curtains. Select a soft brush with 20% opacity and paint shadows underneath.

Step 13
Now let's create shadows for the side curtains. Make a copy of the left curtain layer and lower it under the original. Apply style Color overlay(Color Overlay): black. In warp mode, change the shape of the shadow a little.

Reduce the opacity of the shadow layer to 30%. Then do the same with the right curtain.

Step 14
Create shadows from the brushes in the same way. Use the tool to draw shadows on the floor. Feather(Pen Tool) (P). The opacity of the shadows on the floor is 30%.

Step 15
Place all existing layers in a group (Ctrl + G). Merge the group on one layer (Ctrl + E) and apply the filter Gaussian blur(Filter> Blur> Gaussian Blur) with a value of 5 pixels.

Final result.
Olga Gurkina
Drawing lesson "Ticket to the theater"
Outline plan drawing classes.
Theme: « Theater ticket» .
Tasks:
O - to form skills paint with gouache; convey features in a drawing appearance animals;
R - develop imagination and perception of the surrounding world;
B - to educate accuracy during work.
Sl. R.: ticket, theatre.
Ind. R .: with Kostya B. - to teach how to properly hold a brush in hand when working.
Methods: visual, verbal, practical.
Materials (edit): pictures of a fox, a hare and a rooster; flannelgraph, brushes, paints, strips of paper with the inscription « ticket» for each child, brush stands, water cups.
Course of the lesson:
Children are included in the group. On the flannelgraph are pictures of a fox, a hare and a rooster.
Hello guys. I want to invite you again to theatre... Look at the board, who do you see?
Guys, are the fox and the hare wild animals or pets? Is the cockerel an animal or a bird? That's right - it's poultry. Guys, despite the fact that these animals are so different, they still met in the same fairy tale. I'll start telling you this tale now, and you try to guess what it is called? Right "Zayushkina hut"... Guys, this week we are all invited to the play based on this fairy tale. Remind me what the audience must have to get into auditorium? (tickets) ... Of course tickets... But the trouble is, the box office has already closed and now you can't get tickets... How to be? How else can we get tickets? (draw) ... That's right, but before you start paint, let's play. Physical education:
Chanterelle is walking across the bridge - Children stomp their feet
Carries a bundle of brushwood - Depict that they are carrying a weight on their back
Why brushwood?
Stove to heat - Movement of hands from side to side
Why would she bake?
Cooking lunch - Circular motions with your hands
Why lunch?
Guests to feed - Tilt forward
And the bear come, and the wolf come, and the hare come, and the rooster come!
Oh please! - end of the game.
What a hospitable Fox!
Now let's go to the tables and take care of our tickets. (Children sit down)... Guys, what are we going to be on them paint? Of course, we will draw our fairytale heroes... Someone will draw a bunny, someone a chanterelle, and someone a cockerel, and someone may want to draw everyone together? Let's get to work, and do not forget that our animals should be the same color as they really are. (children draw).
Well done, guys, how beautiful and bright we got tickets... I think that in our the theater will have many guests... Well, I'm waiting for you at the play!
This will unusual lesson, we will try to show other art with the help of art. More precisely, we will learn how to draw theater with a pencil step by step. And it will not be all sorts of nonsense like a scene or spectators, but an attempt to depict the actors' play itself. The drawing itself is well-known, I am sure you have met it on the network more than once: Genres theatrical art there are many: dramatic, opera, ballet, puppet, pantomime and others. The most popular of them is the drama theater, for it reflects reality, conflicts of characters, problems that are not spoken about aloud. Let this motive have already been rubbed to the holes, but as long as a person is alive, he will exist. That's the way people are.
How to draw theater with a pencil step by step
Step one. Let's sketch on paper a sketch of two men. Pay attention to their height as well as the placement of their hands.  Step two. Let's draw the head and torso.
  Step three. Let's round out the shapes, make the lines smoother and add details.
  Step four. Let's add shading to make the drawing more realistic, you're done:
  Here you can find many more good scenes for drawing, for example.