Stylish sketches of clothing. How to draw trendy sketches
Invent your own design of clothes is a very exciting occupation. And not only trendy designers are taken for him. The ability to create an image on paper will help you correctly combine clothes and pick up the most successful color combinations.
Recreation of a man's body frame on paper
Experienced designers prefer to draw sketches of clothing on models. True, famous fashion gurus rarely observe the classic proportions of the shape. Their models are called stylized.
To learn how to draw clothes and models together, you do not have to in-depth to study the course of anatomy. For rapid sketches, it is necessary to master the main lines forming the body frame.
High-quality drawing of the human body can take not one hour. Designer Flight of Thoughts Very Fast, so you need to be able to portray the contours of a person for days to not lose the idea
As a frame image, you have the right to lower the muscles and bones of the person. It is necessary to have an exemplary idea of \u200b\u200bthe volume of the figure and the correct location on it future fashionable products.
If you want to bring your drawing model to reality, clearly observe the proportions. Start with oval head. Following the rules of classical anatomy, the growth of your model should be 7.5 heads (T o there is 1: 7.5). However, higher options are allowed, for example 1: 8. This ratio is more approximate to model standards.
If you draw a configuration model, torso with two trapezes. A wide base of the top will perform the role of shoulders, the base of the lower hip. Between the trapezes, be sure to draw a short line - part of the spine. Draw your legs with the help of lines, correctly twist them. Starting from above, draw a broken outward, then inside. Knees depict Zigzag. Next again a little outside and inside. When drawing a model, use ovals instead of a trapezium.
Try to draw as much as possible. Do not be afraid to try new poses, experiment with the equilibrium of the hand drawn model. To have the opportunity to create at any time, keep at hand:
- notepad with non-similar paper
- mechanical pencil
- eraser
Sketch of clothes over the model
Drawing a simplified figure, proceed to clothes. It will give the image a finished look and literally revitalizes your frame. Remember that clothes are the main link of any designer, and the model performs the role of scenery.
In the world of fashion, the design of new models, before they are chosen and sewing, are in the form of sketches drawn by the hand. First, you make a sketch - a figure in the form of a model that serves as the basis of the picture. The essence is not to draw a realistic figure, you seek the canvas that you will "try on" a variety of dresses, skirts, blouses, accessories or what you decide to create. Adding parts, such as ruffles, seams and buttons, will help to realize your ideas into life.
Steps
Part 1
We start drawing the sketch- If you do not have a necessary type of pencil with yourself, you can make an outline with a TM label (hard-roofing). Just do not forget that it is impossible to pressed, the strokes should be very easy.
- We do not recommend using a drawing handle, because it will not be possible to erase the extra lines.
- You will also need colored markers, ink or paints to color the clothing model.
-
Decide what pose to choose for a designer sketch. Sketches should be drawn so that the silhouette with the clothes drawn on it (we will call it "model") showed it in the most advantageous light. You can draw a running model, sitting, bent or in any other perspective. As a novice, you can start with the most common posture - draw a model standing or walking along the model. Drawing these postures easier, they will allow the design of the clothing design in full.
- Since you want to demonstrate clothing models in professional and attractive light, it is important that the sketches are proportional and well-drawn.
- To improve the performance skills of any poses, many fashion designers are practiced for a long time and make hundreds of sketches.
-
Consider alternative ways to create a sketch. Well, if you can draw your own sketch, as it will allow you to demonstrate a new clothing model exactly as you want. However, if you immediately want to learn how to draw clothes design, there are several quick ways:
- Load the finished sketch of the model from the Internet, there you can find many forms and positions of such models. For example, you can download the sketch of the child, men, women of fragile build and so on.
- Make the sketch - outline the contours of the model from the log or some other picture. Just put the tracing on top of the model that you liked, and outline her contour.
Part 2
Draw a working sketch-
Swipe the equilibrium line. This is the very first line on your drawing, it will serve as the center of gravity of your model. Spend it from the top of the head to the tips of the toes, along the spine of the model. Now drew oval to portray my head. This is the basis of the working model, and now you can draw a proportional pattern. Imagine that the sketch that you did is the "skeleton" model.
- The equilibrium line should be strictly vertical, even if the model itself is drawn with a slope. For example, if you want to draw a model, rejected a little left, with hands on the hips, draw a straight line of equilibrium in the center of the sheet. Thug from the head model to the surface on which it costs.
- Please note that when you develop clothes design, you do not need a proportional model, because you demonstrate our clothes, and not your ability to draw a human figure well. No need to draw everything to the smallest detail, including the face of the model.
-
First draw a pelvic zone. Draw an equilateral square on the equilibrium line, slightly lowering the middle, where the person has a pelvis. Square size Draw according to the size you need. For slim models, a small square will be required, more larger models - a bigger square.
- Considering the position chosen for the model, tilt the square to the left or right. For example, if you want the thighs of the model to be shifted to the left, let the square of the slightly left. If you want to leave the model standing straight, just draw a square, nowhere to reject it.
-
Make the neck and head sketch. The model of the model should be one third of the width of the shoulders and half the length of the head. When you draw your neck, make a head sketch, it must be proportional to the body. The more head, the younger looks like the model.
- You can erase the oval that you painted at the very beginning for the image of the head.
- Draw your head so that it looks commensurate and naturally chosen by you position. You can slightly tilt it down or up, right or left.
-
Dorisinate legs. The legs are the longest part of the body, their length is about four heads. Feet are divided into two parts: the thigh (from the bottom of the pelvic square to the knee) and caviar (from the knee to the ankle). Remember that designers usually increase the growth of the model, for this they draw legs longer than the torso.
- The top of every hip should be about the same width as the head. Treat the width of each leg from the hip to the knee. When you get to the knee, the foot should be one-third wide from the widest part of the hip.
- To draw caviar, narrow the lines to the engines. The ankle must be width into one fourth head width.
-
Draw the feet and arms. The feet are relatively narrow. Draw them in the form of elongated triangles of about the same length as the head. Hands are drawn the same way, they need to be narrowed to the wrists. Make them a little longer in relation to the torsicle than the hands of a real person, so the model will make a stylized impression. And finally, dorisite your fingers.
Part 3.
Draw clothes and accessories- Folds can be depicted with free, wavy lines.
- Circular patterns will help to portray wrinkles.
- Highlight straight edges to show pleated folds.
Now illustrate your design. Think about what exactly you want to create, what kind, and draw it to the smallest details. If you create a dress, draw on the fabric pattern, ruffles or bows so that the thing is beautiful. Focus on unique design elements, add the necessary accessories to the style you create is understood. If you need some fresh ideas, or you do not know where to start, for inspiration, look at the directions in the world of fashion on the Internet or magazines.
Draw clothes with confident strokes. Since the purpose of the designer sketch is to submit your design ideas in the most advantageous light, your drawings should look full and boldly. Clothes should look at the model as in real life. Draw folds and bends on the elbows and at the waist, at the shoulders, ankle and the wrists. Revilize the minds about how clothing fits a living person, and transfer memories to your model.
Learn to draw folds, wrinkles and bends. Use different types of lines to create various folds in the fabric in the picture. The ability to draw folds, wrinkles and bends will help you show the structure of clothes.
-
Draw patterns. If you have fabrics with patterns in your design, it is very important to demonstrate exactly how they will look at the model. Start with the drawing of the contour of patterned clothes, such as skirts or blouses. Divide it with a grid with separate cells. Fill the cell pattern, one after another.
- Pay attention to how the folds, pumping and wrinkles change the appearance of the pattern. Perhaps it will have to bend or remove it from certain sites so that everything looks carefully and accurately.
- Do not hurry, draw the pattern in the details and make sure that it looks the same over the entire grid.
-
Complete the drawing - add shadows, paint and tint. Use a thick black paint to draw the lines that you want to leave in the picture. Now you can erase the lines that you drawn the body shape and mark that you made a pencil. Carefully fasten clothes in those colors and tones that you have conceived.
- Clothes can be painted with markers, ink or paints. Mix the colors and use the most diverse shades to demonstrate your designer ideas.
- When you work on shading and texture, imagine how the model in your clothes moves to contact you under the light of Sofita on the podium. Deep folds on the fabric will result in darker shades of the color you use. And where the fabric is illuminated with bright light, the colors will seem lighter.
- Add hair, sunglasses and makeup. This is the last strokes, and it is they who will breathe life into your designer sketch.
-
Think over to make a "flat" drawing. In addition to the fashionable sketch, you can draw schematic. Flat drawing is a kind of explanation of your design. In such a picture, they depict the irrelevant outline of clothes, as if it was laid on a flat surface. Such a drawing will help see how clothes will look like in a flat form, and not just on the model.
Collect materials. Choose a hard pencil (best with marking T) to make them light, contour strokes that will be easy to erase. Such strokes or notes will not go into paper and leave tracks on it, which is convenient if you then want to paint the pattern. It is also important to choose a tight paper and a good eraser if you want the drawing to look professionally.
- Do not draw a person in detail if only your design implies some kind of specific makeup, which should fit clothes.
- Some love to draw especially skinny models. Draw realistic models, which will help in the future - when the time comes to choose and sew clothes.
- It is often easier not to draw the features of the face, it is enough to apply only a couple of lines to portray hair. Assessing, in the end, there will be no face, but an outfit.
- Put a piece of matter you want to use in your clothing model, near, so it will be easier for you to draw.
- To draw fabric texture, you need to have a certain experience, because it is quite difficult.
No modern designer clothes do without sketch. Model drawings - the embodiment of the thoughts of the couture, asking new trends in fashion.
Not every fashion designer can create a masterpiece. To embody an idea of \u200b\u200blife, it will take careful studying. And in this case - the drawing.
In this master class, we draw a fashion sketch from the very beginning.
So, armed with several sheets of paper, simple pencils of different hardness, eraser, black gel handle and colored pencils or paints (desirable watercolor), we will create your own fashionable image.
For the initial stage, we need a soft pencil. On the sheet of paper, mark the vertical axis on which the silhouette will "hold". For greater convenience, divide this axis into equal parts, the height of which is commensurate with the size of the head: for a male figure of 8-9 parts, for women's - 7-8, and for children - 5-6 parts.
So that the model sketch looks more effectively, you can lengthen your feet, so add more 1-2 parts.
By placing the central axis with light strokes, you can proceed to the creation of a form sketch or a pre-sketch (Fig. 1).
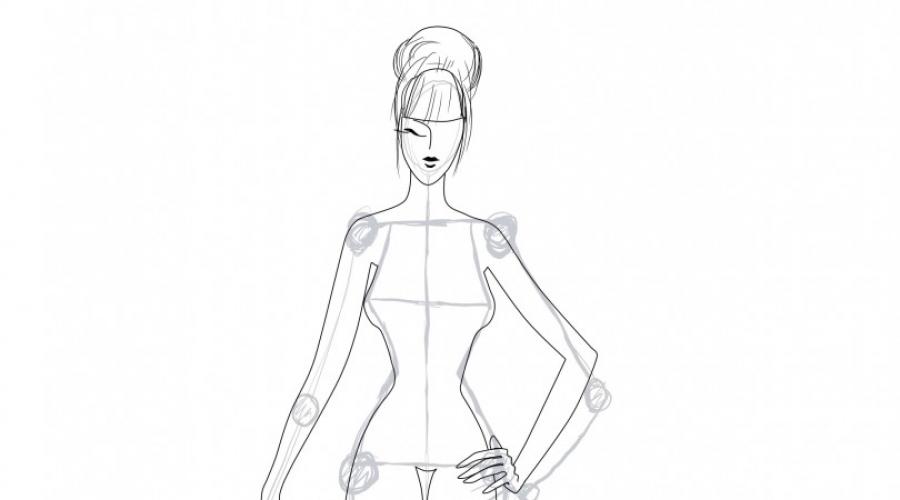
Draw your head, schematically denote hands, legs, shoulder belt, chest line, waist and hips. Sustaines we denote circles.
The drawing does not look too much "appetizing", but at the next stage we will add the volume to our girlfriend. This work will require a more thorough drawing (Fig. 2).

Carefully sketching the main lines, check the symmetry of the shape. In this case, it is advisable to make a universal one, because this billet may be needed in the future if you want to draw something else. But the drawing face is not worth it: we will focus on clothes.
Now we need a black gel pen and a soft eraser. Carefully supply the figure of the girl, let the ink dried.
Removing all the extra lines (Fig. 3) We get ready-made sketch of the shape.

In order not to spoil the work done, carefully move the sketch on the blank sheet of paper with a soft simple pencil.
The next step is to sketching clothes. Here you will need the knowledge of the latest trends of the FashIn-industry. And if you have not yet decided on the way, PRAKE fashion magazines in search of inspiration.
Light strokes apply the contours of future clothes on the figure (Fig. 4).

Gently draw the details of our image (Fig. 5).

Curve out the contours of the gel handle and delete the extra lines (Fig. 6).

Our sketch is almost ready. It remains to remove the auxiliary lines of the figures of our model model (Fig. 7).

So, we have a ready-made sketch of the model. All major work is made. Now we proceed to the design of the technical sketch, on which all structural elements will be visible - pockets, seams, decoration, decor, etc. (Fig. 8).
Welcome to the next DarlingMionette lesson! This time we will plunge into the topic of clothing and folds. In this lesson, we will look at various types of folds, the nature of their occurrence, and also learn to draw clothes so that your character does not look flat as a paper figure. For this lesson, you will not need any special materials; You use pencil or pen, marker, colored chalk or graphic editor - no matter.
First of all, let's talk about the structure of the human body. The human body is not flat, therefore, clothes on it should also not be flat. It seems so logical, but how many times have you seen clothes drawn like that?
Pay attention to the drawing on the left. Something is wrong here, right? This is because the clothes were drawn without taking into account the body shape. And if you translate a picture in computer graphics? Do not know how because it was incorrectly painted the drawing ... well, what if the only problem was the clothes that you draw? If there are no forms, then where to take shadows? Exactly.
Now take a look at the drawing on the right. Pay attention to how clothes sits on the body. The bends of clothing show the body shape, hidden under it. Folds are used to transmit volume and movement. Converting clothes in this picture in computer graphics would be much easier.
This is a lesson. Form, folds, and techniques, with the help of which you learn to choose the clothes properly for your characters.
So let's start with the edge. What is the edge? The edge is the edge of clothing that comes into contact with the skin. For example, in the drawings above the edge there is on the collar, on the bottom of the sleeves, on the waist of shorts, and on the legs, where the shorts concern the hips. The edges should never be straight lines, because they drive the body in a circle (hands, neck, legs, belly), and parts of the body volumetric. They have a mass, and they have a rounded form - so the edges of the clothing should also be rounded.
The direction of the edge lines depends on the direction of the body part, which they clamp, and on how the fabric falls.

If you have already finished looking at my semi-nude model, pay attention to the bend line of the edge. To correctly draw the line of the edge, you need to be able to see the shape of the body of the body under the clothing. Look, for example, on her legs. See the cylinder next to? Imagine that her leg is a cylinder. See how the line goes around it. There is one acceptor who will help you remember how the edge line should go: break the body on the part. If the lower half of the body part is framed by the edge of the clothing, closer to the camera than the upper half, then the line should rise like a rainbow. If the bottom of the body is located further from the camera than the upper part of it, the line of the edge should be fed down as the old cable bridge. If a part of the body is directly perpendicular to the surface of the earth, the line will always be a little bit down, because the fabric saves under his own weight. The farther or closer in relation to the central axis there are certain parts of the body, the more pronounced the edge line will be. Look again to my drawing above: the line of the edge on the legs is much more pronounced than the lines on the stomach.

Even on not direct edges, the line will still submit to this law.
Another very important thing you need to know about the edge is how she wipes the body.

Look at these examples.
This applies to collars, belts, top of the boot, socks ... To all that worst any part of the body and concerns the skin, except when the edge is direct line from the body (in this case, only a cloth climbing the body will be visible, If you look at the bottom). We will come back to this. Pay attention to the drawing above. In the first drawing, the edge edge is quite far from the skin, and on the second image it is much closer. Depending on the "protrusion" width, the illusion of the thickness of the tissue can be achieved. The thicker "protrusion", the thick of the fabric. In the third and fourth examples you will see the difference between free and fitting clothing. Free cloth (example is the third) will retreat a little from the skin. Pay attention to the "loop". A small hook at the end of our edge changes the thickness of the tissue, moving it outwards from the skin, creating the feeling that the fabric sits on the body freely. On the fourth example of the loop there is no (we believe it is because the edge of the clothes tightly fits the waist), showing that the fabric fits tightly to the skin.
This is a very small detail, hardly noticeable, but this small zone, where the edge of the clothes come into contact with the skin, tells us a lot about the clothes of our character (even if we do not realize it!).
So now let's go back to what I said before, looking through the seam from the inside.

As well as the loop, shown in the example above, and showing how free clothes can sit if you look at the edge of the clothes below (as on this example), the seam will be completely curled around the body to the rear of the character. We go further, the skirt is sewn from a very thin fabric, which is why the line comes into contact with the side line going down. If you wanted to show the thickness of the fabric, it would be necessary to draw something like this:

Pay attention to the small overlap on the edge of the skirt and how it is spinning towards the body, thus showing the thickness of the fabric from which the clothes are made.
Now, before plotting in the details of the folds, let's talk a little about the materials. Believe it or not, but the material from which your clothing is made is very strongly affected by the form of folds for it. For example, wool does not particularly generate folds, and if it forms, they are obtained very neatly rounded and long. Atlas is very easy forms folds, but because of its silk texture it is also easy and quickly smoothed. When folds are still formed on it, they usually get long, wide with very smooth beautiful bends. Len also easily creates and maintains folds, so it forms more folds than on other tissues. Velvet is very similar in its properties for wool, forms very sharp folds, but quite rare. It is very important to understand what material is made by the clothes of your character to correct it in the picture. Now there is no work to google and find many types of fabrics to explore their behavior, and I really advise this to do this soon. But for especially lazy ... I present you a crib:
+ Subtlety and thickness: Thin materials will form folds much easier than fat. The folds will be closer to each other and there will be a lot of them.
+ Silkiness and rudeness: Silk materials are not so easy to form folds, unlike coarse materials, but they themselves will most often form them than coarse fabrics.
+ Softness and hardness: The softer the material, the roundle will receive folds, and the more evenly removed they will be from each other. The harder material, the smaller the folds on it will be formed, and they will be large, wide.
+ Flow and rigidity: Current materials, such as silk, will form long, arched folds, but the bends will be very few, and the folds themselves will be barely removed from each other. Hard materials are not draped, they form angular crumpled "crumpled folds", or rather branted, rather than form folds. Rigid fabrics, such as Muslin or jute bags, will easily bend, both small and large templates, and folds will be very wide and angular.

For example, look at the picture above. Pay attention to how the frequency, distance, and the arches on the folds say about the type of tissue, from which the character's clothing is sewn.
Her bodium seems to be made of fine tissue, like flax, because the folds are very much, and they are different thickness, and despite the bends, the folds have strange sharp ends. No loop-shaped folds.
On the other hand, the waist dress seems to be made of thicker, soft tissue, possibly cotton. This is because the folds are very small, in the form of tubes, and rather equally removed from each other.
Her skirt is very similar to the linen bodice, forms rounded folds. It resembles a soft tulle, because the draping is very round, and is aligned at the ends.
The semi-balleto on her neck (although it is not clearly visible on this example), it seems, made of leather. The folds are missing, instead the material "envelopes" the armpit and covers, like a loop, shoulder. We can only assume that some idiot (DarlingMionette ... Khm) spent his time to attach Ryushi to this product.

If you change the folds, the entire appearance will change.
The upper part of the dress resembles latex, or vinyl. There are no folds, edges are neatly rounded.
The fabric from which the middle part of the dress is performed, similar to silk. Some folds, but they are different thickness and are close to each other.
The skirt in this case is uniquely made of dense cotton. Pay attention to the big folds that are reluctantly bend.
Now, I will say again, do not forget that not only the type of material affects the folds, as I said above, but also how freely or tightly fabric sits on the body and, of course, the movement of the body in this dress.
Let's go to the basic principle of forming folds, and let's talk about how to use them in the best way.
Stretch and compression

Most folds are formed either during tension, or when compressed by fabric.
Note that in these examples the fabric is stretched and compressed in accordance with the movement of the body.
If clothes are made not from solid plastic or metal, in all places where the body will pull or compress the clothes, folds will form. These folds you can use to make the focus on the character figure. For example:

1. This fold emphasizes the shape of the chest by spending a line under it and forming a smooth bend at the end of the chest.
2. Compression folds demonstrate hip lifting.
3. This is a bad fold. Why? She, initially, is good because it emphasizes the upper part of the chest, but then it is treacherously descending too low to the right, reducing the size of the breast to 1/3. Such folds can be formed in real life, but we will not draw them in this way. This fold should be connected with fold 4.
4. This fold in the correct way emphasizes the upper part of the chest, and also demonstrates the free cut of the top of the top, thanks to the "tube".
5. Short bending lines between the vertices of her breast demonstrate the completeness of its chest, showing the tension of the top between her nipples.
Now let's consider different "types" of folds
Tubular folds

Tubular folds are most often visible on skirts or dresses (hence the skirts in the fold appear). They are formed when the fabric is compressed as a harmonica (like a ballet tutu). Folds usually cone-shaped or cylindrical shape. They can also form when the tissue is assembled and stretched between two points.

The easiest way to draw tubular folds on a skirt or dress is to start from the bottom. Draw the edge using S-shaped movements (see Example above). Form the similarity of the harmonica of the fabric.

From the longest inner point of each fold, take the line to the waist. Do not be afraid to draw your outer folds in one or another direction to show the movement of the fabric. It will be very boring if all the folds will go up straight lines.

Then mark the middle points of each fold on the waist.

Then you can connect the longest exterior point at the bottom of the folds (accordion) with the middle point to form the inside of each fold.

Click on the picture to see the image in full size and 100% quality.
You will have something like that is a pretty skirt with tubular folds. You can adjust the height of S-shaped folds to change their appearance. If you want to change the direction of tubular folds (as if you look at them from above), make a line from the longest outer point of the S-shaped curve instead of the longest inner point.
Zigzag folds (Omg, I hate them)
Zigzag folds (for me) are the most difficult in the light of the drawing element. They never get ok, but for this lesson I will try. Zigzag folds appear when the fabric rolled into the tube (shedron or sleeve, for example), compressing, thus forming the external folds. These types of folds can form, rather, on rigid tissues.

The most common place where you can observe zigzag folds, these are jeans (usually, near the ankle or knee), where the fabric is compressed from body bends under it.
Please note how in this example, the zigzag fold is formed, because the fabric itself was in itself in the form of Pacman's mouth (Pacman). These folds usually have a diamond cut shape.
Such folds can also be seen around the elbow.
Spiral folds

Similar to zigzag folds. On a softer tissue, the zigzag fold will be shred in a more rounded form (like on sleeves), forming "tubes" from the fabric.
Draw spiralized folds is much easier than zigzag. Just create strips as on the zebra body (as in the drawing under the tube), and then dorisite external brackets (extreme right drawing in the picture).
These folds look good on the elbow zone of sleeves, and in the form of flipper over the edge of the blouse.
By changing the direction of looped folds, you can change the direction of the spirals.
Semi-jammed (hook) folds

Semi-crumb or hook folds are very often found, they can be seen almost everywhere. They are formed in those dreams where the cloth sharply changes its direction. They can often be seen around the armpits, elbows, and knees, but they can be in other places.

In his last project, which I performed for one customer, I used half-closed / hook-shaped folds around the knees. In the figure, it is clearly clearly visible how half-closed / hook-shaped folds from the side look like.
Pay attention to how the direction between the regions of the tissue form the "tunnels" - the inner part of the semi-cocked / hook-shaped folds.
Their education is very similar to the formation of spiral and zigzagovoid folds.
Rhombid / drapering folds
Rhombid or drapery folds, on the other hand, are formed when the fabric "saves" between two supporting points. Such folds are often visible in the area of \u200b\u200bthe neckline, on the mantles, and in the interval between the knees, when a person sits in a long skirt.

Pay attention to how "begins" between two supporting points (for example, knees, fasteners and shoulders).
HOORAY! I run away. Hoho!
When you depict the human body must remember that you are depicting living, and in a particular case design of clothingIt is very important to carefully observe typical movements that characterize poses taken by models.
The reaction to the gait of professional models is amazement and passion, in her face as much charm and elegance.
Graphic interpretation

Model Pose The ideal image of the image of the garment or a whole collection.
It should be a lively expression, the dynamics in motion is elegant in the posture and depicted in the poses, which in accordance with the type of clothing chose. Try not to do model posewhich is too static or too realistic, the result will be wooden, artificial, and not fit the ephemeral and joyful language of the fashion world.
It is also desirable not to depict model posesthat impede the interpretation of the model. Remember that the body of the model acts as the base for the garment, but it should not dominate, close or distort it, it should contribute, and the clarity of cut and parts, suggest dynamic poses.
Rhythmic structure
In order for the figure to come to life not enough to have perfect knowledge of anatomy, copying which too believers can harm the image, which makes it cold and impersonal. It is important to catch the correct position from several angles and distribute the body weight, link the inner and external, body slopes, the comparison lines, corners and perpendicular lines, only so you can reproduce the model's posture in the most correct way. First of all, it is necessary to find a rhythmic structure that is inherent in each pose. This line can be extremely changed, as each figure has its own main rhythm.
First of all, you must mark the line in the upper part of the body, passing through the hollow part of the neck, sternum, navel and pubic area, which is then descended to the ground in the footprint, which is a body support.
In the static figure in front, the rhythmic structure corresponds to the line that describes the height of the pattern.
Method of execution:
To understand how the weight of different parts of the body is distributed, we will make a sketch of the rhythmic structure, having reduced the body of the skeleton and visualizing the sketchy of the basic structures, namely the line of shoulders, waist, hips, and, finally, segments that indicate the position and length of the limbs, noting compounds in small circles .
We should thus get the structure of the female body.
Second phase This procedure, rely on the upper part of the structural framework of the main sketch of the figure determines the areas of the body, outlines and hair volume.
As a result, we obtain a geometric shape similar to a robot, with all the well-specified joints. Then proceed to a more detailed analysis of various anatomical features for the purpose of playing exactly or almost exactly. It is important to draw without pressure, since there will be several layers of the pencil. It is better to draw on a sheet of carting a figure only in general terms, removing all pencil strokes, lines and segments that you painted to emphasize every aspect of the body. Sketch that you get will be your first Fashion -Eskiz.

From left to right: Contour and location of body parts with a rhythmic structure.
Figure in general terms and model pose.

Base fashion.-sketch.
From left to right: Location from key lines or rhythmic structure, skeletal sketch, in general terms, drawing a line of shoulders, loins and hips.

From left to right:
The total sketch of the whole figure.
Detailed analysis of various anatomical parts.
Positive and negative space

The sequence of structural analysis and sketch of the body.
As in all disciplines, there are rules that must be, thanks to which you can reproduce any item or composition correctly. One of these rules is likely the most important thing is the concept of a positive and negative space. The space around the figure is negative, while the space that the body takes place in this area is positive. In all respects, this must be taken into account positive to achieve proper reproduction.
The visual field around the figure is just a negative appearance. In fact, this is a complex structure consisting of dynamic forces, tensions, balance, proportional comparison and depth of perspective.
Consider a figure in accordance with these rules so that it is precisely reproducing in terms of size and position. Using tracing is recommended to visualize all construction lines directly to the object so that you begin drawing your hand.

The model is increasingly defined. Fashionable finished in general features and light light.
